A wok does things no other pan can: sear meat at 800°F, steam vegetables in their own moisture, deep-fry in a cup of oil, and toss a full meal in 90 seconds. The catch is that you need the right wok, and you need to season it before anything works. Once you do, every weeknight dinner gets faster.
By Colin B. · Published August 9, 2026 · Last reviewed August 9, 2026
YOSUKATA Wok Lid (13.6")
— YOSUKATA wok lid with tempered glass insert — see your food without lifting the lid.
Budget total
$35
Typical total
$75
A carbon steel wok and a metal spatula is all you truly need. Everything else — lid, ring, spider — makes life easier but isn't required for your first stir-fry.
We earn commission on qualifying Amazon purchases — see our
affiliate disclosure.
Price tiers and budget totals shown above are editorial estimates;
actual Amazon prices vary.
At a glance
Our top pick in each category
The fastest path through this guide — each best-starter pick by category.
Scroll for the budget and upgrade alternatives.
Carbon steel is the only material worth considering for a first wok. Nonstick woks can't handle high heat. Cast iron woks are too heavy to toss. Stainless steel woks don't season. Carbon steel heats fast, seasons into a natural nonstick surface, and is light enough to lift with one hand. Every serious wok cook uses carbon steel.
Flat bottom vs. round bottom depends on your stove. If you have a Western gas or electric range, get a flat bottom — it sits stable and makes direct contact with the burner. Round bottom woks are traditional and superior on high-BTU wok burners, but they wobble on flat Western stoves even with a ring.
You must season the wok before cooking. A new carbon steel wok is raw metal — food will stick to it like concrete. Seasoning (heating oil past its smoke point repeatedly) creates a polymer coating that becomes naturally nonstick. It takes 30 minutes the first time and improves with every use.
The gear
What you actually need
Woks
A 14-inch flat-bottom carbon steel wok is the sweet spot for home cooking. Big enough to stir-fry a meal for two without crowding, small enough to heat properly on a home burner. The thickness matters: too thin (under 1.2mm) and it warps over high heat; too thick (over 2mm) and it takes forever to heat and is too heavy to toss. The 1.5-1.8mm range is ideal. Hand-hammered woks have subtle dimples that help food grip the surface and create micro-channels for oil.
Best starter
YOSUKATA
13.5" Pre-Seasoned Carbon Steel Wok
$$
★★★★★Our rating
Pre-seasoned at over 600°F, so you can cook on it immediately without the initial seasoning process. Flat bottom sits stable on any stove type — gas, electric, induction. At 13.5 inches and 1.5mm thick, it's the right size and weight for home cooking. No synthetic coatings, just carbon steel and oil.
What we like
Pre-seasoned — cook on day one with minimal prep
Flat bottom works on gas, electric, and induction
1.5mm thickness balances heat response and durability
What to know
Pre-seasoning is a head start, not a finished surface — needs more use
13.5 inches is slightly small for cooking for more than two
A hand-hammered 14-inch pow wok in 15-gauge (1.8mm) commercial-grade carbon steel. The hammered texture creates tiny ridges that improve oil distribution and food release. Comes with both a wooden main handle and a steel helper handle — essential for tossing and pouring. This is the wok that serious home cooks graduate to.
What we like
Hand-hammered surface improves oil distribution
1.8mm commercial-grade steel — durable and warp-resistant
Wooden handle stays cool; steel helper handle aids tossing
What to know
Requires full seasoning from scratch — no pre-seasoning
A hand-hammered 14-inch flat bottom wok at a lower price point. The flat base sits securely on any stovetop, and the hand-hammered body provides good heat distribution. A solid no-frills wok for someone who wants to learn without spending much.
What we like
Hand-hammered construction at a budget price
Flat bottom is stable on all stovetop types
14-inch size is ideal for home cooking
What to know
Requires full seasoning — arrives as raw carbon steel
Helper handle is riveted — some users report loose rivets over time
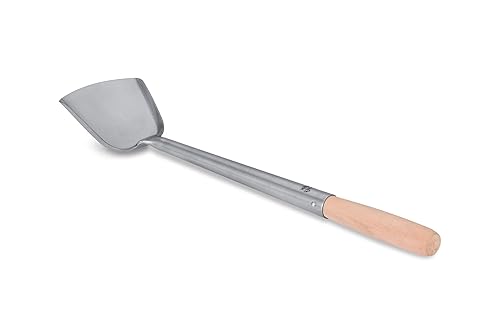
Regular kitchen spatulas are wrong for wok cooking — they're too short, too wide, and the wrong shape. A wok chuan (spatula) has a curved edge that matches the wok's contour, a long handle that keeps your hand away from the heat, and a thin profile that slides under food instead of pushing it. A spider strainer is the other essential: a wide wire mesh basket on a long handle for lifting food out of hot oil or blanching water.
Best starter
Craft Wok
Small Stainless Steel Chuan with Wooden Handle
$
★★★★★Our rating
A traditional wok chuan (turner/spatula) with a curved stainless steel blade that matches the wok's contour. The wooden handle stays cool and gives you good leverage for tossing. The blade is thin enough to slide under delicate food without shredding it. This is the spatula that Chinese home cooks and restaurant wok stations actually use.
What we like
Curved edge matches the wok contour perfectly
Wooden handle stays cool over high heat
Thin blade slides under food without tearing
What to know
Stainless steel will scratch nonstick pans — only use on carbon steel or cast iron
Stainless Steel Chuan & Hoak Set (Spatula + Ladle)
$
★★★★☆Our rating
A matched chuan (spatula) and hoak (ladle) set with long wooden handles. The ladle is essential for sauces, soups, and portioning — tasks where a spatula can't scoop liquid. Having both means you can stir-fry with the chuan in your dominant hand and add sauce with the hoak in the other, which is how professional wok cooks operate.
What we like
Matched set — spatula and ladle designed to work together
15-inch wooden handles keep hands far from the flame
Ladle handles sauces and soups that a spatula can't
A solid stainless steel spider strainer for lifting food out of hot oil, blanching water, or boiling stock. The wire mesh lets liquid drain instantly while keeping food secure. Essential for deep-frying in the wok and for blanching vegetables — two techniques you'll use constantly once you start cooking Chinese food seriously.
What we like
Solid stainless steel construction — no welds to break
Wire mesh drains liquid instantly
Long handle keeps your hand away from hot oil
What to know
5.4-inch basket is small for large batches
Wire mesh requires careful cleaning — bits of food get stuck
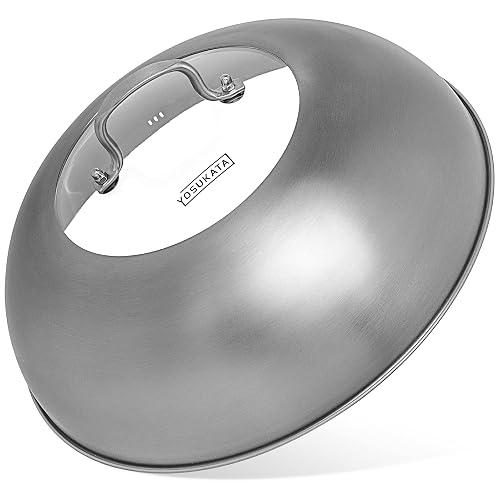
A wok lid traps steam for braising and steaming, which expands your wok's repertoire beyond stir-frying. A wok ring stabilizes round-bottom woks on flat stoves — less critical if you bought a flat-bottom wok, but useful if you want to convert a gas burner into a more wok-friendly setup. Neither is essential for day one, but both make wok cooking more versatile.
Best starter
YOSUKATA
Wok Lid (13.6")
$
★★★★★Our rating
A stainless steel dome lid with a tempered glass insert so you can monitor cooking without lifting the lid and losing steam. Fits 14-inch woks. The dome shape accommodates steaming and braising — two techniques that turn your wok from a stir-fry pan into a complete cooking system. Dishwasher safe.
What we like
Tempered glass insert lets you see food without lifting
Dome shape accommodates steaming and braising
Fits standard 14-inch woks
What to know
Glass insert adds weight compared to all-metal lids
A simple cast iron ring that sits on your gas stove grate and cradles a wok — round or flat bottom. Concentrates the flame upward around the wok's sides, which is closer to how a commercial wok burner works. If you're cooking on gas and want more heat around the wok (not just on the bottom), this is a cheap upgrade that makes a real difference.
What we like
Concentrates flame around wok sides for better heat
Works with both round and flat bottom woks
Cast iron is durable and stable
What to know
Only useful on gas stoves — does nothing for electric or induction
Some gas stoves have safety cutoffs that trigger when grates are modified
Seasoning the wok, your first stir-fry, and the three techniques that turn a carbon steel pan into the most versatile tool in your kitchen. Here's the whole progression from unboxing to dinner.
A new carbon steel wok arrives looking nothing like the blackened, nonstick surface you’ve seen in cooking videos. It’s silvery gray, slightly oily from factory coating, and everything sticks to it. That’s normal. The wok you want — the one where fried rice slides around like it’s on ice — is built through seasoning and use. Here’s how to get there in a week.
Day 1: Seasoning your wok
Strip the factory coating. New woks ship with a protective oil or lacquer coating to prevent rust during shipping. Scrub the wok with hot water, dish soap, and a stainless steel scrubber. This is the only time you’ll ever use soap on your wok. Rinse and dry completely.
The stovetop seasoning process. Turn your burner to high. Heat the empty wok until it starts changing color — you’ll see blue and gold patches spreading from the bottom up. This is the steel oxidizing, and it’s exactly what you want. Rotate the wok to heat the sides evenly. The entire interior should turn from silver to dark blue/brown.
Once the wok is smoking hot, turn the heat to medium. Add 2 tablespoons of a high-smoke-point oil (peanut, avocado, or vegetable oil). Using a wadded paper towel held in tongs, spread the oil across the entire interior surface — bottom, sides, and up to the rim.
Let the oil smoke for 2-3 minutes until the smoking stops. The surface will darken. Wipe it out with a fresh paper towel. Repeat this oil-and-smoke process 3 times. Each round adds a thin polymer layer that builds toward nonstick.
Your wok is now functional — not perfectly seasoned, but ready to cook. The seasoning improves with every use, especially high-heat cooking like stir-frying.
Day 2: Your first stir-fry
Start simple. A basic vegetable stir-fry teaches you the core technique without the pressure of expensive protein.
Mise en place first. Wok cooking happens fast — too fast to chop while cooking. Cut everything before you turn on the burner:
2 cups of mixed vegetables (bell pepper, broccoli, snap peas — whatever you have), cut into bite-sized pieces
3 cloves of garlic, minced
1 tablespoon soy sauce + 1 teaspoon sesame oil + 1 teaspoon sugar, mixed in a small bowl
2 tablespoons of high-smoke-point oil
The cook:
Heat the wok over high heat until a drop of water evaporates instantly — about 90 seconds.
Add oil and swirl to coat the sides. The oil should shimmer and just barely smoke.
Add garlic. Stir constantly for 10 seconds — it should sizzle but not brown.
Add the hardest vegetables first (broccoli), stir-fry for 1 minute. Then add the softer vegetables.
Keep everything moving. The spatula should never stop. Toss, flip, scrape the bottom — movement prevents burning and ensures even cooking.
Add the sauce mixture. Toss to coat. The liquid should hit the hot steel and evaporate almost instantly.
Remove from heat after 30 more seconds. Total cooking time: about 3 minutes.
The result should be vegetables that are crisp-tender with slightly charred edges and a glossy sauce coating. If they’re soggy, your wok wasn’t hot enough. If they’re burnt, you left them in one spot too long. Both are fixable next time.
Every wok dish uses one or a combination of three techniques:
Chao (stir-frying). What you did on Day 2. High heat, small pieces, constant motion, fast cooking. The defining feature is wok hei — the smoky, slightly charred flavor that comes from food briefly touching the screaming-hot steel. You’ll hear it: a loud sizzle that never stops. If the wok goes quiet, it’s not hot enough.
Jian (pan-frying). Lower heat, less motion. Used for dumplings, fish, tofu, and anything you want a crispy crust on. Oil goes in cold, food goes in, and you leave it alone until the bottom is golden. Then flip once. The wok’s curved sides make it easier to slide a spatula under delicate food without breaking it.
Zheng (steaming). Put a few inches of water in the wok, set a bamboo steamer or wire rack inside, cover with a lid. The wok becomes a steamer. Fish, buns, vegetables, dumplings — steaming is healthier than frying and produces textures you can’t get any other way. This is why a wok lid matters.
Once you have these three techniques, you have access to roughly 80% of Chinese home cooking.
Day 5-7: Building the seasoning
Your wok’s seasoning is like a cast iron skillet’s — it improves with use. The best way to build it is to cook on it daily. A few tips:
Cook fatty foods early on. Bacon, skin-on chicken thighs, fried eggs — fatty foods accelerate the seasoning process. The fat polymerizes into the surface during cooking.
Don’t cook acidic foods yet. Tomatoes, vinegar-based sauces, and citrus strip seasoning from a young wok. Wait until the surface is consistently dark and food releases easily (usually 2-3 weeks of regular use) before cooking anything acidic.
Clean properly. After cooking, rinse the wok under hot water and scrub with a bamboo brush or non-abrasive sponge. No soap. If food is stuck, add water to the hot wok and let it simmer — the steam will release everything. Dry immediately over a low flame (30 seconds), then wipe a thin layer of oil on the interior with a paper towel.
Month 3+: Deep black, smooth, genuinely nonstick. This is the wok people show off on Reddit.
Common beginner mistakes
Not hot enough. The single biggest problem. Your wok should be ripping hot before oil goes in — visibly smoking within seconds of adding oil. Most home burners max out around 12,000-18,000 BTU; restaurant wok stations run 100,000+. Compensate by preheating longer (2-3 minutes) and cooking in smaller batches.
Overcrowding the wok. Too much food drops the temperature and creates steam instead of sear. Cook in batches: protein first, remove, then vegetables, then combine at the end. Never fill the wok more than one-third full for stir-frying.
Moving too slowly. Stir-fry means stir-fry. The spatula should be in constant motion. Hesitate for 5 seconds and you have burnt spots. Think of it as aggressive — you’re tossing food through a wall of heat, not gently nudging it around a pan.
Washing with soap. Never. Hot water and a brush is all you need. Soap strips the seasoning you’re building. If you accidentally use soap, it’s not ruined — just do another round of stovetop seasoning.
Giving up on the seasoning. The first week is the worst — food sticks, the surface looks blotchy, and you wonder if something is wrong. Nothing is wrong. Every carbon steel wok goes through this awkward phase. Keep cooking on it daily and it will transform.
Save your money
What you don't need yet
Beginners get pressured to buy a lot of stuff that doesn't help them play
better. Here's what we'd skip on day one.
A wok burner or outdoor burner — Your home stove works fine for learning technique. An outdoor burner is a luxury upgrade once you're stir-frying weekly and want more heat.
Specialty sauces and pastes — Soy sauce, sesame oil, and rice vinegar cover 80% of stir-fry sauces. Build your pantry gradually as you cook more recipes.
A flat-bottom wok for induction AND a round-bottom for gas — Pick one wok for your stove type and master it. You don't need both.
First week
Your first seven days
A short, real plan to get from gear-on-doorstep to actually playing.
Season your new wok — strip the factory coating, heat until blue, and oil 3 times. · Action
Make a simple vegetable stir-fry to test your seasoning and learn wok hei. · Action
Practice the three core techniques: chao (stir-fry), jian (pan-fry), and zheng (steam). · Learn
Cook something fatty (bacon, chicken thighs) to accelerate the wok's seasoning. · Action
Learn proper wok cleaning: hot water, bamboo brush, no soap, dry over flame, light oil wipe. · Learn
FAQ
Common questions
Flat bottom or round bottom wok?
Flat bottom if you have a Western stove (gas, electric, or induction). It sits stable and makes full contact with the burner. Round bottom only if you have a high-BTU wok burner or a wok ring that cradles it properly on gas.
Why does food stick to my new wok?
The seasoning isn't built up yet. A new wok needs 2-3 weeks of regular cooking before it becomes naturally nonstick. In the meantime, use more oil, make sure the wok is smoking hot before food goes in, and cook fatty foods to accelerate the seasoning process.
Can I use a wok on an electric stove?
Yes, with a flat-bottom wok. Electric stoves take longer to heat the wok and can't match gas BTU output, but you can compensate by preheating longer (3-4 minutes) and cooking in smaller batches. Many home cooks produce excellent stir-fries on electric.
My wok is rusty — is it ruined?
No. Scrub the rust off with steel wool, re-season the wok from scratch (heat, oil, smoke, repeat 3 times), and you're back in business. Rust happens when a wok is stored wet or unused for weeks. Prevent it by always drying over a flame and wiping with oil after cleaning.
As an Amazon Associate, JustBeginning earns from qualifying purchases.
We may also earn commission from other affiliate programs linked on this
page. Editorial recommendations are independent; we don't choose
products based on commission rates.
Product prices and availability are accurate as of the date and time
indicated and are subject to change. Any price and availability
information shown on Amazon at the time of purchase will apply.
Our top pickYOSUKATA 13.5" Pre-Seasoned Carbon Steel Wok

 Best starter