Mountain biking's learning curve is mostly about gear confusion, not physical difficulty. A good beginner hardtail in the $700–1,000 range is more capable than bikes costing $3,000 a decade ago. The real question isn't how hard it is — it's knowing which bike to start on, what safety gear is non-negotiable, and what you can skip for year one.
By Colin B. · Published May 22, 2026 · Last reviewed June 3, 2026
Race Face Chester Platform Pedals
— RaceFace Chester flat pedals — the standard beginner-friendly choice. Grippy, durable, and forgiving while you learn.
Budget total
$750
Typical total
$1300
The bike is 70–80% of your total cost. Budget at least $600 for the bike itself — anything cheaper has components that will frustrate you. Add a MIPS helmet ($60–100), flat pedals ($30–50), flat shoes ($70–100), and knee pads ($40–70) and you're properly equipped for under $1,500.
We earn commission on qualifying Amazon purchases — see our
affiliate disclosure.
Price tiers and budget totals shown above are editorial estimates;
actual Amazon prices vary.
At a glance
Our top pick in each category
The fastest path through this guide — each best-starter pick by category.
Scroll for the budget and upgrade alternatives.
Don't buy full-suspension yet. Under $1,500, full-suspension bikes cut corners on the very components that matter (suspension travel, wheel quality, drivetrain). A $900 hardtail rides better than a $900 full-sus every time. More importantly: hardtail forces you to develop better body position and technique. You'll become a better rider faster on a hardtail.
Start on flat pedals, not clipless. Every beginner who ignores this advice eventually clips in for the first time at a stop sign, forgets how to unclip, and falls over in slow motion in front of traffic. Flat pedals let you bail naturally when things go sideways — and things will go sideways. Start on flats, add clipless after your first season if you want.
Your local trail network matters more than your bike. A $2,000 bike ridden on the wrong trail is miserable; a $700 bike on a well-matched trail is a revelation. Before you buy anything, look up your local trails on Trailforks and understand the trail difficulty ratings (green/blue/black). Most beginners should start on green and easy blue trails regardless of fitness level — the skills are different from cardio.
The bike decision is the only one that really matters at first, and the choice is simpler than the forums make it seem. For most beginners: a hardtail 29er in the $700–1,000 range from a real brand (not a big-box store). Hardtail means front suspension only; 29er means 29-inch wheels, which roll over roots and rocks more confidently. Avoid department-store bikes — Walmart and Target bikes have cheap components that fail at exactly the wrong moment. Spend the money on a real bike from a recognized brand, even if it means a smaller budget for everything else.
Bikes — what's the difference?
A few common shapes, each making a different trade.
Hardtail 29er
Front suspension only, 29-inch wheels. The right call for 90% of beginners.
Wheel size
29"
Suspension
Front only
Best terrain
XC, trail, blue runs
Best for Most beginners, riders 5'4" and taller, anyone learning technique
Tradeoff Less traction on steep/rough descents than full-sus
Smaller wheels, more agile feel. Better for shorter riders and tight trails.
Wheel size
27.5"
Suspension
Front only
Best terrain
Technical trail, flow trail
Best for Riders under 5'4", technical/tight trail focus, playful riding style
Tradeoff Rolls slightly less efficiently over large obstacles than 29er
Full-Suspension
Front and rear suspension. More capable on rough terrain, significantly more expensive.
Wheel size
29" or 27.5"
Suspension
Front + rear
Best terrain
All-mountain, enduro
Best for Riders who know they want rough/technical terrain and can spend $1,500+
Tradeoff Heavier, more maintenance, more expensive — not a beginner shortcut at any price under $1,500
Best starter
Diamondback
Bicycles Overdrive 29 2 Hardtail Mountain Bike
$$$
★★★★★Our rating
Diamondback's Overdrive is the gold standard for Amazon-available beginner MTBs. 29" wheels, Shimano drivetrain, SR Suntour front fork, and hydraulic disc brakes — all the fundamentals done right. Ships 85% assembled. Diamondback has been making bikes for 40+ years and their entry-level hardtail is the honest answer to 'what should I start on.'
What we like
Shimano drivetrain and hydraulic disc brakes at an entry-level price
Ships 85% assembled from a 40-year-old brand that stands behind its bikes
29" wheels roll over roots and rocks more easily than smaller wheel sizes
What to know
SR Suntour fork is competent but not plush — your arms feel rough terrain
Final assembly of handlebars and front wheel requires basic tools and patience
If your budget is under $400 and you just want to know whether trail riding is for you before committing, the High Timber is the least-bad cheap option. It has a real derailleur, mechanical disc brakes, and 29" wheels. Component quality is clearly a tier down from the Diamondback, but it rides and shifts like a mountain bike should. Upgrade later once you're sure the sport is sticking.
What we like
Real derailleur, mechanical disc brakes, and 29" wheels for under $400
Honest entry point to test whether trail riding is for you before committing
What to know
Spring fork bounces more than it absorbs — avoid technical rocky terrain for now
When you're ready for a more capable trail machine, the Diamondback Line is the honest step up. 120mm of SR Suntour XCR travel, a slack trail geometry, SRAM 1×9 drivetrain, and hydraulic disc brakes. The Line is designed for trail riding, not just cross-country efficiency — and it ships through Amazon.
What we like
120mm travel and slack trail geometry — built for real trail riding, not just XC
SRAM 1x9 drivetrain with hydraulic disc brakes: full trail spec at this price
What to know
Best purchased from a local shop for proper fitting and professional assembly
Amazon availability varies by size and color — confirm stock before counting on it
MTB helmets cover more of your head than road helmets — they wrap around the back and sides where trail impacts happen. MIPS (Multi-directional Impact Protection System) is worth the extra $20–30; it reduces rotational forces on your brain during angled impacts. Don't skip MIPS at the trail-riding level. A full-face (motocross-style) helmet is overkill for green and blue trail riding — save that for downhill park days.
Best starter
Giro
Fixture II MIPS Mountain Bike Helmet
$$
★★★★★Our rating
The Fixture MIPS is the reliable, widely-recommended beginner MTB helmet. MIPS protection, 18 vents, a Roc Loc Sport fit system that adjusts without fuss, and a price that doesn't sting. Giro has been building bike helmets for 30+ years. This is the helmet most people should buy.
What we like
MIPS protection, 18 vents, Roc Loc dial fit — all the basics done right
Giro's 30-year helmet reputation at an accessible entry price
What to know
Ventilation is good but not exceptional during hot summer trail rides
Bell's Spark 2 MIPS is the other reliable name at the entry price point — updated design that integrates the MIPS slip-plane into the retention system for less bulk and better ventilation than the original Spark. If the Giro is out of stock in your size, this is the equivalent pick.
What we like
MIPS integrated into the retention system — less bulk than the original Spark
Reliable Bell quality at the same price tier as the Giro Fixture
What to know
Fewer color and size options than the Giro Fixture lineup
Speedframe Pro Mountain Bike Helmet, Blocked Black, Large
$$$
★★★★☆Our rating
When you're riding harder terrain and want a helmet that fits like it was made for trail riding, the Speedframe MIPS is the step up most riders make. Extended rear coverage, BOA fit dial for micro-adjustment, and the same MIPS liner as helmets costing twice as much. Fox is the benchmark MTB gear brand; this is their trail helmet designed specifically for the way trail riders fall.
What we like
Extended rear coverage and BOA dial for micro-adjustment on rugged descents
MIPS liner equivalent to helmets costing twice the price
What to know
Premium price — earn it after a season of regular riding, not as a first helmet
Start on flat pedals. No exceptions. Flat pedals let you bail naturally when you go over the bars or catch a pedal on a rock — and both will happen. They also force you to develop proper foot pressure technique, which makes you a better rider. Most entry-level bikes ship with basic plastic platform pedals that work fine. If yours look cheap, the RaceFace Chester is the flat pedal upgrade. Add clipless after your first season once you're confident on trail.
Best starter
RaceFace
Race Face Chester Platform Pedals
$38.96 as of Jun 22, 2026
★★★★★Our rating· In Stock
The standard recommendation for beginner-to-intermediate flat-pedal MTB. Fiberglass-composite body, 10 replaceable pins per side for grip, and sealed cartridge bearings that hold up in mud and rain. Light enough not to feel clunky, grippy enough to hold your foot through choppy terrain. The Chester is what most riders run before they graduate to the aluminum version.
What we like
10 replaceable grip pins per side and sealed bearings that survive mud and rain
Light enough not to feel clunky; the standard step-up before aluminum flats
What to know
Composite body flexes slightly under hard pedaling — upgrade to aluminum Chester later
Flat pedals are only as good as the shoes on them. Five Ten's Freerider has a sticky rubber outsole (Stealth S1 compound) engineered specifically to grip flat MTB pedals. The difference between these and regular sneakers on grippy flat pedals is dramatic — your foot stops sliding mid-corner. The shoe that most flat-pedal riders end up on eventually; skip the intermediate steps and start here.
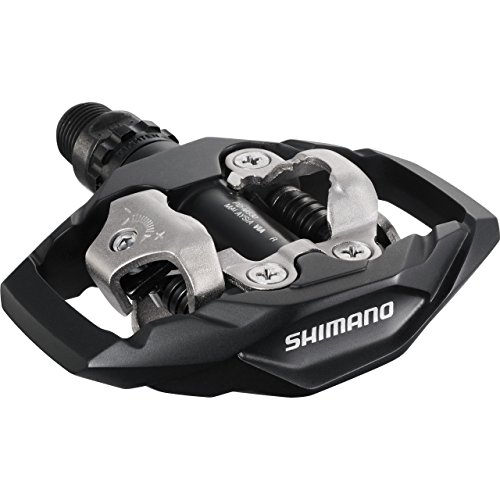
When you're ready for clipless, the M530 is the forgiving trail-specific entry point. Two-sided engagement (clips in from either side), large platform around the cleat for walkability, and adjustable release tension so you can set it loose while you learn. Pair with Shimano SH-MT5 trail shoes — the combo under $150 total.
What we like
Two-sided engagement — clips in from either side, no fumbling to find the pedal
Large platform around the cleat makes walking and trail restarts natural
What to know
Don't add clipless until trail confidence is solid — unclipping mistakes happen fast
Gloves are non-negotiable — they protect your palms in falls and improve grip on the bars. Knee pads are strongly recommended for anything beyond the mellowest green trail. The falls you take in mountain biking are different from road cycling: you come off the side or go over the bars onto hard-packed dirt and roots, not pavement. A $40 pair of knee pads worn every ride is a very cheap insurance policy.
Best starter
Fox Racing
Ranger Gel Gloves
$39.95 as of Jun 22, 2026
★★★★★Our rating· In Stock
The Ranger Gel is what most trail riders reach for: single-layer synthetic back for breathability, genuine leather palm with gel padding at the heel and fingers. Durable enough to last a season of regular riding, comfortable enough to wear in summer heat. Fox's trail gloves are the benchmark and these are their bread-and-butter model.
What we like
Leather palm with gel padding at heel and fingers — exactly where trail falls hurt
Single-layer synthetic back keeps hands cool during summer rides
What to know
Leather palm takes a few rides to fully break in to your hand shape
★★★★☆Our rating· Only 1 left in stock - order soon.
Leatt's Dual Axis knee guard is their flexible trail-riding design — the hinge flexes naturally with your knee rather than fighting it, which makes the difference between wearing pads every ride and leaving them in the car. Hard outer cap, foam liner, secure fit without bouncing. Good coverage for green and blue trail riding without the bulk of motocross-style DH guards.
What we like
Hinged design flexes naturally — the kind you'll actually wear every single ride
Hard outer cap and foam liner without the bulk of downhill-specific guards
What to know
Size by knee circumference, not height — measure before ordering
Trail mechanicals happen — flat tires and dropped chains are the most common. Showing up unprepared means a long walk out. Three items fix 90% of trailside problems: a mini pump or CO2, a tubeless tire plug kit, and a compact multi-tool with a chain breaker. Total kit fits in a jersey pocket or small pack. Skip the under-saddle bag on MTB (it bounces off rough terrain); tuck tools in your pack or jersey.
Best starter
Topeak
Road Morph G Mini Bike Pump
$$
★★★★★Our rating
The Mini Road Morph G has a fold-out foot peg and a pressure gauge — features that sound optional until you're 5 miles from the trailhead trying to inflate a tire to the right pressure by feel. Topeak's mini pumps are the standard for a reason: they work reliably, fit standard and tubeless valves, and get enough air volume to actually seat a tubeless bead if needed.
What we like
Fold-out foot peg and pressure gauge make precise trailside inflation possible
Works on standard and tubeless valves; can seat a tubeless bead if needed
What to know
Smaller volume than a floor pump — expect 30-40 strokes per tire to reach pressure
Most modern MTB tires run tubeless — no inner tube, just sealant that self-heals small punctures. When the sealant isn't enough, a Dynaplug plugs the hole in about 20 seconds without removing the wheel. The Racer is the most foolproof plug tool: you push it in, it self-seals, you ride out. Carry two plugs minimum; trail debris is unforgiving.
What we like
Self-sealing plug installs in 20 seconds without removing the wheel
The most foolproof tubeless repair tool — push it in, self-seals, ride out
What to know
Only works on tubeless setups — verify your tire configuration before buying
Chain maintenance is the one thing beginners skip and then wonder why their drivetrain sounds terrible. Squirt Dry is a wax-based lube that repels dirt and doesn't gunk up your drivetrain on dry trails. Apply after every few rides, wipe off excess — 5 minutes of maintenance that extends chain life by months.
What we like
Wax-based formula repels dirt instead of attracting it like wet lubes do
5-minute application every few rides extends chain life by months
What to know
Needs reapplication every 3-5 rides in consistently dusty or wet conditions
Mountain biking rewards patience and punishes rushing. The skills that make you fast on technical terrain take months to build — but you can have a genuinely great time on trails from week one if you know what to focus on. Here's what the first four weeks actually look like.
Mountain biking looks hard from the outside. The trails, the gear, the vocabulary — it’s easy to assume there’s a steep entry toll before it gets fun. There isn’t. But there is a specific learning curve, with predictable rough patches and predictable breakthroughs, and knowing what’s coming makes the first month a lot less frustrating.
This is what your first four weeks actually look like.
Week 1: Learning to read the trail
The biggest mistake new riders make is treating mountain biking like cycling. It’s not cycling on dirt — it’s a different skill set almost entirely.
Find green trails, not easy road analogues. Before your first ride, look up your local trail network on Trailforks. Green trails are wide, smooth, and predictable. They exist specifically so you can focus on body mechanics instead of survival. Ride greens for your first three sessions minimum, regardless of how fit you are. Fitness and trail skill are completely separate things.
The attack position. Watch a single five-minute video on “attack position MTB” before you ride. This is the default stance for everything in trail riding: pedals level, weight centered, elbows slightly bent and out, hips back, eyes looking ahead at where you want to go. It feels unnatural for the first few rides. By week three it’s automatic.
Look where you want to go, not at what you’re afraid of. Bikes track toward your visual focus. If you stare at the rock or the root in the middle of the trail, you’ll hit it. Look past the obstacle, at the line you want to ride. This is the single most important beginner technique tip and it takes three or four rides before it starts working.
Braking. Brake before you want to slow down, not during. On a trail, your two brakes behave differently: the front brake provides most of your stopping power but will throw you forward if you grab it hard while leaning; the rear brake is safer to use aggressively but will skid and doesn’t slow you as quickly. Most beginners over-rely on the rear. The correct habit: use both together, progressively, with more weight through the pedals as you slow.
By week two, most beginners have survived their first real trail and come home with at least one of the following: a bruised shin from a pedal strike, a slow fall when a wheel washed out, or a moment of panic on a descent that felt too steep. All normal.
The white-knuckle grip is the most common week-two problem. When you’re tense, you grip the bars hard, which stiffens your arms, which stops your bike from tracking through loose dirt and roots, which makes you feel less stable, which makes you grip harder. The loop breaks when you consciously breathe and loosen your hands. Try to hold the bars the way you’d hold a door handle — enough to steer, not enough to strangle.
Practice your descending weight shift. On any downhill, practice pushing your hips back — as if you’re about to sit on the rear tire. This keeps your weight from going over the front wheel when you hit an obstacle or brake hard. The cue is: the steeper the hill, the further back you go. Riders who look smooth on descents aren’t braver than you — they’re just further back.
Start riding with slightly lower tire pressure. Most beginners run their tires too hard. If your tires are tubeless (no inner tube — standard on most bikes above $700), drop the pressure 5 PSI below what’s printed on the sidewall. Lower pressure conforms to trail surface better and gives you significantly more grip on loose or rocky terrain. The right pressure feels a little softer and more planted; wrong-low pressure feels squirmy.
Week 3: Choosing your line
Around week three, a shift happens. Instead of reacting to the trail, you start anticipating it. You see a root 10 feet ahead and think about which side to take it on. You notice the inside of a corner is loose and aim for the firmer outside. This is “reading the trail” and it’s the first real skill that separates confident riders from nervous ones.
Line choice. On any given section, there’s usually a fast line, a safe line, and a challenging line. New riders default to the safe line (which is often the middle of the trail, full of the most-worn-over roots). The faster line is often narrower, off the main track, over a chunk that looks scary but is actually more predictable than the slippery worn section. Start noticing multiple options rather than just reacting to what’s in front of you.
Climbing technique. Climbing on singletrack is different from road climbing. You need to maintain momentum through technical sections — stopping and trying to start again on a steep, rooted climb is extremely difficult. Shift to an easier gear before you need it (not while you’re struggling). Keep your weight forward enough to keep the front wheel on the ground, while keeping enough pressure through the rear to maintain traction. It feels contradictory until you find the balance.
Week 4: Finding the flow
Flow is the reason people get addicted to mountain biking. It’s the state where the trail, the bike, and your body synchronize — where the terrain is calling the shots and you’re just responding without thinking. Most beginners get their first real taste of it around week three to four.
It comes when you stop trying to manage each obstacle individually and start riding the trail as a connected sequence. Instead of slow down → rock → pedal → corner → pedal, it’s one continuous movement. Your eyes are ahead of the bike, your weight is shifting before the terrain demands it, and your hands are loose enough for the bike to do its job.
A few things accelerate this:
Ride with people slightly better than you. Following someone who’s a little faster lets you see the lines they choose in real time. You’ll pick up more in one session of follow-the-leader than in three hours of solo riding.
Session technical features. Pick one small technical section — a root crossing, a tight corner, a small drop — and ride it five times in a row. Sessioning forces you to analyze and improve rather than just surviving a feature and moving on. Every trail rider you see looking smooth has sessioned countless features like this.
Don’t add technical difficulty too fast. The transition from blue to black trail requires a step change in technical skill, not just more confidence. Most riders push into black-diamond terrain two to three rides too early. A mistake on a black trail hits harder than a mistake on a blue. Let your skill pull you up in difficulty rather than pushing.
You will fall. Not as often as non-riders assume, but it happens. On trail riding, most falls are slow and awkward — a wheel washes out, you can’t unclip (if you’re on clipless) or your foot slips (if you’re on flats), and you tip over at low speed. These leave bruises and maybe a small trail rash. Real high-speed falls are rarer and happen overwhelmingly when riders are outside their skill level.
Reduce your fall risk with three habits:
Ride trails matched to your current skill (not one level above your skill)
Never ride when you’re fatigued — most trail crashes happen in the last 20 minutes of a long ride
Wear your helmet and knee pads every single ride, even short ones
The riders who get hurt are almost never the riders who look nervous. They’re the riders who are overconfident on terrain their technique can’t back up.
What to do at month two
After four weeks of regular riding, you’re ready to think about progression:
Take a skills clinic. A two-to-four-hour skills session with a qualified coach will identify the two or three things actively holding you back and give you specific drills. It’s worth doing around this point — you have enough riding under your belt to absorb the feedback and enough bad habits forming to correct before they’re ingrained.
Try a new trail system. Every trail network has a different character. Riding somewhere unfamiliar forces you to read trail in real time rather than relying on familiarity.
Find your local trail community. Most areas have a group ride for beginners or intermediate riders. Trail community is the best way to improve faster, know which trails to hit first, and stay motivated during the awkward middle phase.
You’re not a beginner anymore at month two. You’re an enthusiastic newcomer with some bad habits and one or two sections you can genuinely ride well — which is the most interesting place to be in a new sport.
Save your money
What you don't need yet
Beginners get pressured to buy a lot of stuff that doesn't help them play
better. Here's what we'd skip on day one.
Full-suspension bike — Under $1,500, you're better off on a hardtail. Cheap full-sus bikes have budget components everywhere that matters — suspension, drivetrain, brakes. A $900 hardtail beats a $900 full-sus on every metric.
Clipless pedals — Learn trail technique on flats first. The efficiency gain from clipless is real, but it requires a confidence level you won't have for the first 3–6 months. Falls during the clipless learning phase are demoralizing and avoidable.
A dropper post — A lever that drops your seat for descents. Genuinely useful — but manual saddle height adjustment teaches you to think about position first. Add it once you're riding consistently; the difference will be obvious.
Carbon wheels or frame — Carbon saves 400–600 grams on a bike you'll likely crash in the first year. Aluminum is perfectly fine for trail riding at any level. Carbon is a Year 3+ conversation.
A hydration pack (for short rides) — A bottle cage handles rides under two hours fine. Only move to a hydration pack once you're doing longer trail rides or in heat — it's extra weight and washing hassle for a 90-minute loop.
First week
Your first seven days
A short, real plan to get from gear-on-doorstep to actually playing.
Find your local trails on Trailforks before you buy anything. · Action
Trailforks · The most complete MTB trail database. Filter by difficulty, region, and trail type.
MTB Project · REI-backed trail database with ratings, photos, and GPS routes.
Order a helmet first — it should arrive before the bike. · Buy
Ride three times in the first two weeks. Mountain biking clicks through repetition, and the first two sessions are always awkward. · Action
FAQ
Common questions
How much should I spend on my first mountain bike?
At least $600 for the bike itself. Bikes below that price point have components (fork, drivetrain, brakes) that will fail or frustrate you on real trail. You don't need to spend $2,000 — the $700–1,000 range has genuinely capable bikes. Spend less than $600 only if you're testing whether trail riding is for you at all; budget bikes are better trail bikes than they used to be.
Hardtail or full-suspension for beginners?
Hardtail, almost always. Under $1,500, full-sus bikes cut corners on the components that matter (suspension quality, wheels, drivetrain). A $900 hardtail is a better bike than a $900 full-sus. Hardtails also develop better body position because they don't let the rear suspension compensate for sloppy technique. Most coaches tell beginners to start on hardtail.
Do I need special shoes for mountain biking?
For flat pedals: yes, ideally. Flat MTB shoes (like Five Ten Freeriders) have a sticky rubber outsole engineered to grip flat pedal pins. Regular sneakers work but slide more. You can start with sneakers, but if you're sticking with the sport, dedicated flat shoes are a noticeable upgrade in feel and safety.
How do I find beginner trails?
Trailforks and MTB Project are the two best databases. Filter for green (easy) and easy blue (intermediate) trails in your area. Trail ratings are standardized: green is smooth and wide, blue introduces off-camber sections and small drops, black has significant technical features. Start on greens for your first two to three rides, regardless of fitness level.
Is mountain biking dangerous?
It carries real risk — falls happen, and trail falls are on harder terrain than pavement. But most beginner-trail injuries are scrapes and bruises, not serious injuries. A helmet, knee pads, and gloves cover the highest-risk spots. The biggest risk reducers are: riding trails matched to your skill level, not riding beyond the point of fatigue, and learning proper braking technique before you push into steep terrain.
How long until I'm comfortable on trail?
Most people feel genuinely competent on green and easy blue trails after 8–12 rides over two to three months. The first three rides are awkward (everything moves, you grip too tight, you brake too late). By ride six or eight, you start reading the trail ahead, your body relaxes, and the flow state begins to show up. That's when the sport hooks you.
Trailforks — The most complete MTB trail database globally. Find trails by difficulty, region, and type. Invaluable before any ride in an unfamiliar area.
MTB Project — REI's trail database. Solid GPS routes, photos, and user-added trail conditions. A reliable backup to Trailforks.
Singletracks — MTB news, reviews, and gear coverage with a strong beginner section. More beginner-accessible than Pinkbike, less technical than TF.
Pinkbike — The dominant community and media site for MTB. Gear reviews, race coverage, and forums. Skews enthusiast — useful once you know the vocabulary.
GMBN (Global Mountain Bike Network) — The best MTB YouTube channel for beginners. Technique videos, bike reviews, trail riding. Start with their 'skills' playlist.
Seth's Bike Hacks (YouTube) — Approachable, funny, and genuinely useful. Great for understanding bike setup, basic maintenance, and beginner trail skills.
r/MTB — Active subreddit. Good for trail recommendations and technique questions. Use the wiki before posting a 'what bike should I buy' question.
As an Amazon Associate, JustBeginning earns from qualifying purchases.
We may also earn commission from other affiliate programs linked on this
page. Editorial recommendations are independent; we don't choose
products based on commission rates.
Product prices and availability are accurate as of the date and time
indicated and are subject to change. Any price and availability
information shown on Amazon at the time of purchase will apply.
Our top pickDiamondback Bicycles Overdrive 29 2 Hardtail Mountain Bike