Skateboarding looks like a closed club from the outside, all style and no clear entry point. It's not. The barrier is lower than you think: a decent complete board, a helmet, and a skate park within driving distance will get you from total beginner to landing your first tricks within a month.
By Colin B. · Published May 23, 2026 · Last reviewed June 3, 2026
Vans Old Skool Skate Shoe
— Vans Old Skool for a reason: flat sole, real board feel, and they last more than one season.
Budget total
$80
Typical total
$200
A solid complete board plus helmet runs $80–120. Add skate shoes and wrist guards and you're at $200, fully equipped for your first year.
We earn commission on qualifying Amazon purchases — see our
affiliate disclosure.
Price tiers and budget totals shown above are editorial estimates;
actual Amazon prices vary.
At a glance
Our top pick in each category
The fastest path through this guide — each best-starter pick by category.
Scroll for the budget and upgrade alternatives.
Buy a complete board first. The beginner trap is buying a deck, trucks, wheels, and bearings separately before you know what you actually like. A quality complete in the $80–120 range is properly assembled, correctly adjusted, and ready to skate. Upgrade individual parts later once you have opinions.
Wear a helmet from day one. You will fall (not maybe, definitely). Concrete doesn't care that it's your first session. Most skate parks legally require a helmet, and the ones that don't have an informal 'wear one or get kicked out' policy for under-18 riders.
Skate shoes matter more than they look like they do. Regular sneakers have thick soft soles that muffle board feel and shred on grip tape in one session. After one hour in running shoes, you'll understand why everyone else is in Vans or Nike SBs.
For your first board, buy a complete (a pre-assembled deck with matching trucks, wheels, and bearings). The decks in cheap toy-store completes are pressed from low-quality wood and will snap unexpectedly; the trucks are rough castings that won't grind smoothly. A legitimate complete from a real skate brand runs $80–120, uses real maple, real trucks, and real wheels. Cal 7 and Powell-Peralta make the best-known quality completes at this price. The individual component differences don't matter until you've logged 50+ sessions.
Complete Boards — what's the difference?
A few common shapes, each making a different trade.
Complete Board
Pre-assembled, ready to skate. The right call for anyone in their first year.
Deck
7.5"–8.0" (7.75" default)
Trucks
Stock (pre-adjusted)
Wheels
52–54mm, 99a (hard)
Best for Absolute beginners: you don't know your preferences yet and a complete saves you from expensive guesswork.
Tradeoff Stock trucks and wheels are lower quality than buying components separately, but not in a way you'll notice in your first year.
Deck + trucks + wheels + bearings chosen separately. More expensive, more control.
Deck
7.5"–8.5" (your choice)
Trucks
Independent 149 or 169
Wheels
Spitfire 52–56mm 99a
Best for Skaters who've logged 6+ months and have specific opinions about truck feel, wheel hardness, and deck pop.
Tradeoff Costs $150–250+ and requires knowing what you like. Premature optimization for most beginners.
Cruiser / Longboard
Longer deck, softer wheels. Built for rolling around, not tricks.
Deck
28"–36"+ length
Trucks
Wider (for stability)
Wheels
60–70mm, 78a–85a (soft)
Best for Commuting, campus riding, and casual carving, not trick skating or skate parks.
Tradeoff Can't do flip tricks or skate park obstacles. If you want to eventually skate bowls or street, start on a standard popsicle deck.
Best starter
Cal 7
Complete Skateboard 7.75"
$$
★★★★★Our rating
Cal 7 is the name that comes up every time someone asks 'best beginner complete' on r/NewSkaters, and it's earned it. Seven-ply Canadian maple, real Cal 7 trucks pre-adjusted to medium tightness, 99a wheels that work on both smooth and rough concrete, and Abec-7 bearings. Ships fully assembled with grip tape applied. The 7.75" width is the standard all-purpose size, right for most adult feet.
What we like
Ships fully assembled with grip tape applied, ready to skate out of the box
Seven-ply Canadian maple and real Cal 7 trucks at an honest $80–120
7.75" width works for most adult feet and trick styles
What to know
Stock trucks come tight; loosen the kingpin nut your first session
Stock wheels do the job but aren't a long-term keeper
Around $60 and the most credible option at this price. Still seven-ply maple (not the soft junk in department-store boards), still a usable truck setup. Not as refined as the Cal 7, but if you're genuinely unsure whether skating is going to stick, this is the smart hedge.
What we like
Seven-ply maple deck, not the soft junk from toy stores
Under $60, a smart hedge if you're not sure skating will stick
What to know
Stock wheels are softer than ideal on rough outdoor concrete
Less refined than the Cal 7, which shows after a few months
Powell-Peralta has been making skateboards since 1978. Their Golden Dragon completes use a proprietary deck construction that's noticeably stiffer and more pop-responsive than mass-market maple. If you've already skated a few months on a budget complete and want something that actually rewards progression, this is where to land. Still not a custom build, but it skates like one.
What we like
Proprietary deck construction has noticeably more pop than mass-market maple
From a company that has been making skateboards since 1978
What to know
Only meaningful after 6+ months once you can feel the difference
Costs $30–50 more than a beginner complete you'll grow past anyway
This section is about injury prevention, not style. Wrist fractures and concussions are the two most common skateboarding injuries, and both are almost entirely preventable with the right gear. The Triple Eight Dual Certified helmet is the standard pick across every skate-adjacent sport: it meets both the CPSC (bike standard) and ASTM F1492 (skateboard standard), which is the combination most skate parks explicitly require. Knee and wrist pads matter most in your first month when bailing is constant. Once you've learned to fall, the helmet becomes more critical and the pads become optional.
Best starter
Triple Eight
Dual Certified Helmet
$$
★★★★★Our rating
Meets both CPSC (required for under-18) and ASTM F1492 (skate-specific) certifications, the combination that gets you into any skate park without argument. ABS shell, EPS foam liner, internal ventilation, and a comfortable interior. The certification double-cover is the main reason to pick this over a cheaper helmet; a skate park can turn you away if your helmet is only bike-certified.
What we like
Meets CPSC and ASTM F1492, the certification combo most parks require
ABS shell, EPS foam liner, and internal ventilation in one package
What to know
Runs slightly large in some models; size down when between sizes
Same Triple Eight construction and CPSC/ASTM dual certification, with a sweat-wicking liner instead of the standard foam. Often runs $5–10 less than the regular model. If you run hot, the moisture management is worth it; if not, either helmet is the right call.
What we like
Same CPSC and ASTM F1492 dual certification as the pricier Triple Eight
Moisture-wicking liner keeps it wearable on hot sessions
What to know
Sweat liner compresses faster than standard foam over time
187 makes the pads you see at every skate park on the advanced riders. Hard-cap knee pads designed for repeated impact, not just one-time falls. Worth it if you're skating transitions (bowls and ramps) where knee falls are a consistent technique. For flat-ground street skating, cheaper slip-in pads are fine.
What we like
Hard-cap design handles repeated impact on bowl and ramp transitions
The brand you see on advanced riders at every real skate park
What to know
Run large; size down from your usual athletic sizing
Skate shoes are different from regular sneakers in two specific ways: the sole is flat (no heel-toe drop) so you can feel the board underfoot, and the upper is reinforced in the ollie zones where grip tape destroys normal shoe fabric in one session. Any major skate brand (Vans, Nike SB, DC, Etnies, Emerica) will do this correctly. The differences between brands come down to fit and feel. Vans runs narrow and low-profile. Nike SB runs true to size with more cushioning. DC tends wider and lower. Go with whatever fits your foot.
Best starter
Vans
Old Skool Skate Shoe
$$
★★★★★Our rating
The Old Skool has been a skate shoe since 1977, and it works because it doesn't do anything wrong. Flat waffle sole for board feel, canvas upper that breaks in fast, low-profile silhouette that doesn't interfere with flicking tricks. The reinforced side panels hold up to grip tape better than most shoes at this price. Fifty years of iteration have made this as dialed as a canvas shoe gets.
What we like
Flat waffle sole gives real board feel, not a muffled approximation
Reinforced side panels outlast regular canvas against grip tape
Fifty years of iteration in an honest, dialed-in canvas shoe
What to know
Runs narrow; wide feet should try the Sk8-Hi or a half-size up
DC makes legitimate skate shoes, not costume versions of skate shoes. The Court Graffik runs wide and true to size, has a solid suede toe cap, and lands around $60, often less. A good fit for wider feet that struggle with Vans' narrow lasts, and a good backup if you want a second pair without spending full price.
What we like
Runs wide and true to size, rare for a skate shoe
Solid suede toe cap at a sub-$60 price point
What to know
Heavier and chunkier than minimal-profile skate shoes
Slightly less board feel than canvas Vans due to the thicker sole
Nike's Zoom Air insole under the insole board (a thin cushion that absorbs impact without adding height or losing board feel) is a real upgrade after long sessions. The Janoski silhouette is low-profile, the suede wears slowly, and the rubber cupsole lasts longer than canvas alternatives. Worth the extra $20 once you're skating 3+ times a week and your feet start to notice.
What we like
Zoom Air insole absorbs impact without adding height or losing board feel
Suede upper lasts significantly longer than canvas alternatives
What to know
Narrow heel and slim toe box; try before buying if possible
Three things are worth buying alongside your board: a skate tool (so you can adjust your trucks at the park without hunting down a ratchet set), a bar of skate wax (for making curbs, ledges, and rails grind instead of grab), and eventually a set of replacement bearings when your board starts rolling slow. Total cost under $40. Everything else (stickers, shoe goo, riser pads, shock pads) you can figure out as specific situations arise.
Best starter
CCS
Skateboard Tool All in One
$
★★★★★Our rating
CCS makes one of the most popular skate tools on Amazon, and for good reason: it handles every bolt on your board: 3/8" hardware, 1/2" axle nuts, and 9/16" kingpin nut, plus a fold-out Phillips head for grip tape and hardware swaps. Fits in your pocket, costs about $10, and earns its keep the first session when you adjust your trucks for the first time.
What we like
Handles every bolt on your board in a single pocket tool
Under $10, and earns its keep the first time you adjust your trucks
What to know
Plastic housing feels cheap but doesn't affect function
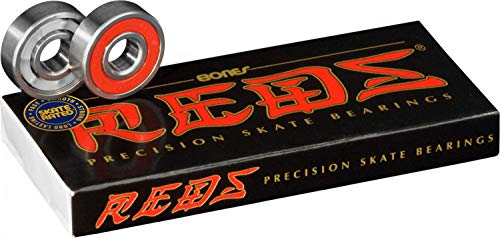
When your stock bearings start sounding rough and your board rolls noticeably slower, Bones REDS are the default upgrade recommendation and have been for 30 years. Simple to install (you'll need your skate tool), spin freely out of the box, and last much longer than budget bearings. A set of 8 runs about $15.
What we like
The default bearing upgrade recommendation for 30 years
Set of 8 for about $15, easy install with your skate tool
What to know
Do not clean with WD-40; it strips the lubricant and ruins the bearing
Fireball formulates specifically for skateboarding: different hardness than surf wax, designed for concrete ledges and metal rails. A bar lasts months of sessions and costs less than $10. Not needed for skate park riding on coated rails, but the difference between a smooth grind and a shoulder-rolling stop on a raw granite curb is exactly one bar of wax.
What we like
Formulated for skateboard concrete and metal, not repurposed surf wax
One bar lasts months of sessions for under $10
What to know
Not needed for coated skate park rails; only worth it for street spots
Skateboarding has a real learning curve — but it's shorter than people think, and the breakthroughs are predictable. Here's what the first month actually looks like, week by week.
Skateboarding has a reputation for being brutally hard to start. That reputation is half-deserved: the first week involves a lot of falling, a lot of awkward shuffling, and a board that does not behave the way you expect. But the first breakthrough — the moment when you push off, glide, and actually feel like a skater — comes sooner than people think. Usually within your first two sessions.
What makes skateboarding confusing to start isn’t the difficulty. It’s the lack of a clear progression. You can’t look at a skate park and see a beginner path the way you can see a bunny slope on a ski mountain. This guide is that path.
Week 1: Ground rules
Before you try anything athletic, stand on the board and figure out your stance.
Regular vs. goofy. Regular riders have their left foot forward; goofy riders have their right foot forward. There’s no right answer — it’s whichever foot you instinctively step forward with when someone pushes you from behind. Don’t overthink it; you’ll know within five minutes of standing on the board.
Your foot position matters immediately. Front foot goes over the front trucks, perpendicular to the deck. Back foot goes on the tail of the board, also roughly perpendicular. Don’t stand with both feet parallel — you’ll have no control over the tail.
Pushing. This sounds trivial but isn’t. You push by shifting your weight to your front foot, lowering your back foot to the ground, pushing backward, then returning your back foot to the tail. Do it 50 times before you try anything else. Smooth, low, consistent — not a hop-and-scoot.
Foot braking. Drag the sole of your back foot on the ground. This is the beginner brake and there’s no shame in it. Do not try to stop by stepping off the board — the board will shoot forward and hit someone.
The mongo problem. Some beginners instinctively push with their front foot instead of their back foot (called “pushing mongo”). It works but looks wrong and limits tricks later. If you catch yourself doing it, consciously switch now before the muscle memory locks in.
Once you can push and stop consistently, start working on turning.
Kick-turns are how you change direction when you’re moving: press the tail with your back foot to lift the front wheels slightly, then twist your shoulders in the direction you want to go. The board follows your shoulders. Practice until you can do a 180° kick-turn without putting a foot down.
Carving is the longer-radius turn you do at speed: shift weight to your heels to go one way, toes to go the other. Happens through your trucks loosening (adjust them slightly if they’re too stiff to carve).
This is also when you start truck adjustment. Stock trucks on most completes come tight — stable, but hard to carve. Loosen the kingpin nut counterclockwise (your skate tool, one turn at a time) until the board responds to weight shifts without flopping around. There’s no magic setting; loose enough to turn, tight enough to feel stable at speed. Everyone’s different.
Falling correctly. You will fall more in week two than week one, because you’re moving faster. The reflex is to extend your arms stiffly — that’s how wrists break. Practice this consciously: when you feel yourself going down, bend your elbows, tuck your chin, and try to land on the fleshy part of your forearms and roll. Wrist guards help absorb the instinctive reaction while you’re training yourself out of it.
Week 3: The ollie
The ollie is the foundation of almost all skateboarding tricks. Learning it takes most beginners two to four weeks of regular practice. That’s normal. Don’t get frustrated — everyone’s ollie looks bad before it looks good.
The mechanics:
Pop the tail. Back foot on the tail, front foot just behind the front trucks. Snap the tail down hard and fast while jumping.
Slide your front foot. As the tail pops, your front foot slides diagonally forward toward the nose. This is the part that feels unnatural and takes the most practice. The slide is what levels the board and brings the nose up.
Level out and land. Both feet on top of the trucks, knees bent, land with your weight centered.
Practice this stationary first — standing still, going nowhere. A stationary ollie requires more commitment than a rolling one, so it’s actually harder, but you won’t hurt yourself if you bail. Once you can land it standing, try it at slow rolling speed. Rolling makes the pop easier.
If you’ve been skating 4–5 days a week for three weeks, you should be able to:
Push smoothly and foot brake reliably
Kick-turn and carve with control
Pop a shaky but recognizable ollie while rolling
Week four is about consolidating the ollie and getting comfortable navigating a skate park.
Skate park etiquette matters. Public skate parks have informal rules that are rarely posted: don’t snake someone mid-run, call out when you’re dropping in, don’t camp in the middle of a line. Watch for 60 seconds before entering any area you haven’t skated before. Experienced skaters are usually patient with beginners who aren’t oblivious — just pay attention and be aware of who’s around you.
Lines. The instinct at a skate park is to find one obstacle and drill it repeatedly in one spot. But skating is about connecting moves: push, ollie over a crack, kick-turn, push again, ollie onto a ledge. Start building short lines — even just three moves connected — instead of isolated tricks. This is when skating starts to feel like skateboarding instead of practice drills.
The skateboarding community is more welcoming than it looks. The closed-club image comes from the outside. At skate parks, people regularly stop to give tips, hype good attempts, and share their own failure stories. The intimidation is mostly in your head before you show up. Show up.
What you’ll fail at — and that’s fine
Every beginner hits the same walls:
The mongo push. Harder to unlearn every session you delay it.
Heel-side falls. When you fall backward, your hands go down before your brain can stop them. Wrist guards are not embarrassing; broken wrists are annoying.
Stationary practice traps. The ollie looks better standing still, so you practice it standing still for two weeks, then it falls apart the moment you add speed. Practice everything rolling as soon as it’s semi-consistent.
Comparing yourself to skate videos. The videos you watch are of people who’ve skated for 10 years. Watch them for technique, not for comparison.
What to do at day 31
A few things that disproportionately accelerate your progression:
Find one skate spot you go back to repeatedly. Familiarity with a particular ledge, bump, or quarter pipe lets you measure improvement in a way that rotating spots doesn’t.
Film yourself. One session recorded on your phone against a wall or skate bag will show you things you can’t feel. Most beginners are shocked at how different their stance looks from how they thought it looked.
Find your local skate community. Even one other person at roughly your level who shows up regularly is the single biggest accelerant to progression. You push each other, share sessions, and give feedback.
Thirty days in, you’re not a beginner anymore. You’re a skater who still has a lot to learn — which is more interesting.
Save your money
What you don't need yet
Beginners get pressured to buy a lot of stuff that doesn't help them play
better. Here's what we'd skip on day one.
A pro-model deck bought separately — Brand-name decks from Baker, Element, Alien Workshop, or Anti-Hero are legitimately better, but only once you've developed enough feel to notice. In your first 50 sessions, a quality complete deck is identical to the touch.
Independent trucks bought separately — Independent 149s are the default truck recommendation for good reason, but your complete's stock trucks will skate fine until you either wear them out or develop specific preferences about truck geometry. Let that take a few months.
A GoPro or skate camera setup — Film yourself with your phone propped on a bench or skate bag; it's enough for feedback and documentation. The filming rabbit hole is deep and expensive; save it for when you're landing things worth filming.
Skate-specific clothing or brand head-to-toe — Any athletic shorts, a t-shirt, and tall socks work fine. Branded skate clothing is a culture thing, not a performance thing.
Electric skateboards or one-wheels — Fun, but a completely different activity with a different skill set. They won't help you learn to skate and they're 5-10x the price.
First week
Your first seven days
A short, real plan to get from gear-on-doorstep to actually playing.
Find your nearest skate park, most cities have at least one public one, usually free. · Action
The Skatepark Project · Non-profit skate park directory and advocacy org. Find parks by city.
Learn to fall before you learn to skate. Seriously: the instinct is to catch yourself with stiff arms, which breaks wrists. Practice rolling through falls: forward roll, tuck your chin, land on the fleshy parts of your forearms. · Learn
Learn the five fundamentals in order: pushing, foot braking, kick-turning, stopping with your foot, and (once those feel automatic) the ollie. Every trick is built on the ollie; there's no shortcut through it. · Learn
Adjust your trucks on the first session. Stock trucks come slightly tight. Loosen them (counterclockwise on the kingpin nut) until you can lean and turn without shifting your entire body weight; your skate tool earns its keep immediately. · Action
Skate three days in your first week. Skateboarding's muscle memory forms fast with daily repetition and fades fast with gaps. Three sessions beats one long one. · Action
FAQ
Common questions
Should I buy a complete board or build my own from parts?
Buy a complete for your first board. Building custom lets you optimize truck geometry, wheel hardness, and deck pop, differences that are only meaningful once you've developed enough feel to notice them. In your first year, a quality complete from Cal 7 or Powell-Peralta is indistinguishable from a custom build to the touch. Build custom after 6–12 months when you have specific opinions.
What size deck should a beginner buy?
7.75" is the safe default for adults. It's wide enough for stable landings, narrow enough for kickflips, and the width matched by stock trucks on most completes. If you're under 13 or have small feet (US 7 and below), consider 7.5". If you have large feet (US 12+), try 8.0". Most beginners won't notice the half-inch difference either way.
Do I really need a helmet?
Yes. Most public skate parks legally require them for riders under 18, and many have informal rules for adults too. More importantly: head injuries from skateboarding are real and preventable. You will fall unexpectedly, and concrete is unforgiving. The Triple Eight Dual Certified helmet costs $45 and covers both the CPSC and ASTM F1492 standards parks look for.
How long does it take to learn to ollie?
Most beginners can pop a consistent flat-ground ollie in 4–8 weeks of regular practice. The ollie is skateboarding's foundational trick (every other trick depends on it) and it's also the hardest to learn because it requires simultaneous timing, foot placement, and muscle memory that don't develop until you've skated enough to stop thinking about each element separately.
Is skateboarding hard on your knees and joints?
Less than you'd expect if you land correctly. The impact of landing tricks is mostly absorbed through bended knees and the board itself. The injuries that accumulate are usually from bad landings (ankle rolls, wrist fractures) and overuse in early weeks when you're skating every day. Knee pads reduce the bruising from transition skating; the bigger risk is wrist fractures from instinctive outstretched-arm falls.
Street skating or skate park: which is better for a beginner?
A beginner-friendly skate park is better. Smooth concrete, flat areas for practicing pushes and kickflips, and other skaters to watch and learn from. Street skating requires reading spots, dealing with pedestrians and security, and the concrete is often rough. Once you've got your basics dialed at a park, street spots open up naturally.
The Skatepark Project — Tony Hawk's nonprofit. Advocates for public skate parks and runs a national directory. The best way to find your nearest free park.
Transworld Skateboarding — Long-running industry publication. Video sections, skater profiles, product coverage. More accessible than Thrasher for beginners.
Thrasher Magazine — The cultural authority of skateboarding. Video of the Year is an annual landmark. Skew advanced; watch for cultural context, not beginner technique.
r/NewSkaters — Active subreddit for beginners. Trick tips, gear questions, local park recommendations. The wiki has a solid progression roadmap.
Braille Skateboarding (YouTube) — Best beginner tutorial channel on YouTube. Patient, structured progression from pushing to kick-flips to tricks. Start here.
The Berrics (YouTube) — Steve Berra and Eric Koston's private skate park turned media channel. Pro skater interviews, BATB competition, and short film sections. More for culture than instruction.
USA Skateboarding — The national governing body. Runs Olympic team selection and official amateur events. Less useful day-to-day, but the competition calendar matters if you get serious.
As an Amazon Associate, JustBeginning earns from qualifying purchases.
We may also earn commission from other affiliate programs linked on this
page. Editorial recommendations are independent; we don't choose
products based on commission rates.
Product prices and availability are accurate as of the date and time
indicated and are subject to change. Any price and availability
information shown on Amazon at the time of purchase will apply.


 Best starter