Skiing has a reputation for being expensive and intimidating. The expensive part is real but manageable, and most gear can be rented for your first few days on the mountain. The one exception is boots. Good-fitting ski boots make everything better; bad boots make everything miserable. Own those, rent the rest, and ski a full season before buying anything else.
By Colin B. · Published May 23, 2026 · Last reviewed June 6, 2026
Buy boots, a helmet, and goggles. That's the core kit. Rent skis, bindings, and poles. After four or five days at resort rental prices, you've spent what a decent used setup costs. The boots and helmet pay for themselves in one full ski week.
We earn commission on qualifying Amazon purchases — see our
affiliate disclosure.
Price tiers and budget totals shown above are editorial estimates;
actual Amazon prices vary.
At a glance
Our top pick in each category
The fastest path through this guide — each best-starter pick by category.
Scroll for the budget and upgrade alternatives.
Rent your skis, bindings, and poles for at least your first full season. This is not beginner-hedging advice; it's the correct financial and practical choice. Resort rentals run $50-80/day for a full setup. Many ski shops offer demo programs where daily rental fees apply toward a purchase, so you're not throwing money away. After 5-7 days of skiing, you'll have a clear sense of what length, width, and style of ski suits you, and that information is worth more than any review you'll read.
Do not rent your boots. I'll say it again: do not rent your boots. Rental boots are shared, they've been compressed by hundreds of feet before yours, and they will fit you like a wet cardboard box. The single biggest day-one comfort upgrade you can make is owning a properly fitted pair of ski boots. Get fitted at a real ski shop (not a sporting goods chain) by someone who watches you walk, measures your foot, and flexes the boot before putting it on you. This takes 30-60 minutes and is completely worth it.
Book a lesson for your first day. Not a half-day. A full-day group lesson with a certified instructor (PSIA-certified). You will learn in four hours what would take a week of trial-and-error on your own. If you already ski a little and just want to get better, a single private lesson targeting your specific issues does more than ten hours of solo practice.
Boots are the single most important gear purchase in skiing, more than your skis, more than your jacket, more than anything else. The boot transfers every movement you make into the ski. A too-stiff boot fights your technique; a too-soft boot gives you no feedback. Beginners need a flex rating of 65-80: soft enough to be forgiving while you're building fundamentals, stiff enough to actually control what the ski does. Get fitted in person at a real ski shop. Wear the ski socks you'll actually use. Tell the fitter if you have wide feet, narrow feet, or any foot issues. This conversation is worth your time.
Ski Boots — what's the difference?
A few common shapes, each making a different trade.
Flex 65–75 (Beginner)
Soft and forgiving. Doesn't punish bad form, comfortable to ski all day.
Flex index
65–75
Best for
0–20 ski days
Feel
Soft, easy to drive
Best for First and second seasons, recreational skiers, anyone returning after a long break
Tradeoff Less precision and feedback; you'll outgrow it if you improve quickly
Noticeably more responsive. Good once you can reliably link parallel turns.
Flex index
80–95
Best for
20–60 ski days
Feel
Balanced, responsive
Best for Skiers with solid basics who want better edge control and feedback
Tradeoff More leg fatigue if your technique isn't there yet
Flex 100+ (Advanced)
Stiff and precise. Built for aggressive skiing at speed.
Flex index
100–130
Best for
60+ ski days
Feel
Stiff, highly responsive
Best for Expert skiers who want precision on steep or technical terrain
Tradeoff Unforgiving of bad form; fatiguing if you're not strong enough to drive them all day
Best starter
Rossignol
Evo 70 Ski Boot
$$
★★★★★Our rating
Rossignol's entry boot hits the ideal flex for someone still building fundamentals: soft enough to be forgiving, stiff enough to transmit intent. The heat-moldable liner is a genuine upgrade over rental foam, and the buckle system gives a consistent fit every session. A well-respected name in ski boots at a fair price.
What we like
Heat-moldable liner fits your foot far better than any rental boot
Flex 70 forgives imperfect technique without feeling sloppy
Buckle system is consistent and easy to adjust at the mountain
What to know
Medium-width last, not ideal for very wide or very narrow feet
You'll outgrow it within 2 seasons as your technique improves
Salomon's beginner boot is about as easy to get into as ski boots get: easy-entry cuff, wide last that accommodates most foot shapes, and a flex that won't punish you for imperfect technique. Not a precision instrument, but that's the point for your first season.
What we like
Wide last accommodates most foot shapes without custom work
Easy-entry cuff makes getting in and out fast at the base lodge
Forgiving flex won't punish you for imperfect form
What to know
Heel lift likely for narrow feet; aftermarket insole helps
Less precise feel than medium-last boots once your skills improve
When your fundamentals are solid and you want a boot that actually responds to subtle input, the Hawx Prime is where most intermediate skiers land. Flex 100 means it'll reward good technique. The Mimic liner adapts to your foot with some heat, and the Grip Walk sole means you can walk to the lift without waddling.
What we like
Mimic liner adapts to your foot shape for a custom-feeling fit
Grip Walk sole is genuinely comfortable walking to the lift
Flex 100 rewards good technique with real edge feedback
What to know
Too stiff for beginners; wait until you can link clean parallel turns
More leg fatigue if your technique isn't strong enough to drive them
Rent your first season. This is the right call economically and practically. A full ski rental setup (skis, bindings, poles) costs $50-80/day at a resort shop, and many shops offer demo-to-buy programs where daily fees apply toward a purchase. After 5-7 days, you'll know your preferred length, turn radius, and width. When you're ready to buy: look for an all-mountain ski in the 75-85mm waist width range, soft to medium flex, and a length roughly chin to eye level. This forgives mistakes and handles the groomed runs you'll spend most of your first seasons on.
Best starter
Rossignol
Experience 76 Skis with Xpress 10 GW Bindings
$$
★★★★★Our rating
The Experience 76 is a textbook beginner-to-intermediate all-mountain ski: forgiving flex, 76mm waist handles both groomers and light powder, and it comes pre-mounted with solid bindings. This is the ski to buy after you've rented for a season and decided you're in it for the long haul.
What we like
76mm waist handles groomers and light powder without specializing
Comes pre-mounted with solid bindings, no separate purchase needed
Forgiving flex lets you make mistakes without getting punished
What to know
Wait at least one full season in rentals before buying any skis
You'll want something stiffer once you progress past early intermediate
Once you're skiing consistently on blue and easier black runs, the Vantage 82 Ti gives you proper edge hold and a stiffer tip that rewards leaning into turns rather than surviving them. Titanal reinforcement makes it noticeably more stable at speed than softer beginner skis.
What we like
Titanal construction adds stability at speed that softer skis lack
82mm waist handles variable terrain, not just groomed runs
Rewards leaning into turns rather than just surviving them
What to know
Less forgiving than beginner skis; requires solid parallel turns first
Overkill and harder to ski if you're still building fundamentals
A helmet is not optional, and we're not going to pretend otherwise. Most resorts require them for children; many are moving toward adult requirements. More importantly, ski helmets prevent injuries in the exact situations where falls happen: beginners going too fast, terrain parks, and icy conditions. Buy your own; it'll pay for itself in two trips compared to the $15-20/day rental cost, and your own helmet fits better and doesn't smell like strangers.
Best starter
Giro
Ledge FS MIPS Ski Helmet
$$
★★★★★Our rating
Giro is one of the most trusted names in snow helmets, and the Ledge MIPS punches well above its price. The MIPS liner reduces rotational force in angled impacts, the most important safety technology in modern ski helmets, and Giro includes it without charging a premium. The In Form 2 fit system adjusts via a dial for a consistent, all-day comfortable fit.
What we like
MIPS liner cuts rotational force in angled impacts, the most common crash type
In Form 2 dial adjusts quickly and holds a consistent fit all day
Trusted brand at a fair price with no corner-cutting on safety
What to know
Runs slightly snug; size up if you're between sizes
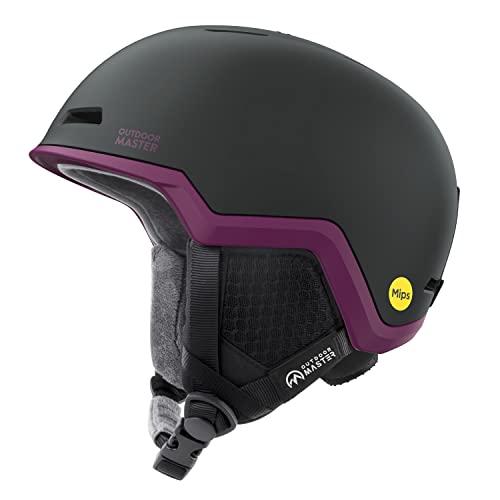
Under $60, MIPS-equipped, adjustable fit. OutdoorMaster's Diamond MIPS helmet has PC shell construction and solid EPS foam, giving you legitimate MIPS protection at a price that makes owning your own helmet a total no-brainer financially.
What we like
MIPS protection under $60, legitimate safety at a budget price
Adjustable fit system works for most head shapes
PC shell plus EPS foam meets safety standards at any price
What to know
Round fit profile; oval heads may find it uncomfortable
Fewer comfort features than mid-range helmets at twice the price
The Vantage is what you graduate to when comfort becomes a priority: Koroyd construction is noticeably lighter than traditional EPS foam, the ventilation system is genuinely impressive, and the integration with Smith goggles (particularly the IOX series) is seamless. If you're skiing five-plus days a year, this is worth the step up.
What we like
Koroyd construction is noticeably lighter than traditional EPS foam
Best-in-class ventilation for high-output skiing on warm days
Integrates seamlessly with Smith IOX-series goggles
What to know
Price is only justified if you ski 5 or more days per year
Don't rent goggles. Resort rental goggles are scratched, fogged, and fit no one's face well. A good pair of your own goggles makes a material difference in how much you can see, and seeing is what prevents crashes. The key specs for beginners: a cylindrical or spherical lens (both work), a foam gasket that seals your face without a gap at the bridge of your nose (helmet compatibility), and ideally a dual-pane anti-fog lens. Don't buy the cheapest goggles you can find; lens quality matters more than any other gear spec for visibility.
Best starter
Smith
Squad Goggles
$$
★★★★★Our rating
Smith's Squad is the entry-level unisex goggle that punches above its price: dual-pane lens for fog resistance, ChromaPop lens technology that genuinely improves contrast in variable light, and the fit works with most helmets. The goggle we'd hand a first-time skier without hesitation.
What we like
ChromaPop lens improves contrast in flat and variable light conditions
Dual-pane construction resists fogging better than single-pane
Helmet-compatible fit works with most brands straight out of the box
What to know
Cylindrical lens has slight edge distortion vs. spherical options
Lens swap requires tools, not a quick-change system
Under $50, works over glasses (OTG) or without, and Bolle's lens quality is better than the price suggests. The double-lens anti-fog system does its job. Not a precision optic, but perfectly adequate for casual skiing and a smart buy if you're not yet sure how often you'll be on the mountain.
What we like
OTG design works with or without glasses
Double-lens anti-fog system works reliably for casual skiing days
Bolle's lens quality is better than the price suggests
What to know
Visible quality gap compared to mid-range goggles in bright conditions
Simpler frame won't integrate as cleanly with all helmet brands
When you're ready to see the mountain like it's meant to be seen: Oakley's Prizm lens technology is the best in the business for enhancing contrast and picking up terrain features in flat or variable light. The Flight Tracker's wide field of view is noticeable the first time you put it on. A real step up once you're skiing often enough to appreciate it.
What we like
Prizm lens is best-in-class for contrast and reading terrain features
Wide field of view is noticeably larger than most budget goggles
Premium clarity pays off in variable or challenging light
What to know
Price only makes sense if you ski regularly enough to notice the difference
Your ski jacket needs to be waterproof (not water-resistant). You will fall down. You will sit in snow. On a bad day, you'll spend twenty minutes navigating beginner terrain and arrive soaking through a water-resistant shell. Look for a jacket rated at 10,000mm waterproof minimum, ideally 15,000-20,000mm. Breathability matters too; high output on steep runs means sweating even in cold temperatures. And you want pit zips or venting, a way to dump heat when you're working hard. Ski pants follow the same logic: waterproof, with either built-in insulation or room for a base layer.
Best starter
Columbia
Bugaboo Interchange Jacket
$$
★★★★★Our rating
Columbia's Bugaboo Interchange system is the best value in ski outerwear: an insulated inner jacket that zips out and a waterproof outer shell that can be worn separately. You get a three-season jacket, a standalone fleece, and a proper ski shell for the price of most one-piece alternatives. Omni-Tech waterproofing holds up in real conditions.
What we like
Three-in-one system gives you standalone fleece, shell, and ski jacket
Omni-Tech waterproofing holds up in normal snow conditions
Best value-per-dollar in ski outerwear at this price point
What to know
Interchange system adds bulk compared to a slim shell
Omni-Tech not rated for extended heavy wet-snow days
Arctix is the brand that quietly keeps millions of recreational skiers dry at a price that doesn't hurt. The waterproofing is adequate for normal conditions (not extended powder days), the insulation is warm for the money, and the articulated sleeves give you full range of motion. Get this if you're skiing one or two trips a year.
What we like
Keeps you dry in normal snow conditions at a price that doesn't hurt
Articulated sleeves don't restrict arm movement while skiing
Adequate insulation for cold resort days at a fraction of premium prices
What to know
Not rated for extended wet conditions or heavy powder days
Should upgrade if you ski more than two trips per year
When you ski often enough that gear quality is the real variable, the Spyder Jagged delivers GORE-TEX waterproofing, the standard everything else is measured against. Shell construction means you layer for the conditions, which is the right system for variable weather days. Spyder is the official brand of the US Ski Team.
What we like
GORE-TEX waterproofing is the benchmark everything else is measured against
Shell construction lets you layer precisely for the day's conditions
Official brand of the US Ski Team, built for real alpine skiing
What to know
Shell only; budget $80-120 extra for a proper mid-layer on cold days
High price only justified if you ski regularly and in varied conditions
Ski pants are just as important as the jacket. Falling means sitting in snow. Arctix's insulated snow pants are the budget-right answer: waterproof, full-coverage, reinforced cuffs, and suspenders included. They're not glamorous, but they keep you dry and cost less than a mid-tier restaurant dinner.
What we like
Reinforced cuffs and waterproofing keep you dry when you fall
Suspenders included, eliminates waistband gap when raising arms
Budget price makes owning your own ski pants a no-brainer
What to know
Insulation runs warm on high-output days above freezing
Not a substitute for dedicated premium ski pants if you ski often
Most beginners walk off the bunny slope after day one wondering if skiing is actually hard or if they're just bad. Both, a little. But the learning curve is front-loaded; the discomfort is worst in the first three days and mostly gone by day seven. Here's what to expect, and how to get there faster.
Skiing has a brutally honest feedback loop: do it wrong and the mountain tells you immediately. That’s actually good news, because it means every session teaches you something. The people who improve fast aren’t the ones with athletic backgrounds; they’re the ones who take lessons, ski a lot in the first two seasons, and resist the urge to skip the bunny slope because it feels embarrassing.
Here’s what your first ski season actually looks like, in honest terms.
Day 1: Survive and commit
Your goal on day one is not to look graceful. Your goal is to learn to stop, learn to turn, and not develop a fear of the sport.
Do this in order:
Take a lesson. A PSIA-certified instructor will teach you the “pizza” (wedge) position: point your tips together, push your heels out. It’s the only reliable way to slow down and stop as a beginner. You’ll feel silly doing it. Do it anyway. The parallel turn comes later; the wedge lets you control speed now.
Learn the chair lift. Getting on and off a chair lift is its own skill and the source of most early embarrassment. Ask the lift attendant to slow the lift for you; most will. Slide into position, don’t look down, sit when the chair hits the back of your legs, and keep your tips up on the unload. On the way off: stand up, bend your knees, and ski straight ahead before you try to turn.
Start on the bunny slope even if you’re athletic. Two hours here builds muscle memory that would take two days to develop by trial and error on an easy run. It’s not about fitness or coordination; it’s about having the right reflexes in your legs before adding speed and slope.
By the end of day one: you can stop. That’s the win. Everything else follows from that.
The second day usually feels worse than the first. This is normal. Day one, adrenaline and novelty carry you. Day two, your legs are tired and your body is fighting the new movement patterns. Push through it.
Here’s what starts working by day three:
The parallel turn begins to form. You’ve been wedge-turning, keeping your tips apart and steering from the heels. The parallel turn brings your skis together and uses your edges instead of just friction. It happens naturally as you gain confidence and loosen your stance. Don’t force it; let the wedge get smaller and smaller as you feel more comfortable.
You start reading terrain. Easy runs have flat sections, fall-away corners, and surprise steeper pitches. By day three, you’re starting to see these coming and adjust your speed beforehand rather than reacting after. This is the beginning of real skiing: anticipation, not reaction.
Your upper body stops rotating. Beginners throw their whole upper body into every turn. It helps them balance in a panic but makes turns less precise. By day two or three, your poles are starting to feel useful (a gentle plant signals the turn) rather than just things you’re awkwardly carrying.
Rest when you’re tired. Skiing fatigued is skiing badly, and skiing badly builds bad habits. The most important thing you can do in days two and three is stop before your legs shake and ski another two runs after the break rather than one more run before the fall.
Between day four and day seven, most adults can confidently complete blue runs (intermediate) and are starting to choose lines rather than just surviving them. This is when skiing becomes genuinely fun rather than just survivable.
A few things that separate people who progress from people who plateau:
Get off the groomed runs, carefully. Groomed runs are perfect for learning, but slight variations in terrain (a little ungroomed snow, a small roll) teach your legs to handle imperfect conditions. Groomed runs make you dependent on the uniform surface. Start adding variable terrain in small doses once you feel stable on blues.
Ski with people better than you. Watching how intermediate and advanced skiers move on terrain (where they look, how they time their turns, how they handle speed) teaches you things that drills can’t. Find a patient friend at a higher level and follow their line.
Stop counting turns. Beginners tend to ski in discrete chunks: turn, stop, turn, stop. Real skiing is continuous, linked turns where each one sets up the next. When you’re ready, pick a stretch of easy terrain and try to ski it top-to-bottom without a full stop. Your turns will be ugly. Do it anyway. The linking is the skill.
Take a second lesson. The most valuable time to take a lesson is after you’ve been skiing for a few days and developed specific questions. A good instructor can diagnose the two or three things you’re doing wrong and fix them in an hour. This is much more useful than day-one instruction where you’re just absorbing basics.
Around day 5–10, a lot of skiers stop improving. They can do blue runs confidently, they’re not falling much, and skiing feels comfortable. That’s the problem: comfort is where improvement stops.
The plateau happens because:
You’re not challenging your edges. Groomed blues at moderate speed don’t require strong edge grip. If you never force your skis onto the inside edge on steeper terrain or firmer snow, you never build that skill.
You’re relying on the wedge for security. Some residual wedge in your turns is the crutch that keeps you from developing proper parallel technique. A lesson specifically targeting “closing the wedge” can fix this in an afternoon.
You’re not skiing enough. Most recreational skiers get 5–10 days a year. That’s enough to maintain your current level, not enough to push past it. The skiers who jump from beginner to solid intermediate in one or two seasons ski 15-20+ days a year: week-long trips, regional mountains, every chance they get.
There’s no shame in staying at the blue-run level for years. Millions of people ski recreationally and happily for their whole lives never touching a black diamond. But if you want to improve faster, more days beats better gear every time.
What to do in your second season
Your second season is when the sport opens up:
Try your first black run on a good snow day. Not moguls, not ice. Just a groomed black diamond on a Tuesday when it’s quiet. The pitch will surprise you. Then you’ll ski it again and it won’t.
Consider your own skis. After 10+ days in rentals, you know what you like. An all-mountain ski in the 75–85mm waist range will serve you well through your intermediate development and beyond. Used skis from a consignment shop or online at a ski swap are a great value.
Take your boots seriously. If your rental boots were mediocre, your ski experience was limited by your feet. A proper boot fitting makes the largest single-purchase difference in skiing performance. Bump the flex up slightly from your beginner boot now that your technique is better.
The sport rewards patience. The people who look effortless on a black diamond didn’t get there by buying better gear; they got there by skiing often and taking instruction seriously in years one and two.
Save your money
What you don't need yet
Beginners get pressured to buy a lot of stuff that doesn't help them play
better. Here's what we'd skip on day one.
Ski poles — Rent them at the resort for your first season. Poles do matter eventually, but as a beginner you'll mostly be using them for balance and getting up from falls; rental poles are perfectly adequate for that.
Heated boot liners — If your boots fit correctly and your circulation is normal, you don't need heated liners. Cold feet are usually a fit problem, not a temperature problem. Fix the fit first.
A terrain-specific ski (powder, carving, freestyle) — Specialty skis reward specialty skills. A beginner on a 120mm-waist powder ski is slower and harder to turn on groomed runs. Ski an all-mountain shape for at least two seasons before you consider a quiver.
A GPS watch or ski app subscription — Fun data, but not performance-improving. Focus on skiing more often, not on measuring how you ski. The apps come free on the iPhone anyway.
Avalanche safety gear — Essential for backcountry and off-piste touring. Not for resort skiing. Resorts manage avalanche risk professionally. If you're venturing off-piste, take an avalanche safety course before buying a beacon.
A ski bag for travel — You don't own skis yet. When you do, a padded ski bag matters for flights. Until then, rent at the destination and skip the checked-baggage fees entirely.
First week
Your first seven days
A short, real plan to get from gear-on-doorstep to actually playing.
Book a lesson at your resort before you go; beginner group lessons fill up. PSIA-certified instructors know how to actually teach skiing, not just demonstrate it. · Action
Rent skis, bindings, and poles at the resort shop on arrival. Tell them you're a beginner; they'll size you appropriately and set the binding release pressure correctly. · Action
Pack base layers that wick moisture. A cotton t-shirt under your jacket is a miserable way to ski. Merino wool or synthetic moisture-wicking long underwear makes a bigger comfort difference than most people expect. · Action
Start on the bunny slope even if it feels beneath you. The two hours you spend there learning to stop and turn will save you hours of fear and frustration on intermediate terrain. · Action
FAQ
Common questions
Should I rent or buy skis as a beginner?
Rent for your first full season, ideally your first 5-7 days of skiing. Rental skis let you try different lengths and styles before committing. Once you know you're going to keep skiing and roughly what kind of skier you are, buy. Many ski shops offer demo programs where daily rental fees count toward a purchase.
What's the right ski boot flex for a beginner?
Flex 65-80 is the right range for most beginners. Softer flex boots forgive imperfect technique, are easier to ski all day, and don't fight you while your fundamentals develop. Stiff boots (flex 100+) are for advanced skiers who want precise edge feedback; they actively make beginners worse by penalizing every mistake.
How much should I budget for my first ski trip?
If you own boots, a helmet, and goggles (around $350–600), add $50–80/day for rental skis and poles, $50–150 for a lesson, and $50–150/day for a lift ticket. A three-day beginner trip with gear owned comes to roughly $700–1,100 all-in, not counting lodging or travel.
Do I really need ski-specific base layers?
Yes. Skiing involves high output (sweating) in cold temperatures, exactly the conditions where cotton kills you. Merino wool or synthetic moisture-wicking base layers regulate temperature by pulling sweat away from your skin. A $30 pair of ski socks and a $60 set of base layers is one of the most underrated comfort upgrades you can make.
Is skiing hard to learn?
The first two days are hard. The third day, it clicks. By day five, most adults are comfortable on blue runs and starting to develop a real parallel turn. The learning curve is front-loaded, which means the worst part is also the shortest part. Take a lesson on day one; it cuts the painful part roughly in half.
What's the difference between a ski jacket and a regular winter coat?
Ski jackets are designed for high output in wet snow: fully waterproof (not just water-resistant), highly breathable so you don't cook on steep runs, and usually have pit zips or venting. A regular winter coat insulates well but will soak through in falling snow, trap sweat, and restrict arm movement. It's not interchangeable.
PSIA-AASI (Professional Ski Instructors of America) — Certifying body for ski and snowboard instructors in the US. Use the instructor finder to locate lessons near a resort. PSIA-certified instructors have completed standardized training and testing, worth seeking out over random in-house instructors.
National Ski Areas Association — Trade organization for US ski resorts. Good resource for resort data, learn-to-ski programs, and the 'Your Responsibility Code' that applies at every resort.
Ski Magazine — The most authoritative mainstream ski publication. Annual gear reviews are among the most comprehensive in the industry. Skews intermediate-to-advanced, but the resort guides and early-season condition reports are useful at any level.
r/skiing — Large, active community. Good for resort condition reports, gear questions, and trip planning. Search before posting beginner questions; the wiki and megathread cover most of them well.
Blister Gear Review — The most rigorous ski gear reviews available. Writers actually ski equipment extensively and report on conditions and skier level. No affiliate clickbait, just thorough testing notes.
Snowbrains — Snow forecasting and resort condition reports. Essential for planning trips around good snow. Free forecast summaries; detailed data requires a subscription.
Epic Pass / Ikon Pass — The two major multi-resort pass systems in North America. If you're going to ski more than two or three trips per year, a season pass to a regional network almost always pays for itself. Compare both systems against the specific resorts you'll visit.
As an Amazon Associate, JustBeginning earns from qualifying purchases.
We may also earn commission from other affiliate programs linked on this
page. Editorial recommendations are independent; we don't choose
products based on commission rates.


 Best starter