Indoor cycling is one of the most time-efficient workouts you can do. No red lights, no flat tires, and you can start at 5am. The catch is an upfront cost and a confusing market. This guide cuts through wheel-on vs. direct-drive, explains what Zwift actually costs, and gets you pedaling before you overthink it.
By Colin B. · Published May 23, 2026 · Last reviewed June 6, 2026
Wahoo KICKR SNAP
— Wahoo's wheel-on trainer pairs to Zwift instantly and fits almost any road or hybrid bike.
Lasko High Velocity Blower Fan
— A high-velocity fan is not optional; indoor heat ends rides early without real airflow at your chest.
Pearl Izumi Attack Bib Shorts
— Bib shorts with a real chamois are the difference between 20 minutes and an hour on the saddle.
Budget total
$400
Typical total
$700
The trainer is the big ticket. A wheel-on runs $250–400; a direct-drive runs $600–1,200. Add $150–200 for mat, fan, and shorts.
We earn commission on qualifying Amazon purchases — see our
affiliate disclosure.
Price tiers and budget totals shown above are editorial estimates;
actual Amazon prices vary.
At a glance
Our top pick in each category
The fastest path through this guide — each best-starter pick by category.
Scroll for the budget and upgrade alternatives.
Check your rear axle before you buy anything. Smart trainers fit most bikes with a standard quick-release rear skewer, but newer road, gravel, and mountain bikes often have thru-axles that need adapters (or don't fit wheel-on trainers at all). Google your bike model plus 'axle type'; five minutes now saves a return later.
Budget for Zwift from day one. The trainer is just hardware; you need a training app to control it. Zwift ($19.99/month) is the most popular, supports both free rides and structured workouts, and has a free trial. TrainerRoad and Wahoo SYSTM are alternatives. This is a recurring cost, so factor it in.
You will sweat more than you expect. Outdoors, speed creates airflow. Indoors, you're stationary and generating the same heat with no wind to cool you. A proper fan pointed at your chest is not optional gear, the difference between a 20-minute slog and an enjoyable 90-minute ride.
The gear
What you actually need
Smart Trainers
The trainer is your biggest decision. Wheel-on trainers ($250–400) clamp your existing rear wheel and are the right call if you're testing commitment: easier to set up, cheaper, and your bike stays intact. Direct-drive trainers ($600–1,200) have you remove the rear wheel; the bike connects directly to the trainer's cassette. The payoff is significantly lower noise, 1% power accuracy versus ±5%, and no tire wear. Most beginners start wheel-on, and those who stick with indoor cycling for six months almost always upgrade to direct-drive.
Smart Trainers — what's the difference?
A few common shapes, each making a different trade.
Wheel-on
Clamps your rear wheel. Budget-friendly, easy to set up.
Power accuracy
±5%
Price range
$250–400
Noise level
Moderate (tire friction)
Best for First-time indoor cyclists testing commitment; anyone who wants to swap bikes easily
Tradeoff Tire wears faster; less accurate; louder than direct-drive
Wahoo is the benchmark brand in indoor cycling, and the KICKR SNAP is their wheel-on entry point. It pairs to Zwift out of the box, handles ERG resistance automatically, and fits almost every road or hybrid bike. The ±5% power accuracy is fine for beginner training. Solid build, reliable firmware updates, and a name that resells well when you upgrade.
What we like
Pairs to Zwift via Bluetooth and ANT+, plug-and-play setup
Wahoo's firmware updates and app support are industry-leading
Fits most road and hybrid bikes with a standard quick-release axle
What to know
Tire wears faster indoors; budget for a replacement every few months
±5% power accuracy is fine for fitness, imprecise for structured racing
Kinetic's fluid resistance unit is famously quiet, quieter than most magnetic wheel-on competitors, and the Road Machine Smart 2 adds full Bluetooth and ANT+ for Zwift compatibility. ERG mode responsiveness is a step below Wahoo's, but for steady-state rides and casual Zwift use, it performs well at a lower price.
What we like
Fluid resistance unit is quieter than magnetic wheel-on alternatives
Full Bluetooth and ANT+ connectivity works with Zwift and all major apps
What to know
ERG mode responsiveness is slower than Wahoo, noticeable during intervals
Firmware updates and app support are less frequent than Wahoo's ecosystem
Direct-drive means your rear wheel comes off; the bike attaches to the trainer's cassette directly. That gets you 1% power accuracy, a significantly quieter ride, and zero tire wear. The KICKR v6 adds a built-in incline that tilts your bike to simulate climbs. Buy this when indoor cycling is a permanent habit, not a trial.
What we like
1% power accuracy: serious training data, not approximations
Built-in grade simulation tilts the bike for realistic climb and descent feel
Significantly quieter than wheel-on trainers, apartment-building friendly
What to know
Cassette sold separately, adding $25–60 and a trip to a bike shop
Overkill until you're riding indoors at least 3 hours per week consistently
Don't skip the mat. A smart trainer vibrates at intensity, and sweat drips constantly; you'll damage hardwood floors, stain concrete, or disturb downstairs neighbors without one. The mat also keeps the trainer from sliding during hard efforts. Any dense foam mat at least 3×5 feet works. Branded trainer mats are sized precisely to fit; generic gym mats cost less and cover more surface area.
Best starter
Wahoo
KICKR MAT
$90.00 as of Jun 22, 2026
★★★★★Our rating· In Stock
Thick enough to protect hardwood floors from sweat and vibration, sized to fit a trainer's footprint with room left for a front wheel riser block. More durable than foam puzzle tiles, which slide and separate under load. If you own a Wahoo trainer, this is the obvious pairing.
What we like
Sized to match trainer footprint with room for a front wheel block
Thick enough to protect hardwood floors from sweat and vibration impact
What to know
Pricey for a mat; similar protection from any thick foam gym tile
Doesn't significantly dampen sound through apartment floors
A thick, no-nonsense foam mat that works under any trainer. Larger than branded trainer mats at a fraction of the cost. Look for a 4×6 or larger option so you have room for both the trainer footprint and the front wheel. The BalanceFrom is a reliable version of a commodity product.
What we like
Larger surface area than branded trainer mats at a lower price
Works under any trainer brand, not Wahoo-specific
What to know
May slide on hardwood without a rubber backing; check before buying
Foam compresses over time; expect replacement after 2–3 years
This is the most underestimated item on the list. Outdoors, cycling speed creates its own airflow. Indoors, you're stationary and generating the same heat with nothing to cool you. Most people who quit indoor cycling in the first month blame the heat and boredom, and a fan fixes the first problem immediately. Point it at your core from three feet away, not at the room. A basic $30 fan works nearly as well as a $300 smart fan for most people.
Best starter
Lasko
High Velocity Blower Fan
$93.99 as of Jun 22, 2026
★★★★★Our rating· In Stock
A high-velocity fan moves enough air to actually matter; you need real airflow, not ambient circulation. The Lasko pivots so you can aim it directly at your chest and face from the floor. Under $50, available for same-day pickup, and genuinely effective. This is the right call for most beginners.
What we like
Moves enough air to actually cool you down during hard efforts
Under $50 and available same-day, no waiting for a riding accessory
What to know
Loud at high settings, can make video calls or music harder to hear
Fixed speed; you'll manually adjust it as your effort level changes
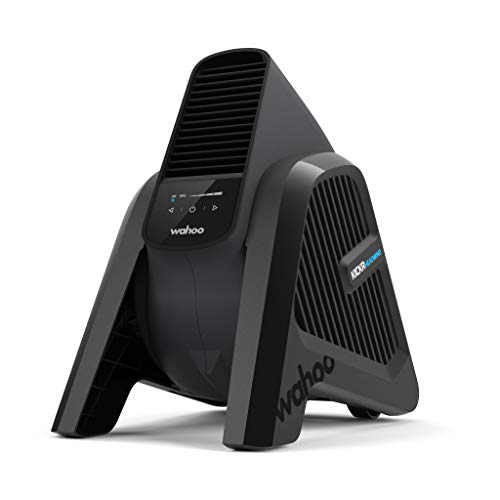
★★★★☆Our rating· Only 6 left in stock - order soon.
The HEADWIND links to your heart rate monitor or trainer and automatically increases fan speed as your heart rate climbs: faster at threshold, slower during recovery. It's a genuinely useful feature once you're doing structured intervals. Expensive for a fan, worth it if you're riding 4+ times a week.
What we like
Fan speed adjusts automatically to heart rate, no manual fiddling mid-ride
Powerful enough to cool at threshold intensity, rivaling two regular fans
What to know
Expensive for a fan, hard to justify unless you ride 4+ times per week
Bluetooth heart-rate sync requires a Wahoo trainer or compatible HR monitor
Your gym shorts will work for the first 15 minutes. Then the saddle becomes the only thing you're thinking about. The chamois (the padded insert in cycling-specific shorts) distributes saddle pressure and prevents chafing over longer sessions. Go padded from day one. Bib shorts (with suspender-style straps) stay put better than waistband shorts during an hour-long ride and are worth the slight extra cost.
Best starter
Pearl Izumi
Attack Bib Shorts
$125.00 as of Jun 22, 2026
★★★★★Our rating
Pearl Izumi makes legitimate cycling shorts at a fair price. The Attack's chamois is designed for 2–3 hour rides, not just gym padding, and the bib straps keep everything in place without a waistband cutting into you at high effort. A trusted brand that washes well and lasts a long time.
What we like
Chamois designed for 2–3 hour rides, not just light gym use
Bib straps eliminate waistband pressure during long efforts
Pearl Izumi build quality holds up through dozens of wash cycles
What to know
Higher price than Amazon brands, worth it but a real spend
Sizing runs slightly small; check the chart and go up if between sizes
Amazon's most reliable cycling shorts for the price. The chamois is thicker than competitors at the same price point, the stitching holds, and sizing is consistent. Not as refined as Pearl Izumi, but perfectly adequate for sessions under 90 minutes and a smart way in for your first pair.
What we like
Chamois is thicker than most competitors at this price point
Sizing is consistent, with fewer sizing returns than other Amazon brands
What to know
Chamois foam compresses faster than premium brands after 3–4 months
Stitching at inner seams shows wear after heavy use
Zwift works without a heart rate monitor, but training without one is guesswork. Your heart rate tells you whether an effort is at threshold, tempo, or easy, all of which feel the same on a stationary bike without feedback. A $50–80 chest strap is the cheapest training upgrade available. Chest straps are more accurate than optical wrist monitors during cycling because arm movement is minimal and contact is steady.
Best starter
Wahoo
TICKR Heart Rate Monitor
$$
★★★★★Our rating
The TICKR pairs instantly to Zwift, TrainerRoad, and all major apps via both Bluetooth and ANT+. Chest strap accuracy beats optical monitors for cycling. Dead-simple setup: snap it on, wet the sensors, pair your app. It just works, and Wahoo's app tracks your data cleanly.
What we like
Broadcasts simultaneously on Bluetooth and ANT+, works with everything
Chest strap accuracy beats optical wrist monitors during steady cycling
Wahoo's app logs history and connects to Strava automatically
What to know
The snap-on strap clip loosens over time; check it before each ride
Chest strap takes a few rides to get used to wearing
The HRM-Pro Plus stores data on the device itself (useful if your phone drops Bluetooth mid-ride), adds running dynamics for bike-run training blocks, and has the cleanest ANT+ connection available. Worth the price if you're training for an event and want reliable data across all your activities.
What we like
Stores workout data on-device, no lost rides if your phone disconnects
Running dynamics make it useful for brick workouts beyond just cycling
What to know
Expensive for a heart rate monitor; overkill for casual indoor sessions
Advanced metrics require Garmin Connect, adding complexity to your setup
Getting on a smart trainer is easy. Staying on it past week two is the actual challenge. Here's what the learning curve really looks like.
Indoor cycling has a reputation for being the punishment version of cycling, the thing you do when the weather is bad and the roads are dangerous. That’s not wrong, but it undersells what it actually is: one of the most efficient, controllable, and data-rich training environments available. No traffic lights, no descents, no coasting. Just you, the pedals, and whatever wattage the app decides you need.
The first four weeks are less about fitness and more about figuring out the setup. By week one you’re just getting it working. By week four you’re actually training.
Week 1: Getting the hardware right
The first ride usually takes longer than expected. Budget 45 minutes for setup before you ever turn a pedal.
Put your bike on the trainer and level it. The rear wheel (or drivetrain, if you have a direct-drive trainer) goes into the trainer. The front wheel sits lower than the rear (this is normal; most people don’t notice it), but if it bothers you, a $12 front wheel riser block fixes it immediately.
Calibrate before every ride for the first week. Wheel-on trainers need a spin-down calibration: you spin up to speed, stop pedaling, and the app times how long it takes to coast to zero. This accounts for tire pressure and temperature, which affect resistance accuracy. Most apps (Zwift, Wahoo) prompt you to do this automatically. It takes 90 seconds and matters for getting accurate power numbers.
The heat problem hits immediately. If you’re doing your first ride without a fan, you’ll stop not because your legs give out but because you’re overheating. Your normal outdoor wind at 18 mph generates real cooling. Stationary, you generate none. Put a fan directly at your chest before your first ride. If you don’t have one yet, open a window and point a box fan at yourself. Anything that moves air toward your core helps.
Your first ride should be short: 20 to 30 minutes, easy effort. Not because you can’t do more, but because you’re figuring out the setup. Is the seat height right? Is the trainer squeaking? Does Bluetooth stay paired? Is the phone/tablet positioned where you can see it? You’re debugging, not training yet.
Zwift setup tip: Pair your trainer, then pair a heart rate monitor if you have one, then do the FTP test Zwift offers (or skip it and start on 200 watts (you can test later)). The FTP number controls how hard Zwift’s structured workouts feel. Get a rough number; you can refine it later.
Week 2: Building the habit
By week two, setup is automatic and you’re actually riding. This is when the two biggest challenges of indoor cycling show up: boredom and the difficulty of pacing yourself.
Boredom is the real dropout driver. Outdoors, scenery, traffic, and terrain provide constant input. Indoors, you’re staring at the same wall. Fix this before it becomes a problem: put your tablet or TV at eye level (a music stand or adjustable arm works), load up a series you’ll only watch during rides, and accept that you’ll need entertainment. Zwift’s virtual worlds help more than you’d expect, having a course to follow and riders to chase changes the experience significantly.
ERG mode is both your best friend and a trap. ERG mode (available in structured workouts) automatically adjusts resistance to hold a target wattage. If you pedal faster, it gets easier; if you slow down, it gets harder. This sounds great, and it is, but beginners often fight it by shifting gears. Don’t. In ERG mode, put the bike in a comfortable middle gear and leave it. The trainer handles resistance; you just hold cadence.
Cadence matters more indoors than out. Without the natural varied terrain of outdoor riding, you control your cadence entirely. Aim for 85–95 RPM for most rides. Grinding slowly at 60 RPM in a big gear builds different (and worse) fitness than spinning efficiently. Most smart trainers and apps track this automatically.
Session length in week two: 30–45 minutes, three times per week. You don’t need to go longer; consistency across the month matters more than any single session.
Week 3: Your first structured workout
By week three, free-riding gets boring. This is when structured workouts start making sense.
A structured workout is a pre-programmed sequence of efforts: 3 minutes at threshold, 2 minutes easy, repeat six times, for example. The app controls the trainer’s resistance automatically in ERG mode, so you just hold cadence and follow the effort levels. The experience is closer to having a coach than anything else in self-directed training.
Zwift workouts versus TrainerRoad: Zwift’s workout library is fine for general fitness. TrainerRoad is purpose-built for structured training; its workouts are more scientifically organized, and its plan builder is more sophisticated. Most casual cyclists use Zwift; most people training for events eventually add TrainerRoad.
Your first structured workout to try: Any workout labeled “Sweet Spot” at your fitness level. Sweet spot efforts (88–93% of FTP) build fitness efficiently and are sustainable enough to finish. They hurt the right amount.
Sweat management becomes real in week three. You’ll go through more kit than you expect; consider an extra set of shorts so you’re not washing after every session. A sweat guard (a towel draped over your stem and top tube) keeps salt off your drivetrain and bars. Indoor cycling corrodes a bike faster than outdoor riding; rinse your frame with a damp cloth after sweaty sessions.
Week 4: You’re actually training
Week four is when indoor cycling starts feeling like a real training practice rather than a novelty or a chore. You have a routine, the setup is invisible, and you’re starting to see the data from the previous three weeks.
Look at your data. Zwift and TrainerRoad both track power output, heart rate, and TSS (Training Stress Score) over time. If your average power at the same heart rate is going up, you’re getting fitter. That feedback loop is why indoor cycling builds fitness faster than unstructured outdoor riding for most people. You can’t hide from the numbers.
Consider your first event. Zwift has group rides and races every hour of every day. Group rides follow a pace leader and stay together; races are races. Doing your first Zwift group ride at week four puts you with people at your level and makes the platform feel like a community rather than a solo activity. Search for D-category group rides (lowest intensity tier) for your first one.
Calibrate your trainer monthly. As your wheel (if wheel-on) and the resistance unit wear in, your calibration baseline shifts. Run a spin-down every few weeks, and re-test your FTP every 6–8 weeks to make sure your training zones are accurate.
Common first-month mistakes
Riding too hard too often. Structured training works because of variation: hard days hard, easy days easy. Beginners tend to ride at medium effort every session, which is hard enough to be tiring and easy enough to not build fitness. If a ride feels comfortably uncomfortable the whole time, you’re probably in the wrong zone.
Not replacing the rear tire. Wheel-on trainers eat rear tires fast; the friction that creates resistance also creates wear. After a month of regular riding, check your tire. If it’s flattening in the middle, it needs replacement. Trainer-specific tires (they’re harder and don’t shed chunks) are worth the $30.
Skipping the fan. We’ll say it again because it’s the most common dropout reason: indoor cycling is hot. Run the fan the entire time, not just when you’re struggling.
Save your money
What you don't need yet
Beginners get pressured to buy a lot of stuff that doesn't help them play
better. Here's what we'd skip on day one.
A smart bike (Wahoo KICKR Bike, Tacx NEO Bike) — These are $2,500–3,500 all-in-one units that replace your regular bike. Wait until you've ridden indoors for six months and know it's permanent.
A power meter on your bike — Your smart trainer already measures power. A separate power meter is redundant until you're comparing trainer data to outdoor riding, a year or two away.
A front wheel riser block — Your rear wheel sits in the trainer; the front drops lower, which some people find uncomfortable. Most people don't notice it. Try it first; it's a $15 fix if you do.
Cycling shoes and clipless pedals — They help efficiency, but flat pedals with athletic shoes work fine for the first few months while you establish the habit.
A Zwift Racing League membership — Zwift racing is addictive, but you need a few weeks of regular riding before group races are enjoyable rather than demoralizing.
First week
Your first seven days
A short, real plan to get from gear-on-doorstep to actually playing.
Set up your trainer before doing anything else; it takes 20–30 minutes the first time. Don't pair it to Zwift until the hardware is stable. · Action
Sign up for Zwift's free trial and do your first ride, even 20 minutes. The app will calibrate your trainer automatically. · Action
Zwift free trial · Most popular indoor cycling app, free trial then $19.99/month
Order a floor mat so it arrives before your second session. Your floors will thank you. · Buy
Set up a fan before your first ride, not after. You'll learn quickly why indoor cycling has a different heat problem than outdoor riding. · Action
Do three rides in your first week, even if they're short. The habit matters more than the duration right now. · Action
Check your trainer's calibration (spin-down) after your first few rides; wheel-on trainers need a warm-up spin before the reading is accurate. · Action
FAQ
Common questions
Do I need a Zwift subscription to use a smart trainer?
You need some app to control the trainer's resistance; it's just hardware without software. Zwift ($19.99/month) is the most popular and has the best free trial. TrainerRoad ($19.99/month) is better for structured training. Wahoo SYSTM is included with some Wahoo trainers. You can also just use the trainer in basic resistance mode without any app, but you lose the ERG (auto-resistance) feature entirely.
Will my road bike fit on a smart trainer?
Almost certainly, if it has a standard quick-release rear axle, which most road bikes made before 2020 have. Check your rear dropout. If you see a 9mm quick-release skewer, you're fine. Newer bikes with 12mm or 142mm thru-axles need adapters or a direct-drive trainer with thru-axle support. Mountain bikes and some gravel bikes often have thru-axles.
How loud are smart trainers?
Wheel-on trainers are moderate: the rubber tire on the roller makes a consistent hum that's noticeable in the same room and muffled through walls. Direct-drive trainers are significantly quieter because there's no tire contact. In an apartment, a direct-drive on a thick mat is usually acceptable; a wheel-on is often not. Both are louder than a spin bike.
What's the real difference between wheel-on and direct-drive?
Wheel-on clamps your existing rear tire against a roller: cheaper ($250–400), easier to set up, but generates tire wear, more noise, and ±5% power accuracy. Direct-drive removes your rear wheel; you attach the bike directly to the trainer's cassette. Quieter, more accurate (±1%), no tire wear, but $600–1,200 and requires buying a cassette separately.
Is a smart trainer better than a spin bike?
It depends entirely on whether you have a real bike. If you own a road or hybrid bike, a smart trainer is almost always better: more realistic ride feel, real power data, Zwift compatibility. If you don't own a bike, a smart trainer forces you to buy one first. A dedicated spin bike is a reasonable alternative if you're starting from zero and don't want to manage two pieces of hardware.
How much should I budget for the first three months?
Trainer ($350 wheel-on or $700 direct-drive) + mat ($30–80) + fan ($30–150) + shorts ($50–100) + Zwift for three months ($60) = roughly $520 on the low end, $1,090 on the high end. The trainer is the only variable that matters. Everything else is fixed and relatively cheap.
DC Rainmaker — The most thorough trainer and power meter reviews on the internet. His comparison charts are the reference for smart trainer accuracy and features. Start here before any trainer purchase.
Zwift Insider — Independent Zwift guide covering routes, workouts, setup tips, and trainer compatibility. Better than Zwift's own documentation for specific setup questions.
TrainerRoad Blog — Structured training articles from the team behind one of the major indoor cycling apps. Strong on training science basics: polarized training, FTP, periodization.
r/Zwift — Active community for app tips, trainer troubleshooting, and route recommendations. Check the wiki before posting beginner questions; most are answered there.
Wahoo Fitness YouTube — Setup tutorials and training videos from the trainer manufacturer. The KICKR setup videos are the clearest available for first-time installs.
Global Cycling Network (YouTube) — GCN's tech channel covers trainer reviews, bike compatibility, and indoor cycling tips in accessible video format. Great for visual learners setting up for the first time.
As an Amazon Associate, JustBeginning earns from qualifying purchases.
We may also earn commission from other affiliate programs linked on this
page. Editorial recommendations are independent; we don't choose
products based on commission rates.
Product prices and availability are accurate as of the date and time
indicated and are subject to change. Any price and availability
information shown on Amazon at the time of purchase will apply.