Horses are big, expensive, and unbelievably rewarding. The good news: you don't need to own one, and you don't need a lot of gear to start taking lessons. You do need a few critical safety items, starting with a certified helmet. Here's exactly what to buy, in what order, and what can wait.
By Colin B. · Published May 24, 2026 · Last reviewed June 9, 2026
Troxel Sierra Riding Helmet
— A MIPS-certified riding helmet that works for both Western and English lessons. It's the one safety item you must own.
Ariat Extreme Zip Paddock H2O Boot
— Paddock boots with a real riding heel: slip-on convenience, stirrup-safe, and works with half chaps as you advance.
Helmets, boots, breeches, and gloves run $250–450 to get properly outfitted. Before tack, you don't need to own a saddle or bridle as a lesson rider.
We earn commission on qualifying Amazon purchases — see our
affiliate disclosure.
Price tiers and budget totals shown above are editorial estimates;
actual Amazon prices vary.
At a glance
Our top pick in each category
The fastest path through this guide — each best-starter pick by category.
Scroll for the budget and upgrade alternatives.
Ask your barn what discipline they teach before buying a single thing. Western and English are different sports in different clothing. Your barn's answer determines your helmet style, your boot height, and whether you ever need breeches at all. Most barns teach one or the other, not both.
Your barn will probably lend you a helmet for the first lesson or two, and you should accept that offer, but buy your own within two sessions. Shared helmets rarely fit well, and fit is a safety issue, not a comfort issue.
Never buy a used helmet, even if the previous owner swears it was never dropped. Helmet foam compresses invisibly on impact. A helmet that's been in a fall is compromised. New only.
The gear
What you actually need
Helmets
The helmet is the only non-negotiable purchase in riding, and it's where you should spend real money. Equestrian helmets must meet ASTM F1163 / SEI certification for riding; this is different from bike helmets or ski helmets. A certified riding helmet protects against the specific impact dynamics of falling off a horse. Do not substitute another sport's helmet. Fit matters enormously: the helmet should sit level on your head, two fingers above your eyebrows, with the harness snug and no lateral wobble. MIPS-equipped helmets add rotational protection and are worth the premium if your budget can absorb it.
Helmets — what's the difference?
A few common shapes, each making a different trade.
English Hunt Cap
Low-profile velvet or suede cap for English disciplines.
Disciplines
Hunter, Jumper, Dressage
Brim
None or minimal
Style
Streamlined
Best for English lesson barns, show rings, jumping
Tradeoff No sun protection; bring sunscreen for outdoor arenas
Troxel is the most recommended beginner helmet brand in the US, and the Sierra is their best all-around starter. ASTM/SEI certified, ventilated, available in a Western-profile brim that works for either discipline. At $70–90 it's the right first helmet: protective enough to matter, priced so you won't resent upgrading later.
What we like
ASTM/SEI certified: meets the equestrian safety standard
Ventilated shell keeps your head cool during warm lessons
Works for Western and English lesson settings
What to know
No MIPS (the rotational protection upgrade costs more)
IRH's entry-level certified helmet runs $50–65 and is a legitimate safety choice: ASTM/SEI certified, real ventilation, and available in multiple sizes. The 4G isn't flashy, but it's not a toy either. If budget is genuinely tight, this is what we'd recommend over skipping a certified helmet entirely.
What we like
ASTM/SEI certified at the most accessible price point
More ventilation channels than competitors in this tier
What to know
Interior liner is basic; uncomfortable in multi-hour sessions
Charles Owen is the gold standard for equestrian safety; this British brand is what competitive riders and instructors wear. The JR8 has a 5-star BETA safety rating (stricter than ASTM), precise fit system, and a premium liner. Once you know you're serious, this is what you want on your head.
What we like
5-star BETA rating, the strictest equestrian safety standard
Precise fit dial system for a truly snug, stable fit
The helmet brand instructors and competitive riders trust
What to know
Round-oval fit; less comfortable for narrow/oval head shapes
Premium price ($200+) is significant for a first-year rider
Riding boots have one non-negotiable feature: a defined heel, at least 1 inch. The heel is a safety feature that prevents your foot from sliding through the stirrup and getting caught. Running shoes and most hiking boots don't have a real riding heel. Beyond the heel, the choice is between paddock boots (ankle-height, more practical) and tall boots (knee-height, traditional). For most beginners, paddock boots with half chaps is the smarter and more affordable starting point.
Best starter
Ariat
Extreme Zip Paddock H2O Boot
$$
★★★★★Our rating
Ariat is the dominant American riding boot brand, and the Extreme H2O is their most practical waterproof paddock boot. Pull-on zip, H2O-rated for wet arenas and muddy paddocks, proper riding heel, and comfortable enough to wear all day. If you're going to buy one pair of boots to start, this is it.
What we like
Waterproof upper handles muddy paddocks and wet arenas
Proper riding heel, safe in the stirrup from day one
Durable Ariat construction holds up to daily barn use
What to know
Runs narrow; wide feet should try before buying
Paddock height means dirty-pant legs without half chaps
Dublin makes solid riding footwear at accessible prices. The Pinnacle is a basic jodhpur (ankle) boot with a real riding heel and decent construction. At $60–75, it's the honest budget pick. Not as durable as Ariat, but entirely appropriate for weekly lessons.
What we like
Real riding heel at a genuinely entry-level price
Slim profile pairs well with half chaps
What to know
Sole wears faster than Ariat; expect 1-2 years of regular use
Less cushioning than mid-tier; feet fatigue on long lessons
The tall field boot is the classic English riding look: knee height, sleek, and a real step up in performance. The Contour II has Ariat's ATS footbed, a close-contact fit that lets you feel the horse better, and a pull-on back zip. Once you're past the early lesson phase and want to look like a real rider, this is where to go.
What we like
Knee-high field boot: the proper English riding silhouette
ATS footbed provides real arch support over long rides
Close-contact design lets you feel the horse's movement
What to know
Tall boots need 6–8 sessions to break in; uncomfortable initially
The jeans-vs-breeches question has a clear answer: breeches. Jeans have thick inseams that create pressure points in the saddle and will rub you raw inside an hour. Breeches have a smooth inner leg, stretch fabric, and a knee patch or full-seat panel that gives you grip. They don't look athletic; they look like riding clothes, because that's what they are. Tights with an inner-leg grip panel are a more affordable entry point that works just as well for lessons.
Best starter
Kerrits
Sit Tight Full Seat Riding Tight
$$
★★★★★Our rating
Kerrits makes the most comfortable beginner riding tights on the market. The full-seat silicone grip keeps you from sliding, the waistband is flattering and secure, and the stretch fabric moves with you. These feel like athletic tights but ride like real breeches. They're also machine washable, which matters more than you think when you're at the barn three days a week.
What we like
Full-seat silicone grip keeps you stable without clinging saddle leather
Feels like athletic wear, easier for beginners than stiff breeches
Machine washable (barn life requires it)
What to know
Less structured than traditional breeches, not ideal for showing
Silicone grip attracts barn hair; lint roller is your new best friend
Ovation makes the best budget traditional breeches in the US market. The Euros have knee patches (not full seat, so you'll slide a little more, but that's fine for walk-trot lessons), real belt loops, and a flat inner leg that won't rub. At $40–55, they're the honest answer for someone who wants a proper breech without spending $100+.
What we like
Traditional breech construction at the most affordable price
Flat inner leg eliminates the saddle friction that ruins jeans
What to know
Knee patch only, less grip than full-seat for canter work
Sizing inconsistent; read reviews for your specific inseam length
The Ariat Tri Factor is what serious amateur riders buy when they're done experimenting. Three-way stretch fabric, full-seat synthetic suede grip, and a waistband that stays put across a two-hour lesson. If you're jumping or working toward a show, this is worth the price; you'll feel the grip difference immediately.
What we like
Full-seat synthetic suede grip, noticeably more secure than knee patch
Four-way stretch that doesn't bag out after a 2-hour lesson
What to know
Runs long in the inseam; petite riders must size down
Premium price ($100+), hard to justify before you know you're committed
Half chaps are the piece of gear most beginners don't know about but should buy immediately after paddock boots. They're a leather or synthetic gaiter that covers from ankle to knee, worn over your paddock boot and under your breech or pant leg. They give you the look and function of a tall boot at a fraction of the cost, protect your calf from stirrup leather rub, and add grip. If you buy paddock boots, buy half chaps with them; separately they're each half of a solution.
Best starter
Ariat
Heritage Contour Half Chap
$$
★★★★★Our rating
The Ariat Heritage Contour half chap is the most comfortable beginner option: suede-lined interior, elastic top band that stays where you put it, and a back zip that goes on in seconds. It pairs perfectly with the Terrain paddock boot and creates a nearly-tall-boot silhouette at about half the cost.
What we like
Suede-lined interior grips the calf and prevents slipping
Back zip makes getting them on and off a 10-second task
Protects inner calf from stirrup leather rub on long lessons
What to know
Fit is very calf-circumference specific; measure your calf before ordering
TuffRider makes the most affordable half chaps worth recommending. Synthetic material means they're easier to clean and more weather-resistant than leather. Not as refined as the Ariat, but they do the job for weekly lessons.
What we like
Synthetic material wipes clean, practical for muddy barns
Most affordable entry into half chap coverage
What to know
Less grip than suede-lined options; slides a bit in the saddle
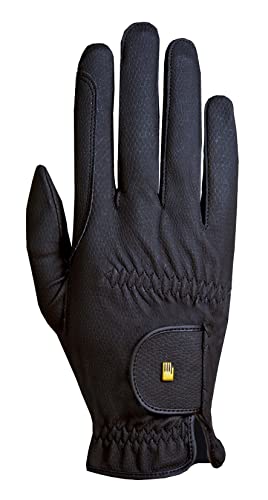
Riding gloves serve two purposes: grip on the reins and blister prevention. Without gloves, even one or two lessons will raise blisters where the reins run across your fingers and palms. Riding gloves are thin and tactile; you can still feel the rein contact through them. They're also cheap enough that there's no reason not to own a pair. Get them with your first order.
Best starter
SSG
Riding Gloves Digital Horseman
$46.95 as of Jun 22, 2026
★★★★★Our rating· Only 7 left in stock - order soon.
SSG is the go-to glove brand for American riders. The Digital Horseman is their most popular model: thin enough to feel the rein, grippy enough to hold through a canter, and priced at $20–25 so they're easy to replace when they wear out. Available in most colors to match any discipline.
What we like
Thin enough to feel rein tension clearly through the glove
The most-recommended brand by US riding instructors
Priced to replace seasonally without guilt
What to know
Wash frequently; barn gloves get funky fast
Grip diminishes after 30-40 hours of use; plan to replace
★★★★☆Our rating· Only 2 left in stock - order soon.
Roeckl makes gloves for Olympic riders, and the Chester is their mid-range model. The fit is exceptional; they contour to your hand and stay put through extended sessions. If you're riding multiple days a week or starting to show, Roeckl is worth the upgrade.
What we like
Anatomical fit conforms to your hand, no bunching or slipping
Longer-lasting construction than budget gloves
What to know
Premium price ($40–55) is hard to justify for once-a-week lessons
Horses are not sports equipment. They're living animals with opinions, and that's what makes riding unlike anything else you'll try. Here's what the first month actually looks like: what clicks, what doesn't, and why your instructor keeps telling you to relax.
Horseback riding has a learning curve that feels steep until suddenly it doesn’t. The first few lessons are mostly survival mode: trying to stay on, stay balanced, and not accidentally communicate the wrong thing to a 1,200-pound animal. Then something clicks, usually somewhere in week three, and you realize you’re actually riding.
This is what that first month looks like, lesson by lesson, with the things that actually matter and the things you’ll be tempted to worry about but shouldn’t.
Week 1: Learning to sit still
The most useful thing you can do in your first lesson is nothing. Specifically: stop gripping the saddle with your thighs, stop bracing against every step, and stop trying to balance by holding on with your hands. None of those work, and all of them make the horse uncomfortable.
What does work is letting your weight sink into the saddle and following the horse’s movement with your hips. It feels passive when you do it right, almost like sitting on a very large, warm rocking chair. Your job in week one is to learn what that feels like.
Your first lesson will likely be on a lunge line (a long rope that attaches to the horse’s halter while your instructor controls the horse’s movement from the center of the arena). This is not training wheels. Even experienced riders work on the lunge to isolate position problems. On the lunge, you can focus entirely on your seat without worrying about steering.
The three things that matter in week one:
Heels down. Your heel should press lower than your toe in the stirrup. This keeps your foot from sliding through and positions your leg correctly. Instructors will remind you every thirty seconds and it will still feel wrong.
Eyes up. Look where the horse is going, not at the horse’s head. When you look down, your whole body collapses forward.
Breathe. Tension travels straight from your body into the horse. A nervous, stiff rider creates a nervous horse. Consciously breathe and let your shoulders drop.
By week two, you’re off the lunge line and steering yourself. Steering in riding is subtler than it looks from the ground. You don’t just pull on one rein; you apply a light, consistent pressure with the inside rein while your outside rein maintains contact, and your leg tells the horse to move forward and bend through the turn. Done right, it looks like nothing from the outside.
The walk should feel natural by now. The trot will not.
The trot is a two-beat gait with significant vertical movement; the horse essentially bounces, and you bounce with it. There are two options: sitting trot (absorbing the bounce in your hips, difficult) and posting trot (rising out of the saddle with every other beat, more sustainable for beginners). Your instructor will teach you to post. It takes most people 3–5 lessons before posting feels like less than controlled falling.
The key to posting is timing. You rise on the outside foreleg, meaning as the horse’s outside front foot hits the ground, you rise. It sounds complicated. Your instructor will say “up-down, up-down” in rhythm, and eventually your body figures it out before your brain does.
Common mistakes in weeks 2–3:
Pulling on the reins for balance. The horse feels this as a stop signal. Use your core instead.
Gripping with your knees. Knee grip actually pushes you out of the saddle. Think “long leg,” not “tight knee.”
Looking at the ground when you lose balance. The natural instinct when you feel unstable. Do the opposite: look up and sit taller. Posture corrects balance.
Week 3–4: The canter and the first real conversation
The canter is a three-beat gait that actually feels smoother than the trot for most people. There’s a rocking-horse quality to it; your hips move with the horse’s back in a rhythm that, once you find it, is almost hypnotic. Most beginners have their first “oh, this is why people do this” moment at the canter.
Getting the canter transition right is another matter. You ask for the canter with a specific leg aid: outside leg slides back, inside leg stays at the girth, both legs press, combined with a light upward feel on the outside rein. The timing matters. If the horse trots faster instead of cantering, you gave the aid at the wrong moment. Your instructor will walk you through this and it will take several lessons before you’re reliably getting the transition you asked for.
This is also when you start to realize that horses communicate back. A horse who pins their ears when you mount is telling you something. A horse who drifts toward the gate is telling you something. A horse who feels “looky” (spooking at corners or shadows) is telling you something. Your instructor will help you read these signals. Pay attention; the ability to listen to the horse is what separates a rider from someone who just sits on one.
Riding uses muscles you don’t use for anything else. By the end of your first few lessons, you’ll be sore in your inner thighs, your lower back, and your core, especially if your fitness background is mostly running or lifting. This is normal and temporary.
The best thing you can do between lessons is walk. Walking keeps your hips loose and your lower back from seizing up. Yoga or Pilates, if that’s in your life, helps significantly; the hip mobility and core control transfer directly. Swimming is the other one riders swear by.
Expect these soreness patterns:
Inner thigh ache (adductors you forgot existed)
Lower back fatigue from sitting upright without a backrest
Upper forearm soreness from maintaining rein contact
Sometimes a surprising neck ache from holding your head up and looking forward
All of this resolves within two weeks of regular riding. Your body learns what’s being asked of it and adapts.
Things every beginner does wrong
Knowing the patterns doesn’t make you immune to them, but it helps to know they’re coming:
You will grip when you feel off-balance. Every beginner does. The instinct is correct (grip something!) but the execution is wrong. Gripping with your thighs and hands sends confusing signals to the horse and stiffens your body in a way that makes the balance problem worse. The antidote is to consciously soften and breathe when you feel uncertain.
You will steer too late. Horses need a moment to process a steering cue and respond. Start your turns earlier than feels necessary. If you wait until you’re at the corner to turn, you’re already through it.
You will forget to kick. Beginners habitually under-ask. You squeeze your legs for a transition and the horse ignores you and you think the horse is ignoring you. Often the horse heard a very small ask and is waiting for you to mean it. Use your leg more firmly than feels polite.
You will have bad lessons. Days when nothing clicks, when the horse seems impossibly difficult, when you feel like you’ve forgotten everything you learned last week. This happens to every rider at every level. It’s not a sign that you’re not getting it.
When it clicks
Somewhere in your first month (usually in week three or four), you’ll have a lesson where things feel different. Not perfect. Just different. The horse’s movement feels like something you’re participating in rather than surviving. You correct your heel position without being reminded. You see a corner coming and you start the turn at the right time.
That’s the inflection point. After that, the improvement feels faster because you’re building on a foundation instead of starting from scratch every lesson.
At one month, most beginners can: walk and trot confidently, post at the trot with reasonable timing, steer deliberately through school figures, and get a canter transition occasionally. That’s a real foundation. Everything after this is refinement and depth, and there is a lot of both.
Save your money
What you don't need yet
Beginners get pressured to buy a lot of stuff that doesn't help them play
better. Here's what we'd skip on day one.
A saddle or bridle — Your lesson barn owns all the tack. You won't need your own until you lease or buy a horse, which is years away for most beginners.
A body protector / safety vest — Required at some jump courses and cross-country events, but not for arena lessons. Add it when your instructor requires it.
Spurs — Spurs are an advanced aid that beginners should not wear. They require enough leg stability that you won't accidentally kick the horse; that stability takes months to develop.
A riding crop or whip — Your instructor will lend you one if needed. A crop in beginner hands often makes things worse, not better.
A show coat — Show attire is a later problem. Focus on learning to ride first.
Horse ownership — Leasing is the intermediate step most riders take. Board alone runs $400–1,200/month before vet, farrier, and feed. It's a real commitment for a first-year rider.
First week
Your first seven days
A short, real plan to get from gear-on-doorstep to actually playing.
Find a lesson barn near you and call about beginner availability. Ask whether they teach Western or English; your gear choices follow from that answer. · Action
Tell your instructor on day one that you're a complete beginner. They'll match you to a horse suited for your first lesson (a 'schoolmaster' who's patient with nervous new riders). · Action
Book at least three lessons in your first two weeks. Weekly once is not enough frequency to build the muscle memory that makes riding feel less like active survival. · Action
FAQ
Common questions
Should I start Western or English?
Ask your local barn, not the internet. Western and English are genuinely different disciplines with different tack, seat positions, and gear. Most beginners start with whatever their nearest barn teaches. Both are great entry points; don't overthink it.
Do I need to own a horse to learn to ride?
No. Most people learn on a lesson horse for years before leasing or owning. Lesson horses are trained to be forgiving with beginners. Horse ownership is a major commitment ($600–1,500/month in board, vet, and farrier costs) that should wait until you're genuinely serious.
Will jeans work for riding?
For one lesson, yes. You'll survive. For regular lessons, no. Jeans have thick inseams that create pressure points against the saddle and will rub blisters within an hour. Riding tights or breeches have a smooth inner leg and are worth buying immediately.
What's the difference between paddock boots and tall boots?
Paddock boots are ankle-height and practical. Tall boots are knee-height and traditional. For beginners, paddock boots plus half chaps is the smarter buy; you get nearly the same function as tall boots at about half the cost, and you can try the hobby without committing to a $200+ boot.
Is riding dangerous for beginners?
Riding has real inherent risk; horses are large, reactive animals. A certified instructor, a calm lesson horse, and a properly fitted ASTM/SEI helmet reduce that risk substantially. Most beginner injuries are minor falls; serious injuries are rare on well-run lesson programs.
How much does it cost to start taking lessons?
Lessons typically run $50–100 per 45-minute session. Gear for your first six months runs $250–450 (helmet, boots, half chaps, breeches, gloves). So budget roughly $500–700 for your first three months of lessons plus gear, a meaningful commitment that drops significantly once you've bought the equipment.
US Equestrian — National governing body for equestrian sports. Official rulebooks, competitions, and a certified instructor database.
Certified Horsemanship Association — CHA certifies riding instructors and camps. Use their barn-finder to verify that a barn uses certified instructors.
The Chronicle of the Horse — The oldest equestrian publication in the US. Covers hunters, jumpers, and eventing with real depth. Read the beginner sections once you're a few months in.
Western Horseman — The equivalent for Western riders. Trail riding, reining, barrel racing, and horsemanship basics. Strong beginner content.
Horse & Rider (YouTube) — Video instruction from Western and English coaches. Great for beginners who want to understand what their instructor is teaching between lessons.
r/Equestrian — Active community of riders at all levels. Good for asking gear questions, finding barn recommendations in specific cities, and reading honest experience posts.
As an Amazon Associate, JustBeginning earns from qualifying purchases.
We may also earn commission from other affiliate programs linked on this
page. Editorial recommendations are independent; we don't choose
products based on commission rates.
Product prices and availability are accurate as of the date and time
indicated and are subject to change. Any price and availability
information shown on Amazon at the time of purchase will apply.

 Best starter