Calisthenics is bodyweight training with zero machines, just you, gravity, and a handful of inexpensive tools. The progression runs from your first pull-up all the way to handstands and muscle-ups, and the gear you need to start is surprisingly specific and affordable. This is that guide.
By Colin B. · Published May 23, 2026 · Last reviewed June 3, 2026
A doorframe pull-up bar gets you started for $30. Add a mat, bands, and rings for a complete home setup around $120.
We earn commission on qualifying Amazon purchases — see our
affiliate disclosure.
Price tiers and budget totals shown above are editorial estimates;
actual Amazon prices vary.
At a glance
Our top pick in each category
The fastest path through this guide — each best-starter pick by category.
Scroll for the budget and upgrade alternatives.
PACEARTHPACEARTH Gymnastics Rings 32mm Wooden Olympic Rings Support 1500lbs Locked Carabiners 9ft Double-Layer Numbered Straps Non-Slip Gym Rings with Foot Straps Door Anchor for Home Gym Full Body Workout
Don't buy gymnastic rings first. Rings are a progression tool for people who can already do 5+ clean pull-ups. If that's not you yet, a doorframe bar and the floor are all you need for the first two months. Rings before that is expensive frustration.
A doorframe bar is enough to start. Seriously, the pull-up bar vs. wall-mount vs. freestanding tower decision paralyzes beginners. Just get a doorframe bar. If you're doing weighted sets six months from now, upgrade then.
Your limiting factor is almost certainly strength and movement pattern, not gear. The most common reason people stall in calisthenics isn't equipment. It's not following a structured program. Pick one and stick to it before buying more tools.
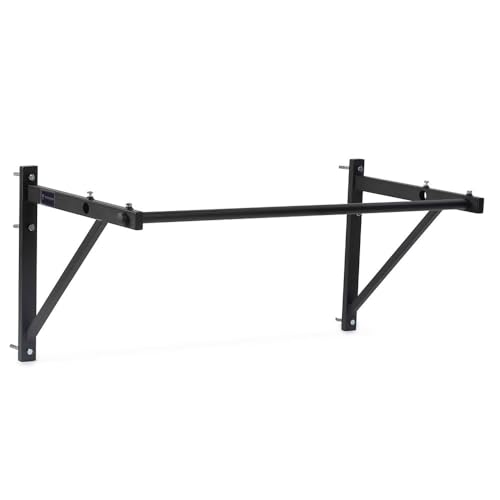
Your first piece of gear, and the most important. Doorframe bars are the right starting point for most people: no drilling, installs in seconds, under $40. Wall-mounted bars are stiffer and better for weighted work, but require drilling into studs. Freestanding towers solve the apartment problem but take up real floor space. Start with a doorframe bar unless you already have a dedicated wall or garage.
Pull-up Bars — what's the difference?
A few common shapes, each making a different trade.
Doorframe (No-drill)
No tools required. Fits most doorframes. The default starter choice.
Install
No drilling
Max load
300 lbs
Fits
24–36" doorframes
Best for Renters, beginners, anyone unsure of their commitment level
Tradeoff Slight wobble under explosive or weighted movements
The doorframe pull-up bar that has introduced more people to calisthenics than any other piece of gear. No drilling, no tools; installs in 30 seconds and holds up to 300 lbs. Supports pull-ups, chin-ups, and wide-grip variations. It wobbles slightly under explosive movements, but you won't notice for the first three months of working toward your first five pull-ups.
What we like
No drilling, installs in any 24–36" doorframe in 30 seconds
Handles pull-up, chin-up, and wide-grip variations in one bar
Under $40, the lowest-friction entry point into pull-up training
What to know
Wobbles on explosive movements (not for kipping or muscle-up work)
Doorframe trim can prevent a flush fit; measure your molding first
Bolts directly into studs and does not move. Period. Once you're doing weighted pull-ups or working toward muscle-ups, the flex from a doorframe bar becomes a real limitation. This is what serious home athletes end up buying six months in. Get it now if you have a dedicated wall and plan to stick with calisthenics long-term.
What we like
Zero wobble under heavy or explosive loads, fully stud-anchored
Multiple grip positions accommodate pull-ups, chin-ups, and neutrals
What to know
Requires drilling into studs (not an option for renters)
Permanent install; choose the wall location carefully before drilling
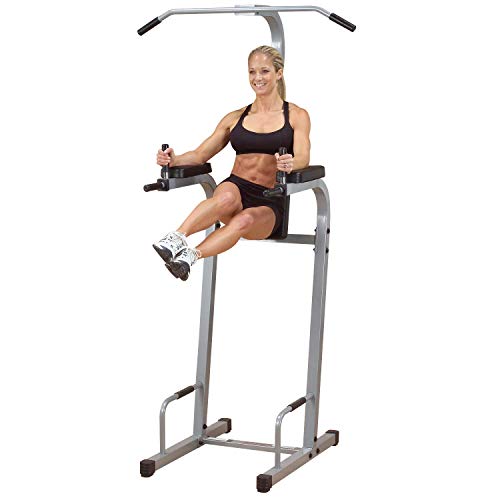
(PVKC83X) Multi-Function Pull Up & Dip Station with Vertical Knee Raise, Chin-Up Bar Stand, and Strength Training Dip Stands
$319.00 as of Jun 22, 2026
★★★★☆Our rating· In stock
The freestanding option for renters who can't drill. You get a pull-up station, vertical knee raise, and dip bars in one unit without touching a stud or a wall. It needs a permanent corner of floor space (roughly 3x4 feet), but if you have it, nothing else in this price range is as versatile for apartment-bound calisthenics training.
What we like
Pull-up, dip, and knee raise in one unit, no drilling required
Freestanding stability beats a doorframe bar for dynamic movements
What to know
Needs a permanent 3×5 ft footprint, not for tight spaces
Assembly takes 30–45 min and goes easier with a second person
Gymnastic rings are the piece of gear that separates calisthenics from regular pull-up training. An exercise that's easy on a bar becomes brutally hard on rings because the rings move, your stabilizer muscles work constantly to prevent swinging. Buy wood rings over plastic: the grip difference is real when your hands are sweaty, and wood is gentler on skin during long sessions. Wait until you can do 5 clean pull-ups before rings become your primary training tool.
Best starter
PACEARTH
Gymnastics Rings 32mm Wooden Olympic Rings Support 1500lbs Locked Carabiners 9ft Double-Layer Numbered Straps Non-Slip Gym Rings with Foot Straps Door Anchor for Home Gym Full Body Workout
$$
★★★★★Our rating
Solid wood rings at a price that doesn't punish you for trying something new. The 1.1-inch diameter matches official gymnastics specs, the straps adjust from 5 to 15 feet, and the buckles stay locked mid-set. Wood grips far better than plastic when your hands are sweaty (which happens on ring dips within minutes). A reliable first set that will outlast multiple training phases.
What we like
Wood grip stays tacky when sweaty; plastic rings lose grip fast
1.1-inch diameter matches official ring specs for real skill transfer
Straps adjust 5–15 feet and buckles stay locked under full load
What to know
Needs 8+ feet of overhead anchor clearance; measure first
Skin conditioning takes 2–3 weeks; expect palm soreness early on
Yes4All's wooden rings are the step-down from PACEARTH if you want wood grip at a lower price. The 1.1-inch diameter is standard spec, and the straps hold reliably. The main tradeoff is simpler buckles and slightly less strap length than premium sets. Solid for ring rows, ring push-ups, and ring dips, plenty of room to grow before you need an upgrade.
What we like
Wood grip at a lower price than premium sets (no plastic slippage)
Standard 1.1-inch diameter for full skill transfer
Straps hold reliably for rows, push-ups, and dips
What to know
Simpler buckles than PACEARTH; strap length adjustment less precise
Shorter strap maximum height; check clearance for high anchor points
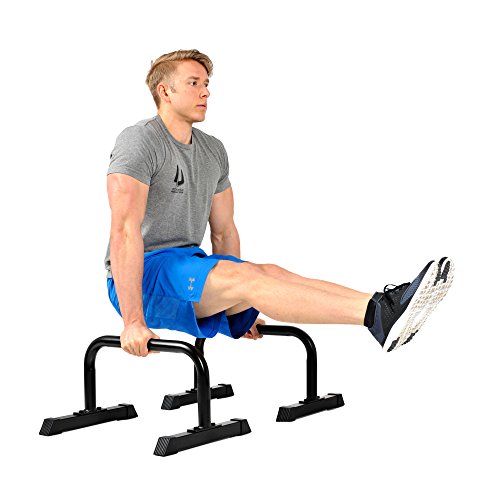
Low parallettes look like two small handles on feet, and they unlock exercises you simply can't do on the floor: deep push-ups with neutral wrists, L-sit practice, and dip progressions. The wrist angle matters more than beginners expect: floor push-ups with hands pronated are rough on joints over time. Parallettes fix this from session one. Start with low parallettes under 12 inches. High parallettes for handstand push-up work come later, when you've earned them.
Best starter
Ultimate Body Press
Parallettes XL Push Up Stands 12x24 inch, Black
$
★★★★★Our rating
Welded steel at a price that makes them a no-brainer first purchase. Low enough to stay stable during L-sit attempts, wide enough for comfortable push-up depth, and the rubber feet grip hardwood without slipping mid-set. This is the parallette 90% of beginners should buy, well-proportioned and sized correctly for the foundational calisthenics moves.
What we like
Neutral wrist position eliminates joint pain from floor push-ups
Welded steel holds up to L-sits, dips, and isometric pressing
Rubber feet grip hardwood floors without moving mid-set
What to know
6-inch height limits L-sit clearance for athletes with long legs
Non-adjustable; upgrade to tall parallettes as skill advances
At 12 inches, these create the clearance you need for straight-leg L-sits and tuck planche progressions that 6-inch parallettes physically cannot offer. Full-coverage foam handles, wide stable base, and zero wobble under load. This is the upgrade buy for calisthenics athletes who've outgrown their starter parallettes and want a proper intermediate set.
What we like
12-inch height creates clearance for straight-leg L-sits and planche work
Full-coverage foam handles reduce hand fatigue on isometric holds
What to know
Taller height requires recalibrating balance on first use; expect adjustment
Overkill for beginners; the height advantage only matters months in
Floor work is central to calisthenics: hollow body holds, ab circuits, planche progressions, and stretching between sets. You don't need anything special. A thick yoga mat (6mm or more) handles all of it. The things that matter: it shouldn't slide during plank variations, and it should be thick enough that hip bones don't meet hardwood on hollow body holds. Carpet works fine. A mat is optional if your floor is already forgiving.
Best starter
ProsourceFit
Original Yoga Exercise Mat
$
★★★★★Our rating
A 6mm mat that handles every floor movement in calisthenics without being so thick that stability suffers on balance work. The textured surface grips hardwood without sliding, and it rolls into a compact tube for storage. It's also a competent yoga mat, so you're not buying two different things for two similar purposes.
What we like
6mm thickness cushions hips and spine on hollow body holds
Textured surface grips hardwood and won't slide during plank work
Doubles as a yoga mat, no duplicate purchase needed
What to know
Edge curl on first use; leave it flat 24 hours before training
6mm is floor-work depth, not a gymnastics crash pad
Under $25 and 1/2 inch of cushioning for floor work that the ProsourceFit's 1/2-inch mat also offers, but at half the price. The textured surface grips on hardwood and tile better than rubber yoga mats.
What we like
Under $25, cheap enough to keep one at home and one in the car
1/2-inch thickness is right for knee-on-floor calisthenics work
Includes a carrying strap
What to know
Lighter-duty material than premium mats; replace every year of heavy use
The main use case for resistance bands in calisthenics is band-assisted pull-ups. If you can't do a single unassisted pull-up yet, looping a heavy band over the bar and stepping in offloads 30–50% of your bodyweight, enough to build the movement pattern and pulling strength simultaneously. Most people who reach their first unassisted pull-up got there faster with band assistance than with negatives alone. A loop band set also covers face pulls and band pull-aparts, which keep shoulders healthy under heavy pull-up volume.
Best starter
Fit Simplify
Resistance Loop Exercise Bands
$9.98 as of Jun 22, 2026
★★★★★Our rating
A five-band set in graduated resistance levels: light for shoulder prehab, heavy for band-assisted pull-ups. The wide bands distribute load across the foot and knee better than thin therapy bands, and they're durable enough for daily training. This is the set you'll still be using after you can do 20 unassisted pull-ups, because the lighter bands stay useful for warmup and mobility work.
What we like
Five resistance levels cover shoulder prehab through pull-up assist
Wide band distributes load evenly across foot during assisted reps
Durable enough for daily use across months of consistent training
What to know
Bands snap if bunched on the bar; loop flat and centered every time
Lightest bands wear faster under daily shoulder mobility work
WODFitters' five-band bundle covers the full range from light mobility work to heavy pull-up assistance for any bodyweight. Their loop bands are notably wider and more durable than mini loop sets, and the heavier gauges (Purple and Green) handle step-in pull-up assistance without snap risk. Buy this instead of the Fit Simplify set if you want serious pull-up assist capacity.
What we like
Heavy-duty loop handles step-in pull-up assist at any bodyweight
Wider band makes step-in assistance more stable than thin loops
What to know
Sold individually; need two colors to cover a useful resistance range
Overkill if you already own a loop band set with a heavy option
Getting your first pull-up takes weeks. An L-sit takes months. But the path from zero to capable is mapped out clearly — here's what each phase actually looks like.
Calisthenics has an unusual reputation problem. Most people think it means doing a few push-ups and calling it a workout. The people who actually do it know it’s one of the deepest and most demanding disciplines in strength training — a route that ends at handstands, front levers, and muscle-ups, and that requires nothing but gravity and a handful of tools to get there.
The first 30 days are about building the foundation: the hollow body position that underlies every advanced skill, the pulling strength that makes rings possible, and the movement patterns that let you progress indefinitely. Here’s what that actually looks like, week by week.
Week 1: Learn the baseline movements
Before you start, test yourself. Do as many pull-ups as you can (zero is fine), as many push-ups as you can, and hold a hollow body position for as long as possible. Write it down. This baseline is what you’ll measure progress against.
The three foundational positions in calisthenics are:
The hollow body. Lying on your back, lower back pressed flat to the floor, arms overhead, legs lifted. It looks simple. Hold it for ten seconds and your abs will disagree. Almost every advanced skill — pull-ups, rings, handstands — requires you to maintain this position under load. Learn it before anything else.
The dead hang. Arms fully extended, hanging from the pull-up bar with no shrugging. This is where your pull-up starts. Beginners often forget that hanging itself is a skill — it builds grip strength and shoulder health simultaneously. Start with 3 sets of 10–20 second dead hangs.
The pike push-up. Hips high, hands shoulder-width apart, lower your head toward the floor. This is your first pressing skill for shoulders. It’s awkward at first. That’s normal.
In week one, the goal isn’t to do pull-ups. It’s to understand what these positions feel like and to start showing up.
Calisthenics is built on progressions — a ladder of variations that get harder as you get stronger. You’re always doing the hardest version you can do with clean form, not the hardest version you can do at all.
For pull-ups, the progression looks like this:
Can’t do any pull-ups: Band-assisted pull-ups (heavy band), negative pull-ups (jump to the top, lower yourself slowly for 3–5 seconds)
Can do 1–3: Keep doing them with band assist for volume, add negatives
Can do 5+: Full pull-up sets, start working toward 10
For push-ups:
Knees: Start here if regular push-ups aren’t clean
Regular: The standard. Work toward 15–20 clean reps before progressing
Pike push-ups and dip progressions: The next step for shoulder and chest strength
The key insight that most beginners miss: you should be failing. If every set feels easy, you’re doing the wrong progression. Find the step where you can do 3–5 clean reps and can barely manage a 6th. That’s your training zone.
The r/bodyweightfitness Recommended Routine structures all of this: 3 sessions per week, one push-focused pairing and one pull-focused pairing per session, plus core work. Three months of this routine, done consistently, will take most beginners from zero to 10 pull-ups and a solid push-up base.
By week four, your hollow body position is starting to feel controlled, you’re working through pull-up progressions consistently, and you’re ready to add the first skill work.
The two skills that pay the biggest dividends for beginners are the L-sit and the wall handstand.
L-sit: Both hands on the floor (or parallettes), both legs extended forward and lifted. Most beginners can’t hold it for a second on day one — your hip flexors haven’t been asked to do this before. The progression: tuck hold (knees bent), straddle hold (legs wide), then full L-sit. Work toward a 10-second tuck hold before worrying about the full position.
Wall handstand: Facing away from the wall, hands on the floor, kick up until your heels rest against the wall. This teaches you what inversion feels like and builds the shoulder and core stability for eventually holding a freestanding handstand. Most people can get their first 10-second wall handstand within a month of consistent practice.
Neither of these is urgent. What matters in week four is that you’re still showing up and that the pull-up progression is moving forward.
The thing beginners get wrong: consistency beats intensity
Calisthenics has a connective tissue adaptation problem that nobody warns you about. Your muscles build strength faster than your tendons, ligaments, and joints adapt to new loads. The people who get injured in their first month are almost always the ones who train every day because it feels good and ignore the soreness.
Two or three sessions per week with a full rest day between them is not a limitation. It’s the actual optimal training frequency for beginners — it’s when the adaptations happen.
The other mistake: skipping the hollow body and foundation work to jump straight to cool skills. The L-sit takes strength and body awareness that takes weeks to develop. The handstand takes shoulder stability that takes weeks to build. Rushing past the foundation doesn’t save time — it costs you time later when the skills won’t click because the base isn’t there.
Thirty days from now, the numbers will have moved. Not dramatically. But you’ll hold a hollow body position longer. You’ll feel the difference in your pull-up. You’ll have a sense of where you’re going, which is better than where you started.
Save your money
What you don't need yet
Beginners get pressured to buy a lot of stuff that doesn't help them play
better. Here's what we'd skip on day one.
Gymnastics crash mat — Not until you're attempting freestanding handstands. Before that, a yoga mat on carpet is fine.
Dip belt for weighted pull-ups — You need 15+ clean pull-ups before adding external weight makes any sense.
Gymnastics chalk — Grip is fine for pull-ups and basic ring work. Chalk becomes useful at advanced ring holds and high rep sets.
Gymnastics gloves or grip tape — Gloves prevent callus development you actually need. Train bare-handed and let your skin adapt.
Freestanding handstand trainer — Not before you can hold a wall handstand for 30 seconds. Many beginners never need one at all.
First week
Your first seven days
A short, real plan to get from gear-on-doorstep to actually playing.
Order a doorframe pull-up bar; have it before the weekend. · Buy
No. A doorframe pull-up bar and the floor is a complete starting setup. Pull-up progressions, push-up variations, dips on a chair, and all core work can be done at home for around $30. Add a mat and parallettes later when the basics feel easy.
How long until I can do my first pull-up?
Depends entirely on your starting strength. If you're at zero pull-ups now, expect 4–12 weeks of band-assisted work before your first unassisted rep. Train 3 times per week with band assistance and negatives; most people get there within 8 weeks of consistent work.
What's the difference between rings and a pull-up bar?
Rings move. That's it, and that's everything. A ring row is dramatically harder than a bar row because your stabilizers work constantly to prevent swinging. Rings are a difficulty multiplier: any bar exercise becomes harder on rings. Don't start with rings if you can't do 5 clean pull-ups.
Is calisthenics good for building muscle?
Yes, legitimately. Research is consistent: progressive bodyweight training builds muscle at the same rate as weight training, using the same progressive overload principles. The limiting factor isn't the method. It's consistency and following a real program with measurable progression.
Do I need parallettes, or can I just use the floor?
The floor works for most things. Parallettes add depth to push-ups (wrists neutral, chest below hand level) and are required for L-sit work. If your wrists hurt during floor push-ups, parallettes fix that immediately, and at $25, they're worth it.
What's the right program to start with?
The r/bodyweightfitness Recommended Routine: 3 sessions per week, covers pull, push, and core, with clear progressions mapped out. Follow it for 3 months before looking at anything else. The community wiki explains every exercise and answers every beginner question.
r/bodyweightfitness Recommended Routine — The most battle-tested beginner program in calisthenics. Start here. Three days a week, push/pull/core, clear progressions. More useful than any book or YouTube channel for the first 3 months.
FitnessFAQs (YouTube) — Daniel Vadnal's channel. Best video breakdowns of skill progressions: pull-up, planche, front lever, muscle-up. Concise, evidence-informed, no fluff.
Calisthenicmovement (YouTube) — Alex Lorenz's channel. Long-form tutorials on skill progressions with real form checks. Best for intermediate skills once you have the foundational movements.
Overcoming Gravity by Steven Low — The comprehensive programming manual for calisthenics. Overkill for beginners; buy it when you can do 10 pull-ups and need to periodize. The gold standard reference for intermediate-to-advanced work.
r/bodyweightfitness — Active community with a useful wiki. Good for form check videos, routine questions, and troubleshooting stalled progress. The wiki is more valuable than the posts.
Simonster Strength (YouTube) — Simon Ata's channel. Particularly good on front lever and planche progressions with programming context. Watch after 3 months of consistent training; before that the skill prerequisites won't be there.
As an Amazon Associate, JustBeginning earns from qualifying purchases.
We may also earn commission from other affiliate programs linked on this
page. Editorial recommendations are independent; we don't choose
products based on commission rates.
Product prices and availability are accurate as of the date and time
indicated and are subject to change. Any price and availability
information shown on Amazon at the time of purchase will apply.