Model rocketry is one of the few hobbies where your first success — a 200-foot climb and a perfect parachute recovery — happens on day one. The engine system is tiered so you genuinely can't outrun your skill level, and the community at any launch field will walk you through everything. Here's what to buy and how to get flying this weekend.
By Colin B. · Published June 2, 2026 · Last reviewed June 2, 2026
A starter rocket, launch system, and a pack of engines runs about $65 at the low end. Add tools and a motor variety pack and you're around $150 for a proper first kit.
We earn commission on qualifying Amazon purchases — see our
affiliate disclosure.
Price tiers and budget totals shown above are editorial estimates;
actual Amazon prices vary.
At a glance
Our top pick in each category
The fastest path through this guide — each best-starter pick by category.
Scroll for the budget and upgrade alternatives.
Buy the complete launch system as a unit. The Estes E Launch System includes both the launch pad and the launch controller, and buying them piecemeal costs more. This is the one kit that genuinely includes everything you need except the rocket and engines.
Engine classes are the whole ballpark. A-, B-, C-, and D-class engines require no certification and are legal for anyone to buy and fly. E-class and above starts requiring paperwork — you won't need that until you're flying bigger rockets, which won't be day one. Start with C engines for most beginner kits.
Find a launch site before you buy anything. You legally can't launch a model rocket in a public park or most backyards. The NAR has a club finder — local clubs host monthly launches, provide field access, and teach the safety code in person. Showing up to one before you fly alone is the smartest start you can make.
The gear
What you actually need
Starter Rockets
Your first rocket is less important than you think and more important than you'd guess. Less important because almost any Estes beginner kit flies reliably — they've been designing these for 60 years. More important because it determines how you spend your first Saturday. A Ready-to-Fly rocket gets you airborne in an hour. A Skill Level 1 kit takes an afternoon to build but teaches you how rockets actually work. The Alpha III is the classic for good reason.
Starter Rockets — what's the difference?
A few common shapes, each making a different trade.
Ready-to-Fly (RTF)
Pre-built — add engines and fly same day.
Build time
0 hours
Skill level
None needed
Customizable
No
Best for Absolute beginners who want to launch today, not next weekend
Tradeoff No building skills gained; you won't understand the rocket you're flying
E2X (Easy to Assemble)
30-minute snap-together kit, no painting required.
Build time
20–30 min
Skill level
Minimal
Customizable
Limited
Best for First-timers who want a quick build and immediate launch
Tradeoff Plastic construction is durable but teaches no finishing technique
Skill Level 1
Real kit — balsa fins, 2–4-hour build, fully customizable.
Build time
2–4 hours
Skill level
Beginner
Customizable
Yes
Best for Anyone who wants to understand and personalize their rocket
Tradeoff Balsa fins are fragile — expect repairs after rough landings
Best starter
Estes
Alpha III Rocket Launch Set
$32.38 as of Jun 22, 2026
★★★★★Our rating· In Stock
The Alpha III Launch Set includes the classic beginner rocket plus a basic launch pad and controller in one box — the complete starter package. The rocket itself is a Skill Level 1 build: balsa fins, a nose cone to fill and sand, maybe two hours of table time. That building time is not a drawback. The Alpha teaches you how rockets actually work before you ever leave the ground.
What we like
The most-launched beginner rocket in history — proven design
Skill Level 1 build teaches real rocketry technique in 2 hours
Cheap enough ($15–20) to buy two and keep a spare
What to know
Balsa fins are fragile on hard landings — expect one repair per season
Modest altitude on C engines (~700 ft) — not a crowd-stopper yet
The Wizard is one of Estes smallest and simplest Skill Level 1 kits — a fast build with plastic parts that snaps together in about an hour. It is the right answer if you want to fly this weekend without a long build session and want something more forgiving on landing. Not as rewarding to build as the Alpha, but plastic components hold up better to rough recoveries.
What we like
E2X assembly — 20 minutes from box to launch-ready
Plastic fins survive rough landings that would crack balsa
What to know
No building skills gained — you won't understand the rocket you're flying
After a few Alpha flights, the Hi-Flier XL is the natural next step. Its slim, high-aspect design is optimized for altitude — on a C6-5 it tops 1,000 feet, and on a D12-5 it genuinely climbs. Still a Skill Level 1 build, but the result turns heads at any launch field.
What we like
Altitude-optimized design — 1,000+ ft on C engines, genuinely impressive
Classic high-altitude silhouette looks great at the launch field
What to know
Slim profile is more sensitive to crosswinds — pick your launch days
Longer recovery walk when wind carries it downfield
You need two things to launch a model rocket: a launch pad (the rod that keeps the rocket flying straight until it has enough speed to stabilize itself) and an electronic launch controller (so you're standing well back when ignition happens). The Estes E Launch System combines both in one kit for under $30 and is the straightforward answer for any beginner. Don't improvise either piece — the rod angle and safety key are there for real reasons.
Best starter
Estes
Porta-Pad II Launch Pad and Electron Beam Controller Set
$34.21 as of Jun 22, 2026
★★★★★Our rating
The Porta-Pad II + Electron Beam combo is the dedicated launch system serious beginners buy when they want something more robust than a bundle. The Porta-Pad II is the standard pad in the hobby — stable blast deflector, adjustable rod angle, compatible with all Estes engines. The Electron Beam controller has the safety key and continuity LED you want.
What we like
Dedicated combo gives you a more stable pad than basic bundle kits
Safety key prevents accidental ignition while you prep the rocket
36-inch rod handles A through C engines — the full beginner range
What to know
15-foot controller cable — fine for A-C engines, limiting for D and above
9V battery not included; bring a spare so you are never stranded at the field
★★★★☆Our rating· Only 13 left in stock - order soon.
The Electron Beam is the standalone version of the launch controller included in most Estes sets — a clean upgrade buy if you lose your original or want a backup for club launch days. Keyed safety switch, continuity LED that confirms the igniter is connected before you arm, and a clearly labeled launch button. The standard Estes controller for the hobby, sold separately.
What we like
Continuity LED confirms igniter connection before you arm — fewer misfires
Keyed safety switch prevents accidental launch while loading the igniter
What to know
15-foot cable is the minimum safe distance — upgrade to a longer controller for D engines
No built-in range indicator — you count distance yourself
Engines are the consumable — each launch burns one. You match the engine class to your rocket's weight and desired altitude. Estes labels them with a letter (impulse class), a number (average thrust in Newtons), and a delay (seconds before the ejection charge fires the parachute). A C6-5 means C-class total impulse, 6 Newtons average thrust, 5-second delay. The right engine makes a great flight; the wrong one makes a lawn dart or a sky-high disappearance. Always check the engine recommendation on your kit's instructions.
Best starter
Estes
C6-5 Model Rocket Engines (3-pack)
$17.80 as of Jun 22, 2026
★★★★★Our rating· In Stock
The C6-5 is the standard recommendation for most Estes beginner kits including the Alpha III and Hi-Flier. The 5-second delay gives the rocket time to coast to apogee before the ejection charge fires — parachute at the top of the arc, not on the way up. Buy a four-pack; you'll want to fly at least twice on your first day out.
What we like
The standard engine for most Estes starter kits — reliably matched
5-second delay fires parachute at apogee, not on ascent
3-pack gives you enough for two complete flights on your first day
What to know
Single-use — each launch burns one, budget -6 per flight
Wrong delay for heavier or lighter rockets — always verify the kit list
The B6-4 is the right engine for lighter, smaller rockets — it gives a good flight without over-powering the airframe. Half the total impulse of the C6-5, meaning lower altitude and more visible flights in smaller open spaces. The smart choice when you have a tight field or a small rocket.
What we like
Right-sized for lighter rockets and smaller flying fields
Lower altitude means easier recovery — no long walks downfield
What to know
Too weak for mid-size rockets — underwhelming on the Alpha III
4-second delay deploys chute slightly before apogee on some rockets
The D12-5 is the upper end of what most beginner rockets can handle — double the total impulse of a C6-5. On the Alpha III or Hi-Flier XL, it delivers 1,500+ feet. The flights are jaw-dropping. Work up to these after a dozen C flights — you will want a bigger open field and calm winds before going this high.
What we like
Double the impulse of C — genuinely impressive altitude
Still within no-certification territory for most beginner rockets
What to know
Higher altitude means longer recovery walk and more wind risk
Some launch sites require a field waiver for D engines — check first
The recovery system is how your rocket doesn't become a lawn dart. Wadding is fireproof paper that goes in the body tube below the parachute — it protects the chute from the hot ejection charge gas. Without it, the charge melts your parachute on the first flight. Most Estes kits include a small sample but you'll run out after a few launches. Buy a bulk pack on day one. A decent replacement parachute is the other thing you'll need sooner than you expect.
Best starter
Estes
Recovery Wadding (75-pack)
$
★★★★★Our rating
Fireproof recovery wadding is the cheapest and most important consumable in the hobby. You stuff three or four sheets into the body tube before each launch — they protect the parachute from the hot ejection gas. A 75-pack is about 20 launches. Stock up, because running out mid-launch day is exactly how you melt your first parachute.
What we like
Non-negotiable safety item — prevents parachute melt on every launch
75-pack gets you through a full season without restocking
What to know
Single-use per flight — you'll burn through it faster than expected
Experienced flyers sometimes switch to reusable dog barf insulation
A replacement parachute is something you'll need sooner than you expect — the stock chute melts, tears, or ends up in a tree within the first season. The 12-inch Estes chute is the standard size for the Alpha III and most comparable rockets. Buy one as a spare before you need one mid-launch day.
What we like
Exact match for the stock chute on most Estes beginner kits
Cheap enough to pre-buy two and keep one as a field spare
What to know
Plastic chutes can still melt if used without recovery wadding
Standard 12-inch size drifts in wind — smaller chute for gusty days
Model rocket kits need specific adhesives and tools — not because they're complicated, but because the wrong glue (white school glue, regular wood glue) is too slow or too flexible for fin joints that experience real G-forces at launch. CA glue (cyanoacrylate) bonds balsa fins in seconds, cures rigid, and is the standard across the hobby. Add a sharp hobby knife for trimming fins and cleaning tubes, and you have everything you need for a proper Skill Level 1 build.
Best starter
Bob Smith Industries
Insta-Cure Super Thin CA Glue
$9.62 as of Jun 22, 2026
★★★★★Our rating· Only 2 left in stock - order soon.
Thin Insta-Cure wicks into balsa wood joints and cures in under 10 seconds — it's the standard adhesive in model rocketry. Apply a drop to the inside of a fin joint and it's locked solid before you've let go. The included accelerator speeds cure to near-instant when you need it. This is what experienced builders use, and it's what you should start on.
What we like
Thin formula wicks into balsa joints for a strong, flush bond
Cures in seconds — no clamp time, no waiting to move on
What to know
Bonds skin instantly — work deliberately and keep acetone nearby
Must store upright in a cool spot or the nozzle clogs between sessions
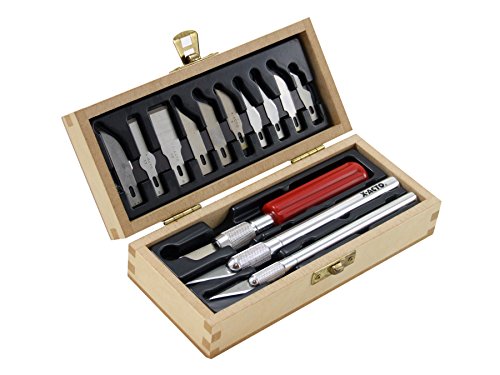
A sharp hobby knife is essential for trimming fin tabs, scribing balsa, and cleaning ejection residue from body tubes. The X-ACTO No. 1 is referenced by name in most Estes kit instructions — it's industry standard. The kit includes multiple blades so you start with sharp edges, not a worn one from someone else's project.
What we like
The industry-standard knife — referenced in most Estes kit instructions
Multi-blade kit means you start sharp, not worn
What to know
Blades dull quickly on balsa — budget for a pack of replacements
Cap the blade whenever you set it down — the exposed tip is invisible
The first launch takes 30 seconds. Everything before and after that — the build, the recovery walk, the next rocket — is what makes this a hobby.
Model rocketry has a reputation for being complicated — certification pathways, engine classifications, stability calculations. None of that applies to you yet. For your first season, the hobby is simple: build a rocket, go to a launch field, light the fuse, watch it go up, find where it came down. Repeat.
The complexity comes later, when you want it. The entry point is just a cardboard tube, balsa fins, and a small cardboard engine. Let’s talk about how it actually goes.
The build: your first afternoon
Most beginners start with an Estes Skill Level 1 kit — the Alpha III is the classic, and it’s the one we recommend. “Skill Level 1” means: balsa wood fins, plastic nose cone, cardboard body tube, pre-printed instructions with diagrams. You don’t need woodworking experience. You need patience, thin CA glue, and a sharp hobby knife.
The build takes two to four hours spread across an evening or two. Here’s what you’re actually doing:
Fin attachment is the heart of it. You’ll cut the fin slots in the body tube, dry-fit the three or four balsa fins, and glue them with thin CA glue. The goal is a fin that’s perfectly perpendicular to the tube — a canted fin will make the rocket spiral instead of climb. Use a launch rod or a straight ruler as a reference during curing.
Nose cone finishing is where the hobby shows its aesthetic side. The balsa nose cone has grain that will show through paint unless you fill it first. Balsa filler (or a coat of sanding sealer, or even thick CA) sands smooth and takes primer cleanly. This step is optional for a first build — some people launch unfinished — but it’s where you learn that building a rocket is actually building a miniature sculpture.
Motor mount and recovery harness go in the aft end. The motor mount holds the engine and redirects the ejection charge upward into the body tube. The elastic shock cord connects the nose cone to the body — when the charge fires, the nose pops forward, the cord stretches, and both pieces descend together under the parachute. Thread it right, or you get the nose separated with no recovery.
You won’t launch alone on your first day out. You’ll go to a launch field operated by a local NAR club — the NAR club finder locates yours. Launch days are typically monthly on a weekend morning. You show up, sign a waiver, introduce yourself as a first-timer, and experienced rocketeers will help you with setup.
The sequence:
Insert recovery wadding (three or four sheets) into the body tube above the motor mount.
Fold the parachute and slide it into the tube above the wadding, attached to the nose cone via the shock cord.
Insert the engine and hook in the igniter wire.
Slide the rocket onto the launch rod.
Walk back to the controller, arm the safety key, count down, press the button.
The launch itself takes about two seconds. The engine burns, the rocket climbs — fast enough that you can’t track it by sight at first. Then coasting silence for a few seconds. Then a small pop (the ejection charge), a flash of orange, and the parachute opens. The whole flight from ignition to peak altitude might be eight to twelve seconds depending on the engine.
Then you walk. Recovery is part of the hobby. The rocket drifts downwind under the parachute, and how far it drifts depends on altitude (engine class) and wind speed. A C6-5 on a calm day might land 100 yards downfield. A D12-5 on a breezy afternoon might put it half a mile away. Learn to read the wind before you choose your engine.
The engine system: the tiered curriculum built into the hobby
One of the genuinely clever things about model rocketry is that its engine classification system accidentally creates a natural progression. You start on A and B engines while you learn the basics — low altitude, easy recovery, cheap enough to replace when you make mistakes. You graduate to C engines when you’ve got the launch procedures solid and want more altitude. D engines require a bigger field and sharper wind awareness.
The letter designates total impulse — each step up roughly doubles the energy. The number after is average thrust in Newtons. The final number is the delay in seconds before the ejection charge fires the parachute.
A B6-4 has B-class total impulse, 6 Newtons average thrust, 4-second delay. Right for the Estes Wizard and lighter kits.
A C6-5 has C-class impulse, same average thrust, 5-second delay. The workhorse for the Alpha III and most Skill Level 1 kits.
A D12-5 is where the flights start feeling genuinely impressive — 1,000 to 1,500 feet on a good high-altitude airframe.
E, F, G and above are high-power rocketry, which requires NAR Level 1 certification. That’s not this season’s problem. When you’re ready, the certification path is well-structured and the club community will prepare you.
The recovery walk: zen and mild frustration
If you ask experienced rocketeers what they remember most from early launches, it’s not the ascent. It’s the recovery walk. You’re scanning a field (or tree line, or cornfield, or neighbor’s yard) trying to spot an orange parachute.
A few practical things that will save you:
Watch it the whole way down. When the parachute opens, don’t take your eyes off the rocket until it’s on the ground. The moment you look away to talk to someone, you lose it.
Bring binoculars to the field. Not essential, but helpful for high-altitude flights where the parachute is a dot against blue sky.
Fly orange or yellow parachutes. White rockets against white clouds are very hard to track. High-visibility orange is easier to follow.
Don’t chase it. Walk toward where it was heading at last sight, and scan slowly. Panicking and running usually puts you in the wrong direction.
When you find the rocket — often slightly battered, occasionally perfect, occasionally missing a fin — you’ve completed your first full flight cycle. Inspect the damage, replace the igniter, fold the parachute again. You’re ready for the next flight.
What to work on in your first season
Launch count matters more than anything else. Fifteen launches with the same rocket, different wind conditions and engine classes, will teach you more than buying five different rockets and flying each one twice. The patterns in flight behavior become readable with repetition.
Learn the safety code before you improvise. The NAR Model Rocket Safety Code is one page and covers separation distances, engine certification, launch site requirements, and observer handling. It exists because the history of the hobby includes the consequences of not following it. Read it, understand it, and don’t improvise around it.
Build a second rocket before you need it. The Alpha III will eventually fail to recover cleanly — a hard landing, a tree, a pond. Build your backup before that happens, not after. The second build goes much faster than the first, and you’ll apply everything you learned on the first kit.
Consider joining NAR. Membership is inexpensive and gives you access to the full launch-site network, their liability umbrella at club launches, and their High Power certification pathway when you’re ready. Most serious hobbyists join within their first season.
When the hobby starts pulling you deeper
At some point in your first season — maybe after your fifth flight, maybe after your fifteenth — the hobby shifts. You stop thinking about whether you’re doing it right and start thinking about what you want to do next.
For most people it’s altitude: a bigger engine, a higher-aspect rocket designed for maximum climb, a field with more sky. For others it’s the build: scratch-designed airframes, multi-stage configurations, electronics bays with altimeters that log peak altitude and velocity. For others still it’s the high-power pathway — NAR certification, composite engines, rockets that need FAA waivers to fly.
All of those are the same hobby, just more of it. For now, load a C6-5, point it into a calm sky, and press the button.
Save your money
What you don't need yet
Beginners get pressured to buy a lot of stuff that doesn't help them play
better. Here's what we'd skip on day one.
High-power rockets (G class and above) — Requires NAR Level 1 certification. Learn the hobby first — you'll know when you're ready.
Electronic altimeter — Useful once you're flying consistently and want telemetry data. Premature on day one.
GPS tracker — Adds weight and complexity to an early build. Learn to read the wind instead.
Reloadable motor casings — Single-use engines are cheaper while you're figuring out your preferences. Reloadables pay off later.
Multi-stage or clustered rockets — Way beyond beginner territory. Fly single-stage kits for the first year.
Scratch-built airframe designs — Kit builds for the first year. The math behind stability and CG isn't trivial.
First week
Your first seven days
A short, real plan to get from gear-on-doorstep to actually playing.
Find your local NAR club and their next launch date. · Action
NAR Club Finder · National Association of Rocketry — official club directory
Build your rocket. Take two evenings if you want — there's no rush and a careful build flies better than a hurried one. · Action
Attend your club's launch day. Introduce yourself as a first-timer — experienced rocketeers are almost universally enthusiastic about helping beginners fly safely. · Action
FAQ
Common questions
Do I need certification to start model rocketry?
No. A- through D-class engines require no certification — anyone can buy, fly, and enjoy them. NAR Level 1 certification is required for high-power rocketry (G class and above, generally), which won't be relevant until you've been flying for months and are ready to move up.
Where can I legally launch a model rocket?
You need open, unobstructed land with no air traffic — not most backyards or public parks. The practical answer is a local NAR-affiliated club's launch site. Clubs handle FAA waivers and field safety. The NAR club finder locates your nearest club and their launch schedule.
Which engine should I start with?
The C6-5 is the standard recommendation for the Alpha III and most beginner kits. Check the engine recommendation on the side of your kit's box — it will list the specific engines that have been tested with that rocket. Using a bigger engine than recommended is how beginners destroy their first rocket.
How high does a model rocket actually fly?
On A and B engines: a few hundred feet — you can track it easily with your eyes. On a C6-5: around 500–800 feet depending on rocket weight. On a D12-5: 1,000–1,500+ feet on a high-altitude design like the Hi-Flier XL. High enough to disappear into a blue sky and come back under a parachute.
How much does each launch cost?
A C-class engine runs about $4–6 each, plus a few sheets of recovery wadding (pennies). Plan on $5–8 per flight. The hardware — launch pad, controller, the rocket itself — is reused indefinitely until you crash it.
Is model rocketry dangerous?
The NAR safety record is genuinely excellent — the hobby has been practiced safely by millions of people since the 1950s. The safety code exists for good reasons and it works. The main risks are ignoring the separation distances, launching in wind without adjusting for drift, and using the wrong engine for your rocket.
National Association of Rocketry (NAR) — The governing body for sport rocketry in the US. Safety code, certification program, club finder, and the FAA waiver process. Start here.
ThrustCurve.org — The complete database of certified rocket motor thrust curves. Search by impulse class, manufacturer, or diameter to compare engines for any rocket.
Apogee Rocketry — Peak of Flight Newsletter — Free bi-weekly newsletter from one of the top rocketry retailers. Technical, educational, and accessible — the best ongoing education in the hobby.
The Rocketry Forum — The dominant online community for model and high-power rocketry. Search before asking — nearly every beginner question has a well-answered thread.
Estes Rockets — The manufacturer whose kits most beginners start with. Their website has kit-specific instructions, engine recommendations, and a decent video library for first builds.
r/rocketry — Active subreddit spanning model, high-power, and amateur rocketry. Good for build photos, flight reports, and quick sanity-checks on beginner questions.
As an Amazon Associate, JustBeginning earns from qualifying purchases.
We may also earn commission from other affiliate programs linked on this
page. Editorial recommendations are independent; we don't choose
products based on commission rates.
Product prices and availability are accurate as of the date and time
indicated and are subject to change. Any price and availability
information shown on Amazon at the time of purchase will apply.

 Best starter