CNC routing is woodworking with a GPS. The machine follows exact coordinates, repeats the same cut perfectly hundreds of times, and produces results that would take a skilled craftsman hours to lay out. The hard part isn't the cutting. It's learning the software chain from design to toolpath. Here's what to buy and what to skip.
By Colin B. · Published May 24, 2026 · Last reviewed June 12, 2026
The machine is the big spend ($500–1500). Budget another $150–300 for bits, workholding, dust collection, and safety gear before your first cut.
We earn commission on qualifying Amazon purchases — see our
affiliate disclosure.
Price tiers and budget totals shown above are editorial estimates;
actual Amazon prices vary.
At a glance
Our top pick in each category
The fastest path through this guide — each best-starter pick by category.
Scroll for the budget and upgrade alternatives.
Software is not an afterthought. Every CNC workflow has two phases: design (drawing what you want) and CAM (telling the machine how to cut it). Carbide Create is free and pairs perfectly with Shapeoko machines. VCarve Desktop costs $350 but is significantly more powerful. Decide which path you're on before you buy the machine.
Your first CNC will cut mostly wood and MDF. Not aluminum, not steel (not yet). A beginner-class machine in the $500–900 range handles wood, soft plastics, and circuit boards. Don't buy for the materials you want to cut someday; buy for what you'll cut this year.
You will break end mills. Every beginner does, usually by setting feeds and speeds too aggressively or from a workholding failure. Buy a few extras upfront and treat the first breakage as tuition, not disaster.
This is the decision that shapes everything else. Hobby CNC routers split into three tiers: desktop machines (small, limited to soft materials), hobbyist class (Shapeoko-size, the real sweet spot for beginners), and pro class (production-capable, larger price). For most people starting out, the hobbyist class is the right answer: big enough to do real work, small enough to fit in a spare bedroom, with communities and tutorials built around them.
CNC Machines — what's the difference?
A few common shapes, each making a different trade.
Desktop / 3018-class
Tiny footprint, soft materials only. Learning CAD/CAM, not production.
Work area
~180×100mm
Materials
Foam, PCBs, balsa
Price
$100–350
Best for Total beginners learning software before committing to a bigger machine
Tradeoff Too small and underpowered for meaningful wood projects
Hobbyist / Shapeoko-class
The sweet spot. Cuts hardwood, fits a bedroom shop, real community.
Work area
~420×420mm
Materials
Wood, MDF, soft plastics, foam
Price
$500–1200
Best for Most beginners: big enough for real projects, small enough for home use
Tradeoff Belt drive limits precision on very aggressive cuts or aluminum
Pro / Ball-screw class
Production rigidity, larger cutting area, serious shop commitment.
Work area
~900×900mm
Materials
Hardwood, aluminum, solid surface
Price
$1500–3000
Best for Makers who know they want to sell their work or cut aluminum
Tradeoff Heavy machine, long lead times, steep learning curve if you skip hobbyist class
Best starter
BobsCNC
Evolution 4 CNC Router Kit with Router
$$
★★★★★Our rating
The Evolution 4 is the hobbyist CNC that actually shows up on Amazon. Work area is 610 × 610 mm, the Makita router is included, and the GRBL controller works with Carbide Create, Easel, or any standard CAM sender. The plywood frame is lighter than aluminum extrusion machines but more than adequate for wood and MDF. Active community; assembly is well-documented.
What we like
Router included; no separate spindle purchase to get started
610×610mm work area handles most hobby-scale projects
GRBL controller: pairs with any standard CAM software
What to know
Plywood frame less rigid than aluminum extrusion on aggressive hardwood cuts
No dust shoe included; source or print one before first cut
The 3018-PROVer is how thousands of people learned CNC without committing $500 upfront. Work area is 300 × 180 mm, small but enough for signs, coasters, PCBs, and shallow relief carving. Includes limit switches and an emergency stop, which the original 3018 lacked. Use this to learn the software chain before sizing up.
What we like
Under $250: lowest-risk way to learn CAD/CAM before committing
Limit switches and E-stop included; safer than the original 3018
Large user community with extensive tutorial coverage
What to know
300×180mm work area is too small for most woodworking projects
Underpowered for hardwood; foam, balsa, MDF, and PCBs only
Quantum Max CNC Router Kit with Router (50" × 24")
$$$
★★★★☆Our rating
When the Evolution 4 feels small, the Quantum Max doubles the cutting length to 50 inches, enough for cabinet panels and full sign blanks. Same BobsCNC ecosystem (GRBL, Makita router included), same software workflow. The larger footprint requires a dedicated workspace, but if you're cutting production quantities, the Quantum Max is the logical next step.
What we like
50" cutting length handles full cabinet panels and sign blanks
Same BobsCNC ecosystem; existing workflow transfers directly
Makita router included; no additional spindle cost
What to know
Requires dedicated shop space; too large for most bedroom setups
Plywood frame: same flex limitation as the Evolution 4, just bigger
End mills are the actual cutting tools (not drill bits, and the distinction matters). For wood, a 1/4-inch downcut spiral is your everyday bit: it leaves a clean top surface and pushes chips down instead of throwing them. An upcut moves chips up and clears faster but can fray the top face. Buy a few of each; you will break some on early cuts. Cheap bits are false economy; dull edges burn wood and stall the machine.
Best starter
YONICO
32210-SC 1/4" Downcut Spiral Router Bit
$16.95 as of Jun 22, 2026
★★★★★Our rating· Only 20 left in stock - order soon.
Downcut geometry pushes chips down instead of lifting them, which means a clean top surface on plywood and MDF: exactly what you want on signs, boxes, and flat-panel work. YONICO's carbide is solid for hobby use. Buy two or three at a time; first-session breakage is common and you don't want to halt mid-project waiting for a replacement.
What we like
Downcut geometry = clean top surface on plywood and MDF
Solid carbide holds an edge well through hobby-volume cutting
Affordable enough to buy a few spares and not stress breakage
What to know
Downcut packs chips in deep pockets; take more passes at shallower depth
Single bit; order multiples (breakage happens early in the learning curve)
★★★★☆Our rating· Only 8 left in stock - order soon.
A mixed set (upcut, downcut, and compression cuts) under $30 gives you a working vocabulary of bit types before you commit to buying specialty bits in quantity. Upcut clears chips in deep pockets; downcut finishes top surfaces; the compression bit does both at once on laminate and plywood. Good introduction to why geometry matters.
What we like
5 bits covering upcut, downcut, and compression for full type coverage
Under $30: affordable way to learn which geometry suits your work
TAC coating improves edge retention vs uncoated carbide
What to know
Sampler set, not depth stock; reorder the types you use most
Slight quality variance between bits; inspect before committing to a cut
★★★★☆Our rating· Only 13 left in stock - order soon.
Once you need fine detail (inlays, small lettering, relief carving) a 1/8-inch bit is essential. Amana is the professional standard for carbide end mills, and even one will last hundreds of hours of careful cutting. Buy this after you've broken a few cheap bits and understand why a sharper edge matters.
What we like
Professional-grade carbide; holds an edge through serious production runs
1/8" diameter opens up inlay and lettering work impossible with larger bits
Amana geometry cuts hardwood cleanly without burning or deflecting
What to know
Pricier per bit; save it for good material, not test cuts
Slender shaft deflects easily; conservative depth-of-cut is non-negotiable
If your stock moves mid-cut, the piece is ruined and you've got a loose bit flailing at full speed. Workholding is unsexy but critical. T-track systems let you clamp anywhere in the work area and reset quickly between pieces. The other popular beginner method (blue tape plus super glue on the spoilboard) is genuinely effective and costs almost nothing once you have the materials.
Best starter
POWERTEC
71004 T-Track Clamp Set (20-piece)
$15.99 as of Jun 22, 2026
★★★★★Our rating· In Stock
T-track clamps are the standard CNC workholding system. You route T-track slots into your spoilboard, drop in these clamps, and tighten with a hex key. Repositionable in seconds, holds stock flat without over-clamping, and survives the occasional bit strike that tags a clamp instead of the stock. Twenty pieces covers most spoilboard layouts.
What we like
Repositions in seconds with no fussing between different stock sizes
Survives occasional bit strikes without damaging the machine
20-piece set covers most spoilboard layouts out of the box
What to know
Requires routed T-track slots in spoilboard; setup before first use
Low-profile clamps can be bypassed by thin or warped stock
The tape-and-super-glue method is beloved in the CNC community: double-sided tape on the spoilboard, super glue on the back of the stock, press together. Holds incredibly well for the cut, then pops off cleanly with a putty knife. This 3M tape has exactly the right tack: enough grip but not so much that it tears the spoilboard.
What we like
Tape-and-glue method holds extremely well without obstructions above stock
Ideal for thin or irregularly shaped pieces clamps can't hold
Releases cleanly with a putty knife, no residue
What to know
Fails on dusty or warped surfaces; stock must be flat and clean
Single-use; costs add up on high-volume production runs
CNC routers produce enormous amounts of fine dust, especially in MDF, which is a health hazard. A dust shoe (a skirt around the router that connects to a vacuum) catches 80–90% of dust at the source. Pair it with a shop vacuum and a cyclone separator to keep the vac filter from clogging every session. This is not optional safety theater; MDF dust is a real respiratory risk.
Best starter
RIDGID
RT1200 NXT 12-Gallon Wet/Dry Shop Vac
$$
★★★★★Our rating
A 12-gallon shop vac has enough suction to pull chips from a standard CNC dust shoe without losing flow as the canister fills. RIDGID's HEPA filter is important; standard shop vac filters let fine dust blow straight through. The 7-foot hose and casters make it easy to reposition around a hobby bench setup.
What we like
HEPA filter captures fine MDF dust that standard filters pass through
12-gallon capacity runs through a full session without emptying
RIDGID parts available everywhere; hose and filter are easy to replace
What to know
Hose may need adapter for third-party dust shoes; verify diameter
Loud; hearing protection recommended during full sessions
★★★★☆Our rating· Only 16 left in stock - order soon.
The Dust Deputy sits between your dust shoe and the shop vac, spinning chips into a separate bucket before they reach the filter. Filter cleaning drops from every session to every few months. The Deluxe kit includes a 5-gallon bucket; just add your own shop vac hose. Required equipment once you're cutting regularly.
What we like
Keeps 99% of chips out of the shop vac filter; filter lasts months
Deluxe kit includes bucket; plug-and-play with any shop vac
Massive suction reduction time spent cleaning filters
What to know
Slight suction loss (~5%) in the hose chain
Takes up floor space; a second bucket to trip over near the machine
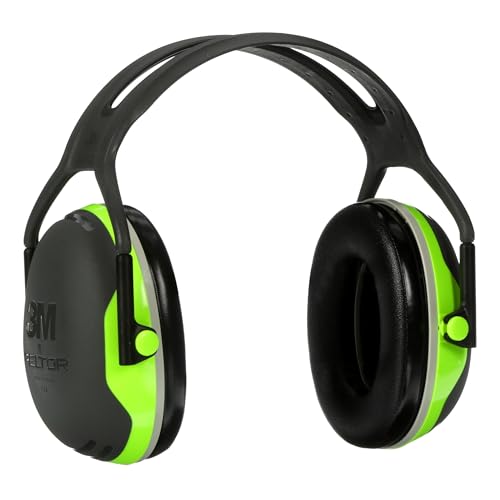
CNC routers are noisy, produce fine dust, and can throw chips at eye level. Three items belong on your workbench before the first cut: hearing protection rated for shop equipment, safety glasses rated for impact, and an N95 respirator for MDF and composites. The machine has a guardrail. Your lungs and ears don't.
Best starter
3M
Peltor X4A Over-the-Head Earmuffs
$37.99 as of Jun 22, 2026
★★★★★Our rating· In Stock
NRR 27 earmuffs that fold flat for storage and sit comfortably over glasses. The X4A is the CNC and woodworking community standard: loud enough that the router spindle doesn't register as uncomfortable, quiet enough that you can still hear the machine's tone shift if something goes wrong. Don't cheap out on hearing protection; hearing loss is permanent.
What we like
NRR 27; rated for shop tools including router spindles
Folds flat for storage; comfortable over glasses
Still lets you hear the machine's tone change if a cut goes wrong
What to know
Warmer than foam plugs in summer shop conditions
Cushions compress over 2–3 years; replace when seal degrades
MDF dust is classified as a carcinogen when inhaled regularly. The Aura 9205+ seals better than a flat-fold N95: the domed shape creates real clearance away from your mouth, and it stays put during a 90-minute session. A 10-pack lasts a few months of regular cutting; replace when the mask gets dusty inside or breathing becomes noticeably harder.
What we like
Domed shape seals better than flat-fold N95 during active work
10-pack provides months of supply at regular cutting pace
NIOSH-approved N95 filtration; proper protection for MDF dust
What to know
No vapor protection; not for lacquers, finishes, or solvents
Must be replaced when inside surface becomes dusty or seal degrades
Most people who buy a CNC router expect to be cutting parts within a day. Most people are cutting parts within a day. The harder surprise is that the machine itself is the easy part: it does exactly what you tell it. The challenge is learning to tell it the right thing.
That’s the CAD-to-CAM-to-machine software chain, and it’s where new CNC owners actually spend their first month. This guide walks you through what that chain looks like, what’s going to go wrong, and what a good first month of CNC routing actually produces.
Week 1: Before you touch the machine
Download Carbide Create before the machine arrives. It’s free, it runs on any laptop, and you can design and simulate toolpaths without a machine connected. Spend a few hours here.
Your first exercise: model something simple. A coaster. A name sign. A box joint corner piece. Draw the profile, apply a pocket toolpath, simulate the cut. Watch where the bit goes. Change the depth. Change the step-over. Run the simulation again. This takes twenty minutes and teaches you more than three hours of YouTube.
The software chain has two stages that beginners often blur together:
CAD (Computer-Aided Design) is drawing what you want. In Carbide Create, this means lines, circles, polygons, and imported SVG files. The output is geometry, a shape on screen.
CAM (Computer-Aided Manufacturing) is telling the machine how to cut it. You take that geometry, assign a toolpath (pocket, contour, V-carve, drill), set the depth, the bit diameter, the feed rate, and the plunge speed. The output is G-code, a list of machine instructions.
Most beginner confusion lives at the boundary between these two. “Why isn’t it cutting the right shape?” is usually a CAD problem (the profile is wrong). “Why is it burning the wood?” is usually a CAM problem (feed rate too slow, depth per pass too deep, wrong bit).
Week 2: First cuts and what goes wrong
Assemble the machine carefully. Follow the tramming instructions (this is aligning the spindle perpendicular to the wasteboard). A machine that’s out of tram cuts angled walls on pockets and can’t produce flat floors. Every CNC manual covers tramming; don’t skip it.
Surface the spoilboard first. Before any real project, run a facing operation across the entire wasteboard at shallow depth. This makes your cutting surface perfectly flat relative to the machine, which is the prerequisite for every clean cut after. It also gives you a feel for how the machine moves and what feeds sound like.
Your first real cut should be in cheap pine or MDF, not the hardwood you’re saving for later. On that first session, you will:
Get the workholding wrong at least once. Either the stock moves mid-cut (terrifying, ruin the piece) or the clamps are in the path of the bit (same). T-track clamps and the tape-and-super-glue method both work; the key is planning clamp placement before generating the toolpath.
Set the feed rate too fast and snap a bit, or too slow and burn the wood. This is normal. Start with Carbide Create’s built-in presets for pine and work from there.
Forget to account for bit diameter in the toolpath and end up with pockets that are slightly too big or too small. This is the “offset” concept in CAM; understand it on day two, not day ten.
Week 3: Understanding feeds and speeds
Every experienced CNC user has a mental model of feeds and speeds. Every beginner ignores this until a bit breaks or the wood burns. Skip that learning sequence.
Feed rate is how fast the machine moves sideways. Spindle speed is how fast the bit spins. Depth per pass is how deep the bit cuts on each pass. These three numbers interact, and getting them wrong is the source of most beginner problems.
Signs you’re going too fast: the bit deflects, finish is rough, you hear chattering.
Signs you’re going too slow: wood is burning brown at the cut edges, the bit is rubbing instead of cutting.
Signs the depth is too deep: bit snaps, machine stalls, cut walls are angled.
The practical shortcut: use the FSWizard calculator (free online). Enter your material, bit diameter, number of flutes, and spindle RPM. It spits out starting values. Use them, then adjust from there based on what you hear and see.
Carbide Create’s built-in feeds and speeds for “Wood (Soft)” and “Wood (Hard)” are conservatively correct for a new Shapeoko operator. Start there. You can always push harder once you know what the machine sounds like when it’s happy.
Week 4: First project that makes you proud
By week four, you know the software well enough to design something real. The milestone to aim for: a project with more than one toolpath operation.
A good week-four project: a box with finger joints, or a sign with both V-carving (lettering) and a pocket background. This requires at least three toolpath passes (contour the outside, pocket the background, V-carve the text), which forces you to understand tool changes, toolpath order, and hold-down strategy for multiple operations.
You will set up the file, simulate it, think it looks right, cut it, and find one thing that’s slightly off. This is the normal cycle. The person who makes a perfect first project doesn’t exist.
What you’re building in month one isn’t skill. It’s pattern recognition. After 10–15 cuts you start to hear the difference between a clean cut and a struggling one. You start to anticipate where the workholding will be a problem before it becomes one. The machine stops feeling like a black box and starts feeling like a tool.
Running the simulation but not checking for clamp collisions. The simulation shows you where the bit goes. It doesn’t show your clamps. Run the simulation, then manually trace the toolpath at table height with your finger and check every clamp.
Buying expensive wood for the first cut. Walnut is beautiful. It also costs $15/board-foot and teaches you nothing that pine doesn’t. Cut pine until you can produce clean results reliably. Then switch.
Skipping the wasteboard surface. An unsurfaced wasteboard is uneven. Uneven means your cuts are different depths in different areas. Surface it.
Not securing the stock in both axes. A clamp that prevents forward-backward movement fails sideways. Use at least two clamps, positioned to resist movement in all horizontal directions.
Treating the router bit like a drill bit. A router bit cuts sideways, not straight down. Plunging too aggressively breaks bits. Use a ramp entry in your CAM settings so the bit spirals in gradually rather than drilling straight down.
What to do in month two
Find a project with functional requirements. Not a sign, not a test piece. Something that has to fit something else. A drawer, a bracket, a replacement part. Dimensional accuracy under constraint is where CNC routing becomes genuinely useful, and it’s where you find out how good your setup actually is.
Join the Carbide 3D community forum and post your first cut photo. Ask questions. This community is genuinely helpful and specifically patient with beginners. You’ll get better answers there than anywhere else.
When you’re ready to go deeper on software, look at Fusion 360 (free for hobbyists). It’s dramatically more powerful than Carbide Create for 3D work and complex joints. The learning curve is real, but the tutorials are excellent and the community is massive.
Save your money
What you don't need yet
Beginners get pressured to buy a lot of stuff that doesn't help them play
better. Here's what we'd skip on day one.
A laser engraver add-on — Learn to cut clean parts first. Laser is a separate skill and a separate safety category.
VCarve Pro ($700) — Start with Carbide Create (free) or VCarve Desktop ($350). Pro adds features you won't need for 6–12 months.
A 4th axis rotary attachment — Cylindrical carving is advanced. Master flat work first.
Aluminum-specific end mills — You're not cutting aluminum yet. The starter machine may not handle it well anyway.
An enclosure — Dust collection handles the mess. Sound-dampening enclosures make sense later, once you know your workflow.
Touch-probe zero-finding kit — Manual Z-probing with a paper slip teaches you more in the first month. Add the probe once you're running production quantities.
First week
Your first seven days
A short, real plan to get from gear-on-doorstep to actually playing.
Download Carbide Create (free) and run the built-in tutorial project before the machine arrives. · Action
Surface your spoilboard (face-mill the entire surface flat) as your very first job. It calibrates the machine and gives you a reference plane. · Action
Cut your first real project from cheap pine or MDF, not expensive hardwood. Save the good material for after your first dozen cuts. · Action
Join the Carbide 3D community forum, post your first cut photo, and ask questions without embarrassment. · Action
How much does it really cost to get started with CNC routing?
Budget $800–1500 for a real beginner setup. The machine ($500–900 for hobbyist class), end mills ($50–80), workholding ($40–60), dust collection ($150–250), and safety gear ($40–60). Desktop 3018 machines run $100–300 but are too limited for meaningful wood projects.
Do I need CAD experience to use a CNC router?
No. Carbide Create lets you draw shapes directly with no CAD background. More complex designs benefit from Inkscape (free) or Fusion 360 (free for hobbyists), but you can cut useful things your first week using only Carbide Create's built-in tools.
What's the difference between a CNC router and a laser engraver?
A router physically removes material with a spinning bit. A laser burns or vaporizes a thin surface layer. Routers can cut full depth through stock; lasers engrave and cut thin material. Both are digital fabrication tools, but they're separate skills with different safety requirements.
Is CNC routing safe for a home shop?
Yes, with proper precautions: hearing protection (router spindles are loud), eye protection (chips fly at eye height), and a dust collection setup with N95 respiratory protection for MDF cuts. The machine itself has no exposed blade. The spinning end mill is the hazard, and it's easy to never be near it during a cut.
Shapeoko vs. X-Carve: which should I buy?
Both are excellent hobbyist machines. Shapeoko comes with free CAM software (Carbide Create) and has a larger active community. X-Carve uses Easel (also free) and pairs with the Inventables ecosystem. If you're not already committed to a software ecosystem, Shapeoko's community advantage is real; the forums have seen every beginner problem.
What materials can a hobby CNC router actually cut?
Wood, MDF, plywood, foam, soft plastics (HDPE, UHMW), circuit boards (PCBs), and with care, aluminum (though aluminum requires an aluminum-specific end mill, slower feeds, and ideally a more rigid machine). Hardwood (oak, maple, walnut) cuts fine on hobbyist machines. Stay off steel and cast iron.
How long does it take to learn CNC routing?
First successful cut: 1–2 weekends. Comfortable with feeds, speeds, and workholding: 1–2 months. Designing and cutting complex projects reliably: 6 months. The software learning curve (CAD to CAM to machine) is the bottleneck, not the cutting itself.
Carbide 3D Community Forum — The most active beginner CNC forum online. Machine-agnostic enough to help non-Shapeoko users. Search before posting; your question has been asked.
Winston Moy (YouTube) — Deep-dive Shapeoko tutorials and project builds. The best single channel for new Shapeoko owners; start with his setup and tramming series.
CNC Router Tips (YouTube) — Machine-agnostic fundamentals: feeds, speeds, workholding, toolpaths. Watch this before touching your machine.
r/hobbycnc — Active community across machine brands. Good for sourcing advice and troubleshooting. Post photos of failed cuts; diagnosis is fast.
Carbide Create — Free CAM software. Works with any GRBL-based machine, not just Shapeoko. Download this before the machine arrives.
FSWizard (Feeds & Speeds Calculator) — Free feeds-and-speeds calculator. Enter your material, bit diameter, RPM, and it gives you feed rate and depth of cut starting points.
As an Amazon Associate, JustBeginning earns from qualifying purchases.
We may also earn commission from other affiliate programs linked on this
page. Editorial recommendations are independent; we don't choose
products based on commission rates.
Product prices and availability are accurate as of the date and time
indicated and are subject to change. Any price and availability
information shown on Amazon at the time of purchase will apply.
Our top pickBobsCNC Evolution 4 CNC Router Kit with Router