Blinking your first LED, soldering your first joint, building a circuit that actually does something. This is a hobby that grows with you. The entry cost is surprisingly low: a $35 kit and a $25 iron gets you further than you'd think. Here's exactly what to buy, and what to skip entirely.
By Colin B. · Published May 24, 2026 · Last reviewed June 9, 2026
Under $70 gets you fully started: a microcontroller kit plus a basic iron and solder. Add a $20 multimeter and you're set for everything in your first six months.
We earn commission on qualifying Amazon purchases — see our
affiliate disclosure.
Price tiers and budget totals shown above are editorial estimates;
actual Amazon prices vary.
At a glance
Our top pick in each category
The fastest path through this guide — each best-starter pick by category.
Scroll for the budget and upgrade alternatives.
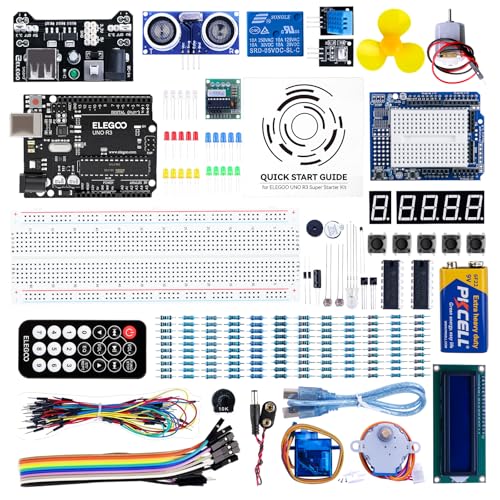
Start with the microcontroller kit before you buy a soldering iron. The Elegoo UNO R3 starter kit arrives pre-assembled: you can blink an LED in 20 minutes with no soldering at all. Learn whether you like the hobby first, then buy the iron.
The soldering iron you don't want is the 30-watt fixed-temperature pencil from the hardware store. No temperature control means cold joints, burnt pads, and frustration. Spend a little more for adjustable temp. It's genuinely the difference between success and giving up.
Breadboard before you solder. Breadboards let you prototype circuits without committing any solder: push components in, test the circuit, change your mind. Solder only when you're ready to make something permanent.
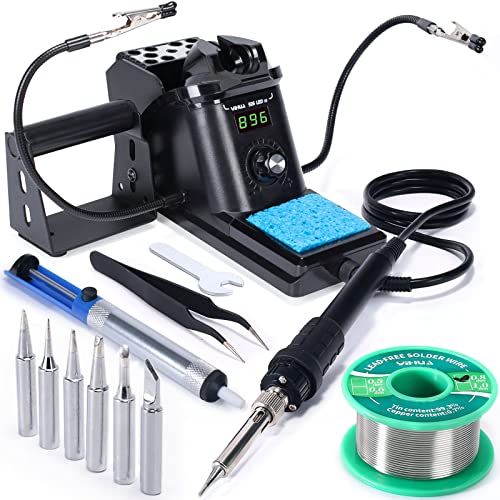
The iron is where most beginners make their first mistake: buying a cheap pencil iron with no temperature control. Adjustable temperature is the difference between clean, shiny joints and frustrating cold joints that fall apart. You don't need a $100 station: a USB-C iron like the Pinecil or a basic station in the $35-80 range handles everything a beginner needs.
Soldering Iron — what's the difference?
A few common shapes, each making a different trade.
Fixed-watt pencil iron
Cheap, but temperature is a guessing game.
Power
25-40W fixed
Temp control
None
Price
$10-15
Best for Absolute last resort only, not recommended for beginners
Tradeoff No temperature control; cold joints and burnt pads guaranteed
Temperature-controlled station
Digital display, swappable tips, stays at your desk.
Power
50-65W adjustable
Temp control
Dial or digital
Price
$35-110
Best for Home workbench users who want a traditional setup
Tradeoff Not portable, designed to stay plugged in at your bench
The Pinecil heats to working temp in under 10 seconds, runs off any USB-C PD charger (including your laptop brick), and has open-source firmware you can actually configure. At ~$25, it outperforms irons twice the price. This is what we'd hand a friend on day one.
What we like
Heats to working temperature in under 10 seconds
Runs off any 65W USB-C PD charger you already own
Open firmware, configurable, community-supported, hackable
What to know
Needs a PD-capable charger; phone chargers won't power it
Slim handle isn't for everyone; some prefer a chunkier grip
A proper temperature-controlled station for $35-45. Not as fast to heat as the Pinecil, but it comes with a real stand, a brass tip cleaner, and knob-based controls that are approachable for a first-timer who prefers a traditional setup.
What we like
Temperature dial is dead simple, no firmware or menus
Comes with a stand and brass tip cleaner in the box
Mains-powered: full wattage from any standard outlet
What to know
Slower to heat than a Pinecil or Hakko
Included tips are coarse; fine-point tips sold separately
The FX-888D is the benchmark that everything else gets compared to. Rock-solid temperature stability, a massive tip ecosystem, and genuine long-term durability. Most serious hobbyists end up here eventually. Buy it once you know you'll be soldering for years.
What we like
Temperature stable within 1-2°C, the hobbyist benchmark
Huge Hakko tip ecosystem; swap tips in seconds
Built to last years of heavy use, a one-time purchase
What to know
~$100 is overkill until you're sure this hobby sticks
An Arduino-compatible board is the starting point for almost every hobby electronics project: blinking LEDs, reading sensors, controlling motors, building your own gadgets. The key phrase is 'starter kit': you want a bundle that includes the board, a breadboard, jumper wires, resistors, LEDs, and a few sensors. Buying components piecemeal triples your setup time and delays your first project by days.
Best starter
Elegoo
UNO R3 Super Starter Kit
$44.99 as of Jun 22, 2026
★★★★★Our rating· In Stock
This is what most beginners should buy first. Arduino UNO-compatible, comes with a complete component set (breadboard, wires, resistors, LEDs, sensors, LCD screen, servo motor), free tutorial PDFs for 30+ projects, and costs $35. It's the single purchase that gets you from zero to blinking LED in 20 minutes.
What we like
Complete kit: breadboard, wires, sensors, LCD, servo included
Free tutorial PDFs walk you through 30+ beginner projects
UNO-compatible: run any Arduino code without modification
What to know
Not an official Arduino board, functional but not premium quality
Tutorial quality varies; some skip explanation, just show code
The original board, the one the entire community was built around. Better component quality, unambiguous compatibility, and real peace of mind. Buy this if you want the authentic experience; then source a component variety pack separately.
What we like
Official hardware with unambiguous compatibility with every library
Every tutorial photo looks like your board; no guesswork
What to know
Board only; add $20-30 for breadboard, wires, and components
SunFounder Raspberry Pi Pico W Ultimate Starter Kit
$69.99 as of Jun 22, 2026
★★★★☆Our rating· In Stock
The future-proof option: runs MicroPython (real Python, not C-like Arduino sketches), has built-in WiFi for IoT projects, and the bare board costs $6. Most hobbyists who stick with the hobby end up on a Pico or ESP32 eventually, and this kit gets you there faster.
What we like
Runs real Python (MicroPython), no C++ knowledge needed
Built-in WiFi opens up IoT projects from day one
The board itself costs $6, the cheapest capable platform available
What to know
Debugging tools less mature than Arduino IDE's serial monitor
Fewer beginner tutorials than Arduino; you'll Google more
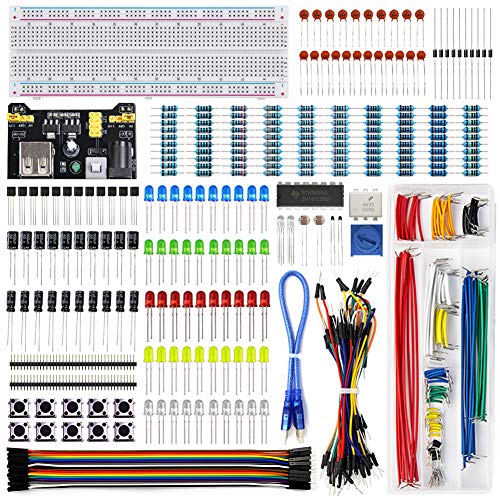
A breadboard is a plastic board with holes that lets you build temporary circuits without soldering: push components and wires in, test the circuit, change your mind. It's the first tool you'll use. The best first buy is a variety component pack: resistors, LEDs, capacitors, transistors. Having them all means you won't wait a week on shipping when a tutorial calls for a 10kΩ resistor.
Best starter
REXQualis
Electronics Component Fun Kit
$15.98 as of Jun 22, 2026
★★★★★Our rating· In Stock
An honest variety pack: resistors, capacitors, LEDs, transistors, diodes, potentiometers, and tactile buttons in labeled compartments. Everything you need for the first 50 tutorials, all for $15. Buy this before you need specific parts and you'll never be blocked by a missing component.
What we like
Covers resistors, caps, LEDs, transistors, diodes in one box
Labeled compartments, no digging through mixed bags of parts
~$15 for parts that cost $50+ bought individually
What to know
Some component values mislabeled; verify with a multimeter
Component quality varies; a few may be out of spec
Three 830-tie-point breadboards for $9. You'll use multiple breadboards simultaneously as projects grow, with one for power rails, one for your main circuit, one for the sensor block. Don't buy just one.
What we like
Three boards for $9; stock up before you need a second one
830 tie-points is the standard size for tutorial circuits
What to know
Adhesive backing doesn't grip slick or polished surfaces
No jumper wires included, buy separately or get a component kit
Seventy-two common resistor values, 10 of each, in a labeled compartment box. When a schematic calls for a 4.7kΩ pull-up or a 220Ω LED current limiter, you just open the box. The 1% metal film variety is more accurate than the carbon film in most beginner kits.
What we like
72 values in a compartmented box, no hunting through loose bags
1% metal film: more accurate than carbon film in beginner kits
What to know
Must read color bands or multimeter to identify values
10 per value means common ones (10kΩ, 1kΩ) run out quickly
The iron is only half the equation. You also need solder (obviously), flux for difficult joints, a tip cleaner, and a way to hold your work still. Total cost for all consumables is $25-40 and they'll last a beginner a year or more. Don't cheap out on solder; the metal is the actual joint.
Best starter
Kester
44 Rosin Core Solder, 0.031" Diameter
$13.43 as of Jun 22, 2026
★★★★★Our rating· In Stock
Kester 44 is the classic electronics solder: 63/37 tin-lead eutectic alloy with a rosin flux core. This is what the industry has used for decades because it flows clean, creates shiny reliable joints, and is forgiving with a beginner iron. The 0.031" diameter works for through-hole and compact surface-mount pads.
What we like
63/37 eutectic alloy: flows at one temperature, no mushy phase
Rosin core flux, self-cleaning, no separate flux for most joints
0.031" diameter works for through-hole and compact SMD work
What to know
Contains lead; ventilate workspace and wash hands after use
Not RoHS compliant; can't be used in commercial products
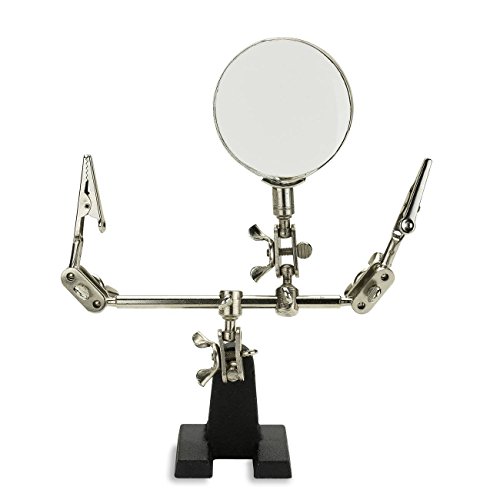
01902 Adjustable Helping Hand with Magnifying Glass, Third Hand Solder Aid, Soldering Wire Station Stand with Dual Alligator Clips and a Heavy Base
$16.98 as of Jun 22, 2026
★★★★☆Our rating· In Stock
Soldering requires both hands, but your board needs to be held still too. A helping hands stand (weighted base, articulating alligator clips, and a magnifying glass) is the difference between precise work and burned fingers. Essential once you move beyond breadboard prototyping.
What we like
Frees both hands for iron and solder, the game-changer for precision
Articulating clips hold boards and wires at any angle
Magnifying glass catches cold joints you'd miss with the naked eye
What to know
Alligator clips can scratch delicate PCBs if overtightened
Base can tip if you extend the arms at aggressive angles
Flux makes stubborn joints flow. Apply a drop to a pad that won't wet, touch it with the iron, and solder flows instantly. No-clean formula means no residue to scrub off. Sounds optional until you encounter a difficult joint, then it becomes indispensable.
What we like
No-clean formula, zero residue to remove after soldering
Pen applicator puts flux exactly where you need it
What to know
Overkill for basic through-hole work where rosin-core solder suffices
Strong smell during application; ventilate your workspace
A multimeter is the most important tool in hobby electronics after your soldering iron. It tells you if your circuit is shorted, if your power rail is actually 5V, if a component is fried, and if a solder joint is connected. The $20 ones do everything a beginner needs. An oscilloscope is real gear, great eventually but completely unnecessary for your first year.
Best starter
AstroAI
Digital Multimeter TRMS 6000
$34.99 as of Jun 22, 2026
★★★★★Our rating· In Stock
Accurate, safe (CAT III rated), and under $20. Auto-ranging means you don't set a range: just probe and read. Measures DC and AC voltage, current, resistance, continuity (the beep that confirms a good solder joint), and diode function. Everything a beginner needs for the first two years.
What we like
Auto-ranging: just probe and read, no manual range selection
CAT III safety rated for real electrical safety margin
Continuity beep is the #1 debugging tool for beginners
What to know
Not true RMS despite the name; AC measurements are approximate
Basic probes; upgrade wires if you do precision measurement work
When you're past the beginner phase and doing real measurement work (verifying signal levels, measuring capacitance, checking AC loads), the UT61E+ is a proper tool. True RMS, 22,000-count display, auto-ranging, USB data logging. This is where intermediate hobbyists end up.
What we like
True RMS for accurate AC measurements on real loads
22,000-count display reads fine-grained values others miss
USB data logging for long-running measurement sessions
What to know
Feature set is overwhelming until you know what you need
Larger physical form than compact budget multimeters
Most beginners stall before they solder a single joint. Here's the actual sequence, from blinking an LED to building your first real project, and why the order matters.
Hobby electronics has a reputation for being intimidating, and that reputation is partly earned. Resistors have color codes. Schematics look like alien script. Soldering takes practice to do right. But here’s the thing: none of that is where you start.
You start by buying a $35 kit, plugging a cable into your laptop, and running a program that blinks a light. That’s it. Everything complex comes later, and only when you need it.
This is what your first month actually looks like: what to do when, what to expect, and how to avoid the two or three mistakes that turn beginners into people who have a dusty Arduino kit in a drawer.
Week 1: The breadboard phase
Your first tool is a breadboard, a plastic board with holes that lets you push components in and out to prototype circuits without any soldering. Think of it as an electronics scratch pad. Everything you build in week one is temporary and revisable.
Most starter kits (the Elegoo UNO R3 kit is what we recommend) include a breadboard, an Arduino-compatible microcontroller board, jumper wires, resistors, LEDs, and sensors. The kit also includes tutorial PDFs that walk you through a set of beginner projects.
The correct approach is to follow them in order. Don’t skip to the interesting-sounding sensor project. The first tutorial (blinking an LED) isn’t teaching you about lights. It’s teaching you how to upload code from your computer to the board, which is the skill you’ll use for everything else. Do it first.
By the end of week one, you should have:
Uploaded and run your first program (the Blink sketch)
Built a circuit by following a diagram, components in specific holes, wires in specific places
Understood the difference between a digital pin (on/off) and an analog pin (a range of values)
Made something happen in the physical world (an LED blinked, a buzzer buzzed, a motor turned) in response to code you wrote
A schematic is a circuit diagram that shows how components connect using standardized symbols. It’s the language electronics hobbyists use to communicate, and the sooner you can read one, the less you’re dependent on step-by-step tutorials.
You don’t need to read schematics fluently in week two. You need to recognize that a line between two symbols means a wire connection, that a zig-zag symbol is a resistor, and that a triangle with a flat bottom is an LED. The rest clicks in context.
This is also the week to write your first non-tutorial code. Take one of the kit projects and modify it. If the kit tutorial makes an LED blink once per second, make it blink twice per second. If it turns on when you press a button, make it turn on for exactly 3 seconds and then turn off automatically. Small modifications teach you far more than reading through new tutorials.
The core Arduino language has about 10 functions you’ll use 90% of the time:
pinMode(): tell the board whether a pin is input or output
digitalWrite(): set a digital pin high (5V) or low (0V)
digitalRead(): read the state of a digital input pin
analogRead(): read an analog value (0-1023) from a sensor
delay(): pause execution for a number of milliseconds
Serial.println(): send text to your computer so you can see what’s happening
That’s your entire vocabulary for most beginner projects. Arduino’s reference documentation (docs.arduino.cc) explains every function. Bookmark it; you’ll use it weekly.
Week 3: Your first solder joint
If you’ve been doing week one and two projects without a soldering iron, you’re ready to buy one and try it. Soldering is a physical skill, taking 30-50 joints to feel natural, and the only way to learn is to do it.
Before you solder anything important, practice on a scrap piece of wire or an old PCB (printed circuit board). Here’s what a good solder joint looks like and how to make one:
Heat the pad and the component lead simultaneously with the iron tip, not just one or the other
Touch the solder to the joint (not to the iron tip) after the metal is hot enough to melt it
Let solder flow onto the pad and leg naturally; don’t “paint” it on
Remove the iron; let the joint cool without moving it for 5-10 seconds
A good joint looks like a small shiny volcano, concave and shiny, with the component leg visible through the center
A bad joint looks dull and lumpy (called a “cold joint”) and won’t conduct reliably. If you see one, add a tiny bit of flux, reheat the joint, and let the solder reflow.
Your first soldering project should be something that already works on the breadboard. Solder a simple LED circuit (resistor, LED, two wires to the power rails) onto a piece of perfboard (a bare board with pre-drilled holes). Compare it to your breadboard version. If the LED lights up the same way, your joint is good.
By week four, you have enough to build a real project. It doesn’t have to be complex. Here are a few things that are genuinely within reach after a month:
Temperature monitor with LCD display. The Elegoo kit includes a temperature sensor (DHT11 or similar) and a small LCD screen. Wire them together and display the current temperature. Add a threshold and make the LCD backlight turn red when the temperature exceeds 75°F. This is a real project that uses real sensors, real code, and real decision logic.
Custom night light. A light-dependent resistor (LDR) senses ambient light; below a threshold, your circuit turns on a warm LED. Solder the final version onto perfboard and house it in a small enclosure. You’ll use it.
Doorbell counter. A button circuit that counts presses and displays the total on an LCD. Genuinely useful if you run a business out of your home or just want to know how many times someone rang your doorbell while you were out.
The goal of week four isn’t to build something impressive. It’s to build something you conceived yourself (even if the concept is simple) and make it work. That’s the moment when the hobby clicks. Before that, you’re following tutorials. After that, you’re making things.
The mistakes that stall beginners
Almost every beginner who quits does so for one of these reasons:
Buying gear before skill. A $100 soldering station, a $40 component kit, a $25 oscilloscope, and never finishing the first tutorial. Buy the starter kit. Learn whether you like the hobby first. The rest of the gear follows naturally once you have specific problems to solve.
Not using Serial.println(). When your circuit doesn’t work and you have no idea why, the first thing to do is add Serial.println() statements to your code to print the values your sensors are reading. Beginners who don’t do this spend hours checking wires when the problem is actually in their code. This one habit halves your debugging time.
Moving to a Raspberry Pi too early. The Pi is a full Linux computer, and Linux is a distraction when you’re learning circuits. Stick with Arduino for hardware projects: it’s simpler, faster to iterate on, and the feedback loop is immediate.
What comes next
After a solid month, you’ll have a real sense of whether you want to go deeper. A few directions hobbyists tend to go from here:
More complex circuits: capacitors, transistors, op-amps, H-bridge motor drivers. The Adafruit Learning System and SparkFun Learn have tutorials on all of these.
WiFi and IoT: the ESP8266 and ESP32 modules are Arduino-compatible and add wireless capability for $5. Suddenly your circuits can post to the internet, read API data, and send notifications.
Designing your own PCBs: once you’ve prototyped something on perfboard, you can design a real printed circuit board using KiCad (free, open-source) and order it printed for $5-10 at JLCPCB or PCBWay.
Surface-mount soldering: the tiny components on modern electronics boards. Hard to do freehand; gets dramatically easier with a stencil, solder paste, and a hot plate or toaster oven repurposed as a reflow oven.
None of these are beginner territory. But they’re all reachable, and a month from now you’ll have a clearer sense of which direction pulls you forward.
Save your money
What you don't need yet
Beginners get pressured to buy a lot of stuff that doesn't help them play
better. Here's what we'd skip on day one.
An oscilloscope — Incredible for diagnosing signal timing issues, and completely overkill until you've built 20+ projects. A $20 multimeter handles 90% of beginner debugging.
A hot air rework station — For surface-mount soldering and component removal. You won't touch SMD work in your first year; learn through-hole first, it's much more forgiving.
A Raspberry Pi 4 or 5 — A full Linux computer that's great for software projects, but overkill for hardware control. Arduino and Pico are the right platforms for circuits and sensors.
A logic analyzer — Invaluable for debugging serial protocols like I2C and SPI, after you've built something that uses one. Not a day-one tool.
A bench power supply — Useful once you're building circuits that draw more current than USB can deliver. USB power banks and 5V wall adapters handle everything in your first six months.
First week
Your first seven days
A short, real plan to get from gear-on-doorstep to actually playing.
Order the Elegoo UNO R3 Super Starter Kit. You can blink an LED your first evening, no soldering required. · Buy
Download the Arduino IDE (free) before your kit arrives. Install it, run the included Blink example, and confirm your computer talks to the board. · Action
Find a local makerspace or hackspace. Most have electronics nights, free tool access, and people who will answer 'why isn't this working' in real time. · Action
Post a photo of your first working circuit to r/arduino. The community is genuinely encouraging to beginners. · Action
r/arduino · Active beginner community with a good wiki
FAQ
Common questions
Do I need to know how to code to get started?
Not really. Arduino sketches are closer to structured recipes than programming. Starter kit tutorials walk you through copy-paste-run, and you'll pick up the logic by modifying examples. Real coding skills become useful around month 2-3, once you want to build something original instead of following a tutorial.
Is leaded solder safe to use at home?
Yes, with basic precautions: open a window, don't eat while soldering, and wash your hands after. The flux fumes are more irritating than the lead vapor at normal soldering temperatures. Most hobbyists use 63/37 leaded solder for bench work because it flows better. Lead-free solder exists but requires higher temperatures and is harder for beginners.
What's the difference between Arduino and Raspberry Pi?
Arduino is a microcontroller: it runs one program in a loop, controlling pins and sensors in real time. It's perfect for hardware projects. Raspberry Pi is a full Linux computer, great for software projects that happen to have hardware attached. For blinking LEDs, reading sensors, and controlling motors, start with Arduino.
Are Arduino clone boards (Elegoo, etc.) as good as the official Arduino?
Close enough that it won't matter for a year. Clones run identical code, use the same pins, and work with every library. The differences are in build quality (marginal) and the chip brand. You won't notice the difference as a beginner; the $35 Elegoo kit includes $30 worth of components the official board doesn't.
How much does it actually cost to start?
Around $65-70 covers everything: the Elegoo starter kit ($35), a Pinecil iron ($25), and a spool of solder ($10). Add a $20 multimeter and you're fully equipped for everything in your first six months. The components inside the starter kit stretch even further; most tutorials use what's already in the box.
What can I realistically build in my first month?
LED blinker (hour 1), traffic light circuit, temperature display with LCD screen, servo-controlled arm, alarm with a buzzer and button, and a light sensor that triggers an LED, all from the Elegoo tutorials. Your first month is tutorial-following, not original design, and that's exactly right. Original projects come after you've absorbed the patterns.
Arduino Official Documentation — The authoritative reference for Arduino language, libraries, and hardware. Bookmark the Language Reference page; you'll return to it constantly.
Adafruit Learning System — The best free electronics tutorial library on the internet. Covers Arduino, CircuitPython, Raspberry Pi, and electronics fundamentals. The natural next stop after your starter kit tutorials.
SparkFun Learn — Excellent tutorials on components, sensors, communication protocols, and projects. The 'How to Solder' guide here is particularly well done for beginners.
r/arduino — Active, beginner-friendly community. The wiki answers most common questions. Post your first working project and they'll celebrate it.
EEVblog (YouTube) — Dave Jones's channel: teardowns, tutorials, and electronics theory. More advanced than beginner, but excellent when you're ready to go deeper on how circuits actually work.
As an Amazon Associate, JustBeginning earns from qualifying purchases.
We may also earn commission from other affiliate programs linked on this
page. Editorial recommendations are independent; we don't choose
products based on commission rates.
Product prices and availability are accurate as of the date and time
indicated and are subject to change. Any price and availability
information shown on Amazon at the time of purchase will apply.


 Best starter