The good news: you don't need a recording studio. A decent microphone, a quiet room, and free software is all it takes to sound professional. The bad news: there are a thousand ways to overthink it. Here's what actually matters — and in what order to buy it.
By Colin B. · Published May 24, 2026 · Last reviewed June 15, 2026
Audio-Technica ATH-M20x
— Closed-back monitoring headphones that reveal what your audio actually sounds like.
Budget total
$100
Typical total
$270
A USB mic + closed-back headphones + free software runs $100–150. Add an audio interface and XLR mic and you're at $270–400. Start USB, upgrade later.
We earn commission on qualifying Amazon purchases — see our
affiliate disclosure.
Price tiers and budget totals shown above are editorial estimates;
actual Amazon prices vary.
At a glance
Our top pick in each category
The fastest path through this guide — each best-starter pick by category.
Scroll for the budget and upgrade alternatives.
Don't buy an XLR mic before you buy an interface. They come as a pair — an XLR mic without an interface is a paperweight. If budget is tight, start with USB and upgrade later.
Your room matters more than your microphone. A $150 USB mic in a quiet, soft-furnished room will sound better than a $400 XLR setup in a live, reverby space. Before you spend on gear, spend five minutes recording in your closet and hear the difference.
Free software is good enough to start. Audacity is free, reliable, and what thousands of successful podcasters still use. Don't spend money on editing software until you've produced at least ten episodes and have a specific complaint about Audacity.
The gear
What you actually need
Microphones
Your microphone choice defines the rest of your setup. The binary for beginners is USB vs. XLR. USB mics plug directly into your computer — no extra gear required. XLR mics need an audio interface but give you more control, lower self-noise, and better rejection of room reverb. Start USB unless you already know you want the XLR path. A good USB mic sounds genuinely professional; the gap between USB and XLR is smaller than the marketing suggests.
Microphones — what's the difference?
A few common shapes, each making a different trade.
USB Condenser
Plug into USB — no interface needed. The default beginner path.
Setup
Plug and play
Room sensitivity
High — treat your room
Extra gear
None
Best for First-time podcasters, solo shows, anyone starting without an interface
Tradeoff More sensitive to room noise than a dynamic — treat your space
Needs interface and treated room. Studio-grade detail, unforgiving.
Setup
Mic + interface + treatment
Room sensitivity
Very high — hears everything
Extra gear
Interface + treatment required
Best for Treated home studios, music producers adding podcast, audiophile-tier production
Tradeoff Reveals every room flaw — skip this path until your room is treated
Best starter
Blue
Yeti USB Microphone
$104.71 as of Jun 22, 2026
★★★★★Our rating
The Blue Yeti has sold millions of units for a reason: it sounds genuinely good, requires zero setup beyond a USB cable, and gives you four polar patterns including cardioid — the one you want for solo podcasting. If you want to start today without buying anything else, this is the pick. Ignore the stereo and omnidirectional modes until you actually need them.
What we like
Four polar patterns — cardioid, bidirectional, omnidirectional, stereo
Zero-latency headphone jack built into the mic base
Plug-and-play on Mac, Windows, and Linux — no drivers needed
What to know
Built-in stand positions capsule at desk level — a boom arm is nearly required
Picks up keyboard and mouse clicks if not carefully positioned
Under $40 and shockingly capable. The FIFINE K669B is a cardioid condenser that rejects side and rear noise, connects via USB, and has a zero-latency headphone monitoring jack. It's not the Blue Yeti — the top end is thinner and the build feels it — but for a first podcast before you know if you'll stick with it, this is the smart entry point.
What we like
Under $40 with a built-in headphone monitoring jack
Cardioid pattern rejects sound from sides and rear
Mute button with LED indicator on the base
What to know
Condenser capsule picks up room noise more than a dynamic mic
Audio is noticeably thinner than mid-range USB mics
The SM7B is the podcast world's most famous mic. The SM7dB is its upgrade: same legendary capsule, plus a built-in preamp so it doesn't need a high-gain interface. Rejects room noise better than any condenser, forgives imperfect room acoustics, and sounds unmistakably broadcast. Where serious podcasters land when they commit to XLR.
What we like
Dynamic capsule rejects room noise better than any condenser
Built-in preamp — works with modest interfaces, not just high-end ones
The broadcast standard — Joe Rogan, Alex Cooper, hundreds of major shows
What to know
Requires an audio interface — not plug-and-play like USB mics
Large and heavy — needs a robust boom arm rated for the weight
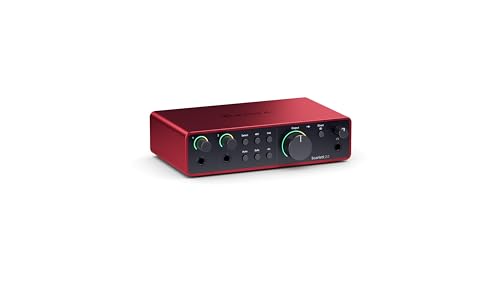
An audio interface is the box between your XLR microphone and your computer. It converts the analog signal to digital, supplies phantom power for condenser mics, and drives your headphones. You only need one if you go the XLR mic route — USB mic users can skip this category entirely. The Focusrite Scarlett line is the category standard by a wide margin: clean preamps, reliable drivers, and supported on every platform.
Best starter
Focusrite
Scarlett Solo (4th Gen)
$159.99 as of Jun 22, 2026
★★★★★Our rating· In Stock
The Focusrite Scarlett Solo is the default recommendation for a reason: it just works. One XLR input, clean preamp, and USB-C that plays nice with every computer. The 4th Gen added a direct monitor mix knob and better headphone output — small things that matter after hours of editing. If you're a solo podcaster going XLR, this is the one.
What we like
Clean, transparent preamp — doesn't color your mic's sound
USB-C bus-powered — no external power brick needed
Headphone output loud enough to drive even demanding headphones
What to know
Single XLR input — can't record a second guest in the same room
No built-in compressor or EQ — handle that in software
Two XLR inputs lets you record a co-host in the room, or run a second instrument feed. Same clean Scarlett preamps, same USB-C workflow, roughly $50 more than the Solo. If there's any chance you'll record with someone else in person, just get this one from the start.
What we like
Two XLR inputs — handles solo or in-person co-host setups
Same transparent preamp quality as the Solo, just more of it
Air mode adds vintage console-style high-frequency presence
What to know
Only one headphone output — co-host monitoring still needs a splitter
Overkill and extra cost for solo shows — the Solo is enough
Use closed-back headphones for recording — the sealed ear cups prevent your monitor mix from leaking into the mic. Open-back headphones sound more accurate but bleed audio, so they're for editing only. Any consumer headphones you own are probably tuned to sound flattering; monitoring headphones are tuned to reveal problems — distortion, room noise, and clipping that feel-good headphones smooth over.
Best starter
Audio-Technica
ATH-M20x
$59.00 as of Jun 22, 2026
★★★★★Our rating· In Stock
Closed-back monitoring headphones that block outside noise and reveal what's actually in your recording. Audio-Technica's M-series is the standard for home recording; the M20x is the entry point and it's genuinely honest. You'll catch problems — mic positioning, room reverb, breath noise — that consumer headphones smooth over.
What we like
Closed-back design blocks room noise during recording
Honest, flat sound profile reveals problems other headphones hide
40mm drivers — noticeably more detailed than budget consumer options
What to know
Firm pads become uncomfortable after two or more hours of editing
Less accurate than the M40x or M50x in the low-mid frequency range
A broadcast industry staple since the 1980s — what you'll find in radio stations, film sets, and TV production booths worldwide. Accurate across the midrange where voice lives, foldable for travel, and under $100 after decades on the market. Bordering on overkill for a beginner, but it never needs an upgrade.
What we like
Broadcast standard since 1991 — proven in the harshest professional environments
Foldable with coiled cable — designed for portable studio use
Remarkably accurate midrange, exactly where voice frequency lives
What to know
Enhanced treble makes sibilance sound harsher than listeners will hear it
Heavy coiled cable is annoying when sitting at a desk for long sessions
German-engineered closed-back headphones rated for decades of daily studio use. The 80-ohm version drives cleanly from an audio interface without needing a dedicated headphone amp. Wide, accurate soundstage for closed cans — you'll hear subtle reverb, breath noise, and low-end problems that budget cans miss entirely.
What we like
Industry-standard closed-back — accurate without the fatiguing treble spike of competitors
Replaceable pads, cable, and headband — built for a decade of daily use
80-ohm drives from standard interfaces without a dedicated headphone amp
What to know
Coiled cable is heavy and stiff — inconvenient for long desk sessions
Narrower soundstage than open-backs — fine for recording, less useful for mixing
Room acoustics are the difference between a pro-sounding podcast and one that sounds like it was recorded in a bathroom. Most untreated rooms create flutter echo — the hollow reverb that makes amateur recordings instantly recognizable. Acoustic foam absorbs high-frequency reflections off walls. A reflection filter wraps around the mic to block direct wall reflections. Even hanging moving blankets works. Fix your room before upgrading your microphone.
Best starter
Auralex
Acoustics Studiofoam Wedgies
$$
★★★★★Our rating
Auralex makes the foam in professional recording studios. The Studiofoam Wedgies are 2-inch panels that absorb flutter echo in the high and mid frequencies where voice sits. Cover the wall behind your mic and the side walls first. The difference on a recording before and after treatment is not subtle — it's immediately obvious.
What we like
Professional studio-grade foam — not the cheap peel-and-stick variety
2-inch depth absorbs mid and upper frequencies where voice lives
Immediate, audible difference before and after installation
What to know
Only treats flutter echo — doesn't address low-frequency bass buildup
Adhesive installation is semi-permanent and takes paint with it on removal
A foam sphere that wraps around your mic capsule and acts as a portable vocal booth. Completely ridiculous-looking, completely effective — removes room reflection without mounting a single panel on your walls. Beloved by traveling podcasters and anyone recording in a rented space or untreatable room.
What we like
No wall mounting — works in hotel rooms, offices, untreated apartments
Cuts room reflection by an amount that usually requires wall panels
Portable and compact — fits in a mic bag
What to know
Only fits certain mic form factors — check compatibility before ordering
Doesn't address bass frequency buildup or HVAC hum
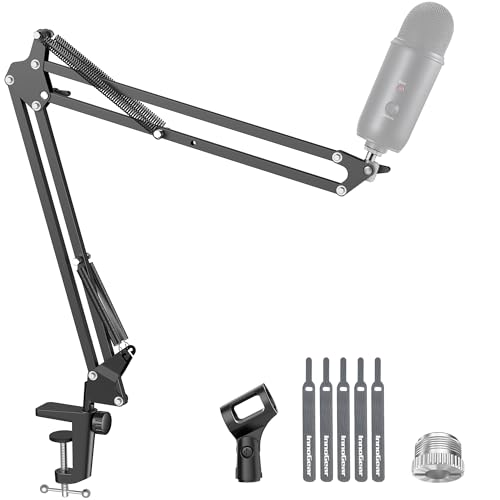
A boom arm positions your mic at mouth level and isolates it from desk vibrations. A mic sitting on its own stand aims at the ceiling or your chin — not your mouth. A pop filter screens out plosive blasts — the hard 'p' and 'b' sounds that spike levels and distort. Both are cheap, both make a real difference in recording quality, and neither one shows up in your finished audio. Together they cost under $50.
Best starter
Elgato
Wave Mic Arm LP
$89.99 as of Jun 22, 2026
★★★★★Our rating· In Stock
Built-in cable management, low-profile design that sits flat to the desk rather than arching overhead, and rated for mics up to 1.5 kg — covers everything on this list. Elgato's fit-and-finish is noticeably better than most arms in this price range. Clamps to any desk edge without tools.
What we like
Cable channels built in — no visible cable wrap needed
Low-profile design keeps the desk uncluttered and camera-friendly
Rated for 1.5 kg — handles the heaviest mics on this list
What to know
Low-profile keeps mic closer to desk level — some posture adjustment needed
No spring tension adjustment — arm position is locked by friction once set
The default budget arm recommendation: it holds the mic steady, the spring tension adjusts, and it costs under $25. Cable management is manual — wrap it yourself — but it works reliably. Most beginners use one of these until they decide they're serious enough for a nicer arm.
What we like
Under $25 and often bundled with XLR cable and pop filter
Spring tension holds most USB and small XLR mics without drooping
360-degree rotation — positions anywhere around your desk
What to know
Tension knob loosens over months of use — tighten periodically
The double-layer mesh screen that eliminates plosive 'p,' 'b,' and 'd' bursts that spike audio peaks and distort recordings. Required gear if you're using a condenser mic without a built-in windscreen. The Aokeo's dual-layer design is meaningfully more effective than single-mesh budget options.
What we like
Dual-layer mesh — more effective than single-layer at blocking plosives
Flexible gooseneck arm positions independently of the boom arm
Metal mesh alternative built in for a different position option
What to know
Clamp is sized for round mic stands — test fitment on larger clamp points
Metal mesh can add a slight metallic coloration on some condensers
The gear matters less than you think. The editing matters less than you think. Here's what actually determines whether your podcast survives its first month.
Podcasting has an unusual problem: the barrier to starting is so low that people spend months preparing to start instead of starting. They buy a microphone, research editing software, read about acoustics, download three DAWs to compare them, and never record a single episode. Don’t be that person.
This is what the first ten episodes of podcasting actually look like — the things that matter, the things that don’t, and when your priorities should shift.
Episodes 1–2: Get audio on disk
Your only job in the first two episodes is to produce audio and figure out how to edit it into something listenable. Not perfect. Listenable.
Here’s the minimum viable setup:
Record in your softest room. Carpets, bookshelves, curtains, and upholstered furniture all absorb echo. A walk-in closet with clothes hanging in it is acoustically excellent and free. The single biggest improvement most beginners can make to their audio is to move from a hard-walled office or kitchen into a bedroom.
Set your mic level so peaks hit -12 dBFS to -6 dBFS. That’s the sweet spot — loud enough to record clearly, quiet enough to avoid clipping. In Audacity, this means your recording bar should be bouncing in the orange, not pinning to the red. If you don’t know what any of that means, open Audacity, hit record, and talk — you’ll see the waveform. Adjust your mic’s gain knob until the peaks reach about two-thirds of the available height.
Talk to one person. Not “your audience.” One specific human being. What would you tell your friend Sarah about this topic? That framing produces more natural, less broadcast-y delivery than trying to speak to an anonymous crowd.
After recording, your editing checklist for episodes 1–2 is short: cut the first and last five seconds of dead air, delete obvious stumbles, and export to MP3 at 128 kbps stereo. That’s it. Don’t obsess over the edit.
Episodes 3–5: Fix the one thing that’s actually wrong
By episode three, you know what your specific problem is. It’s almost always one of these:
Room echo. The hollow reverb that makes your voice sound like you recorded in a bathroom. Fix: move to a softer room, hang a blanket behind you, or buy foam panels for the wall behind your mic. Even a Kaotica Eyeball mic shield will dramatically reduce this without mounting anything.
Plosive pops. The hard burst on “p,” “b,” and “d” words that clips and distorts. Fix: a pop filter, or pull back 6 inches from the mic and aim slightly past it rather than directly into the capsule.
Inconsistent volume. Some sentences are loud, others quiet — listeners have to reach for their volume knob. Fix: compression. In Audacity, Effect → Compressor. Use a ratio of 3:1, threshold around -12 dB, and that’s 80% of the way there.
Background noise. HVAC hum, refrigerator buzz, street noise. Fix: record late at night or early morning when HVAC cycles are quieter. In Audacity, select 2 seconds of room-tone silence from before you started talking, run Effect → Noise Reduction → Get Noise Profile, then apply it to the full recording. It removes a surprising amount without damaging voice quality.
Don’t try to fix everything at once. Find the one thing that bothers you most, fix that, and move on.
Episodes 6–8: Lock in a format and workflow
By episode six, you should have answers to questions you probably haven’t consciously asked yet.
How long should my episodes be? The right length is as long as it takes to say what you’re saying, minus the parts that aren’t interesting. Most beginners record too long and edit too little. A tight 20-minute episode delivers more value than a rambling 50-minute one. Check your listener dropoff rate — every host stats platform shows it — and cut the sections where people leave.
What’s your episode structure? The shows that survive past ten episodes all have a repeatable structure that listeners can orient to: an intro (here’s what we’re covering), a middle (the actual content), and an end (key takeaway and CTA). That structure doesn’t have to be announced out loud — it just needs to exist. Improvised, structureless episodes are hard to edit and harder to listen to.
Build an editing template. After five episodes, you know your workflow: remove dead air, apply noise reduction, compress, normalize to -16 LUFS (the podcast standard), add your intro music if any, export. Save that as an Audacity project template. You shouldn’t be reconfiguring your settings every episode.
Most podcasts die between episode four and episode eight. They stop because the host expected it to feel different — more listened-to, more acknowledged, more meaningful — by now. If you’ve made it to episode nine, you’ve already beaten the majority.
At episode ten, do an honest audit:
Listen to episode 1 and episode 10 back to back. The improvement is usually significant and motivating. Your delivery is more natural. Your editing is more efficient. Your audio quality has improved as you’ve dialed in your room and levels.
Ask someone to listen to three episodes and give you honest feedback. Not “is it good?” — that’s too easy to deflect. “What part do you skip? What do you want more of? What confuses you?” Those answers are more useful than any production upgrade you could buy.
Don’t buy new gear yet. Unless a specific problem (consistent echo, a broken mic, no interface for your XLR mic) is holding you back, gear is not your constraint. Content and consistency are your constraint.
The things that actually matter
A list of things that have no correlation with whether a podcast survives ten episodes:
The price of your microphone
Whether you use Audacity or Adobe Audition
Having a perfect recording space
Your intro music
Your cover art
A list of things that do correlate:
Recording at least once a week
Cutting episodes ruthlessly (short and tight beats long and comprehensive)
Having a specific topic and a specific kind of listener in mind
Publishing consistently, even when it feels rough
The shows that are still going after a year are not the ones with the best gear. They’re the ones that shipped episodes ten, eleven, and twelve when they felt like quitting.
Save your money
What you don't need yet
Beginners get pressured to buy a lot of stuff that doesn't help them play
better. Here's what we'd skip on day one.
A soundproof vocal booth — They cost $400–1,200+, occupy a corner of your room, and a closet full of clothes does 80% of the job for free. Treat your existing space first.
A hardware podcast mixer (RodeCaster, Zoom PodTrak) — Everything a hardware mixer does — compression, EQ, sound effects — free software handles on your computer. Hardware is fun for live streaming; it's overkill for edited podcasts.
Paid editing software — Audacity is free, open-source, and what thousands of successful podcasters use. Descript and Adobe Audition add convenience, not quality. Don't buy until Audacity is genuinely frustrating you.
A remote recording service subscription — Riverside.fm and Squadcast are excellent for remote co-hosts — but start with Zoom plus local recording and move to a platform only when quality becomes a real complaint.
Bass traps — Treat flutter echo with foam panels first. Bass traps solve low-frequency buildup that becomes noticeable after ten episodes of critical listening — a later problem.
First week
Your first seven days
A short, real plan to get from gear-on-doorstep to actually playing.
Record five minutes of yourself speaking. Listen back with headphones. You'll immediately hear your room — echo, hum, breath noise. This is the baseline you're improving from. · Action
Order closed-back headphones if you don't already own a monitoring pair. · Buy
Identify your quietest, softest-furnished room. Carpets, bookshelves, and curtains absorb reflections. A walk-in closet is often the best home studio you already own. · Action
Join r/podcasting and search for your specific setup before asking — most beginner questions are answered in depth in the community wiki. · Action
r/podcasting · Gear questions, show feedback, hosting advice
Record your actual first episode. Don't wait for the room to be perfect. Shipping a slightly rough episode beats never shipping a perfect one. · Action
FAQ
Common questions
Do I need an audio interface to start podcasting?
Not if you start with a USB microphone. USB mics plug directly into your computer and require no additional hardware. An audio interface is only needed for XLR microphones. Start USB, upgrade to XLR later if you want to.
What's the difference between a condenser and dynamic microphone?
Condenser mics are more sensitive — they capture more detail but also more room noise, breath, and background sounds. Dynamic mics reject off-axis noise and forgive imperfect rooms. For an untreated bedroom, a dynamic sounds more professional. The Blue Yeti is a USB condenser; the Shure SM7dB is an XLR dynamic.
What free software should I use to edit my podcast?
Audacity. It's free, cross-platform, and handles everything you need for the first year: multitrack recording, noise removal, compression, EQ, and MP3 export. Descript is excellent for AI-assisted editing, but it's a paid subscription — something to consider after you've produced ten or more episodes.
How much should I budget to start podcasting?
USB mic + boom arm + headphones + free software runs $100–170 to start. If you want the XLR path — better isolation, more upgrade headroom — add a Focusrite Scarlett Solo for $270–400 total. Most people start USB and upgrade later. That's the right call.
Do I need acoustic treatment before I start recording?
No — but you'll want it soon. Record in your softest, quietest room: carpets, bookshelves, and curtains all absorb echo. A walk-in closet is often the best home studio you already own. Acoustic foam panels make a noticeable difference once you've heard what they do; add them after your first few episodes.
Can I record a podcast with two people in the same room?
Yes, but you need two mics and something to record them independently. Option A: two USB mics into two laptops, sync in editing. Option B: two XLR mics into a Focusrite Scarlett 2i2, which has two inputs. For a casual show, a single quality mic between you also works — just expect less isolation between your voices.
r/podcasting — The most active podcasting community. Gear recommendations, hosting questions, show feedback. Search before asking — most beginner questions are answered in depth in the wiki.
The Podcast Host — Detailed, opinionated guides on mic selection, recording setup, and distribution. One of the most useful gear-independent resources for beginners.
Transom.org — The public radio community's resource for audio craft. Deeper and more technique-focused than most podcasting blogs. Read the Tools section for equipment guides by working producers.
Audacity Manual — The official reference for Audacity. More useful than YouTube tutorials when you have a specific task — noise removal, export settings, multitrack setup.
Podcast Movement — The industry conference and community. Events, webinars, and a job board. Relevant once you're serious about building an audience.
As an Amazon Associate, JustBeginning earns from qualifying purchases.
We may also earn commission from other affiliate programs linked on this
page. Editorial recommendations are independent; we don't choose
products based on commission rates.
Product prices and availability are accurate as of the date and time
indicated and are subject to change. Any price and availability
information shown on Amazon at the time of purchase will apply.

 Best starter