Axe throwing is easier to start than it looks and harder to master than you'd think. Stance and release click within your first session. What keeps people coming back is chasing that bullseye, joining a league, and a genuinely social scene built around the sport. Here's exactly what you need to get started.
By Colin B. · Published May 24, 2026 · Last reviewed June 17, 2026
A good throwing hatchet and a basic target board gets you started for around $80-100. Add a proper stand and maintenance kit and you're at $150-180.
We earn commission on qualifying Amazon purchases — see our
affiliate disclosure.
Price tiers and budget totals shown above are editorial estimates;
actual Amazon prices vary.
At a glance
Our top pick in each category
The fastest path through this guide — each best-starter pick by category.
Scroll for the budget and upgrade alternatives.
Go to a venue first. Most cities have at least one axe-throwing bar or venue where $20-35 gets you a lane, an instructor, and axes to throw for 90 minutes. One session teaches you whether you like the sport and which axe weight feels right — information you can't get from product listings.
Sharpness is not optional. A dull axe will bounce off the board more often than it sticks. Every throwing axe you buy needs a proper edge before you throw it, and maintenance every few sessions. Budget for a sharpening stone.
The throwing distance is fixed. Standard hatchet distance is 12-15 feet from target (venue-dependent). You need that much clear space in your backyard. Measure before you order a target stand.
The right axe for throwing is not a camping axe, a splitting maul, or a full-size felling axe. You want a mid-weight hatchet — 1.25 to 1.75 lbs — with a handle in the 13-16 inch range and a flat, thin blade grind. Most leagues use this format (NATF standard). The key is consistent release: a hatchet that's well-balanced from the factory will stick more consistently than an expensive but poorly-weighted upgrade. Buy one good hatchet, throw it several hundred times, and only then decide if you want to go deeper on gear.
Throwing Axes — what's the difference?
A few common shapes, each making a different trade.
Standard Hatchet (NATF / WATL)
The universal beginner format. Works at any venue.
Weight
1.25–1.75 lbs
Handle
13–16"
Distance
12–15 ft
Best for Beginners, league play, most backyard setups
Tradeoff Less dramatic than big axe, but easiest to learn
Heavier competition format. More power, steeper learning curve.
Weight
3–3.5 lbs
Handle
24–30"
Distance
20–22 ft
Best for WATL competition, experienced throwers, larger backyards
Tradeoff Takes 2-3x longer to get consistent sticks than a hatchet
Best starter
CRKT
Kangee T-Hawk
$145.07 as of Jun 22, 2026
★★★★★Our rating
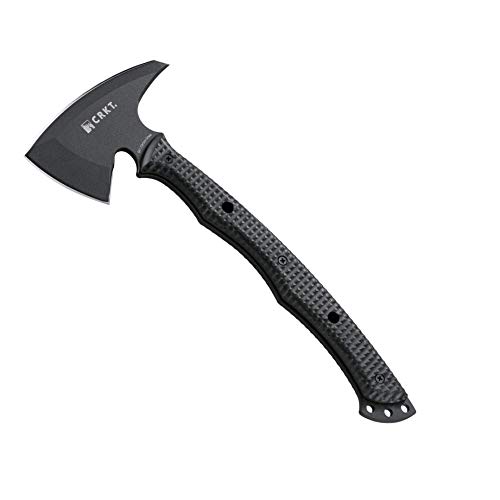
CRKT builds the Kangee specifically as a throwing tomahawk — proper balance point, a flat 2.5mm thin grind that buries cleanly, and a 19" Tennessee hickory handle that absorbs impact well. It's the hatchet most league coaches hand to first-timers. At around $60-70, it's not the cheapest pick, but you won't be fighting the axe to get consistent sticks.
What we like
Designed specifically for throwing — proper balance and thin grind
Hickory handle absorbs impact and resists cracking on hard boards
Trusted by NATF coaches as a first-day hatchet
What to know
Factory edge needs sharpening before first session
The Trail Hawk has been a budget favorite in the throwing community for years. Under $35, it's 1.3 lbs with a 22" American hickory handle and a thin, flat blade that sticks reasonably well once you sharpen the edge. The handle is interchangeable if it cracks, which it eventually will. You'll outgrow it, but it's a perfectly functional way to decide if the sport is for you.
What we like
Under $35 — lowest cost to try the sport with real gear
Replaceable American hickory handle is cheap and easy to swap
Flat blade grind sticks reliably when kept sharp
What to know
Head-to-handle fit loosens noticeably over time
Light at 1.3 lbs — some beginners find heavier axes more forgiving
Husqvarna's compact hatchet wasn't designed for competition throwing, but it's become one of the most popular backyard choices because it's beautifully balanced at 1.5 lbs, holds an edge well (Swedish steel), and has a gorgeous hickory handle with a rubber grip. Once you've been throwing for a month, this is the hatchet you'll reach for in the backyard.
What we like
Swedish steel holds an edge significantly longer than budget options
Beautifully balanced at 1.5 lbs — predictable release feel
Hickory handle with rubber grip cushions hand impact
What to know
Curved handle is non-standard for NATF league competition
Not designed for throwing — no thin blade grind from factory
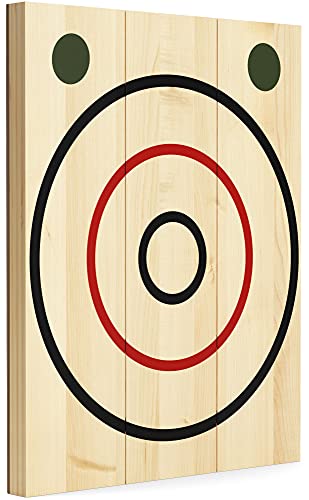
A proper axe-throwing target is five vertical 2×12 pine boards, 4 feet tall, butted tight together. The softness of the pine is the point — it lets the blade bite in. Hard wood, OSB, or plywood will bounce the axe more than it sticks. If you're buying pre-made boards, make sure they're kiln-dried pine or poplar, roughly 3-4 inches thick combined across the face. Replace individual boards when they split through.
Best starter
BIGSHOT
Pro Wooden Axe Throwing Target
$119.99 as of Jun 22, 2026
★★★★★Our rating· In Stock
Pre-cut to the correct dimensions, kiln-dried pine, and ships as a ready-to-mount set. Saves the Home Depot run and the measuring. Comes with painted bullseye rings and mounting hardware. Not cheap, but for a first backyard setup this is the fastest path to throwing the same day it arrives.
What we like
Pre-cut to NATF dimensions — no measuring or cutting required
Kiln-dried pine bites the blade reliably from day one
Painted bullseye rings eliminate the guesswork on scoring
What to know
Boards split after several hundred throws — replacement cost adds up
If you're sourcing your own 2×12 pine boards from a lumber yard (the cheaper path), the WATL stencil kit paints the official scoring rings on them accurately. Costs under $20, and your own boards will be fresher and cheaper than pre-made sets anyway. The DIY route for backyard setups that will see heavy use.
What we like
Under $20 — cheapest path to a properly marked target
Official WATL ring dimensions for accurate league-style scoring
What to know
Requires separate purchase of 2×12 pine boards from a lumber yard
Paint needs to dry before you can throw — plan ahead
Your boards need to be held vertical and stable enough to absorb repeated impacts without moving. A simple A-frame stand works for most backyard setups. More important than the stand is the backstop: any axe that misses the board needs to hit something that won't ricochet — a thick rubber mat, a wood wall, or a fabric backstop behind the target. Don't skip this. Bounce-backs are the main safety hazard in backyard setups.
Best starter
Viking Culture
Axe Throwing Target with Stand
$$$
★★★★★Our rating
A complete setup — official-size wooden target and a free-standing frame in one kit. Folds flat, ships assembled, and holds up to repeated throws. If you just want to throw in your backyard without building anything, this is the fastest path to a ready range.
What we like
Steel frame handles repeated impact without flex or walk
Folds flat for garage storage between sessions
Adjustable height fits different board sizes
What to know
Heavy — you'll want a second person for first-time assembly
Target boards wear out — a bullseye that has taken a thousand throws compresses and starts bouncing axes. These replacement pine sections swap into a BIGSHOT target frame and restore a fresh biting surface. Plan on replacing your boards every few months of active throwing.
What we like
Fresh pine surface restores sticking quality after heavy use
Swaps into existing BIGSHOT frame without tools
What to know
BIGSHOT-specific fit — not compatible with DIY frames
Budget-wise, DIY lumber from a hardware store costs less per section
A sharp axe sticks. A dull axe bounces. This is the most underrated variable in axe throwing — you can have perfect form and still see every throw bounce off a blade that's lost its edge. Budget throwers who sharpen regularly outperform expensive-axe owners who don't. Plan on touching up your edge every 2-3 sessions with a pocket sharpener, and doing a proper stone pass every few weeks.
Best starter
Lansky
Puck Dual-Grit Sharpener
$12.02 as of Jun 22, 2026
★★★★★Our rating· In Stock
The Lansky Puck is the classic axe sharpening tool — dual-grit (coarse and fine), fits in a pocket, and works on any axe blade without any setup. Two-minute touch-up before a session keeps your edge in throwing shape. The puck shape matches the convex geometry of axe blades better than a flat stone.
What we like
Dual-grit covers both restoration and finishing in one tool
Puck shape matches axe blade geometry better than flat stones
Fits in your gear bag — sharpen at the range before a session
What to know
Angle consistency takes practice — watch a tutorial first
Coarse side removes metal aggressively; avoid on fine knives
★★★★☆Our rating· Only 1 left in stock - order soon.
After sharpening, a light wipe of oil on the blade prevents rust between sessions. Ballistol is the throwing community's standard for blade and handle care — it protects metal from oxidation and conditions wood handles without softening them.
What we like
Protects steel and conditions wood in one product
The throwing community's standard — reliable and widely available
What to know
Slight odor — some people find it off-putting
Over-application makes the blade surface slick; less is more
Most beginners land their first stick within 10 throws. Getting consistently good — that takes a little longer. Here's what your first five hours actually look like, and what to focus on.
The first stick is always a surprise. You step up, you throw, and the blade buries itself in the wood with a sound you feel more than hear. Then you throw nine more and most of them bounce off. That’s exactly the axe-throwing experience — early success followed by a real learning curve. What separates people who get consistent quickly from people who stay streaky is understanding why the axe bounces.
This is what your first five hours actually look like.
Hours 1–2: Learning the rotation
The fundamental challenge in axe throwing is matching your axe’s rotation to the throwing distance. A hatchet thrown from 12 feet needs to complete exactly one full rotation to arrive blade-first at the target. Throw it the same way from 15 feet and it arrives at 1.25 rotations — and bounces handle-first. Distance is fixed. Your throw has to be right.
The two-hand overhand throw is where everyone starts. Stand at the throwing line (12-15 feet from target face), feet shoulder-width apart, step forward with your non-dominant foot as you throw, and release when the axe is directly overhead. Most coaches call this the “12 o’clock release point.”
Things that cause bouncing in your first session:
Releasing too late. If the blade is already past vertical when you release, the axe over-rotates. Let go at the top.
Too much wrist snap. The throw is a straight arm motion, not a wrist flip. Wrist snap adds unpredictable rotation. Lock your wrists.
Inconsistent grip pressure. Hold the handle firmly enough that you feel it the whole motion, loosely enough that you’re not white-knuckling it. Squeezing too hard kills the release.
Don’t think about where the axe lands in your first session. Think about the release point. Get ten throws in a row with the same motion and same release, and the pattern will start to emerge.
Hours 2–4: Getting it sharp and getting it consistent
Around hour two, most people have their first genuinely consistent sequence — three or four sticks in a row. Then it stops. This is almost always a sharpness issue or a fatigue issue, and it’s easy to separate: if the blade is landing flat on the board but not biting in, it needs sharpening. If it’s rotating inconsistently, you’re getting tired and your release point is wandering.
Sharpness matters more than almost anything else in your setup. An axe that’s even slightly dull will bounce more often than it buries, because the blade needs to cut into the pine fibers rather than compress them. Sharp means a blade that can shave arm hair. Most new axes ship at “functional but not sharp” — run a whetstone over the edge before session one and touch it up every 2-3 sessions.
The other variable worth adjusting in this window is your distance. If you’re consistently over-rotating (handle hits the board), move slightly back. If you’re under-rotating (blade is flat when it hits), move slightly forward. Small adjustments — 3-6 inches — can be the difference between consistent sticks and constant bouncing. Mark where you stand when you’re sticking consistently; it’s probably not exactly on the throwing line.
The one-hand throw comes in this window for some people. It’s harder — one arm means less predictable rotation — but it’s also what most competition formats use. Technique is similar: straight arm overhead, 12 o’clock release, no wrist flip. It takes most people 30-50 additional throws to get their single-hand throw as consistent as their two-hander.
Hours 4–5: Aiming for the bullseye
Once your axe is sticking consistently — 7 out of 10 throws — you can start thinking about where it lands. A standard NATF/WATL target has a bullseye (worth 6 points), a series of outer rings, and kill shots in the corners (worth 8 points, but only if you hit them).
Most beginners aim for the middle of the board and let the throw land where it does. This works fine. Real targeting develops by using your grip as a sight: where the handle points at your release point is roughly where the blade will go. Slightly right-of-center release puts the axe slightly right of center. It takes a few hours of sticking to start reading these patterns.
The kill shots — small circles painted in the corners of the target — are tempting. They’re worth more points, so beginners chase them. Don’t. Corners require throwing near the edge of the board, and a miss bounces off the board frame (or misses the board entirely). Hit the bullseye reliably before thinking about corner shots.
By hour five, most people are playing their first informal game — competing against a friend or a venue’s scoring system. The format is usually best-of-five rounds, five throws each. Scoring, strategy, and the social angle all become real at this point.
The axe hits handle-first: You’re over-rotating. Either move back 6 inches, release slightly later (more past 12 o’clock), or reduce your throw speed slightly to add less rotation.
The axe hits flat (blade parallel to board): You’re under-rotating. Move forward 6 inches, release slightly earlier, or increase throw speed.
The axe sticks but immediately falls out: The edge is dull. Sharpen it and the blade will cut into the pine fibers instead of just compressing them.
You’re getting inconsistent rotation: You’re introducing wrist snap. Lock your wrists and think of the motion as a straight-arm pendulum. If you’re still getting wobble, check your grip — loosen up.
Your throws feel strong but the blade keeps bouncing: The board is too hard (older, dried-out pine) or you’re hitting a spot that’s been thrown at too many times and compressed. Rotate your target face or replace the boards.
Joining a league
NATF and WATL leagues run recreational seasons at participating venues — typically 10-12 weeks, one 90-minute session per week, around $150-200 for the season. You throw against other players at your skill level, scores are tracked, and the top finishers go to regional tournaments.
The ideal time to join is after your first 4-6 weeks of throwing. Before that, you’re still building mechanics and league night can feel frustrating when you’re having an off session. After 4-6 weeks, the competitive format accelerates your improvement dramatically.
Most venues offer a free intro session or beginner night before you commit to a season. Go to one.
Save your money
What you don't need yet
Beginners get pressured to buy a lot of stuff that doesn't help them play
better. Here's what we'd skip on day one.
A dedicated competition axe from a custom forge — Custom forged competition axes ($150-300+) are for league players who throw 3+ times a week. You won't feel the difference until you have reliable mechanics.
Electronic scoring systems — LED target rings and Bluetooth scoring apps look cool. Painted rings on pine boards are free and work just as well.
An axe-throwing glove — Gloves change your feel of the handle and can hurt your release consistency. Most coaches recommend bare hands or a simple athletic grip tape wrap.
Multiple axes — The competition format uses two throws per round, so some people buy pairs. For learning, one axe is plenty — the walk to retrieve it is part of the pace.
A full league membership on day one — NATF and WATL leagues are genuinely fun, but throw for 4-6 weeks first so you're not paying league fees while you're still figuring out the rotation.
First week
Your first seven days
A short, real plan to get from gear-on-doorstep to actually playing.
Book a venue session before buying anything. · Action
Aim for 20-30 throws per session in your first week. Your release will start becoming consistent around throw 40-50. · Action
FAQ
Common questions
How much does it cost to start throwing axes at home?
A solid throwing hatchet ($40-70) and a basic target board set ($60-120) puts you in the $100-190 range. If you source your own pine boards from a lumber yard you can get that under $80.
Is axe throwing dangerous?
It's as safe as archery when done properly. The main rules: clear the lane before retrieving your axe, never throw at a wet board (it causes unpredictable bounces), and always have a proper backstop. Venues enforce these rules; backyard throwers have to enforce them yourself.
Do I need any experience to go to a venue?
None. Every axe-throwing venue runs beginner orientation before you enter a lane — it's usually 10-15 minutes. You'll be throwing (and sticking) within your first 20 minutes. No prior experience required.
What's the difference between NATF and WATL?
NATF (North American Axe Throwing Federation) and WATL (World Axe Throwing League) are the two main governing bodies. Both run recreational and competitive leagues. WATL is somewhat larger globally; NATF is dominant in the US Southeast and Midwest. Check which league your local venue is affiliated with.
How long does it take to get consistent?
Most people land their first stick within the first 5-10 throws. Getting reliably consistent — where you can aim at the bullseye and hit it more often than not — takes 4-8 hours of practice spread over a few sessions.
Can I use any axe, or does it have to be a specific type?
For backyard throwing, any well-balanced 1.25-1.75 lb hatchet with a thin blade grind works. For NATF/WATL league competition, axes must meet specific specs (weight, handle length, blade width). Check your league's rulebook before buying a competition axe.
WATL — World Axe Throwing League — The global league with venues in North America, Europe, and Australia. More international presence than NATF; runs both hatchet and big-axe formats.
WATL Axe Throwing Handbook — Official rules, scoring, legal axe specs, and safety requirements. Essential reading before joining any league.
r/axethrowing — Active community for technique questions, gear recommendations, and troubleshooting. Good for 'why isn't my axe sticking' posts.
Forged Axes (YouTube) — One of the best YouTube channels for axe-throwing technique. Clear instruction on the one-hand and two-hand overhand throws.
As an Amazon Associate, JustBeginning earns from qualifying purchases.
We may also earn commission from other affiliate programs linked on this
page. Editorial recommendations are independent; we don't choose
products based on commission rates.
Product prices and availability are accurate as of the date and time
indicated and are subject to change. Any price and availability
information shown on Amazon at the time of purchase will apply.


 Best starter