Judo is one of the oldest Olympic martial arts and one of the smartest to start. You learn to throw, trip, and control people larger than you, not out-muscle them. The gear list is short and cheap. The technique curve is steep and deeply rewarding. Here's exactly what to buy first.
By Colin B. · Published May 24, 2026 · Last reviewed June 15, 2026
A beginner judogi runs $45–90. Add ear guards and a bag and you're under $150. Judo gear is cheap; the club provides the mats and the instruction.
We earn commission on qualifying Amazon purchases — see our
affiliate disclosure.
Price tiers and budget totals shown above are editorial estimates;
actual Amazon prices vary.
At a glance
Our top pick in each category
The fastest path through this guide — each best-starter pick by category.
Scroll for the budget and upgrade alternatives.
Don't buy anything until you've confirmed a dojo and a start date. A few clubs will lend you a loaner gi for your first class. Attend once before spending $100.
Your gi needs to be cut for judo, not karate or BJJ. Karate gis are too light and tear. BJJ gis have thinner lapels that won't survive randori (sparring). Buy from a brand that specifically sells judo uniforms.
The club provides everything else: mats, coaching, the other people you need to practice with. Your personal gear list is short: judogi, ear guards, bag, and eventually grip training tools.
The gear
What you actually need
Judogi
The judogi (your judo uniform) is different from a karate gi or BJJ gi. It's heavier, the lapels are thicker so opponents can grip without tearing it, and it fits looser to allow full-range throws. For your first gi, single-weave in the $60–100 range is ideal. Double-weave gis are more durable but heavier and hotter, so save that for when you start competing. Buy from a real judo brand; generics fall apart inside a month of hard practice.
Judogi — what's the difference?
A few common shapes, each making a different trade.
Single Weave
Light, affordable, and easy to move in. The right starting point.
Weight
Lightest
Durability
1–2 years heavy use
Price
$45–90
Best for Beginners, warm climates, 2–3x per week training
Tradeoff Lapels soften faster; heavier grips wear it down sooner
This 500g training judogi is Adidas's honest entry-level option, not cut-rate, just right for beginners. Single-weave construction keeps the weight manageable for long practice sessions, the pre-shrunk cotton holds its fit after the first wash, and it comes in full sizes including tall options. The gi you'll outgrow only when you start competing, which might not happen for two years.
What we like
Pre-shrunk cotton; sizing holds after the first wash
Adidas consistent sizing across production runs
Single weave stays cool through 90 minutes of hard randori
What to know
Lapels soften faster than double-weave at high training volume
Slim through the shoulders for muscular or wider builds
★★★★☆Our rating· Only 8 left in stock - order soon.
Fuji has been making martial arts uniforms for decades and the quality-to-price ratio on their single weave is hard to beat. Under $60 with a belt included, sized for judo (not karate or BJJ), and durable enough for months of regular practice. The obvious starting point if you're not yet sure judo will stick.
What we like
Under $60 with belt included, a smart way to test if judo sticks
Cut for judo, with more room in the shoulders and hips than BJJ gis
Fuji has supplied martial arts schools for 50+ years
What to know
Fabric shows wear sooner than mid-range gis at high volume
Runs large; size down from your normal athletic fit
When you're ready for a gi that lasts years instead of months, the Mizuno Yusho is the move. The gold-weave construction is heavier than single weave but cooler than double, IJF-approved for tournament use, and cut to competition measurements. Mizuno has dressed Olympic-level judoka for decades. Get this after your first year.
What we like
Gold weave: tougher than single, cooler than double weave
IJF-approved, valid for any tournament you enter as a beginner
Mizuno quality holds up to daily training for 2–3 years
What to know
Significantly more expensive ($150+); wait until you're committed
Heavier than a single weave; takes adjustment in summer heat
Judo involves constant head-to-head contact during throws, grip battles, and newaza (ground work). Without protection, repeated friction causes cauliflower ear, a permanent deformity from blood pooling in the cartilage. It happens faster than people expect, and it's irreversible. A solid pair of wrestling ear guards costs $20–35. A mouthguard is $10. Both are worth it from your very first class.
Best starter
Cliff Keen
F5 Tornado 4-Strap Wrestling Headgear
$49.99 as of Jun 22, 2026
★★★★★Our rating· Only 1 left in stock - order soon.
Wrestling ear guards are functionally identical to judo-specific ones, and Cliff Keen makes the most trusted version in combat sports. Adjustable fit, secure velcro strap, and ventilated cups that stay put through full-intensity randori. Worn by wrestlers and judoka alike for decades for one reason: they work.
What we like
Industry standard in wrestling and grappling, proven to stay on
Ventilated cups don't trap heat through a full hour of randori
Adjustable strap fits youth and adult head sizes
What to know
Bulkier than thinner designs; takes a few practices to ignore it
Judo involves occasional accidental impacts; a partner's shoulder can catch your chin during a throw. A boil-and-bite mouthguard is cheap, fast to fit, and does the one job it needs to do. The Gel Nano is thin enough that you can still breathe hard and communicate normally through a full practice.
What we like
Thin profile; breathe hard and talk normally mid-practice
Boil-and-bite fit in under 5 minutes, no dental appointment
What to know
Gel wears faster than harder compounds under high-intensity use
Not a substitute for a custom guard if you compete seriously
In judo, your grip on the gi is everything; most techniques start by establishing the right grip and breaking your opponent's. Grip strength is a genuine limiting factor in your first months, and dedicated training pays off faster than almost any other conditioning work. A few tools you can use at home between practice sessions make a measurable difference within 60 days.
Best starter
IronMind
Captains of Crush Trainer Hand Gripper
$
★★★★★Our rating
The CoC hand grippers are the gold standard for grip training across combat sports and climbing. The Trainer level (100 lbs resistance) is the right entry point, enough to build real strength without risking tendon injury. Close 100 reps a day on each hand and your gripping strength will improve noticeably within a month of regular use.
What we like
Industry standard for grip strength in combat sports and climbing
Portable; 15 minutes of reps on a couch is real training
Lifetime warranty; these don't wear out under normal use
What to know
Trains closing strength only; pair with extension work for balance
Squeaky when new; breaks in after a few hundred reps
Grapplers who only train closing strength develop imbalanced hands; the finger flexors overpower the extensors and tendon issues follow. These rubber bands train the opening motion, restoring balance and reducing injury risk. A set costs $10, takes 5 minutes a day, and is the most overlooked recovery tool in martial arts.
What we like
Balances the constant grip-closing load that judo puts on your hands
Cheap, light, and can be used during any downtime
What to know
Bands wear and break after a year of daily use
Easy to overdo on the lighter bands; stick to 3 sets of 10 per session
Your judogi is wet after practice. So is everything else. A dedicated bag with a vented shoe compartment saves your car and your dry gear from your soaked gi. You don't need a branded martial arts bag; any spacious duffel works. What you need is room for a folded judogi (bigger than you think), shoes, and a water bottle.
Best starter
adidas
Unisex Defender 4.0 Gym Duffel Bag for Men and Women
$$
★★★★★Our rating
Large enough to hold a folded judogi, shoes, and a water bottle without stuffing. The Defender IV has a vented shoe pocket that separates wet shoes from your dry gear, a padded shoulder strap, and is priced low enough that you won't cringe when it gets soaked post-practice. Exactly what you need.
What we like
Vented shoe compartment keeps wet shoes away from your clean gi
Medium holds a judogi, water bottle, and shoes without stuffing
What to know
Wet gi goes in the main compartment (no dedicated wet bag pouch)
Shoulder strap only; no backpack straps for longer commutes
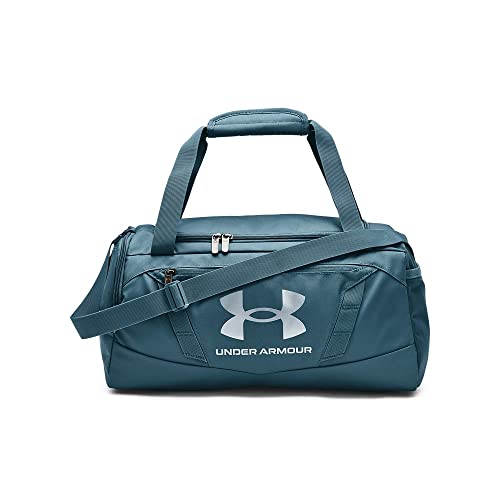
The UA Undeniable is the budget counter to the Adidas, a bit less polished but nearly as functional. UA Storm coating resists water and scuffing, there's a proper vented shoe bay, and at $35–45 it's easy to replace after a year of hard use. Buy this until you know judo is your sport.
What we like
UA Storm coating repels water and resists scuffs from gym floors
Vented shoe bay on the underside keeps the main compartment fresh
What to know
Zippers stick occasionally; carry a key ring for better leverage
Straps slightly short for taller people carrying a heavy bag
Judo takes longer than a week to click, but the first month builds the foundation everything else sits on. Here's what to focus on, and what to ignore.
Most people start judo expecting to learn throws. What they actually learn first is how to fall, and that turns out to be the smarter move. Judo is an unusually physical martial art: you’re being grabbed, tripped, and thrown from your first session. Before any of that is safe or useful, you need to learn how to hit the mat and bounce back up without getting hurt.
This is what your first month actually looks like, with the things that matter and the things you’ll be tempted to worry about but shouldn’t.
Week 1: Learn to fall before you learn to throw
The Japanese term is ukemi (breakfalling). It’s the first technique every judo student learns, and it’s the one that keeps you coming back rather than getting injured and quitting.
The mechanics are simple: when you hit the mat, you slap it with your arm flat and outstretched, which absorbs the impact and stops your head from bouncing. You tuck your chin. You roll rather than land flat. Every dojo will walk you through this on your first day, usually before any throwing happens at all.
Take it seriously. Don’t rush through ukemi to get to “the real judo.” Ukemi is the real judo: it’s what lets every other technique exist. A student who can’t fall confidently can’t train at full intensity, can’t be thrown by partners pushing their limits, and can’t improve beyond a certain ceiling.
The three basic breakfalls:
Backward breakfall (koho ukemi): fall straight back, slap the mat with both arms at 45 degrees
Side breakfall (yoko ukemi): fall to one side, one arm slaps
Rolling breakfall (mae mawari ukemi): roll diagonally over one shoulder
Practice all three every session in week one, even if it feels repetitive. This is the work.
Once you can fall reliably, you start learning kumi-kata (the grip). In judo, most technique starts with your grip on your opponent’s gi. The basic grip for right-handed players is one hand on the collar (left hand, on the opponent’s right lapel) and one hand on the sleeve (right hand, gripping just above the elbow). This is called the standard grip and it’s the launching position for most fundamental throws.
Your first throws will probably include:
Ippon seoi nage, a one-armed shoulder throw
O-goshi, a hip throw, good for beginners because it uses the hips not the arms
De-ashi barai, a foot sweep that catches the opponent mid-step
Don’t expect to execute these cleanly in weeks two or three. What you’re actually doing is learning the mechanical feel of each technique: where to put your feet, when to commit, what “loading” your hips actually feels like. The throws won’t be crisp. That’s fine. The timing comes from repetition, not from studying.
The most important technical habit to build early: move your feet before your arms. Beginners grab and pull before they’ve moved their bodies into position. Every throw in judo requires a specific foot placement relative to your opponent, and no amount of arm strength compensates for wrong feet. When a throw fails, look at your feet first.
Randori is free sparring; both partners are trying to throw each other, within the rules, at something less than full competition intensity. It is simultaneously the hardest and most important part of judo training.
Your first randori experience will probably feel chaotic. You’ll grip and move and nothing will happen; your throws won’t set up, your partner will feel immovable, and you’ll spend most of your energy just staying upright. This is normal. Randori teaches everything that drilling doesn’t: distance management, reading your opponent’s balance, how to break a grip, what real resistance actually feels like.
A few things to focus on during your first few randori sessions:
Don’t just grip and stand there. Movement is what creates the opportunities for throws. If you and your partner are both stationary, nothing works. The goal is to keep moving, keep your partner moving, and catch them off-balance when their foot shifts.
Tap early, tap often. If someone’s pulling off a throw and you feel the point of no return, just go with it. Don’t stiffen up to prevent being thrown. Being thrown cleanly is how you learn ukemi under pressure, and stiffening up is how you get hurt.
Position over technique. In early randori, your job isn’t to pull off the specific throws you’ve been drilling. Your job is to stay in good posture (back straight, knees bent, head up) and not give your partner clean opportunities. If a throw happens, great. If it doesn’t, good posture was still worth doing.
The thing nobody warns you about: it’s grip-intensive
Judo is harder on your hands than almost any other sport. Within two or three weeks of regular training, your forearms will be noticeably sore and your grip will fatigue before the rest of you does. This is normal; your hands aren’t conditioned for gripping a thick cotton gi for 90 minutes.
Two things help. First, do grip training between sessions (a hand gripper 100 reps per day is enough to start). Second, be patient: this adaptation takes about four to six weeks and then largely disappears. Most students don’t warn newcomers about the forearm soreness, and a lot of beginners assume something is wrong with their training. Nothing is wrong. Your hands just need time.
What good progress looks like at one month
After one month of consistent training (two or three sessions per week), you should:
Fall reliably in all three basic ukemi without thinking about it
Know and be able to name 3–5 throws, even if you can’t reliably execute them
Have survived and started to enjoy your first few randori sessions
Feel the difference between standing in good judo posture and poor posture
Be starting to feel the beginnings of a grip conditioning that wasn’t there before
You won’t be able to throw people cleanly yet. You shouldn’t be able to. The first month builds vocabulary: the movement patterns, the posture, the falling, the early grip instincts. The throws come in month two and three, once your body has the underlying motor patterns to support them.
Judo’s learning curve is steeper than most martial arts in the first month, and more rewarding than almost any of them by month three. You’ll feel this transition yourself. Keep showing up.
Save your money
What you don't need yet
Beginners get pressured to buy a lot of stuff that doesn't help them play
better. Here's what we'd skip on day one.
A competition IJF-approved judogi — Your first gi just needs to be cut for judo. IJF approval matters at tournaments, which you won't enter for months.
Tatami mats for home — Your club has mats. Home mats cost $200–400 and collect dust until you're training seriously.
Judo-specific shoes — Traditional judo is practiced barefoot on tatami. Shoes are for the walk to and from the mat.
Ankle and knee braces — Buy these if you have a specific injury history, not preemptively. Most beginners don't need them.
Instructional DVDs or courses — Your sensei's corrections after live randori are worth more than any online course. Get to class.
First week
Your first seven days
A short, real plan to get from gear-on-doorstep to actually playing.
Find a judo club with a certified coach, not a self-defense school or an MMA gym that offers judo as an add-on. · Action
IJF Club Finder · International Judo Federation, the place to find affiliated clubs
In your first session, ask the sensei to drill ukemi (breakfalling) before anything else. Learning to fall safely is the foundation of every technique. · Learn
Order ear guards before your second class; cauliflower ear can start forming within a few hard randori sessions. · Buy
Attend 2–3 times in your first week. Judo technique is motor memory; frequency beats duration. · Action
Watch at least one IJF World Championship highlight reel. Seeing elite throwing technique before you've built bad habits shapes how you practice. · Learn
IJF YouTube · YouTube · World Championship highlight clips
FAQ
Common questions
How is judo different from BJJ?
Judo focuses on throws and takedowns. The goal is to score by throwing your opponent onto their back. BJJ focuses on ground work, submissions, and positional control. Judo does have ground work (newaza), but it's limited: if neither person is working toward a submission, the ref stands you back up. A heavier judogi, more standup sparring, and a different scoring system are the practical differences you'll notice from day one.
Do I need to be strong or athletic to start judo?
No. Judo literally translates to 'gentle way,' and the core principle is using your opponent's balance and momentum, not your own strength. A skilled smaller person routinely throws stronger, larger partners. Strength helps at high levels but is actively less important in judo than in most other combat sports. Show up as you are.
Is judo dangerous for beginners?
Judo has a higher injury rate than many martial arts, mostly from falls and from randori that escalates too fast. The risk is manageable: learn ukemi (breakfalling) first and take it seriously, wear ear guards, and tap early and often in sparring. Most beginner injuries come from not knowing how to fall correctly.
What color belt do I start with?
White. In most Western judo federations you start white and progress through yellow, orange, green, blue, and brown before black. The timeline to black belt averages 4–6 years of consistent training. Some clubs use a simplified system with fewer colored belts; ask your sensei at enrollment.
How much does it cost per month to train judo?
Most judo clubs charge $60–120/month for unlimited classes. That's cheap compared to BJJ, Muay Thai, or MMA gyms. One-time gear costs run $70–165 (gi + ear guards + bag). The total first-year cost including gear and dues is roughly $800–1,500 depending on your city and how often you train.
Can I learn judo at home without a partner?
You can train grip strength, flexibility, and some solo uchi-komi (technique repetition against a wall or post) at home. But judo is fundamentally about reading and responding to another person's balance, and you need a partner and mats. Supplement your dojo time at home; don't try to replace it.
International Judo Federation (IJF) — The global governing body. Official rules, World Ranking, club directory. Bookmark the rules page; the competition rulebook explains exactly how ippon, waza-ari, and penalties work.
Judo Info — Comprehensive technique library: throw names, grip breakdowns, history. The best free reference for learning the Japanese terminology and understanding technique variations.
r/judo — Active community. Useful for finding local club recommendations, gear advice, and technique questions. The wiki has a solid beginner FAQ.
Shintaro Higashi (YouTube) — Former US Olympic team member. His YouTube channel is the clearest English-language judo instruction available: patient, technique-focused, no filler.
IJF YouTube Channel — Full matches and highlight reels from World Championships and Grand Slams. Watching elite throwing technique is one of the best ways to internalize what correct judo looks like.
As an Amazon Associate, JustBeginning earns from qualifying purchases.
We may also earn commission from other affiliate programs linked on this
page. Editorial recommendations are independent; we don't choose
products based on commission rates.
Product prices and availability are accurate as of the date and time
indicated and are subject to change. Any price and availability
information shown on Amazon at the time of purchase will apply.

 Best starter