Kettlebell training is one of the few fitness pursuits where a single piece of gear is genuinely all you need. The bad news: most beginners pick the wrong weight or buy a bell with a handle that will shred their palms. Here's what to actually buy, how heavy to start, and what the kettlebell community has figured out that the fitness industry won't tell you.
By Colin B. · Published June 2, 2026 · Last reviewed June 2, 2026
Ader Sporting Gym Chalk Block
— Gymnastics chalk is identical to 'gym chalk' sold at a markup. Dry hands grip the bell with less tension and tear less.
One quality kettlebell runs $40–90 depending on weight. Add chalk, rubber mat tiles, and flat shoes and you're in for $150–200 total.
We earn commission on qualifying Amazon purchases — see our
affiliate disclosure.
Price tiers and budget totals shown above are editorial estimates;
actual Amazon prices vary.
At a glance
Our top pick in each category
The fastest path through this guide — each best-starter pick by category.
Scroll for the budget and upgrade alternatives.
Weight selection is the most important decision you'll make. Women starting out typically use 8–12 kg (18–26 lbs). Men with no lifting background start at 16 kg (35 lbs). Men with some gym experience start at 20–24 kg (44–53 lbs). Starting too heavy is how beginners blow out their lower back on swings — the bell takes over the movement.
One bell is enough. Every legitimate beginner program — Pavel's Simple & Sinister, Enter the Kettlebell — is designed around a single bell. Resist buying a set until you're training three days a week for a month and actually need variety.
Handle quality matters more than brand, coating, or color. A rough seam through the palm area will tear your hands during high-rep swings. Run your thumb along the handle before buying. Look for machine-finished, seamless handles. Most budget bells cut costs here.
The gear
What you actually need
Kettlebells
The kettlebell IS the workout. One quality bell at the right weight is all you need for the first three to six months — no gym required, no other equipment. The two things that matter at this stage: handle quality (a rough seam tears palms during swings) and starting weight (too heavy and form collapses; too light and you won't get the training stimulus). Competition bells use a uniform 33mm handle across every weight, which matters when you plan to progress up in size. Cast iron bells cost less and work fine for most beginners.
Kettlebells — what's the difference?
A few common shapes, each making a different trade.
Cast Iron
Traditional, affordable. The default pick for most beginners.
Handle diameter
Varies (33–38mm)
Price per lb
$1.50–2.50
Finish
Painted or powder coat
Best for Most beginners — one or two fixed-weight bells
Tradeoff Handle diameter changes between weights — minor form adjustment as you progress
Rep Fitness machines their handles to a consistent 33mm diameter across every size, with a flat-ground seam that won't cut your palm — genuinely hard to find at this price. Available in single-kilogram increments from 4 kg to 48 kg, so you order the exact weight you need without paying competition prices.
What we like
Consistent 33mm handle diameter across all weights
Flat-ground seam — handle won't tear palms during high-rep swings
Single-kg increments — no awkward weight jumps between sizes
What to know
Powder coat feels slightly rough until broken in over two weeks
Heavier weights ship via freight — adds a few days to delivery
Yes4All is the most purchased entry-level bell on Amazon for a reason: wide size selection, competitive price, and handle quality that beats similarly priced competitors. A sound first bell if budget is the hard constraint — just inspect the handle seam when it arrives.
What we like
Lowest reliable price in the cast iron category
Available in all common starter weights with Prime shipping
What to know
Handle seam varies — may need light sanding before high-rep use
Weight markings are paint-only; they'll fade after a few months
Competition bells — steel, uniform 33mm handle at every weight, color-coded by size — are worth the price jump if you plan to stay with kettlebell training for years. The consistent handle means your technique transfers cleanly as you progress up in weight instead of adapting to a different tool each time.
What we like
Uniform 33mm handle at every weight — technique stays consistent
Steel with hollow core for precise weight distribution and balance
Color-coded by weight class — matches competition standards worldwide
What to know
Roughly 40% more expensive than equivalent cast iron options
Overkill for beginners who aren't sure the practice will stick
The 840 replaces six separate bells (8–40 lbs) with one dial-adjustable unit. The right call if you're training in a small space or want to progress through weights without buying multiple bells.
What we like
Replaces six bells — major space saver for apartment home gyms
Dial adjusts in 5-pound increments, covering starter through intermediate
What to know
Not for drops or hard floor contact — casing cracks on impact
Only pays off economically if you'd otherwise buy 3+ separate bells
Your hands are the primary friction point in kettlebell training. High-rep swings and snatches build grip strength — and calluses. Calluses that get too thick will tear mid-set. The solution is chalk (reduces grip tension without muffling feedback) and periodic hand care. Wrist support matters most during the learning phase: the rack position for cleans and presses takes weeks to dial in, and wraps provide stability while the neural pattern develops. Avoid padded gloves — they hide the sensory feedback your hands need to learn proper technique.
Best starter
Ader Sporting Goods
Ader Sporting Gym Chalk Block
$
★★★★★Our rating
Gymnastics chalk (magnesium carbonate) is chemically identical to the 'gym chalk' sold inside fitness brands at three times the price. Keeps your hands dry and the bell grippy without the feedback loss of gloves. A block lasts months; buy two.
What we like
Reduces grip tension — lets you hold the bell without white-knuckling
Prevents skin tears during high-rep swings and snatches
Same magnesium carbonate gymnasts use — no fitness markup
What to know
Messy — use a chalk bag if training somewhere chalk is restricted
Hands dry out if you over-apply; follow up with lotion post-session
Wrist wraps provide stability feedback while you're learning the rack position and overhead press. Beginners who skip wrist support often develop wrist-flexion habits that get painful at heavier loads. A $15 pair of wraps buys insurance until proper positioning becomes automatic.
What we like
Provide joint stability during cleans and presses while form develops
Cheap insurance against wrist strain in the first month of training
What to know
Can mask poor wrist positioning if worn too long — phase out gradually
Unnecessary for swings and deadlifts — overapplication is common
Hand grips are the kettlebell community's answer to 100+ rep snatch sessions — they protect the callus-heavy base of your fingers without muffling bell feedback the way gloves do. Carbon fiber texture grips the handle while remaining thin enough to feel what's happening.
What we like
Carbon fiber texture grips the bell without eliminating hand feedback
Open-finger design preserves sensory contact better than gloves
What to know
Overkill until rep counts are high enough that callus tearing happens
Carbon fiber feels rough until broken in — expect 4–5 sessions minimum
Running shoes are the worst possible choice for kettlebell training, and most beginners make this mistake. The cushioned heel introduces instability in the hip hinge, puts your foot further from the floor than it should be, and reduces the ground-contact feedback your nervous system uses for loading patterns. Flat-soled shoes — Converse, wrestling shoes, minimalist trainers — are correct. Training barefoot on a clean rubber mat is also legitimate. The goal is zero heel elevation and maximum floor contact.
Best starter
Converse
Chuck Taylor All Star Low Top
$$
★★★★★Our rating
Converse Chuck Taylors are the kettlebell community's default recommendation for a reason: zero-drop flat sole, minimal cushion, canvas upper that wraps the foot without restricting it. They cost $65 and perform as well as a $180 lifting shoe for beginner and intermediate programming.
What we like
Zero-drop flat sole — direct ground contact during the swing's hinge
The same shoe recommended by RKC and StrongFirst coaches worldwide
Canvas upper is flexible without being sloppy under load
What to know
Canvas wears through on rough outdoor concrete within a few months
No lateral support — fine for kettlebells, wrong shoe for court sports
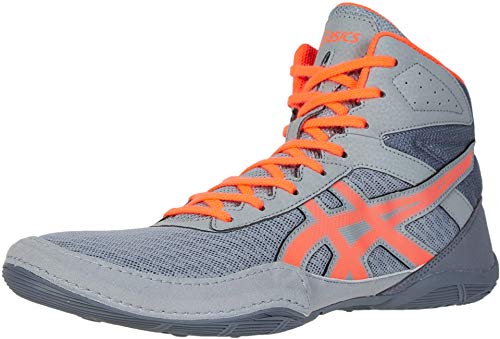
Wrestling shoes are the kettlebell world's best-kept budget secret: dead flat sole, ultra-thin profile, zero heel drop. The ASICS Matflex regularly hits $50–60 and trains more like barefoot than any general-purpose trainer on the market.
What we like
Flat sole puts you as close to barefoot as any shoe can
Often under $60 — the most affordable correct-footwear option
Used by competitive kettlebell athletes and girevoy sport competitors
What to know
Indoor grip wears quickly on outdoor concrete surfaces
The look is pure gym — no utility outside of training
NOBULL's training shoe is designed for exactly the lateral and hinge loads kettlebell training creates. Flat outsole, grippy rubber, upper that resists stretch better than canvas, and it survives outdoor surfaces where Chuck Taylors fail within months.
What we like
Flat outsole purpose-built for hinge and lateral loading patterns
More durable than canvas on outdoor concrete and rough surfaces
Wide toe box lets feet spread naturally under heavy load
What to know
Hard to justify at $119 until you're training several days per week
Polarizing minimalist aesthetic won't appeal to everyone
Floor protection is not optional if you train at home. A dropped 24 kg bell on hardwood is a floor-refinishing job. More importantly, a slippery or soft surface destabilizes the swing at the moment of maximum tension. Interlocking rubber tiles — 3/8-inch or thicker — are the standard home gym solution. Start with four tiles and you have a platform large enough for swings and Turkish get-ups. Expand later if needed.
Best starter
IncStores
Sport-Lock Rubber Interlocking Floor Tiles
$$
★★★★★Our rating
3/8-inch rubber absorbs impact when a bell drops without compressing underfoot the way foam does — critical for stable hip hinges. The interlocking design lets you start with four tiles and expand the platform over time without starting over.
What we like
3/8" rubber protects hardwood from even heavy bell drops
Doesn't compress underfoot — stable platform for swings and hinges
Interlocking tiles — start small and expand as your setup grows
What to know
Strong rubber smell for 1–2 weeks after unboxing — off-gas outdoors
Edges are sharp when new; file or chamfer them if barefoot is a priority
A budget foam mat won't feel as stable as rubber under your feet, but it absorbs impact when the bell lands and protects hardwood from drops. The right call if you're renting and can't put down permanent rubber tiles.
What we like
Lightweight — rolls up between sessions if floor space is shared
Protects floors from bell drops without the cost of rubber tiles
What to know
EVA foam compresses underfoot — less stable than rubber for swings
Not suitable for drops heavier than 35–40 lbs consistently
Kettlebell training has unusually good beginner resources because the community spent twenty years documenting technique in writing. The hardest part of the swing is not the swing — it's the mental model for hip hinge, tension, and breathing. A structured program prevents the 'figure it out' path that gives most self-taught beginners lower-back problems. Pavel Tsatsouline's Simple & Sinister is the consensus first program: two movements, daily practice, and clear progression standards that tell you exactly when you're ready to move up in weight.
Best starter
StrongFirst
Kettlebell Simple & Sinister (Revised & Updated)
$24.95 as of Jun 22, 2026
★★★★★Our rating· In Stock
S&S is the consensus beginner program: 100 one-hand swings and 10 Turkish get-ups, practiced daily, progressing through weights over months. It builds the two most foundational movement patterns — the hip hinge and full-body tension linkage — before adding any complexity.
What we like
The canonical first kettlebell program from the RKC founder
Two movements only — mastery before variety, every time
Clear progression standards tell you when to add weight
What to know
Only two exercises — minimal variety is a feature, not a bug
Dense writing style; read slowly and re-read before first session
★★★★☆Our rating· Only 1 left in stock - order soon.
The program that introduced the Western fitness world to kettlebell technique. Covers swings, cleans, military presses, and snatches with technical depth you can't get from YouTube. Better used as a reference after a month of S&S than as a starting point.
What we like
Covers four core lifts with step-by-step technique breakdowns
The reference text behind most kettlebell certifications worldwide
What to know
Not a daily training log — you plan your own session structure
Assumes swing competency; don't start here if you're brand new
Most people who start kettlebell training hurt their lower back in week one. Here's why that happens, what the actual learning curve looks like, and how to come out of the first month with technique instead of injuries.
Kettlebell training has one of the highest ratios of “looks simple, is subtle” of any fitness practice. A kettlebell swing looks like you’re picking something up and swinging it. What it actually requires is a precise hip hinge, coordinated tension and relaxation across your entire posterior chain, and breathing patterns that most people have never consciously trained.
This is not a warning to scare you off. It’s a setup for the right expectation: you’re not going to feel competent in week one, and that’s completely normal. The first month is the learning curve. By month two, the movement starts to feel athletic instead of awkward. By month three, you’re actually training.
Here’s what the first month looks like, week by week.
Week 1: Learn the hip hinge
Before you touch a kettlebell, you need a hip hinge. The hip hinge is the foundational movement of almost every kettlebell exercise — it’s not a squat, not a back bend, and not a deadlift (though it’s closest to that).
The wall drill: Stand about a foot from a wall, feet hip-width apart. Push your hips back until they touch the wall. Keep your back flat, weight in your heels, soft bend in the knees. The movement is entirely at the hip joint — not the lower back, not the knees. This is the pattern the swing is built on.
Do the wall drill fifty times before your first session with the bell. It sounds excessive. It isn’t.
When you first swing, the instinct is to squat down and lift with your back — it’s how your body solves “pick this thing up” when it doesn’t yet know the correct pattern. The back injury that gives most beginners their first week of soreness comes from loading that squat-with-a-forward-lean pattern at speed.
Start with a lighter weight than you think you need. The swing is a ballistic movement — the bell should float momentarily at chest height, pulled by hip drive alone, not muscled up with your arms. If you’re using your arms, the weight is too heavy or the pattern isn’t loaded yet.
Your first session: 5 sets of 10 two-hand swings with full rest between sets. Put the bell down if your form breaks. Keep the session under 20 minutes.
Week 2: Add the Turkish get-up
The Turkish get-up (TGU) is the second half of Pavel’s Simple & Sinister program, and it earns its place. It’s a slow, deliberate movement that takes you from lying on your back to standing, bell held overhead, and back down again. Performed correctly, it teaches shoulder stability, full-body coordination, and the overhead position that the press and snatch eventually require.
The get-up looks impossibly complex the first few times. There are seven distinct positions. Don’t learn them all at once. Learn the first three positions until they’re automatic, then add the next two, then add the final two. Most coaching videos walk you through all seven in one pass — slow down, stop the video, practice each position before moving on.
Start with no weight at all for your first get-up practice. Use a shoe balanced on your fist so you learn to maintain arm position without worrying about the load. Add the lightest bell you own only after the movement sequence is clean.
Soreness from TGUs will find muscles you didn’t know you had — the lateral hip stabilizers, the serratus, the triceps at full extension. This is normal and it fades within two weeks of regular practice.
Week 2 target: 5 TGUs per side per session, no weight or lightest available. Continue 5×10 two-hand swings.
By week three, you’ve developed enough hip hinge and tension pattern to add one-hand swings and start pushing the load.
The one-hand swing is harder than the two-hand version because the bell pulls you into rotation — you have to resist that rotation with your obliques and lats rather than just driving with your hips. It’s more demanding and teaches the lateral stability that cleans and snatches require.
The hard style breathing pattern becomes important at week three. At the top of the swing, you exhale sharply through pursed lips (Pavel calls this the “hissing exhale”) — this creates intra-abdominal pressure, stiffens the core, and coordinates the ballistic tension that drives the bell. It feels theatrical until it becomes automatic, then you can’t imagine swinging without it.
Load is starting to matter: if you can complete 10 one-hand swings per side without your form breaking, you’re ready for a heavier bell. The rep standard to clear a weight is 100 consecutive swings in 5 minutes with the bell you’re currently using — Simple & Sinister calls this “Simple” and it’s a genuine benchmark.
By week four, you have enough reps that your form has both improved and solidified in whatever direction it’s going — which may include some ingrained errors you can’t feel from the inside.
This is the week to film from two angles (side and rear) and either post to r/kettlebell for feedback or book a single session with an RKC or StrongFirst certified instructor.
The things you can’t feel from the inside:
Cervical spine position (most beginners look up at the bell at the top of the swing — this loads the neck incorrectly)
Knee tracking during the hinge (knees should stay relatively stationary; beginners often push them forward instead of loading the hip)
Bell path (the bell should arc close to the body on the backswing, not swing out wide)
Heels lifting (any heel rise during the hinge means the weight is too heavy or the hinge pattern is leaking into a squat)
One session with a qualified coach will identify two or three things to fix. Spend the following month fixing those specific things. Don’t add new movements until the swing is clean.
What to expect after the first month
At the end of month one, you should be able to do: 5 sets of 10 one-hand swings per side and 5 TGUs per side in a session. That’s not a small thing. The hip hinge pattern is loaded, the posterior chain is stronger, and the movement has started to feel natural rather than effortful.
Month two introduces the clean and press if you’re following S&S’s progression, or the snatch if you’ve moved to Enter the Kettlebell. Both require the swing as a foundation — which you now have.
The kettlebell community’s benchmark for “the swing is working” is this: after a set of 10 hard swings, your heart rate is up, your hamstrings are pumped, and your arms feel almost nothing. When the arms are tired, the hip drive isn’t loaded. When the hips are working, the bell becomes almost effortless at the top — it floats up on its own.
You’ll feel that for the first time somewhere in week three or four. When you do, the practice stops being work and starts being interesting.
Save your money
What you don't need yet
Beginners get pressured to buy a lot of stuff that doesn't help them play
better. Here's what we'd skip on day one.
A complete kettlebell set — You need one bell for the first three to six months. Every beginner program is designed around a single weight — resist the urge to buy variety before you need it.
A kettlebell storage rack — One bell on the floor or a shelf. Racks make sense when you own five or more bells. They're not starter gear.
A weightlifting belt — Kettlebell training teaches you to create your own intra-abdominal pressure — a belt short-circuits that learning. Get the skill first.
Battle ropes or TRX bands — A single kettlebell already gives you a complete full-body training system. Additional tools add complexity without adding value in month one.
Padded lifting gloves — Gloves muffle the feedback your hands need to learn proper grip. The kettlebell community avoids them unanimously. Use chalk instead.
An adjustable-weight dumbbell set — Kettlebell programming is specifically designed around the off-center load and ballistic movements the shape enables. Dumbbells aren't a substitute.
First week
Your first seven days
A short, real plan to get from gear-on-doorstep to actually playing.
Decide on your starting weight. Women: 8–12 kg. Men without prior lifting: 16 kg. Men with gym experience: 20–24 kg. If in doubt, go lighter. · Action
Order your kettlebell and chalk at the same time. · Buy
Set up four rubber tiles in your training area — enough for swings plus a step back. · Action
Your first session: 5 sets of 10 two-hand swings with full rest between sets. No more. The movement is new and your lower back will tell you about it tomorrow. · Action
Film yourself from the side on day three. Self-diagnosing form issues requires video — you cannot feel what you cannot see. · Action
Post a form-check video to r/kettlebell after your first week. The community is genuinely helpful and the feedback is fast. · Action
FAQ
Common questions
What weight kettlebell should a beginner buy?
Women starting out: 8–12 kg (18–26 lbs). Men without prior strength training: 16 kg (35 lbs). Men with a gym background: 20–24 kg (44–53 lbs). Starting too heavy is the leading cause of beginner lower-back injuries from swings. Go lighter than your instinct says.
Can I train kettlebells every day?
Yes — the Simple & Sinister program is designed for daily practice. The key is keeping intensity manageable: stop a few reps short of failure, rest as needed between sets. Daily easy practice beats three brutal sessions per week at this stage.
Do I need a coach to start kettlebell training?
Not mandatory, but highly recommended for the first one or two sessions. The hip hinge is a skill and it's easy to learn wrong. One session with an RKC or StrongFirst certified instructor will fix form issues in real time that video-watching takes months to identify. Find one through StrongFirst.com.
Cast iron vs competition kettlebell — does it actually matter?
For one bell at one weight, no — cast iron is fine. Competition bells become meaningful when you own three or more bells across different weights. The uniform 33mm handle means you're not re-learning your grip at each size. For a single starter bell, save the money.
Why does the bell keep hitting my forearm during cleans?
Forearm bruising from cleans is the universal beginner experience. The fix is keeping the bell close to your body during the pull and letting it rotate into the rack position — not trying to flip it into place. Watch Mark Wildman's clean technique on YouTube. It takes weeks to dial in and then it stops hurting entirely.
Is kettlebell training alone enough, or do I need to also lift weights?
Kettlebell training is a complete fitness system on its own — it covers strength, cardiovascular conditioning, and mobility in a single practice. The question is whether you enjoy it enough to train consistently. Many kettlebell practitioners train exclusively with bells for years without adding barbells or machines.
StrongFirst — Pavel Tsatsouline's organization. The canonical technique authority for kettlebell training. Instructor finder, certified program library, and the articles section is the most technical free resource available.
r/kettlebell — Active community. The wiki is excellent — start there. Form-check posts get fast, substantive feedback. Skip gear recommendation threads; the community has opinions.
Mark Wildman (YouTube) — The most technical kettlebell YouTube channel available. Extremely precise breakdown of the swing, clean, press, and snatch. Watch the clean tutorial before you develop forearm bruise habits.
Iron Cardio — Brett Jones (YouTube) — StrongFirst Master Instructor. Patient, precise technique videos. Especially strong on the Turkish get-up, which most YouTube coaches explain poorly.
Girevoy Sport Association of America — The competitive end of kettlebell training — 10-minute sets of continuous snatches or jerks. Useful reference for anyone who gets serious. Not beginner territory, but worth knowing the competitive scene exists.
As an Amazon Associate, JustBeginning earns from qualifying purchases.
We may also earn commission from other affiliate programs linked on this
page. Editorial recommendations are independent; we don't choose
products based on commission rates.
Product prices and availability are accurate as of the date and time
indicated and are subject to change. Any price and availability
information shown on Amazon at the time of purchase will apply.
Our top pickRep Fitness Powder Coat Cast Iron Kettlebell

 Best starter