Powerlifting is the sport of the squat, bench press, and deadlift: three lifts, one total, and a subculture that takes the numbers seriously. You don't need to compete to train like a powerlifter, but the gear follows the same logic either way: a real belt, lifting shoes, knee sleeves, and eventually a singlet. Here's what to buy first and what to wait on.
By Colin B. · Published May 28, 2026 · Last reviewed June 21, 2026
Adidas Powerlift 5
— Adidas Powerlift 5: heeled squat shoes built for this sport at a price that makes sense for a beginner.
Rehband Rx 7mm Knee Sleeves
— Rehband Rx 7mm Knee Sleeves: what coaches recommend and most federations approve for competition.
Budget total
$200
Typical total
$450
Belt + shoes + knee sleeves gets you training like a powerlifter for $200–250. Add singlet and wrist wraps when you have a meet on the calendar ($150–200 more).
We earn commission on qualifying Amazon purchases — see our
affiliate disclosure.
Price tiers and budget totals shown above are editorial estimates;
actual Amazon prices vary.
At a glance
Our top pick in each category
The fastest path through this guide — each best-starter pick by category.
Scroll for the budget and upgrade alternatives.
Get your technique down before you buy a belt. A belt helps you brace harder — it doesn't protect bad form. Most coaches recommend training beltless for the first three months to build bracing habits from scratch. Rush the belt and you'll lean on it instead of your core.
The lever vs. prong debate is worth 10 minutes before you spend $100+. Lever belts snap shut for identical tightness every set but require a small hex key to adjust fit if your weight changes. Prong belts adjust on the fly. Both are legal in USAPL and IPF. Most beginners end up on a lever.
Shoes matter more than you'd expect. Running shoes have spongy midsoles that eat your leg drive into the floor. You want either flat soles (Chuck Taylors work) or heeled lifting shoes depending on your squat mechanics. Read the shoes category before you decide — it's a real choice, not just aesthetics.
A powerlifting belt does one thing: it gives your core something rigid to brace against. You push your abs out against the belt, creating intra-abdominal pressure that stabilizes your spine under load. Thicker (13mm) belts are stiffer; 10mm belts are more comfortable and still legal everywhere. The lever vs. prong choice is mostly preference: levers are faster, prongs are adjustable. Don't buy cheap here: a quality belt lasts a decade.
Belts — what's the difference?
A few common shapes, each making a different trade.
Lever Belt
Snaps shut for identical tightness every set. The community default.
Width
4 inches (10 cm)
Thickness
10–13 mm
Closure
Lever (no tools to wear, hex key to resize)
Meet legal
Yes — IPF / USAPL approved
Best for Most powerlifters — fast on/off, consistent tension each set
Tradeoff Requires a hex key to change the fit setting between weight changes
Training convenience only. Not legal at USAPL or IPF meets.
Width
4 inches (10 cm)
Thickness
5–8 mm (thinner foam/nylon)
Closure
Velcro / quick-release clip
Meet legal
No — training only
Best for General gym training only — not powerlifting competition
Tradeoff You will need to rebuy before your first sanctioned meet
Best starter
Inzer
Forever Lever Belt 10mm
$$$
★★★★★Our rating
Inzer has been the powerlifting belt standard for 40 years, and the Forever lever belt is why. The 10mm thickness is manageable for beginners while being competition-legal in USAPL and IPF. The lever snaps shut for fast transitions between sets. This is the belt coaches recommend, the belt you see at every local meet, and the one you'll still be using in five years.
What we like
The community default: coaches recommend it, meets are full of them
Lever mechanism makes on/off between sets fast and consistent
10mm thickness works from beginner through elite competition
What to know
Requires a hex key to adjust fit (inconvenient if weight fluctuates)
Stiff out of the box; takes a few weeks of use to break in
At roughly half the price of an Inzer, the Gymreapers leather belt is the most legitimate budget option in powerlifting. Single-prong closure means you can adjust tightness between sets without a hex key — useful if your weight fluctuates. Genuine leather, 10mm construction, and a reliable buckle that holds through heavy training. If you're not certain powerlifting will stick, start here.
What we like
Adjustable tightness mid-session without a hex key — unlike lever belts
Genuine leather construction holds up through a year or more of training
What to know
Takes more time per set than a lever belt — clip and pull on every rep
Slightly harder to get identical tightness compared to a lever
The belt you see at IPF World Championships. SBD's lever belt is 13mm thick, precision-built, and designed to last your entire lifting career. The lever is noticeably smoother than competitors, and the extra stiffness of a 13mm belt makes a real difference when you're handling maximal weights. Worth the price after two-plus years when you know this sport is yours.
What we like
13mm thickness is maximum competition spec and maximum support
The belt elite IPF lifters actually compete in, including World Champions
What to know
Premium price ($240+) is difficult to justify before you're competing
13mm stiffness feels aggressive for beginners still learning to brace
The shoe decision in powerlifting is actually a mechanics question. Heeled lifting shoes (like the Adidas Powerlift) tilt your torso forward slightly, allowing a more upright position and deeper squat, ideal for narrow to medium stance squatters and anyone with limited ankle mobility. Flat shoes (Chuck Taylors) keep you stable for wide-stance squats and are the standard for deadlifts, where a heel only adds range of motion you're fighting. Most powerlifters own both.
Best starter
Adidas
Powerlift 5
$$
★★★★★Our rating
The Powerlift is Adidas's entry-level lifting shoe — purpose-built with a 0.6-inch heel drop at $110 instead of $200. It has the heel that makes squat mechanics click for most people, a wide velcro strap for lateral stability, and a flat non-compressible sole. The right shoe for 80% of beginners who need help getting depth with an upright torso.
What we like
0.6-inch heel helps most people squat deeper with an upright torso
Wide velcro strap locks the foot laterally on heavy sets
Purpose-built sole that doesn't compress under load
What to know
Only for squatting — use flat shoes or socks for deadlifts
Less ankle support than premium options like the Romaleos
The flat-soled option half the powerlifting world deadlifts in. Chuck Taylors have a completely flat, barely-cushioned sole that gives direct contact with the floor and consistent leg drive. They work for wide-stance squats too. At $55–70, they're the simplest way to stop lifting in running shoes, and they'll be in your gym bag for years.
What we like
Flat hard sole is ideal for deadlifts and wide-stance squats
Under $70, available at any shoe store — no waiting for shipping
What to know
No heel elevation means narrow-stance squatters may struggle with depth
Minimal upper support — not designed for heavy squatting
The premium heeled squat shoe. The Romaleos 4 SE has a 0.75-inch heel vs. the Powerlift's 0.6 inches, a rigid midsole, and dual velcro straps for maximum lockdown. Noticeably more stable than the Powerlift at max effort — you'll feel the difference once you're squatting heavy. Difficult to justify before year two, but worth it when you get there.
What we like
0.75-inch heel provides more squat depth than budget heeled options
Dual velcro straps give maximum lateral lockdown on heavy sets
What to know
$200+ is hard to justify until you're squatting seriously
More aggressive heel can throw off technique if you're not ready
Knee sleeves are legal in raw powerlifting at most federations and serve two purposes: warmth keeps the joint moving better, and compression reduces discomfort under load. They're not a brace and won't protect a damaged knee; they're a training aid. The 7mm neoprene standard is right for powerlifting; 5mm is used for lighter training. Buy them a size tighter than feels comfortable out of the bag; they need to be snug to do anything useful.
Best starter
Rehband
Rx 7mm Knee Sleeves
$$$
★★★★★Our rating
Rehband makes the knee sleeve that physical therapists and strength coaches recommend by name. The 7mm neoprene is the right thickness for powerlifting — stiff enough to keep the knee warm and supported, flexible enough to move naturally through a full squat. IPF- and USAPL-approved for competition. They'll last five years of hard training use.
What we like
The knee sleeve coaches and physical therapists recommend by name
7mm neoprene provides warmth and compression without restricting range
IPF and USAPL competition-approved — no gear swap needed for meets
What to know
Expensive for neoprene sleeves — you're paying for proven durability
Run large: size down and follow Rehband's chart, not your usual size
At roughly a third of Rehband's price, these deliver real compression for training. 7mm neoprene, decent warmth, and they hold up reasonably for a year or two of regular use. Not approved for strict IPF-level competition, but fine for training and meets with looser gear rules. The right answer if you want to try sleeves before committing.
What we like
Budget-friendly — lets you try sleeves without committing to premium cost
7mm neoprene provides real warmth and compression for training use
What to know
Seams wear faster than Rehband after extended heavy use
Not IPF/USAPL-approved — will need upgrading for strict federations
SBD sleeves are stiffer than Rehband and provide noticeably more rebound out of the hole. At elite meets they're as common as Rehband. They're also harder to put on — most lifters use a thin plastic bag over the foot to slide them up. The extra stiffness matters once you're squatting near maximal weights and is worth the price when you're competing seriously.
What we like
Stiffer than Rehband — more rebound and support at near-maximal weights
Standard gear at elite meets; IPF and USAPL approved
What to know
Hard to put on — requires the plastic-bag trick, which you'll need to learn
Premium price only justified when squatting near competition maxes
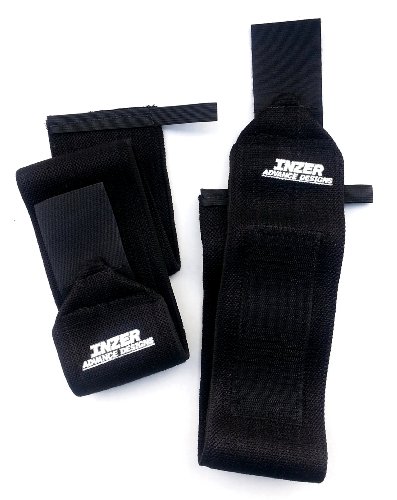
Wrist wraps stabilize the joint on bench press and front squat by limiting hyperextension under load. They're not critical for beginners, but most powerlifters add them within the first year. The difference between flexible training wraps and stiff competition wraps is real: training wraps are comfortable for high reps; competition wraps like the Inzer Iron Z lock the wrist rigid for max-effort singles. USAPL requires wraps to be 1 meter or less.
Best starter
Inzer
True Black 24" Wrist Wraps
$$
★★★★★Our rating
Competition-stiff wrist wraps from the same brand as the standard belt. These are stiff enough to actually lock your wrist on max-effort bench sets rather than just add compression. At 24 inches, they provide serious support and are competition-legal in USAPL. If you're buying the Inzer belt, the wraps are a natural companion — same quality, same brand trust.
What we like
Competition-legal stiffness that actually locks the wrist on heavy bench
18-inch length meets USAPL and IPF equipment rules
Same quality standard as Inzer's legendary belts
What to know
Too stiff for warm-up sets — wrap only before heavier working sets
Takes a few sessions to break in to your natural wrist angle
Under $20 and a legitimate way to try wrist wraps before committing to a stiffer pair. Flexible enough for a full training session without discomfort, with enough compression to feel the support on bench press. Not as stiff as competition wraps, but fine for training and lighter meets. Good starter pair while you decide what stiffness you want.
What we like
Under $20 — low-stakes way to try wraps before upgrading
Flexible enough for warm-up sets and accessory work
What to know
Not stiff enough to fully lock the wrist on max-effort singles
May lose elasticity within a year of heavy training use
You don't need a singlet to train, but you need one to compete: it's required at every USAPL and IPF-affiliated meet, and most other federations too. A singlet plus deadlift socks (required to protect shins from the bar) gets you through equipment check. Chalk is essential for grip on deadlifts and bar placement on back squats. Many gyms ban loose chalk; liquid chalk is the standard workaround that most gyms allow.
Best starter
Titan
Triumph Singlet
$$
★★★★★Our rating
The Titan Triumph is the community's standard starter singlet — IPF/USAPL-approved, well-made, and under $60. It fits as a singlet should: snug but not restrictive, no bunching during lifts. Most beginners competing in USAPL end up here. No reason to spend more until you have opinions about singlet brands, which takes time to develop.
What we like
IPF and USAPL approved — passes equipment check at sanctioned meets
The standard starter singlet for USAPL beginners
What to know
Runs small — size up and verify with Titan's chart before ordering
Plain design; other brands offer more style options at similar prices
Loose chalk is the best grip tool in powerlifting, but it's banned at most commercial gyms. Liquid chalk solves the problem — it dries to a dry-chalk feel without the dust cloud, and most gyms allow it. Squeeze a small amount in your hand, rub it in, let it dry 30 seconds, and your deadlift grip will immediately feel more secure.
What we like
Gym-friendly alternative to loose chalk — no dust cloud, widely allowed
Dries to a dry-chalk feel that makes a real difference on deadlifts
What to know
Not quite as grippy as loose chalk at true maximum effort
Most beginners spend their first month second-guessing their form, their program, and whether they're strong enough to be here. Here's what actually matters, what to ignore, and when it starts to feel like yours.
Powerlifting has a steep-looking entrance from the outside. Three lifts, a lot of gear opinions, a specific competition format, and a community with strong views on programming. From the inside, the first month is more straightforward than it looks: pick a program, learn three movements, and get under the bar a few times a week.
Here’s what the first month actually looks like and what to focus on.
Week 1–2: Learn the three lifts
The squat, bench press, and deadlift are the sport. Before anything else — program, gear, meet schedule — you need to be able to execute these movements with consistent, safe technique. Not perfect. Consistent.
Squat: Set up with the bar across your upper traps (high bar) or lower across your rear delts (low bar). Take a shoulder-width or slightly wider stance, push your knees out over your toes, and descend until your hip crease is below the top of your knee (this is “below parallel” — the legal standard in competition). Brace your core before you unrack, and don’t let it go until the rep is finished.
Bench press: Lie flat, arch your back slightly (this is legal and standard in powerlifting), grip the bar just outside shoulder width, lower it to your lower chest, pause briefly at the bottom, then press to lockout. The pause is required in competition — train it from day one.
Deadlift: Bar over mid-foot, hip-width stance. Hinge forward and grip the bar just outside your legs. Take a big breath, brace hard, and push the floor away while keeping the bar close to your body. Lock out standing tall. For conventional pulling, use an alternating (mixed) grip on heavier sets; both hands over for warm-ups.
The most useful thing you can do in weeks one and two is find Alan Thrall’s technique videos on YouTube (squat, bench, deadlift — one video each) and watch them once before your first session and once after. His cues are specific and correct. Don’t try to absorb everything at once — watch, apply two things, then come back.
Week 2–4: Commit to a beginner program
The program question is the biggest distraction in beginner powerlifting. Everyone has an opinion; almost any well-structured beginner program works well. Here’s the short version:
GZCLP is the most beginner-friendly option. It uses simple linear progression on the main lifts (add weight when you hit your rep targets), a clear hierarchy of movements, and it accommodates four training days. Most beginners can run it productively for six to twelve months.
5/3/1 for Beginners (Jim Wendler’s adaptation of his original program for newer lifters) uses a wave-loading scheme and works well if you respond to slightly lower frequency with higher weekly progression. Three days a week, easy to follow.
Starting Strength (Rippetoe) is barbell-only and teaches the movement patterns aggressively well. If your technique is rough and you want a program that forces you to think about each lift, this is effective.
Pick one. Follow it for twelve weeks before evaluating. The most common beginner mistake in powerlifting is program-hopping — switching every three weeks because something “looks better.” The program doesn’t matter as much as consistency and progressive overload. Add weight when the program says to add weight.
More than any program or gear choice, learning to brace is the highest-leverage skill in powerlifting. Here’s how it works:
Take a big breath into your belly — not your chest. Push your belly out hard against an imaginary belt. Hold that pressure throughout the entire rep. Let it out only when the weight is racked.
This is called intra-abdominal pressure, and it stabilizes your spine under load more than any external support. When coaches say “tight” or “brace,” this is what they mean. Beginners who figure this out in the first month are safer and progress faster than those who don’t learn it for six months.
Practice it on every warm-up set, not just when the weight feels heavy. Make it automatic.
When to compete for the first time
Earlier than you think. The most common mistake is waiting to feel “strong enough” — this is the wrong frame. Powerlifting doesn’t have a minimum strength requirement. You just need to be able to squat, bench, and deadlift with safe, consistent technique and hit three white lights.
A local USAPL meet twelve to sixteen weeks away is the right target. Having a date changes how you train — you’ll get serious about your commands (squat, bench, deadlift), your equipment check, and your attempt selection in a way that solo training never forces.
What to expect at your first meet: it will take longer than you expect (full-day events are normal), the warm-up room will be chaotic, and you will be nervous for your first attempts. All of this is normal. Every experienced lifter in the room had a first meet. The community at local meets is genuinely welcoming to beginners.
Pick three attempts for each lift: an opener you could hit on your worst day (90% of your training max), a second that’s your realistic goal, and a third that’s ambitious but possible. Go nine for nine if you can. A successful total at your first meet beats a failed personal record every time.
Things every beginner gets wrong
Training to failure on the main lifts. Powerlifting trains proximity to max effort, not failure. Leave reps in the tank. Form breaks down when you fail — and failure rep after failure rep builds bad movement patterns.
Buying a belt immediately. Train beltless for your first three months. Learn to create intra-abdominal pressure with your own abs first. A belt amplifies bracing ability you already have — it doesn’t replace it.
Ignoring the pause on bench. Competition bench requires a clear, motionless pause at the bottom. If you bounce every rep in training, you’re training a different lift than the one you’ll be judged on.
Maxing out too often. Max singles in training are useful twice a year — before a meet to confirm opener selection and in a peak block. Testing maxes every month burns your joints and your CNS and doesn’t accumulate training volume the way the program calls for.
Save your money
What you don't need yet
Beginners get pressured to buy a lot of stuff that doesn't help them play
better. Here's what we'd skip on day one.
A squat suit or deadlift suit — Equipped powerlifting is a separate sport. Raw lifting (belt, sleeves, wraps only) is where almost every beginner starts — it's where you should be for at least your first year or two.
Knee wraps instead of knee sleeves — Knee wraps provide dramatically more rebound than sleeves and belong in equipped or 'wraps' divisions. Raw beginners use sleeves. The distinction matters at equipment check.
A powerlifting bar for your home gym — Get your technique down and compete a few times first. A quality power bar runs $300–500. Buy it when you know you're staying in the sport, not before.
Lifting straps for heavy deadlifts — Straps are banned in competition deadlifts across essentially every major federation. Train without them on your heavy sets so your grip is competition-ready when it counts.
Advanced or custom programming — Any well-reviewed beginner program — GZCLP, 5/3/1 for Beginners, Starting Strength — outperforms expensive custom programming in your first year. Master the basics first.
First week
Your first seven days
A short, real plan to get from gear-on-doorstep to actually playing.
Pick a beginner powerlifting program and commit to it for at least 12 weeks. · Learn
GZCLP program · Reddit · beginner-friendly linear progression built around the big three
Learn the bracing cue: deep breath, push belly out hard against your hands, hold it through the lift. Practice this every set for your first month — it's the most important skill in the sport. · Learn
Watch meet footage from a local USAPL meet on YouTube. Seeing what a meet looks like before your first one removes most of the anxiety. · Action
USAPL meet footage · YouTube · search for meets in your region to see what to expect
Sign up for a meet 12–16 weeks out — before you feel ready. Having a date on the calendar changes how you train. · Action
Getting started for real — belt, shoes, and knee sleeves — runs $200–250 with budget picks or around $400–450 with our recommended picks (Inzer belt, Adidas Powerlift, Rehband sleeves). Add a singlet and chalk when you have a meet on the calendar. The good news: quality powerlifting gear lasts a decade. It's a one-time investment, not a recurring cost.
Do I need a belt as a beginner?
Not immediately. Most coaches recommend training beltless for three to six months to build your bracing pattern without relying on external support. A belt enhances technique you already have — it doesn't substitute for it. That said, Inzer ships slowly, so order it before you feel 'ready' or it won't arrive when you actually want it.
What's the difference between flat and heeled lifting shoes?
Heeled shoes (Adidas Powerlift, Nike Romaleos) tilt your torso slightly more upright, helping narrow-stance squatters get deeper with their chest up. Flat shoes (Chuck Taylors) keep you neutral and are ideal for wide-stance squats and all deadlift variations. Most powerlifters own both: heeled shoes for squats, flat shoes for deadlifts.
What federation should I compete in?
USAPL is the largest drug-tested federation in the US, uses IPF rules, and has beginner-friendly local meets everywhere. USPA and RPS have looser equipment rules and are also large. Don't agonize over the choice — just find the federation whose local meets are geographically closest to you and enter one.
When should I compete for the first time?
Earlier than you think. The most common mistake is waiting to feel 'strong enough,' which is the wrong frame. Powerlifting doesn't have a minimum strength requirement. You just need to be able to squat, bench, and deadlift with consistent, safe technique and hit three white lights.
Can I use straps on the deadlift in competition?
No. Straps are banned in raw powerlifting across every major federation. Train without them on your heavy deadlift sets so your grip is competition-ready. Straps are fine for accessory work like Romanian deadlifts at high volume — just don't use them on every heavy pull or your grip will fail you when it matters most.
USA Powerlifting (USAPL) — The largest drug-tested federation in the US. Meet finder, approved equipment list, rules, and membership registration all live here.
Alan Thrall (YouTube) — The best beginner technique breakdowns on YouTube. His squat, bench, and deadlift tutorials are clear, opinionated, and correct. Start here.
Stronger By Science — Greg Nuckols's evidence-based strength training site. Detailed programming guides, free programs, and deep dives on training science.
r/powerlifting — Active community. Read the wiki before posting gear questions — most beginner questions are answered there in detail.
Starting Strength — Mark Rippetoe's linear progression method. Useful for understanding barbell mechanics and building an early training base.
As an Amazon Associate, JustBeginning earns from qualifying purchases.
We may also earn commission from other affiliate programs linked on this
page. Editorial recommendations are independent; we don't choose
products based on commission rates.
Product prices and availability are accurate as of the date and time
indicated and are subject to change. Any price and availability
information shown on Amazon at the time of purchase will apply.