Punch needle is one of the most satisfying fiber crafts to start — one simple tool, a taut hoop, and some yarn, and you're making real textured pieces in your first afternoon. The entire starter kit costs under $80. Here's exactly what you need, and the gear you can skip until you know you're hooked.
By Colin B. · Published May 24, 2026 · Last reviewed June 15, 2026
Q-Snap Frame 11x11 Inch
— A Q-Snap frame holds fabric drum-tight without the distortion embroidery hoops cause.
Budget total
$55
Typical total
$80
A real punch needle starter kit is intentionally cheap: one tool ($20), half a yard of monks cloth ($10), a Q-Snap frame ($15), and two or three skeins of worsted yarn ($15). Total under $65 if you buy components separately.
We earn commission on qualifying Amazon purchases — see our
affiliate disclosure.
Price tiers and budget totals shown above are editorial estimates;
actual Amazon prices vary.
At a glance
Our top pick in each category
The fastest path through this guide — each best-starter pick by category.
Scroll for the budget and upgrade alternatives.
HeatnBondHeatnBond Iron On Hemming Tape - No Sew Hemming Tape for Pants, Dresses, and Curtains - Fabric Tape for Hemming - Heat and Bond Tape - Made in USA - 4 Rolls (3/4 Inch x 8 Yards Each), 32 Yards, White
Don't buy a complete punch needle kit. The bundled monks cloth is usually too coarse, the hoop is usually too small, and the yarn is acrylic you wouldn't have chosen. Buy components separately — it's roughly the same price and you get proper monks cloth, a Q-Snap frame, and yarn that won't fight you.
Needle size determines what yarn you use and what kind of work you'll make. Regular gauge (#8–10) with worsted-weight yarn is where most beginners should start — the loops are easy to see and the stroke clicks faster at that scale. Fine punch needle with embroidery thread is beautiful but harder to learn on. Don't buy both at once.
Your first piece should be small. Punch a 4-by-5-inch area with one or two colors before you attempt anything with shading or fine detail. The motion is genuinely simple — you'll have muscle memory inside an hour — but small first projects let you get through the whole process (punching, finishing, backing) before you commit to something bigger.
The punch needle is the hollow-tipped tool that makes the loops — push the tip through the backing fabric, release, pull back, and the loop stays. Gauge matters: fine needles (gauges 1–5) use embroidery thread for intricate detail work, regular needles (#8–10) use worsted-weight yarn and are the right starting point for most people, and rug needles (gauge 12+) use bulky yarn for fast, textured coverage. Start with a regular needle and worsted yarn. You'll learn the stroke faster at that scale and finish your first piece in an afternoon.
Punch Needles — what's the difference?
A few common shapes, each making a different trade.
Bulky yarn, fast coverage. Built for rugs and large wall pieces.
Gauge
#12–14+
Thread
Bulky / super-bulky yarn
Best for Floor rugs, large wall art, quick decorative projects
Tradeoff Less fine detail control; loops visible at arm's length
Best starter
Oxford
Punch Needle Regular #10
$35.00 as of Jun 22, 2026
★★★★★Our rating
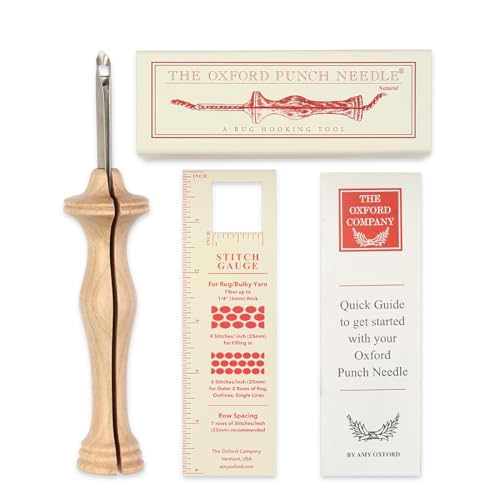
The Oxford Regular #10 is the closest thing punch needle has to a community standard. Simple machined aluminum handle, precise loop height, and it punches cleanly through monks cloth without snagging. Nearly every punch needle tutorial assumes you're working with this tool — which means the community's tips actually apply to you out of the box.
What we like
Machined aluminum handle — precise and doesn't flex under steady rhythm
Loop height consistent across the entire piece
Ships with a threading hook — the only extra tool you need
What to know
Fixed gauge only — buy a second size if you want fine detail later
No adjustable loop height; you're committed to the standard depth
Clover's punch needle comes in fine, medium, and large sizes for under $15 each. Not as precise as the Oxford, but the plastic handle is comfortable and the needle loads without a separate threader. A good choice if you want to try punch needle before committing to a better tool.
What we like
Under $15 — low-risk way to try punch needle before committing
Built-in threading mechanism, no separate threader needed
Available in three sizes — easy to grab fine, medium, and large
What to know
Plastic tip flexes under fast punching — slow your stroke
Less precise loop height than machined metal tools
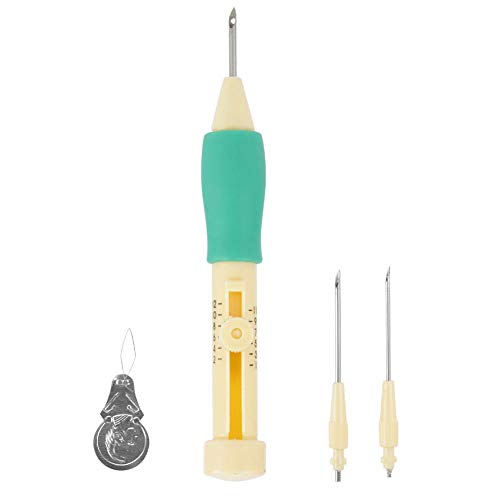
Punch Needle Embroidery Set Embroidery Needle Punch with 3 Sizes Needle Pen Kit Tool for DIY Craft for DIY Threaders Sewing Knitting for Mother(Yellow + Green)
$14.64 as of Jun 22, 2026
★★★★☆Our rating· In Stock
Three punch needles in one purchase — fine, regular, and rug gauge — so you can try different scales without committing to separate tools. Having all three sizes ready makes it easy to experiment as your skills grow. The right buy if you want to explore the craft before settling on a single favorite gauge.
What we like
Three gauge sizes in one purchase — fine, regular, and rug ready to go
Comfortable handle for long punching sessions
Good value way to explore different punch needle scales before specializing
What to know
Three separate tools means re-threading each time you change gauge
Not as precise as the Oxford — plastic tips have slightly more flex
The backing fabric is what you punch through — the weave needs to be open enough for the needle to enter smoothly but tight enough to hold the loops once they're set. Monks cloth is the near-universal choice for beginners: 100% cotton, soft enough not to fight the needle, and holds loops cleanly. Linen is the traditional option for fine punch needle work — slightly stiffer, better for small detail, but less forgiving of early mistakes. Always pre-wash monks cloth before use; it shrinks about 10%.
Best starter
Monks Cloth
Punch Needle Fabric 1 Yard
$24.99 as of Jun 22, 2026
★★★★★Our rating· In Stock
The default backing for punch needle work — soft, forgiving, and takes loops cleanly. Pre-wash in hot water and dry on high before you start (it shrinks, and you want that to happen before you punch, not after). Buy at least 4 inches more than your finished dimensions to allow for the frame margin.
What we like
100% cotton — soft enough that the needle glides without resistance
Holds loops firmly once set — won't unravel when removed from the frame
Sold by the yard — cheap enough to practice on before a real project
What to know
Must be pre-washed or the finished piece puckers — non-optional step
Loose weave ravels at cut edges — tape or overlock before mounting
A tighter-weave even-weave cloth designed specifically for fine punch needle work using thread rather than yarn. The stiffer hand helps loops stay upright and evenly spaced in high-detail pieces. Switch to this once you're comfortable with the stroke and want crisper edges and more precise shading on a finished piece.
What we like
Tighter weave creates crisper loop edges for detailed thread work
Stiffer hand keeps loops upright without flattening over time
Designed specifically for fine punch needle — no improvisation needed
What to know
Too stiff for rug-gauge work — use only with fine and regular needles
Pricier per yard than monks cloth; not the right choice for practice
Punch needle requires backing fabric stretched drum-tight — loose fabric means uneven loops or the needle skipping without catching. Standard embroidery hoops work for small pieces, but they create a distortion groove and loosen during long sessions. Q-Snap frames are the punch needle community's preferred alternative: snap-on locking rails hold monks cloth evenly taut without distorting the weave, and you can slide the fabric to reposition as you work across a larger piece.
Best starter
Q-Snap
Frame 11x11 Inch
$26.99 as of Jun 22, 2026
★★★★★Our rating· Only 1 left in stock - order soon.
The punch needle community has largely standardized on Q-Snaps for good reason: the locking rails hold monks cloth taut without the distortion ring of embroidery hoops, and you can slide the fabric to reposition without losing tension. An 11x11 frame handles the majority of beginner projects.
What we like
Locking rails hold monks cloth taut without distortion rings
Reposition fabric by sliding — no unclipping or re-tensioning needed
Snaps together and apart without tools
What to know
Needs a table or stand — doesn't freestand
11x11 limits larger projects; you'll want a bigger frame as work grows
If you're starting with a small design or just want to try punch needle before buying more gear, a 12-inch wooden hoop works fine for first projects. The outer ring creates a slight distortion groove, but nothing that affects a 4-by-5-inch center piece. Go Q-Snap once you're making things you care about.
What we like
Under $10 — cheap enough to try the craft before committing
Doubles as a display frame for small finished wall hangings
Works fine for pieces smaller than 8 inches across
What to know
Loosens during long sessions — must re-tighten regularly
Hoop groove distorts the fabric weave at the ring edge
For regular-gauge punch needle (#8–10), worsted-weight yarn is the right weight — light enough to pull through monks cloth smoothly, substantial enough to make loops that stand upright and hold their shape. Wool or wool blends are the traditional choice: the fiber's natural crimp helps loops lock together and the finished surface holds up better than pure acrylic over time. That said, acrylic works well for practice and for anything decorative that won't see heavy wear.
Best starter
Lion Brand
Wool-Ease Worsted Weight Yarn
$11.77 as of Jun 22, 2026
★★★★★Our rating· In Stock
The 80% acrylic, 20% wool blend is genuinely useful for punch needle: the wool gives the loops a slight crimp that helps them stay upright, and the acrylic makes the finished piece machine-washable. Consistent gauge across the color range means your loops stay the same height when you switch colors mid-project.
What we like
80/20 acrylic-wool blend — crimp helps loops stand and stay upright
Machine washable — a real bonus for anything that gets handled
Consistent gauge batch to batch; colors mix without loop-height drift
What to know
Three weights in the product line — easy to order the wrong one
Less loft than pure wool; loops don't lock quite as firmly
Pure acrylic, but cheap, colorful, and consistent. A 7-oz skein covers a lot of monks cloth, and the huge color range is available everywhere. Great for practice pieces and anything decorative that won't see daily handling.
What we like
7-oz skein goes far — good for larger practice pieces
Huge color range, always in stock at big-box craft stores
Value price makes it guilt-free for practice and experiments
What to know
Pure acrylic loops don't lock together as naturally as wool
Stiff finish until washed — plan to machine-wash once after finishing
One hundred percent virgin wool in a large 8-oz skein. Wool's natural crimp makes punch needle loops lock together and hold their shape noticeably better than acrylic — the difference is visible in the finished texture. Fishermen's Wool is also one of the most affordable 100% wool options on Amazon, which matters when you're punching a piece that needs several skeins.
What we like
100% virgin wool — loops lock together and hold shape better than acrylic
8-oz skein is generous; lower cost per yard than most wool options
Natural fiber feels better in hand over a long punching session
What to know
Limited to natural/earthy colorways — not for bright or saturated palettes
Hand-wash only; finishes need care that acrylic blends don't
A finished punch needle piece needs two things before it leaves the frame: the raw edges sealed so the monks cloth doesn't ravel, and the back stabilized so loops don't shift. Hem tape iron-bonds the folded edge in minutes. Fabric adhesive applied to the back locks every loop in place and adds just enough stiffness for a wall hanging to hold its shape. A sharp pair of embroidery scissors handles yarn tails and pile trimming — they're worth keeping dedicated to this craft.
Best starter
HeatnBond
Iron On Hemming Tape - No Sew Hemming Tape for Pants, Dresses, and Curtains - Fabric Tape for Hemming - Heat and Bond Tape - Made in USA - 4 Rolls (3/4 Inch x 8 Yards Each), 32 Yards, White
$8.49 as of Jun 22, 2026
★★★★★Our rating· Only 2 left in stock - order soon.
Bonds the folded monks cloth edge permanently with an iron — no sewing, no stitching required. Run it around the perimeter after you take your piece off the frame and you've sealed the raw edges in about five minutes. Simple, cheap, and exactly right for the job.
What we like
No-sew edge finishing — iron bonds the fold in a few minutes
Works on cotton monks cloth and linen backing fabrics
Cheap enough to keep a few rolls on hand
What to know
Requires a hot iron — won't bond synthetic-blend fabrics
Only works for straight-edge finishing, not shaped or curved cuts
Apply a thin coat to the back of the finished piece (the punched side), let it dry overnight, and every loop is now locked. It also stiffens the piece just enough for a wall hanging to hold its shape without a frame. The punch needle community's go-to for finishing wall art and pillows.
What we like
Locks every loop permanently — piece survives handling and light washing
Flexible when dry — doesn't make the piece board-stiff
Doubles as adhesive for attaching backing fabric or hanging hardware
What to know
Apply thin — heavy coat stiffens the piece to the point of cracking
Dries overnight; plan the finishing step around the wait time
Short, sharp, and precise — the right tool for trimming yarn tails flush and leveling the loop pile after punching. The 4-inch blade gets into tight pile areas without knicking adjacent loops. Worth keeping as a dedicated pair that never gets used for anything else.
What we like
Short 4-inch blade reaches yarn tails in tight pile without awkward angles
Sharp tips trim flush without catching adjacent loops
Under $12 — easy to keep as a dedicated craft-only pair
What to know
Too short for large cutting tasks like trimming fabric edges
Tips dull fast if used on anything other than yarn or fiber
Pick up the tool and you'll have the stroke in ten minutes. Here's what the first few hours actually look like — and the one insight that keeps beginners from quitting too early.
Punch needle has an unusually short learning curve for a fiber art. The stroke is simple and rhythmic — push, release, pull back — and you’ll feel it click within the first ten minutes. What slows most beginners down isn’t the technique, it’s everything around it: fabric that isn’t tight enough, yarn that doesn’t pull smoothly, a design that’s too ambitious for a first session.
This is what the first few hours actually look like, with the setup decisions that make the difference between a satisfying afternoon and a frustrating one.
Before you start: getting the fabric right
The single most important thing about punch needle is that the backing fabric has to be stretched drum-tight. Not medium-tight, not pretty-tight — drum-tight. Tap the center with a finger and it should sound like a snare drum. If it doesn’t, your loops won’t form cleanly and the needle will skip.
A few things that make this work:
Pre-wash your monks cloth. Cotton monks cloth shrinks roughly 10% in hot water. If you skip this, your finished piece will pucker after the fact. Wash it in hot water, dry it on high heat, and you’re done — it won’t shrink again.
Leave more margin than you think. Your design area is the center of the fabric. You need at least 3–4 inches of margin around the edges to grip in the frame. Cut your monks cloth bigger than your finished piece, not the same size.
Use masking tape on the raw edges. Monks cloth ravels at cut edges. A strip of painter’s tape around each edge keeps it from unraveling into a fringe while you work.
Mount the fabric in your Q-Snap frame. Pull it tight in all four directions before locking the rails. When it sounds like a drum, you’re ready.
The stroke: ten minutes to muscle memory
Thread the punch needle from the back of the handle through the hollow needle tip, with the yarn tail hanging out the needle end. Hold the needle like a pencil — handle pointing up, tip pointing into the fabric.
Push the tip straight down through the fabric until the handle’s flange (the wide collar at the tip) touches the surface. This sets the loop depth. Drag the needle along the fabric surface — keep it pressing down — then push through again. You’re pulling a new loop through on each punch. The loops form on the underside; the flat dragged surface is the back.
The most common mistake: lifting the needle too high between punches. You should be dragging it just above the fabric surface, barely lifting off. If you lift too high, you pull the previous loop out as you move.
Go slow the first time through. Once you feel the rhythm — push, drag, push, drag — your hand will want to speed up on its own. Let it.
Work in rows, punching parallel lines across the design area. Fill each color section completely before switching yarn. Gaps close as the loops compress against each other; don’t overthink spacing.
Five inches by five inches is the right scale for a first piece. That’s small enough to finish in one session and large enough that you can see the loops forming and know what you’re doing.
Simple geometric shapes work best: circles, stripes, simple outlines. Avoid fine detail, text, or anything that requires a quarter-inch line. That’s not because the craft can’t do it — it absolutely can — but fine detail is learned technique that comes after you own the basic stroke.
Draw your design directly on the monks cloth with a Sharpie. You work from the back (the flat side), not the front (the loop side), so draw your design mirrored if it matters. For abstract shapes and simple forms, mirroring usually doesn’t matter.
Fill backgrounds last. Punch the detailed areas first, then fill the background color around them. It’s easier to see the detail sections when they’re already punched, and you can work the background right up to them without worrying about placement.
When you finish a color area, cut the yarn and pull the tail to the back. Trim the tail flush with the loop pile — it disappears into the surface.
Finishing: ten minutes more
Once you’ve filled your design, take the piece off the frame and lay it flat, loop-side down.
Apply a thin coat of fabric adhesive to the punched back. Aleene’s Fabric Fusion or similar — thin, even coverage. This locks every loop in place and stiffens the piece enough for it to hold its shape as a wall hanging. Let it dry overnight.
Fold the monks cloth margin over the back and iron-hem it with hem tape. This gives the piece clean, finished edges. If you’re mounting it on a backing board or inside a frame, you can just fold and glue instead.
Trim any yarn tails that stick up above the loop pile with sharp embroidery scissors. The loop surface should look even and textured, not fringed.
That’s it. Your first piece is done.
What changes after your first session
The stroke becomes automatic after one or two sessions — you stop thinking about it and start thinking about design. That’s when punch needle gets genuinely fun.
The next things to work on: color transitions (punching two colors right up against each other creates a sharp line; leaving a slight gap and filling it later creates a softer blend) and background texture (alternating directions across the background field creates a woven effect, while parallel-line rows read as more graphic).
A bigger Q-Snap or a lap frame opens up larger pieces. Fine-gauge punch needle (with embroidery thread) is a whole separate direction toward detailed, painterly work. Both are worth exploring once you’ve made three or four small pieces and know you’re committed.
Save your money
What you don't need yet
Beginners get pressured to buy a lot of stuff that doesn't help them play
better. Here's what we'd skip on day one.
A rug tufting gun — That's a different craft entirely — an electric tool for cut-pile rugs on a standing frame. Punch needle is the hand-tool version. Don't conflate them.
Printed pattern kits with pre-stamped monks cloth — Fun, but they limit you to someone else's design. Learn to transfer your own art first — it's easy and opens up the whole craft.
A floor-standing punch needle frame — Nice once you're making large pieces regularly. A tabletop Q-Snap handles most beginner projects and takes up no space.
1-lb cones of rug yarn — Overkill for first projects. Buy individual skeins until you know your color preferences and project scale.
A lightbox for pattern tracing — A sunny window works just as well for tracing a design onto monks cloth. Buy a lightbox if you're doing fine detail work regularly.
First week
Your first seven days
A short, real plan to get from gear-on-doorstep to actually playing.
Order the Oxford #10, a yard of monks cloth, an 11-inch Q-Snap frame, and two or three skeins of worsted yarn. · Buy
Pre-wash the monks cloth in hot water and dry on high heat. This is non-optional — it shrinks, and you want that to happen before you punch. · Action
Watch one 10-minute beginner tutorial on YouTube before starting. Search 'punch needle beginner tutorial' — pick the shortest one. Ten minutes is enough. · Learn
Draw or trace a simple design onto the monks cloth with a Sharpie. Start with geometric shapes or simple organic forms — no fine detail. · Action
Mount the fabric in your Q-Snap until it sounds like a drum when you tap it. If it's not that tight, your loops won't form correctly. · Action
Punch a small 4-by-5-inch area completely before attempting anything bigger. You'll get the stroke in ten minutes — finish one small piece end-to-end before scaling up. · Action
Finish your first piece: fold and iron-hem the edges, apply a thin coat of fabric adhesive to the back, let it dry overnight. · Buy
Under $65 if you buy components separately: Oxford #10 punch needle (~$20), half a yard of monks cloth (~$10), a Q-Snap frame (~$15), and two skeins of worsted yarn (~$15). Kit purchases are usually worse value — the included components are often the wrong size or quality.
What's the difference between punch needle and rug tufting?
Punch needle is a hand tool — you push loops through fabric by hand, one at a time. Rug tufting uses a pneumatic or electric gun to shoot cut or loop pile through a primary tufting cloth stretched on a frame. Punch needle is quieter, cheaper to start, and better for smaller decorative pieces. Tufting is faster for large rugs but costs $300+ to set up.
Do the loops fall out when I take the piece off the frame?
They stay put on their own — the backing fabric's weave grips the loops. A coat of fabric adhesive on the back locks them permanently and is standard finishing practice for anything you care about. You can handle a finished, backed piece as roughly as any textile.
Can I use any yarn for punch needle?
Worsted-weight yarn works in a regular (#8–10) punch needle. Avoid anything too fuzzy (mohair catches in the needle channel) or too stiff (jute, rope). Embroidery thread works in fine-gauge needles. The main rule: the yarn needs to pull through the needle channel smoothly and fill the backing weave without too much resistance.
What size needle should I start with?
Regular gauge (#10 is the Oxford's standard size) with worsted-weight yarn. This is what the majority of tutorials teach, and the loops are large enough that you can actually see what you're doing. Fine punch needle is beautiful but frustrating to learn on — the loops are tiny and the stroke much less forgiving.
Is monks cloth the only backing I can use?
It's the standard for good reason — the cotton weave is open enough for easy punching but tight enough to hold loops. Weaver's cloth and even-weave linen also work. Avoid stretchy or dense fabrics. Burlap technically works but the rough texture dulls needles and makes the stroke uncomfortable.
r/punchneedle — Active community with beginner help threads, finished-work galleries, and pattern recommendations. Search before asking — most first questions are answered in the wiki.
Amy Oxford Rug Artistry — Amy Oxford makes the Oxford Punch Needle tools and publishes technique guides and video tutorials on her site. Authoritative source for tool care and advanced technique.
Punch Needle Tutorials on YouTube — Search 'punch needle beginner tutorial' — several strong channels post clear technique breakdowns. Watch one before your first session.
Hawthorn Handmade — UK-based fiber arts retailer with an unusually good punch needle blog — technique posts, pattern ideas, and material guides. The beginner-focused posts are some of the clearest online.
As an Amazon Associate, JustBeginning earns from qualifying purchases.
We may also earn commission from other affiliate programs linked on this
page. Editorial recommendations are independent; we don't choose
products based on commission rates.
Product prices and availability are accurate as of the date and time
indicated and are subject to change. Any price and availability
information shown on Amazon at the time of purchase will apply.


 Best starter