Crocheting moves faster than most people expect. One hook, one skein of yarn, and thirty minutes in, your hands start finding a rhythm. Most beginners are making real things within a week. Here's exactly what you need, and what you can safely ignore until month two.
By Colin B. · Published May 9, 2026 · Last reviewed August 7, 2026
Crocheting has one of the lowest barriers of any craft, one hook and one skein of yarn is a real starter kit. The money comes later, once you discover that the yarn store is a place that exists.
We earn commission on qualifying Amazon purchases — see our
affiliate disclosure.
Price tiers and budget totals shown above are editorial estimates;
actual Amazon prices vary.
At a glance
Our top pick in each category
The fastest path through this guide — each best-starter pick by category.
Scroll for the budget and upgrade alternatives.
Hook size and yarn weight are a matched pair. The label on any yarn skein lists the recommended hook size, follow it. For your first project, buy worsted weight yarn (label says '4' or 'worsted') and a size H hook (5.0mm). That combination is the universal beginner setup and works with roughly 80% of beginner patterns.
Don't buy a hook set on day one. You'll be told to get a set of hooks in every size from B to P. You don't need one yet. Start with one H hook and see if the hobby clicks. If it does, a set is a fine second purchase. If it doesn't, you're out $5 instead of $25.
Practice before you pattern. Chain 50 stitches and then single crochet back across them. Do it again. And again. This is genuinely the only preparation you need before starting a real pattern. Beginners who skip straight to projects spend the first hour confused about their stitch count; beginners who practice the chain and single crochet for one session spend the first project actually enjoying it.
Start with worsted weight acrylic. Not because acrylic is better than wool or cotton, it isn't, in any aesthetic sense, but because it's cheap, machine-washable, and doesn't punish uneven tension the way natural fibers do. Worsted weight (thickness level 4 on the label) is thick enough to see your stitches clearly and standard enough that virtually every beginner pattern assumes it. Once you've crocheted a few things and understand how your tension works, branch into cotton for kitchen items or wool for garments. Until then, acrylic is the smart choice.
Best starter
Lion Brand
Pound of Love Yarn
$
★★★★★Our rating
Over 1,000 yards in a single skein, more than enough for months of learning projects without buying more. Genuinely soft for an acrylic, machine-washable, and sold in a 'no dye lot' format so a second skein will match if you need it. It's the yarn we'd hand a friend who just decided to learn. Buy the color you like; it doesn't matter which one.
What we like
1,000+ yards in one skein, enough for months of practice without resupply
Genuinely soft for an acrylic; won't scratch sensitive skin
Machine-washable and no-dye-lot safe for easy care
What to know
Less polished look than natural fibers for finished objects
The cheapest worsted-weight yarn worth using. Rougher hand than Lion Brand on some colorways, noticeably stiff if you get a heather or variegated color, but it tolerates beginner tension inconsistencies, comes in enormous economy skeins, and costs almost nothing. The right pick if you're not yet sure crocheting will stick and don't want to spend $10 to find out.
What we like
Costs almost nothing, the lowest entry price into crocheting
Enormous economy skeins mean fewer mid-project resupply runs
What to know
Rougher hand than most acrylics, especially heather colorways
Stiffer fabric, not ideal for wearables or anything touching skin
The step up once you want finished objects that actually look polished. DK weight is thinner than worsted, stitches are smaller and the fabric drapes better, so it's harder to learn with but gorgeous to work with once your tension is consistent. Paintbox's color range is exceptional and the price is fair. Buy two skeins of the same dye lot for any project bigger than a small pouch.
What we like
Exceptional color range, dozens of saturated solids that hold their color
Drapes beautifully once your tension is consistent
Fair price for a yarn that produces polished-looking finished objects
What to know
Thinner weight requires smaller hook and more even tension than worsted
Not beginner-friendly, learn on worsted weight first
★★★★☆Our rating· Only 5 left in stock - order soon.
100% cotton for market bags, dishcloths, and summer tops. Cotton has zero stretch, which makes it unforgiving of uneven tension, but produces a stiff, crisp fabric that's perfect for structured items and anything that touches food. Once you understand your tension, cotton is transformative. Not before.
What we like
100% cotton, ideal for items touching food, skin, or water
Crisp stiff fabric perfect for structured bags and dishcloths
What to know
No stretch makes it unforgiving of uneven tension, learn on acrylic first
Heavier than acrylic; hands tire faster in long sessions
The hook is the one tool crocheting requires, and the choice that affects your experience most, especially in the first few sessions. There are two meaningful decisions: tip style (inline vs. tapered) and handle (bare metal vs. ergonomic grip). Tip style is mostly preference; handle type is about comfort. If you plan to crochet for more than 30 minutes at a stretch, ergonomic handles are not a luxury, they significantly reduce hand and wrist fatigue. Start with size H (5.0mm), which pairs with worsted weight yarn and is the assumed size in most beginner patterns.
Hooks — what's the difference?
A few common shapes, each making a different trade.
Bare Aluminum (Susan Bates / Boye)
Classic straight aluminum hook. Slick, lightweight, and cheap. The hook most beginners start with.
Handle
Bare aluminum, thumb rest only
Grip
Minimal, slick in humid hands
Best for
Trying the hobby before committing
Best for Beginners who want to spend $3 to see if crocheting is for them before buying ergonomic hooks
Tradeoff No grip means hand fatigue faster, most people upgrade to ergonomic handles after a few sessions
A long hook for Tunisian crochet, a hybrid technique that creates a woven fabric unlike standard crochet.
Length
14–36 inches
Working method
Pick up stitches across a full row, then work them off
Best for
Tunisian crochet specifically, scarves, blankets, structured fabric
Best for Crocheters who want to explore Tunisian technique, a genuinely different look from standard crochet
Tradeoff Not interchangeable with regular crochet, learn the basics first, then branch here
Best starter
Clover
Amour Ergonomic Crochet Hook Set
$49.96 as of Jun 22, 2026
★★★★★Our rating· Only 7 left in stock - order soon.
The Amour set covers sizes B through N in a single purchase, with Clover's soft rubber handles that are genuinely the most comfortable on the market. The aluminum tip is smooth enough to glide through acrylic yarn without snagging. One set covers every project you'll do in the next year. Buy this once, don't buy aluminum singles first.
What we like
Soft rubber handles dramatically reduce hand fatigue in long sessions
Full B-through-N range covers every beginner project in one purchase
Smooth aluminum tip glides through acrylic without snagging
What to know
Color-coding can confuse until you memorize the size assignments
The $3 way in. Susan Bates's aluminum hooks have a tapered tip that's easy to insert into tight stitches, and the size is accurate and consistent. Not comfortable for long sessions, no grip, bare metal, but perfectly fine for 20-minute practice sessions while you decide if crocheting is for you. If you want to try before investing in ergonomic handles, this is the right test.
What we like
Under $5, the right way to test the hobby before committing
Tapered tip inserts easily into tight stitches
What to know
No grip, bare metal causes hand fatigue after 30 minutes
The hook people buy when they're serious. Furls Streamline has a resin handle shaped for extended comfort, an aluminum tip polished to a mirror finish, and weight balanced so your grip barely has to work. The first time you use it after starting on metal hooks, the difference is obvious. Buy one in your most-used size (probably H or J) when you're crocheting several hours a week.
What we like
Resin handle shaped for extended comfort, a noticeable step up from metal
Mirror-polished aluminum tip is the smoothest on the market
What to know
At $25+ per hook, choose your size carefully before committing
Both inline and tapered tip styles available, know your preference first
Two things you cannot finish a project without: a tapestry needle (to weave in yarn tails, every project has at least two of them) and stitch markers (to mark the beginning of a round in amigurumi and in-the-round work). Buy both now. Total cost under $10, and you'll reach for them constantly. Everything else, row counters, yarn bobbins, blocking boards, can wait until a project needs it.
Best starter
Clover
Chibi Bent-Tip Tapestry Needles, Set of 2
$7.17 as of Jun 22, 2026
★★★★★Our rating· Only 1 left in stock - order soon.
Blunt-tipped, large-eyed needles designed to thread chunky yarn through finished fabric without splitting it. The bent tip is the detail that matters, it angles the needle so you can weave through stitches without stabbing your palm. You'll use these at the end of every single project. Buy them now so they're there when you need them.
What we like
Bent tip angles away from your palm, weaving in ends is much easier
Large eye threads chunky worsted yarn without fighting
What to know
Only 2 needles per pack, easy to lose; consider ordering two packs
Locking stitch markers are essential the first time you try amigurumi, granny squares, or anything worked in the round, marking the beginning of each round keeps your stitch count honest. The Clover soft rings don't snag acrylic the way coilless pins can, and the assorted sizes cover hook ranges from B to N. You'll use them on roughly half the patterns you make.
What we like
Soft rings won't snag acrylic yarn mid-project
Assorted sizes cover every common hook size from B to N
What to know
Small pieces, keep them in the bag or they disappear fast
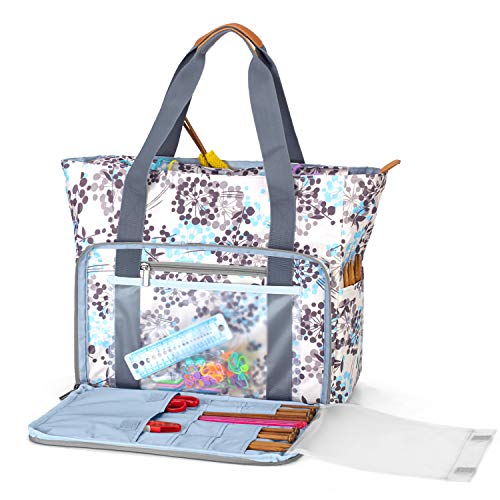
A project bag isn't strictly necessary, any zip-close bag and a tote will hold your yarn and hooks. But once you're working on multiple projects, a dedicated bag with hook storage, a zippered inner pocket for scissors and markers, and a smooth interior (so yarn doesn't snag) makes a real difference. Worth it once you're starting your second or third project.
Best starter
Teamoy
Crochet Bag Organizer, Knitting Tote Bag
$28.99 as of Jun 22, 2026
★★★★★Our rating· In Stock
Multiple compartments that actually stay organized: dedicated slots for hooks, a main section for yarn and works-in-progress, and a zippered inner pocket for scissors, stitch markers, and tapestry needles. Holds everything you need for one to two projects without digging. Well-made, practical, and under $30.
What we like
Dedicated slots for hooks, yarn, and accessories, everything visible at once
Under $30 for a bag that genuinely stays organized
What to know
Sized for one active project, active WIP-jugglers will outgrow it
Crochet Hook Case Organizer Storage Bag with Handle, Cute Crochet Hook Organizer Portable Travel Knitting Needle Case for Crochet Hooks, Knitting Needles (Up to 11''), Knitting Crochet Supplies
$
★★★★☆Our rating
If you already have a bag you like and just need a dedicated home for your hooks, this flat case has 37 independent pockets so every hook is visible and findable at a glance. Closes with a double zipper, has a carry handle, and fits ergonomic hooks including full-length Clover Amours. Keeps hooks separated so tips don't dull each other. A tidy solution for under $20.
What we like
37 independent pockets, every hook visible and findable at a glance
Fits full-length ergonomic hooks including Clover Amours
What to know
A case only, you still need a separate bag for yarn and WIPs
Crocheting is one of the fastest crafts to learn, but the first few sessions have a specific rhythm. Here's what you'll actually experience, week by week, and when each stage stops feeling awkward.
Crocheting has a reputation for being easy to pick up. That reputation is mostly accurate, but “easy to pick up” obscures the specific experience of the first few sessions, which feels chaotic before it feels natural. There’s a moment somewhere in the first week where your hands stop fighting the hook, and once that happens, the craft genuinely becomes meditative.
This is what your first month actually looks like, with the things that matter and the things you’ll be tempted to worry about but don’t need to yet.
Week one: The hook and the chain
You have one hook, one skein of yarn, and about an hour. Here’s the order of operations.
Start with the slip knot. It’s the foundation of every stitch and takes about three minutes to learn. Every crochet video starts here, watch one, practice it until you can do it without thinking, then move on.
The chain stitch is the building block. Once you have a slip knot on your hook, you wrap the yarn over the hook (this is called a “yarn over”) and pull it through the loop. That’s a chain stitch. Do it 50 times in a row. The chain curls up and looks like nothing, but you’re training the fundamental motion: yarn over, pull through.
Single crochet is the first real stitch. Chain 20 stitches, then insert your hook into the second chain from the hook, yarn over, pull through, yarn over again, pull through both loops. That’s a single crochet. Work across all 20 chains, chain 1, turn your work, go back the other direction. Do five rows like this.
Here’s what will happen: your first row will be uneven. Some stitches will be tight and some will be loose. You’ll lose track of where to insert the hook. You’ll accidentally pick up two strands instead of both loops of a stitch. All of this is normal and unfixable by technique videos, it only gets better by doing it more.
The goal by end of week one: chain stitch and single crochet feel automatic. Not perfect, automatic. You shouldn’t have to think about the motion.
Week two: The double crochet and your first real project
Double crochet is where crocheting becomes fast. It’s taller than a single crochet, two yarn overs instead of one, and creates a fabric with a more open, draped texture. Most blanket, scarf, and granny square patterns are written in double crochet. Learn it in the same way: make a chain, work across, go back.
Once double crochet feels manageable, pick a first project. A granny square is the traditional starting point for a reason: it’s small (you can finish one in an afternoon), it works in the round (which teaches you a new construction method), and it’s forgiving of uneven tension because the open lace structure hides a lot of imperfections.
If the round construction intimidates you, a simple rectangle is fine: chain 25 stitches and double crochet back and forth for 20 rows. Make it a dishcloth. It’s humble, it’s useful, and by the time you’re done, double crochet will be automatic.
The turning chain is the thing beginners get wrong most often. At the end of every row, before you turn your work, you chain 1 (for single crochet rows) or chain 3 (for double crochet rows). That chain counts, sometimes as a stitch, sometimes not, depending on the pattern. Most beginner patterns in the US count the chain-3 as a stitch. When the instructions say “dc in the 4th chain from hook,” the first three chains are your turning chain acting as the first double crochet. Read the pattern notes; they’ll tell you.
Count your stitches at the end of every row. You should have the same number you started with. If the count is off by one, you either crocheted into the turning chain (gaining a stitch) or skipped the last stitch before the turning chain (losing one). Those are the two places to look, every time.
Week three: Reading patterns and fixing mistakes
By week three, the stitches themselves shouldn’t require much thought. The new skill is reading a pattern.
Crochet patterns are written in abbreviations. The main ones you’ll see in beginner patterns:
ch: chain
sc: single crochet
dc: double crochet
sl st: slip stitch (a joining stitch that adds no height)
MR or mc: magic ring (used to start items worked in the round)
BLO / FLO: back loop only / front loop only (creates a ribbed texture)
Most beginner patterns also include a stitch count in parentheses at the end of each row, like (25 dc). This is your check, count your stitches after every row and confirm. Patterns that don’t include stitch counts are harder to follow correctly; stick to ones that do until you’re comfortable.
Frogging (unraveling your work) is not failure, it’s how crochet works. The word comes from “rip it, rip it,” which is what you say while you pull the yarn back out. Crochet unravels cleanly stitch by stitch if you do it slowly; fast unraveling tangles. When you notice a mistake three rows back, frog to that row and redo it. The time you spend not fixing it is time your project is going in the wrong direction.
Week four: Amigurumi, colorwork, or just making more things
Week four is when crocheting either hooks you (and you start a blanket) or you realize you prefer smaller projects (and you start an amigurumi). Both are valid.
Amigurumi: the small stuffed animals and objects beloved by Japanese craft culture, are worked in continuous rounds of single crochet using a magic ring. They’re a natural next step because the construction teaches you everything at once: working in the round, invisible decreases, and stuffing and closing seams. The Ravelry search for “beginner amigurumi” returns thousands of free patterns.
Blankets are the other classic next project: chain 100-150 stitches, double crochet back and forth until you run out of yarn, repeat with different colors. The result is actually a blanket. The repetition is meditative rather than boring once the stitch is automatic. This is the project that converts people from “I crocheted something once” to “I am a person who crochets.”
Color changes are simpler than they look: on the last stitch before the color change, do everything up to the final yarn-over, then drop the first color, pick up the new color, and complete the stitch. Carry the old color along the inside of your work for a few stitches if you’ll use it again soon; cut it and weave it in if not. That’s it.
By the end of month one, you’ll know whether crocheting is something you want to keep doing. If it is, and for many people it is, you’ll already be thinking about the project after next.
The things you’ll fail at, and that’s normal
Same mistakes, every beginner, every time:
Uneven tension. Your stitches will vary in size for the first few weeks. This is not a problem you can think your way out of, only repetition fixes it. Keep going.
Increasing stitch count. Almost always from crocheting into the turning chain at the start of a row. Count every row; catch it before it becomes a trapezoid.
Tight stitches. If your hook barely fits into your stitches on the way back, you’re crocheting too tightly. Try consciously relaxing your grip on the yarn and going deliberately slowly. Tight tension loosens over time as your hands settle.
Splitting the yarn. Inserting your hook between strands of the yarn instead of cleanly into the stitch. Happens most often with loosely spun or textured yarn. Slow down and look at where the hook is going.
Nobody who sees your first dishcloth is grading it. Make the next one.
Once the basics are solid, a few things accelerate your progress:
Try a granny square blanket. Join 16 or 25 granny squares together into a lap blanket. You’ll learn joining methods, blocking, and the satisfaction of making something big from small repeated units.
Join a community. Local yarn shops often have free “stitch and sip” nights, and Ravelry’s forums let you post project photos and get feedback on technique. The fiber arts community is unusually welcoming of beginners.
Watch technique videos when a pattern term confuses you. Don’t try to decode abbreviations from text alone, a 60-second YouTube video of the motion is worth 10 minutes of rereading. Search “[stitch name] crochet tutorial” and watch TL Yarn Crafts or Bella Coco Crochet first.
You’re not a beginner anymore at the end of month one. You’re someone with a hook, a stash beginning to form, and opinions about turning chains.
Save your money
What you don't need yet
Beginners get pressured to buy a lot of stuff that doesn't help them play
better. Here's what we'd skip on day one.
A full hook set before you start — Buy one H hook first. A full set is a good second purchase once you know the hobby is sticking, not the first.
Yarn under size 3 (DK, sport, fingering) — Thin yarn requires smaller hooks and tighter tension, mistakes are harder to see and harder to fix. Learn on worsted weight first. Go thinner once your tension is consistent.
A blocking board and pins — Blocking is real and useful, wetting a finished piece and pinning it to shape while it dries makes a dramatic difference. But you need a finished piece first. Buy these after you complete something.
Pattern books — Ravelry has over 100,000 free crochet patterns and is free to join. YouTube teaches every technique for free. You won't need to spend money on learning resources for at least your first year.
A yarn swift and ball winder — Necessary only when you buy yarn sold in hanks (loose loops, like you'd see at a yarn shop). All beginner-friendly yarn (Lion Brand, Red Heart, Paintbox) comes pre-wound into cakes or skeins ready to use.
First week
Your first seven days
A short, real plan to get from gear-on-doorstep to actually playing.
Order worsted weight yarn and a size H hook now. You can't practice the chain stitch in your head. · Buy
Learn the slip knot and chain stitch from a single YouTube video. These two things take about 15 minutes and are the mechanical foundation of everything else in crochet. · Learn
Bella Coco Crochet, Absolute Beginner series · Sarah-Jayne Fragola's channel. The clearest beginner crochet instruction on YouTube, watch the first three videos in her beginner series.
Practice chain stitch and single crochet until they stop requiring conscious thought. Cast on 20 chains and single crochet back across them. Repeat. Don't skip this, it's how your hands learn before your brain has to manage a pattern. · Action
Order tapestry needles now so you have them when your first project is ready to finish. · Buy
Find a simple beginner pattern on Ravelry for your first real project, a granny square, a dishcloth, or a simple flat rectangle. Search 'beginner' and filter by free patterns. Don't start anything with in-the-round construction or colorwork until the single and double crochet are automatic. · Learn
Learn the double crochet stitch once the single crochet feels natural. It's the workhorse stitch you'll use in probably 60% of patterns, faster, taller, and more versatile than single crochet. · Learn
FAQ
Common questions
Is crocheting or knitting easier to learn?
Crocheting has a slightly easier first hour, one hook is less confusing than two needles, and mistakes are easier to fix (you can unravel stitch by stitch without the whole thing collapsing). Knitting has more garment patterns and is more widely taught in classes. Pick based on what you want to make, not ease of entry. They don't transfer.
What size hook should a beginner start with?
Size H (5.0mm). It pairs with worsted weight yarn, which is what virtually every beginner pattern assumes. It's large enough to see your stitches clearly and forgiving of uneven tension. Buy this size first; expand from there once you have a pattern that requires something different.
How long does it take to learn to crochet?
You can learn the chain stitch and single crochet in under an hour. Double crochet takes another session. Your first finished project, something simple like a dishcloth or a granny square, is realistically within the first week. 'Knowing how to crochet' in the sense of reading a pattern and finishing cleanly takes a month of regular practice.
Why does my stitch count keep changing?
The most common beginner problem: accidentally crocheting into the turning chain at the start of a row, or skipping the last stitch before the turning chain at the end. Count your stitches at the end of every row for your first few projects. When the count is off, those two spots are where to look first.
What's a good first crochet project?
A granny square or a simple flat dishcloth (20 stitches wide, 20 rows of double crochet). Small enough to finish in a few sessions, forgiving of uneven tension, and gives you practice with the two stitches you'll use forever. Don't start a hat or bag until the dishcloth feels easy.
How much should I expect to spend to start?
Around $20 to try it seriously: one H hook ($3-8) and one skein of worsted weight yarn ($8-12). Around $40 if you start with the ergonomic hook set we recommend plus a few accessories. Either way, crocheting has one of the lowest startup costs of any craft.
Ravelry — The hub of the fiber arts world. Free to join, with over 100,000 crochet patterns (most free), project tracking, and forums. Filter patterns by difficulty, yarn weight, and hook size. Bookmark this before anything else.
Bella Coco Crochet (YouTube) — Sarah-Jayne Fragola's channel. The clearest and most patient absolute beginner instruction on YouTube, her 'Crochet for Absolute Beginners' series covers the first month of learning in well-paced videos. Start here.
Daisy Farm Crafts (YouTube) — Tiffany's channel. Warm, approachable instruction with excellent beginner project tutorials, blankets, hats, amigurumi. Good for when you want to follow along with a complete project from start to finish.
TL Yarn Crafts (YouTube) — Toni Lipsey's channel. Intermediate-to-advanced technique explanations with unusually clear camerawork on the hook motion. Watch after you have the basics, her stitch tutorials are the best on the platform.
Moogly Blog — Long-running free crochet pattern site with a large archive of beginner and intermediate patterns. Well-photographed, well-tested patterns across a range of projects. The stitch dictionary is particularly useful.
r/crochet — Active community. Post a photo of your confused stitch and get a diagnosis within hours. The wiki has a good beginner FAQ. Skip the 'what should I make next' threads until you know what you want.
As an Amazon Associate, JustBeginning earns from qualifying purchases.
We may also earn commission from other affiliate programs linked on this
page. Editorial recommendations are independent; we don't choose
products based on commission rates.
Product prices and availability are accurate as of the date and time
indicated and are subject to change. Any price and availability
information shown on Amazon at the time of purchase will apply.


 Best starter