Welcome to the most forgiving art form on the list. Acrylic pouring is exactly what it sounds like: you mix paint with a pouring medium, tilt a canvas, and let physics do the rest. The results are always a little surprising. Here's exactly what you need to start, and why the $20 Amazon starter kit isn't it.
By Colin B. · Published June 14, 2026 · Last reviewed June 14, 2026
A solid starter pour setup runs $50-90. The big cost spikes come from buying the wrong things first (usually cheap starter kits that aren't ready to pour). Buy the ingredients separately instead.
We earn commission on qualifying Amazon purchases — see our
affiliate disclosure.
Price tiers and budget totals shown above are editorial estimates;
actual Amazon prices vary.
At a glance
Our top pick in each category
The fastest path through this guide — each best-starter pick by category.
Scroll for the budget and upgrade alternatives.
The generic Amazon acrylic pouring starter kits look appealing at $20-30 but they almost always include low-quality paint that separates, mystery pouring medium, and canvases too small to do anything interesting on. Buy the ingredients separately and you'll spend about the same money for dramatically better results.
You need a perfectly level surface. This sounds obvious until your first pour slides entirely off one side. Before you buy anything, identify a flat table and get a cheap bubble level. The canvas will sit wet for 24 hours while it dries, so pick a spot you can leave undisturbed.
Cells (the circular ring patterns you see on Pinterest) require silicone oil. Most beginners don't realize silicone is a separate ingredient from the paint and medium. You can do beautiful pours without it, but you won't get cells. Buy a small bottle if cells are why you're here.
The most important decision in acrylic pouring is what paint you start with. You need fluid-consistency paint: either pre-mixed pouring acrylics, or standard acrylics mixed with a pouring medium. Heavy-body tube acrylics (the thick stuff) need a lot of medium to flow right, and cheap craft acrylics have inconsistent pigment that muddies when mixed. Pre-mixed pouring paints solve both problems for beginners: open the bottle, pour. Once you're comfortable, switching to artist-grade acrylics with Floetrol gives you more control over color and consistency.
Acrylic Paints — what's the difference?
A few common shapes, each making a different trade.
Pre-Mixed Pouring Acrylics
Ready to pour from the bottle. The easiest start.
Prep
None, open and pour
Flexibility
Fixed ratios
Cost
~$1-2 per oz
Best for First pours, impatient beginners, anyone who wants to skip mixing
Tradeoff Less control over viscosity; harder to dial in specific effects
Mix your own ratio for more control over flow and cells.
Prep
Mix per color before pouring
Flexibility
Adjustable viscosity
Cost
~$0.30-1 per oz
Best for Intermediate pourers, anyone wanting control over paint behavior
Tradeoff Requires measuring and testing; more variables to manage
Best starter
U.S. Art Supply
Pouring Masters 12-Color Metallic Acrylic Pouring Paint Set
$34.99 as of Jun 22, 2026
★★★★★Our rating· In Stock
Pre-mixed to pouring consistency so you open the bottle and go. The metallic shimmer in these pigments shows off especially well in fluid art, where light plays across flowing patterns. Twelve colors gives enough palette to explore without analysis paralysis.
What we like
Pre-mixed to pouring consistency, no measuring on day one
12 colors at a fair price per bottle
Consistent pigment density across the set, colors mix cleanly
What to know
Pigment settles; stir every bottle before each session
Not archival; colors may fade with prolonged UV exposure
Under $15 for 18 colors, and when mixed with Floetrol they actually pour quite well. The pigment density varies across colors (darker ones are much stronger than the pastels) but that's true of every budget craft paint. If you want to experiment before committing to better paints, this is the smart low-stakes way in.
What we like
Under $15 for 18 bottles, very low stakes to experiment
Wide color range to explore palettes before buying artist-grade
What to know
Pigment strength varies a lot across colors in the set
Needs significantly more medium than artist-grade paints
When you're ready to care about finished-piece quality, Liquitex BASICS fluid is the step up. Artist-grade pigment, consistent viscosity, and real archival longevity. Colors stay true over years and mix with minimal muddying. Worth it once you're doing pieces you actually want to keep or give away.
What we like
Artist-grade pigment with real archival longevity
Consistent viscosity across the set, predictable behavior
Pouring medium is what makes acrylic paint flow without losing color or drying cracked. Without it, thinned paint just gets watery and pale. The right medium adds a gel-like body that lets paint slide across the canvas in sheets. The confusion for beginners: there are cheap options ($8 for a quart) and premium options ($30 for a quart), and for starting out the cheap option is genuinely excellent. Most of the fluid art tutorials on YouTube and Pinterest use Floetrol.
Best starter
Flood
Floetrol Latex Paint Conditioner, 1 Quart
$
★★★★★Our rating
Floetrol is a plumber's paint conditioner that the fluid-art community adopted years ago because it's dirt cheap and works beautifully. A quart runs about $8 at any hardware store and will outlast several full sets of paint. The YouTube and Pinterest tutorials you're watching were almost all made with Floetrol. It's the right starting medium.
What we like
About $8 a quart, cheapest effective medium by far
Most tutorials use Floetrol, so instructions translate directly
Dries flexible, minimal cracking versus water-only thinning
What to know
Dries slightly milky in thin washes (negligible in finished pours)
Not marketed for fine art, so no published longevity data
★★★★☆Our rating· Only 2 left in stock - order soon.
A true art-supply pouring medium at a mid-range price. Dries crystal clear (unlike Floetrol), produces slightly tighter cells, and the ratio is easier to dial in for beginners. Good stepping stone between Floetrol and the premium Liquitex option.
What we like
Dries crystal clear, no milky haze on finished pours
Specifically formulated for fluid art, not a repurposed product
What to know
Thicker than Floetrol; may need water adjustment with craft paints
The artist-grade standard. Archival, ultra-clear, and formulated to produce consistent cells and controlled flow. When you're making pieces you want to frame and sell, this is the medium. Pairs with Liquitex BASICS or Golden fluid acrylics for a fully professional setup.
What we like
Archival and UV-resistant; pieces last decades when properly sealed
Ultra-clear dry film, the cleanest look in the category
Consistent behavior across dirty pours, flip cups, and swipe techniques
Stretched canvas is the standard for acrylic pouring, but size and prep matter. Anything under 8x10" is frustrating to work with: too small for interesting cell patterns and easy to overtilt. Surfaces need to be pre-sealed or paint will absorb unevenly. Most stretched canvases come pre-primed with gesso, which is exactly what you want. Canvas panels (flat boards) are cheaper but lack the elevated frame edges that help you manage runoff.
Best starter
Arteza
Stretched Canvas, 12-Pack (8x10 inch)
$30.99 as of Jun 22, 2026
★★★★★Our rating· In Stock
Pre-gessoed and ready to pour on without any additional prep. The 8x10" size is ideal for learning: large enough to see cell patterns develop, small enough to use confidently. A 14-pack lets you experiment with color palettes without precious-canvas anxiety. You'll genuinely use all fourteen in the first month.
What we like
Pre-gessoed and ready to pour, no additional prep needed
8x10" is ideal for learning cell patterns without wasting paint
14 canvases per pack; enough to experiment freely
What to know
Canvas weave texture is visible in very thin pours
Cotton canvas; fine for learning, less archival than linen for display
★★★★☆Our rating· Only 9 left in stock - order soon.
Canvas panels are flat cardboard-backed canvases at about half the price of stretched. No elevated edge means you manage runoff with tilt angle rather than the frame, which is fine for beginner technique. Buy these for practice sessions and save stretched canvases for pieces you want to keep.
What we like
About half the price of stretched canvas, good for practice pours
Flat profile is easier to store in large quantities
What to know
No frame edge to contain runoff; need a tray underneath
Less rigid than stretched; can warp under heavy paint
Wood panels are the archival choice for pieces you want to display. The non-porous surface produces sharper cell definition than canvas, and the rigidity means no warping under heavy pours. Once you've done 20-plus pours and know which results you'd frame, switch a few sessions to wood panels.
What we like
Non-porous surface creates sharper cell definition than canvas
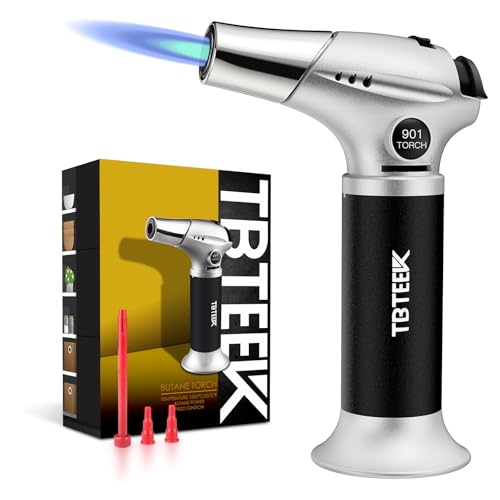
Cells are the circular ring patterns that define the most iconic acrylic pours on Pinterest and YouTube. You create them by adding a few drops of silicone oil to each color cup before pouring. Silicone and acrylic don't mix, so the oil rises through the paint layer and creates those rings. A quick torch pass brings cells to the surface by popping the skin that forms on top. You can do beautiful pours without any of this, but if cells are why you're here, you need both ingredients.
Best starter
live4art
Dimethicone Silicone Oil for Acrylic Pouring, 4 oz
$13.80 as of Jun 22, 2026
★★★★★Our rating
100% dimethicone silicone with no additives that interfere with paint adhesion. Two to three drops per color cup is all you need. Overusing silicone is the most common beginner mistake and causes the finished paint to delaminate when dry. A 4 oz bottle will last dozens of sessions.
What we like
100% pure dimethicone, no additives that interfere with adhesion
2-3 drops per cup; a 4 oz bottle lasts dozens of sessions
Produces consistent cells without the guesswork of hair serums
What to know
Too much causes peeling after drying; requires restraint
Cells still need a torch pass or active tilt to develop fully
Butane Torch with Safety Lock and Adjustable Flame
$15.99 as of Jun 22, 2026
★★★★☆Our rating· In Stock
A quick pass with a kitchen torch pops the surface skin on your pour and draws silicone cells to the top. The TBTeek model is well-priced, has an adjustable flame, and a safety lock. Three to five seconds from six inches above the canvas is the right technique. Keep moving, don't hover.
What we like
Adjustable flame with safety lock; easy to control intensity
Works for creme brulee too, which justifies the purchase broadly
What to know
Butane canisters sold separately (one can lasts about 10 sessions)
Easy to scorch paint if you hold still; practice quick sweeping passes
Acrylic pouring is a genuinely messy hobby. The setup you skip at the start is the one that costs you a kitchen table or a good pair of jeans. You need something to catch paint runoff, disposable cups in volume, and gloves. All of this is cheap, and a proper setup means cleanup takes ten minutes instead of an hour of scrubbing dried acrylic off surfaces.
Best starter
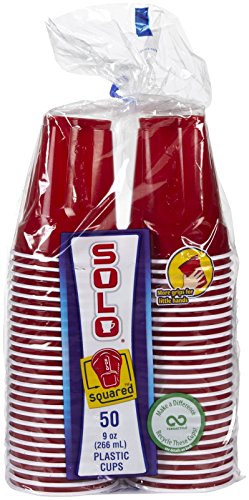
Solo
Plastic Cups, 9 oz (50-Pack)
$13.53 as of Jun 22, 2026
★★★★★Our rating· In Stock
You need a cup per color per pour, plus a larger mixing cup for dirty pours where all colors stack in one vessel. Solo 9oz cups are the standard in the fluid-art community: the right size for individual color mixes, graduated markings visible enough to eyeball ratios, and cheap enough to discard after use. Buy 50 and stop worrying about running out mid-session.
What we like
9oz is the right size for individual color mixes
Cheap enough to discard; no scrubbing acrylic out of cups
Graduated markings help eyeball paint-to-medium ratios
What to know
Single-use plastic; use as sparingly as the technique allows
Thin walls can tip easily; use a tray or wide base to stabilize
Acrylic paint stains hands for days and the skin contact from repeated sessions adds up. Nitrile gloves are chemical-resistant, snug-fit, and cheap enough to change between color setups. A 100-count box covers many sessions at a minimal cost per pour.
What we like
Nitrile resists acrylic paint better than latex
100-count box covers many sessions
What to know
Runs large; order one size down for a snug fit
Single-use plastic; reuse until visibly soiled to reduce waste
A canvas drop cloth under your workspace catches all the runoff and protects the table permanently. Canvas stays flat and doesn't scrunch under cups the way plastic sheeting does. Buy two: one on the floor for splash, one folded flat on the table surface.
What we like
Canvas lies flat; doesn't scrunch or slide under cups
Reusable indefinitely; acrylic peels off once fully dry
What to know
Heavier and bulkier to store than plastic sheeting
Acrylic pouring is the rare hobby where you get a finished piece on day one. Here's what to expect from your first pour session: what the paint does, how to get cells, and why your second pour is always better than your first.
Acrylic pouring has almost no learning curve for the first step. You mix paint with a pouring medium, pour it onto a canvas, tilt, and whatever happens is the art. There’s no drawing skill involved, no years of muscle memory to build. The challenge is everything before and after the pour: getting the right consistency, setting up a workspace that doesn’t ruin a table, and figuring out why your cells aren’t forming.
This is what your first weekend actually looks like.
Before you mix anything: setup matters
The setup you skip is the one that costs you something. Before mixing a single color, do these things:
Get a level surface. This is the single most important variable in your first pour. A canvas that isn’t perfectly level will drain all your paint to one corner while it dries. Get a cheap bubble level from a hardware store and actually use it. Adjust with books or cardboard until the bubble sits center.
Elevate the canvas. Set your stretched canvas on plastic cups or small blocks before pouring. You need air under the canvas so the runoff can drip off the edges freely. If the canvas sits flat on the table, paint pools under it and the canvas sticks once dry.
Lay down protection. A canvas drop cloth under the workspace catches runoff. Plastic tarps slide and scrunch. Use canvas. Set this up before mixing anything, because once your hands are covered in paint you don’t want to be repositioning tarps.
Put on gloves now. Acrylic paint stains hands for days. Nitrile gloves are the right choice over latex. Size down one from your normal size; they run large.
The most common beginner mistake isn’t technique. It’s wrong paint consistency. Too thick and the paint won’t flow; it’ll sit in blobs and pull apart when you tilt. Too thin and it’ll be watery, pale, and won’t hold any pattern.
The target: paint flows off a stir stick in a ribbon and holds shape for about two seconds before sinking back in. That’s it. That’s the whole test.
The basic Floetrol ratio: Start with 2 parts Floetrol to 1 part acrylic paint. Stir thoroughly. Add water a teaspoon at a time, test with the stir stick, until you hit that ribbon consistency. Budget craft paints need more Floetrol than artist-grade fluid acrylics. That’s normal.
Mix each color separately in its own cup. For a dirty pour (where all the colors stack in one larger cup), you’ll also need a solo cup big enough to hold all your colors layered together. Don’t stir after layering — just let them sit.
Add silicone oil now if you’re going for cells. Two drops per color cup. Three at most. Stir just enough to incorporate it into the top layer of that color. Do not overmix.
The first pour
The dirty pour is the right beginner technique: layer all your colors into one cup, place it upside-down on the canvas, then lift the cup and let the paint flow out. Tilt the canvas in slow circles to spread the paint to the edges.
What you’ll notice immediately: the colors move in unexpected ways. You won’t fully control what happens. That’s the nature of the medium. Your job during the tilt phase is to spread coverage, not to direct specific colors to specific places.
If you added silicone: do your torch pass right after pouring, before the surface starts to skin over. Hold the torch six inches above the canvas, keep it moving in slow sweeping passes, and count to three. You’ll see cells emerge as the silicone rises through the paint layer. Stop when the cells look interesting. More torch time does not equal more or better cells.
Let the canvas sit flat on your elevated cups and do not touch it for 24 hours. This is the hard part. The paint is still moving for the first few hours, and what looks unfinished at the 30-minute mark often looks great at the 24-hour mark.
The first pour almost never looks the way you imagined. This is universal.
The colors may go muddier than you expected. That happens when the ratios are slightly off or when you over-tilt. The cells may not appear, or may appear and then close up as the paint settles. The edges may be thinner than the center. One corner may be mostly one color because you over-tilted in that direction.
None of this means you did it wrong. It means you’ve learned several things about consistency and tilt timing that you couldn’t have learned any other way.
What to note after pour one:
Was the paint too thick (blobs, didn’t flow), too thin (watery, pale), or about right?
Did you use silicone? Did cells appear? Did they close up?
Which colors dominated, and was that from the layering order or from the tilt direction?
Is there a section that looks better than the rest? That’s worth replicating.
Don’t change everything for pour two. Change one variable. If the consistency felt thick, add a bit more water or Floetrol. If cells didn’t form, try adding a silicone drop to each color and a torch pass. If the colors got muddy, try fewer colors in the dirty cup.
Pour two is almost always noticeably better than pour one. Not because you’re suddenly skilled, but because the first pour answered the questions you didn’t know to ask.
The things that tend to improve naturally:
The tilt becomes more deliberate. You’ll tilt less frantically and more slowly, which keeps colors distinct longer.
The consistency is closer. You’ve felt what “right” feels like once, and you’ll dial in the ratio faster.
You’ll torch less. Beginners always over-torch on pour one. By pour two, you know to stop sooner.
By pour three or four, you’ll have a technique that’s starting to feel like yours. The results will be partially predictable and partially surprising, and that balance is the thing that makes people come back to this hobby for years.
Save your money
What you don't need yet
Beginners get pressured to buy a lot of stuff that doesn't help them play
better. Here's what we'd skip on day one.
A $60 silicone spreader tool — A plastic straw, an old palette knife, or a finger through a glove create the same patterns for free.
Golden Fluid Acrylics at $20 a bottle — Start with budget or mid-range paints. The technique matters more than the brand for your first 20 pours.
UV resin top coat — Wait until you're consistently making pieces worth protecting. Resin adds time, cost, and real complexity.
Specialty pour cups (ring pour, Y-tube) — Learn basic dirty pours and tilting first. Specialty cups produce their own look; you need the fundamentals before you'll appreciate the difference.
A level glass table — A cheap bubble level on a regular table works fine. The level matters; the table doesn't.
A heat gun — A butane torch is faster and cheaper for developing cells and popping bubbles. Heat guns are for resin, not fluid art.
First week
Your first seven days
A short, real plan to get from gear-on-doorstep to actually playing.
Order paint, Floetrol, and a canvas multi-pack so everything arrives together. · Buy
Set up your workspace with a drop cloth and elevate the canvas on plastic cups before mixing anything. · Action
Mix each color: 1 part paint to 2 parts Floetrol. Add water a teaspoon at a time until paint flows off a stir stick in a ribbon and holds shape for 2 seconds before sinking. · Action
Pour your first dirty pour and tilt. Don't overthink it. If cells appear, great. If they don't, that's normal — technique time is required. · Action
Let the canvas sit perfectly level for 24 hours minimum. Coming back to a fully dry pour is one of the best parts of the hobby. · Action
Do at least three more pours in the first week. The technique clicks through repetition, not study. · Action
FAQ
Common questions
What is the best pouring medium for beginners?
Floetrol is the best starting point. It's a paint conditioner sold at hardware stores for about $8 a quart, and the fluid-art community adopted it because it works beautifully and is far cheaper than art-supply alternatives. Most beginner tutorials you'll find use Floetrol. Once you care about archival quality, upgrade to Liquitex Pouring Effects Medium.
How do I get cells in my acrylic pour?
Cells require silicone oil. Add 2-3 drops of 100% silicone oil to each color cup and do a quick torch pass (3-5 seconds from 6 inches above) immediately after pouring. More silicone does not equal more cells. Overusing it causes the dry paint to peel. Start with 2 drops per cup and adjust from there.
Can I use regular acrylic paint for pouring?
Yes, but you need to mix it with pouring medium. Heavy-body tube acrylics need significant medium. Budget craft acrylics need roughly 2 parts medium to 1 part paint. Pre-mixed fluid acrylics require no mixing. The correct consistency: paint should flow off a stir stick in a ribbon and hold shape for 2 seconds before sinking back in.
How long does it take for an acrylic pour to dry?
Surface-dry in 1-2 hours, fully dry in 24 hours, fully cured in 72 hours. Don't touch, move, or tilt the canvas for at least 24 hours or you'll smear the wet paint. Keep it perfectly level the entire drying time.
What size canvas should I start with?
8x10" is the sweet spot for beginners. Large enough for patterns to develop, small enough that you won't waste a lot of paint on mistakes. Anything under 6x6" is too small to learn on; anything over 12x16" at the start uses more paint than you've learned to control.
Do I need a torch for acrylic pouring?
Only if you want cells. Without silicone oil and a torch, you'll still get beautiful color flows, lacing, and marble-like patterns, just not the iconic cell look. Start without a torch, then add it once you're comfortable with basic pour technique and mixing ratios.
Olga Soby (YouTube) — One of the most-watched fluid art channels. Consistent technique, clear instruction, good range from beginner to advanced. Start here.
Acrylic Pouring — Deby Coles (YouTube) — Channel specifically for beginners entering acrylic pouring. Excellent coverage of mixing ratios, troubleshooting, and different pour techniques.
r/AcrylicPouring — Active community with an excellent wiki. Search before posting; most beginner questions about cells, ratios, and cracking are already answered there.
Acrylic-Pouring.com — Dedicated reference site with technique breakdowns, medium comparisons, and mixing ratio guides. The best written resource for getting paint consistency right.
As an Amazon Associate, JustBeginning earns from qualifying purchases.
We may also earn commission from other affiliate programs linked on this
page. Editorial recommendations are independent; we don't choose
products based on commission rates.
Product prices and availability are accurate as of the date and time
indicated and are subject to change. Any price and availability
information shown on Amazon at the time of purchase will apply.
Our top pickPouring Masters 12-Color Metallic Acrylic Pouring Paint Set


 Best starter