You've passed your IKO lessons. You've body-dragged, relaunched a downed kite, and triggered the quick-release. Now you're ready to buy your own kit. Here's the honest gear roadmap: what to invest in, what to buy used, and the one corner you should never cut.
By Colin B. · Published May 23, 2026 · Last reviewed June 4, 2026
A realistic first kit (kite, bar, board, harness, helmet, impact vest) runs $1,200–1,800 buying used, or $2,500+ new. Lessons ($400–800) come first and are a separate cost.
We earn commission on qualifying Amazon purchases — see our
affiliate disclosure.
Price tiers and budget totals shown above are editorial estimates;
actual Amazon prices vary.
At a glance
Our top pick in each category
The fastest path through this guide — each best-starter pick by category.
Scroll for the budget and upgrade alternatives.
Take lessons before you buy anything. This is not optional. Kiteboarding carries real injury risk when the kite pulls you unexpectedly into obstacles, the water, or other people. An IKO or PASA-certified school (8–12 hours of instruction, $400–800) is the universal prerequisite. The safety systems, right-of-way rules, and self-rescue skills you learn there are the only reason this sport is survivable.
Buy used for your first kit. New kiteboarding gear is expensive and your first year is hard on equipment. Good used kites (under 3 years old, bladders intact, no major canopy repairs) sell for 40–60% off retail. Check Facebook Marketplace, local kiteboarding clubs, and community classifieds at TheKiteMag.
You'll eventually need two kites. Wind conditions vary: most kiteboarders run a 9m for high-wind days (25+ knots) and a 12m for typical coastal winds (15–22 knots). Start with a 12m. The 9m comes later, once you know your spot and conditions.
The kite is the engine of your entire setup and the most consequential purchase you'll make. For your first kite, prioritize three things: predictable depower (the bar should dump power cleanly in an emergency), high relaunchability from the water, and a wide wind range. Most beginners start with a 12m Leading Edge Inflatable (LEI) kite, the right size for an average adult rider in typical coastal winds of 15–22 knots. Plan on buying used; kites lose 40–50% of their value in year one and you'll upgrade once you know your spots and conditions.
Kites — what's the difference?
A few common shapes, each making a different trade.
9m
High-wind specialist. For 22–30+ knot days or riders under 140 lbs.
Best wind
22–35 knots
Rider weight
Under 150 lbs
Use case
Strong-wind days
Best for Gusty spots, lighter riders, or a second kite for high-wind days
Tradeoff Underpowered in typical 15–20 knot winds; don't make this your only kite
12m
All-around starter. Covers the widest range of conditions for most riders.
Best wind
15–25 knots
Rider weight
130–190 lbs
Use case
Everyday kiteboarding
Best for Most beginners at most spots, the default recommendation
Tradeoff May feel underpowered below 12 knots or overpowered above 28 knots
Covers almost every wind window you'll encounter year-round.
Coverage
12–35+ knots
Days on water
Maximized
Investment
$$ used
Best for Committed kiteboarders who want to ride every windable day
Tradeoff Two sets of gear to maintain, store, and transport; plan for the logistics
Best starter
Cabrinha
Switchblade Kite 12m
$$$$
★★★★★Our rating
The Switchblade is the closest thing kiteboarding has to an industry-standard beginner kite. Cabrinha designed it to be forgiving first: big depower range, easy relaunch when it falls in the water, and a predictable, drift-friendly feel. Most IKO schools teach on Switchblades or their siblings. If you don't know where to start, you start here.
What we like
Massive depower range, dumps power fast when things go wrong
Relaunches from water easily, a critical skill for beginners to practice
Forgiving drift kite feel; doesn't over-steer or loop unexpectedly
What to know
Full retail is $700–900; buy used or wait for seasonal sales
A bit slow for experienced riders chasing performance
Slingshot makes some of the most durable kites in the industry, and the Rally GT is their entry-level all-around design: simpler construction, lower price, still reliable. Not as refined as the Switchblade, but Slingshot quality holds up to beginner abuse better than most off-brand options.
When you've been riding for a year and want to unlock performance, the Cabrinha Contra is where serious kiteboarders often land. The 3-strut design is lighter and more responsive than the Switchblade, with better drift for riding waves and a crisper bar feel for freeride. Still easy to relaunch, but with noticeably more performance ceiling.
What we like
Lighter 3-strut design, more responsive steering than the Switchblade
Better drift for wave riding and more performance ceiling for freeride
Cabrinha quality and dealer network means support is easy to find
What to know
Less forgiving than beginner kites, punishes sloppy flying more noticeably
Premium price ($800+); wait until you're riding consistently before upgrading
The control bar connects you to the kite via the lines and is how you steer, depower, and trigger the safety release. Buy the bar designed for your kite brand: Cabrinha kites take Cabrinha bars, North kites take North bars. Mixing brands is possible but creates compatibility headaches on safety systems you don't want while you're learning. If you buy a used kite, make sure the bar is the same brand and generation as your kite.
Best starter
Cabrinha
1X Control Bar
$$$
★★★★★Our rating
If you're riding a Cabrinha kite, this is your bar: no compatibility guesswork, the safety system works as engineered, and the adjustable spreader bar fits most body sizes. The 1X bar features a simple, reliable quick-release that IKO instructors teach on. Easy to inspect and maintain between sessions.
What we like
Engineered to match Cabrinha kites, safety system works as designed
Adjustable width fits most rider body types out of the box
Simple quick-release is easy to learn and inspect pre-session
What to know
Brand-locked: only works correctly with Cabrinha kites
Bar and lines together cost $200–300 new; buy used when possible
If you move to North kites, their Reach bar is the current standard. Clean design, excellent safety systems, and the North Quick Release mechanism has one of the best track records in the industry. Slightly more expensive but the engineering quality is noticeable in daily use.
What we like
North's quick-release system has excellent reliability record in the field
Clean, durable build quality that holds up to daily saltwater riding
Intuitive depower system, bar trim is responsive and precise
What to know
Only compatible with current North kites, not for other brands
Premium pricing ($300+) adds up quickly on an already expensive setup
Nearly every beginner starts on a twin-tip board (the symmetrical, bidirectional board that looks like a wakeboard). Twin-tips are forgiving, easy to water-start on, and go both directions so you don't worry about which foot is forward. Bigger and wider is better for beginners: more surface area means more float, easier water-starts, and more stability. Start around 138–145cm long and 40–44cm wide. Surfboards and foil boards come much later.
Best starter
Cabrinha
Spectrum Twin Tip 148cm
$$$
★★★★★Our rating
Wide, stable, and designed to get beginners up and riding fast: the Cabrinha Spectrum is their dedicated entry-level twin-tip. The 148cm width gives you plenty of float for water-starts, and the flex pattern is forgiving on choppy water. It pops reliably for your first basic jumps without punishing you when you land wrong.
What we like
Wide outline adds stability for water-starts beginners struggle with
Continuous rocker absorbs chop, forgiving in rough water conditions
Comes with fins and straps, ready to ride out of the box
What to know
Bigger boards feel draggy at speed once technique improves
You'll outgrow the size within 12–18 months of consistent riding
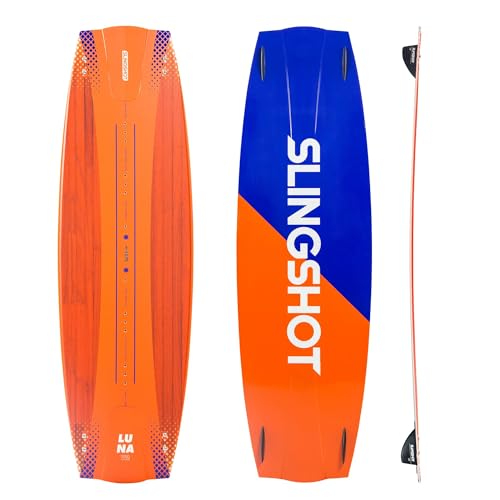
Slingshot builds boards for real conditions and the Luna V2 is their approachable twin-tip with a forgiving flex pattern. It absorbs chop without feeling mushy, tracks well on flat water, and holds up to the knocks a beginner board takes. Buy used for even better value.
What we like
Slingshot durability is proven, holds up to beginner abuse better than average
Medium flex works in both flat water and light chop conditions
Often available used at 40–50% off from riders moving to smaller boards
What to know
Proprietary fin system limits local shop replacement options
Less float than a dedicated beginner board; slightly harder water-starts
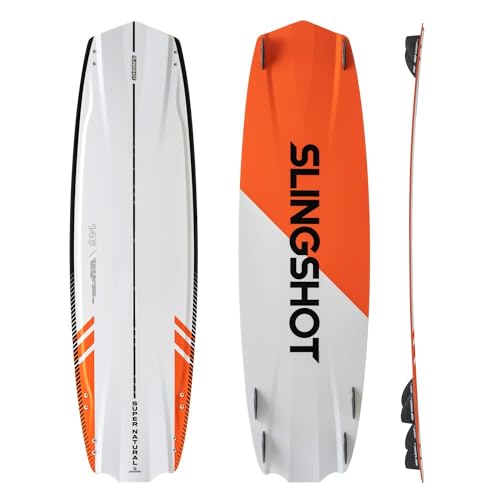
Once you're riding edge-to-edge and starting to pop for small jumps, the Slingshot Super Natural V2 rewards dialed technique. Snappier flex, precise rail engagement, and a hybrid shape that works across flat water, chop, and small waves. The step up from a beginner board is noticeable in pop and response, exactly what you want when you're no longer a beginner.
What we like
Snappy flex pattern rewards good technique and aggressive edging
Hybrid shape works in flat water, chop, and small waves equally well
Slingshot build quality holds up to big air and harder landings
What to know
Stiffer flex punishes hard landings more than softer beginner boards
Performance shape less forgiving for water-starts than a dedicated beginner board
The harness connects your body to the control bar; your core and legs do the work, not your arms. For beginners, a seat harness is the strong recommendation: it sits around your hips and thighs, holds the hook lower on your body, and prevents the bar from riding up toward your face when you're still figuring out your stance. Waist harnesses offer more movement freedom and are preferred by experienced riders, but they require good technique to prevent riding up. Start with a seat harness. You'll move to a waist harness when your instructor says you're ready.
Best starter
Prolimit
Harness Kite Seat Pro
$$
★★★★★Our rating
Prolimit makes the most comfortable beginner seat harnesses in the sport. The padding is substantial, the hook is well-positioned, and the spreader bar is adjustable without tools. Your first 20 hours of riding involve a lot of water-starting and being dragged across chop. A supportive seat harness makes a real difference. Buy this before you buy a waist harness.
What we like
Low hook position prevents the bar from riding up into your chest
Comfortable padding handles hours of water-starts without bruising your hips
Adjustable spreader bar fits most body shapes without modification
What to know
Restricts hip movement for advanced tricks and riding switch
Bulkier and heavier than waist harnesses, noticeable on long sessions
Once your technique is solid enough that the bar isn't riding up into your face, the Dakine Renegade is one of the best waist harnesses at a fair price. Firm back support, stiff spreader bar, and a clean hook that doesn't snag. Dakine's harnesses outlast cheaper options. The Renegade is their time-tested workhorse.
What we like
Firm back support prevents the hunched posture that kills beginners' backs
Stiff spreader bar stays centered, doesn't shift mid-session
Dakine durability holds up to saltwater and UV over multiple seasons
What to know
Will ride up without proper riding technique; wrong for beginners
Less comfortable for water-starting than a seat harness
Kiteboarding safety gear isn't optional. It's what makes a dangerous sport manageable. At minimum: a helmet for head protection in crashes and board hits, an impact vest for falls and being dragged across choppy water, and a hook knife clipped to your harness spreader bar for cutting lines in an emergency. Spend properly here. This is not the category where you look for bargains.
Best starter
GATH
SFC Surf Convertible Helmet
$$$
★★★★★Our rating
GATH helmets are the gold standard for water-sports head protection, used by pro kiteboarders, surfers, and kayakers worldwide. The Surf Convertible fits snugly, doesn't shift during crashes, and sheds water cleanly without the weight or heat of a skate helmet. Your head hitting a board or the water at speed is a real risk; don't put a $30 bike helmet in the way.
What we like
Purpose-built for water sports, sheds water and floats if it comes off
Snug secure fit that stays on during hard crashes and body drags
Wide peripheral vision compared to cycling or ski helmets
What to know
Premium pricing ($80–120) for what looks like a simple piece of gear
Snug fit can be uncomfortable in heat; ventilation is limited
An impact vest absorbs the body shots you take crashing across choppy water, the kind that leave bruises on your ribs if you're just in a wetsuit. ION's Vector Vest is flexible enough that it doesn't restrict your riding while offering meaningful protection. Wear it over your wetsuit. Especially important in your first year when crashes are frequent.
What we like
Flexible enough to ride comfortably, doesn't feel like a straitjacket
Absorbs rib and chest impacts from choppy-water falls significantly
Built-in flotation adds reassurance in open-water riding situations
What to know
Not a substitute for a life jacket; don't treat it as one
Adds warmth in summer conditions, can be uncomfortable in heat
★★★★☆Our rating· Only 6 left in stock - order soon.
A hook knife on your harness is the last resort if you're tangled in your lines. Myerchin makes the most trusted cutting tools in watersports. The blunt-tip, serrated blade cuts line fast without risk of puncturing your kite fabric or wetsuit while you're in the water. Clip it to your harness and never need to use it. That's the goal.
What we like
Serrated blunt tip cuts line fast without puncturing kite fabric
Stainless construction handles saltwater corrosion for years of use
Compact enough to clip to spreader bar without getting in the way
What to know
Requires occasional sharpening; serrated blades dull over time
Small size makes it easy to lose after a crash in deep water
Your wetsuit choice depends almost entirely on where you kite. In warm-water spots (Florida, Hawaii, Caribbean), boardshorts and a rashguard work most of the year. In temperate zones (US East Coast, California), a 3/2mm full suit covers spring through fall. In cold-water spots (Pacific Northwest, New England, Great Lakes), a 5/4mm or drysuit is the only way to extend the season safely. Cold water and cold air hit differently when you're wet and windblown. Hypothermia risk is real.
Best starter
O'Neill
Reactor-2 3/2mm Full Wetsuit
$$
★★★★★Our rating
The Reactor II is the wetsuit most kiteboarding schools put beginners in: reliable, flexible, easy to get in and out of, and priced fairly for the quality. O'Neill's neoprene is proven in cold and temperate water, and the seams hold up to the stretching and washing that comes with regular water sessions. Right for 55–70°F water.
What we like
O'Neill neoprene quality is proven in real ocean water, not just pools
Flexible enough to raise a kite bar without feeling like you're fighting it
Easy entry and exit, important when gearing up on a cold windy beach
What to know
3/2mm insufficient for cold-water spots, not for sub-55°F ocean water
Flatlock seams flush water in cold conditions compared to glued seams
Hyperflex builds honest wetsuits for real water use and the VOODOO is a solid value 3/2mm that covers the same conditions as the O'Neill without the brand premium. Good neoprene stretch, a comfortable collar, and holds its shape over a full season of regular use. If budget is tight, this is where to save.
What we like
Solid warmth and flexibility at 30–40% below premium brand pricing
Good collar seal prevents the neck flush that kills warmth in cold conditions
Holds shape and insulation value through a full season of regular use
What to know
Sizing inconsistency; check the brand's size chart carefully before ordering
Stitching quality not quite at O'Neill or Rip Curl level in stress areas
Kiteboarding has the steepest entrance ramp of any wind sport, and the highest payoff once you clear it. Here's what the first month actually looks like, from lesson one to riding upwind on your own.
Nobody learns kiteboarding in a weekend. That’s not a knock on the sport. It’s just what an honest account of the learning curve looks like. The kite is powerful, the environment is unpredictable, and there are real safety systems to internalize before any of it is fun. But the people who get through the first month? They tend to stay kiteboarders for the rest of their lives.
Here’s what that first month actually looks like.
Before you touch a kite: find a certified school
The first action item in kiteboarding isn’t buying gear. It’s booking lessons with an IKO (International Kiteboarding Organization) or PASA (Professional Air Sports Association) certified school. This isn’t a bureaucratic formality. It’s how you learn the safety systems that make the sport manageable.
A kite can generate several hundred pounds of upward force. An untethered kite doesn’t stop. It goes where the wind takes it, and if you’re attached to it, you go too. IKO Level 1–2 certification covers the mechanics you need before you’re allowed on the water independently: how to launch and land safely, how to self-rescue, what the right-of-way rules are, and, most importantly, how to trigger the quick-release and get the kite out of the sky immediately.
Expect to spend $400–800 for 8–12 hours of instruction spread over two to four days. Do not try to shortcut this.
Your first lesson will probably happen on dry land. That’s not a disappointment. It’s the right approach. You’ll fly a trainer kite (a small, manageable two-line kite) to understand the wind window: the three-dimensional arc in front of you where a kite generates power. The center of the window (directly downwind) is maximum power; the edges are neutral. Understanding this relationship (not intellectually, but physically in your hands) is the foundation of everything else.
After trainer kite time comes body dragging: flying the full kite while being dragged through the water, no board. This sounds unglamorous. It’s actually one of the most useful skills you’ll build. Body dragging teaches you kite control under real conditions, trains you to position upwind of your board after a fall, and builds the muscle memory you’ll draw on constantly once you’re riding.
The water-start (actually getting up on the board) comes later in the IKO sequence. Most people are surprised by how much they learn before ever touching the board.
What most beginners struggle with in this phase:
Keeping the kite in the neutral “parking” zone (12 o’clock, overhead) while they deal with other things. The instinct is to let it drift.
Flying the kite with their whole arm instead of just wrist movement. The corrections are small; the movements are small.
Trusting the quick-release. It feels dramatic. It’s designed to. Pull it when you need it.
The water-start is the moment where kiteboarding stops feeling like a lesson and starts feeling like a sport. You’re floating in the water, board on your feet, kite parked overhead. You dive the kite to generate power, edge the board, and if the variables align, you’re up and riding.
It usually doesn’t work the first ten times. That’s completely normal. The variables are: kite timing, board angle, body position, wind consistency, and your own nerves. On any given attempt, two or three of these will be slightly off. You’ll sink back into the water. You’ll reset, body-drag back upwind to your board, and try again.
When it finally works, you know. The kite pulls, the board planes, and for a moment you’re skimming across the water with the kite overhead. Most people ride about ten meters before falling on their first successful water-start. That’s fine. Ten meters is real.
The common failure modes:
Diving the kite too aggressively before the board is in position. Power comes before you’re ready and you get pulled forward and underwater.
Not edging the board enough. The board needs to be perpendicular to the direction of pull. Otherwise it just slides across the water rather than lifting you.
Looking at the kite instead of where you’re going. Once you’ve dived it, the kite mostly handles itself for a moment. Look downwind.
Week 3–4: Riding and the upwind problem
Getting up is one thing. Going somewhere intentional is another. Most beginners spend their first few solo sessions riding downwind, which is easy, comfortable, and gets you stranded a quarter-mile from where you launched.
Riding upwind is the milestone that turns kiteboarding from a novelty into an actual activity. It requires more kite control (keeping the kite higher in the window generates more lift and less drag), more aggressive edging (you’re fighting the kite’s pull with your legs), and a body position that feels counterintuitive (leaning back and away from the kite, not forward toward it).
Most people crack this somewhere in their third or fourth week of regular sessions. Once it clicks, you can complete a loop back to your launch point. That’s when the sport opens up.
Consistent sessions matter more than long ones. Four two-hour sessions beat one eight-hour day. Muscle memory is built in repetition across days, not within a single day.
Riding with someone better than you. Not to follow their advice, but to watch what they do with the kite while they ride. The patterns become obvious when you see them executed well.
Wind awareness. Check forecasts obsessively. You’ll learn to read your spot: which direction produces clean, steady wind vs. gusty and shifty. Steady wind is significantly easier to learn in.
What “getting good” actually means
By the end of month one, a student who’s been diligent, attending all their lessons and getting two or three independent sessions per week in good conditions, should be:
Water-starting consistently (maybe 7 out of 10 attempts)
Riding both directions on the board
Getting back upwind enough to complete a loop back to their launch point most of the time
Handling their gear setup and break-down independently
This is IKO Level 3 territory. It’s not expert riding. You’ll still fall frequently, you’ll still lose your upwind progress more often than you’d like, and you probably haven’t jumped yet. But you’re a kiteboarder. The rest is refinement.
The first jump (even a small, controlled hop) typically happens somewhere in months two or three. It arrives unexpectedly: you edge hard, the kite pulls, and suddenly you’re off the water. Most people land wrong the first dozen times. That’s fine. Jumping is the beginning of a much longer chapter.
Save your money
What you don't need yet
Beginners get pressured to buy a lot of stuff that doesn't help them play
better. Here's what we'd skip on day one.
A hydrofoil board — Foiling requires solid kite control and strong edge skills. It's an entirely different sport with its own learning curve. Wait at least a full year of regular kiteboarding first.
A directional surfboard — Kitesurfing on a directional board requires advanced kite handling. Learn on a twin-tip. You'll know when you're ready for the transition.
A wind meter — Useful eventually, but your school has one and local kiteboarders will tell you the conditions. Learn to read flags, whitecaps, and talking to people at the spot first.
Brand-name kiteboarding apparel — Any athletic shorts, rashguard, and UV layer work fine. The branded stuff is mostly marketing at this stage.
A kite pump with digital gauge — The pump included with your kite is fine. A digital gauge is a nice-to-have after year one when you're dialing exact bladder pressure, not before.
First week
Your first seven days
A short, real plan to get from gear-on-doorstep to actually playing.
Book your IKO or PASA lessons before you buy anything. Nothing else happens until this is done. · Action
IKO school finder · International Kiteboarding Organization, the most widely recognized certification
PASA school finder · US-based alternative; smaller network but strong curriculum
Find your local kiteboarding beach or launch spot and visit it. Learn the wind direction, typical conditions, and launch zones before you own gear. · Action
Join your local kiteboarding community on Facebook or at the beach. Kiteboarders share gear advice and launch windows freely. You'll learn what kite sizes and brands work at your specific spot. · Action
After lessons: scout used gear on Facebook Marketplace and kiteboarding classifieds. Look for kites under 3 years old, bladders intact, no canopy patches in the load-bearing areas. · Action
Expect $400–800 for lessons (non-negotiable first step), then $1,200–1,800 for a used starter kit covering kite, bar, board, harness, helmet, and impact vest. A full new kit from a single brand runs $2,500–3,500. Most beginners buy used kite and board, new harness and safety gear.
Do I really need lessons?
Yes, without exception. Kiteboarding is one of the few sports where skipping instruction has caused serious injuries and deaths. A kite can generate enormous upward and forward force unexpectedly. IKO and PASA schools teach the safety systems, emergency procedures, and right-of-way rules that keep you and others safe.
What kite size should I start with?
A 12m is the standard for an average adult rider (130–190 lbs) in typical coastal winds of 15–22 knots. Lighter riders or gusty spots may do better with a 10m. Your local school will have a recommendation for your specific spot. Take their advice over any general guidance.
Seat harness or waist harness for beginners?
Seat harness. It holds the bar lower on your body, which forgives the stance problems beginners have. Waist harnesses offer more freedom but ride up the torso if your technique isn't right, which it won't be in your first year. Move to a waist harness when your instructor says you're ready.
Can I learn kiteboarding on my own?
Technically yes; practically no. The consequences of getting it wrong are severe. The sport's safety record has improved dramatically since IKO certification became standard. Self-learners exist, but the majority of serious kiteboarding accidents involve people who skipped formal instruction.
How long until I'm riding independently?
Most people complete IKO Level 1–2 in 8–12 hours of instruction over 2–4 days. After that, expect another 5–15 hours of practice before you're consistently water-starting and riding upwind on your own. Wind conditions, spot difficulty, and practice frequency matter more than anything else.
IKO (International Kiteboarding Organization) — The world's largest kiteboarding certification body. Use their school finder to locate a certified instructor. Don't learn from an uncertified teacher.
TheKiteMag — The best editorial magazine in kiteboarding: gear reviews, technique articles, and destination guides. Their classifieds section is also the best place to find used gear.
Progression Kiteboarding — The best structured video tutorials available. Their beginner series maps to IKO curriculum. Watch between sessions to reinforce what your instructor taught.
r/kiteboarding — Active community with honest gear discussions. Search before posting gear questions; most have been answered in detail. Always include your weight, local spot, and typical wind when asking about kite sizes.
Windy / Windguru — The two forecast tools serious kiteboarders use. Windy for visual overview; Windguru for hourly model comparisons at the same spot. Check both for anything above 20 knots or below 12; the models disagree at extremes.
As an Amazon Associate, JustBeginning earns from qualifying purchases.
We may also earn commission from other affiliate programs linked on this
page. Editorial recommendations are independent; we don't choose
products based on commission rates.
Product prices and availability are accurate as of the date and time
indicated and are subject to change. Any price and availability
information shown on Amazon at the time of purchase will apply.