Ice climbing has a finite gear list and a steep learning curve — and those two things are related. Two ice tools, crampons, screws, rope, harness, and helmet. Here's what to actually buy, what to rent first, and what the leash-versus-leashless debate actually means for a first-season climber.
By Colin B. · Published May 31, 2026 · Last reviewed May 31, 2026
Ice climbing is a $900–$1,500 commitment from scratch: two tools ($300–$700/pair), crampons ($150–$280), a 6-screw rack ($150–$240), dry rope ($150–$200), harness ($60–$120), and helmet ($60–$120). Rent tools and crampons for your first two guided sessions before buying.
We earn commission on qualifying Amazon purchases — see our
affiliate disclosure.
Price tiers and budget totals shown above are editorial estimates;
actual Amazon prices vary.
At a glance
Our top pick in each category
The fastest path through this guide — each best-starter pick by category.
Scroll for the budget and upgrade alternatives.
Take a guided lesson before buying anything. Ice climbing involves real hazards — falling ice, cold exposure, and technical self-rescue skills you won't learn from YouTube. A half-day with a certified guide (AMGA/IFMGA) teaches you more than a month of reading reviews. Most guide services supply all the gear. Rent for your first two or three trips before committing to a purchase.
Boot compatibility determines crampon choice — get this order right. You need stiff mountaineering or technical ice boots, not hiking boots or approach shoes. Once you have boots, select crampons that match the binding system. Buying crampons first and then searching for compatible boots is the classic expensive mistake.
Rent ice tools for your first sessions. Leashed versus leashless feels abstract until you've held both on real ice. Most guide services rent quality tools. Use them before committing $300+ per axe — and your hands will tell you which style feels better.
Your ice tools are the heart of this sport and the most technically nuanced purchase you'll make. The key decision for beginners is leashed versus leashless: leashed tools have a wrist loop so you can't drop them — simpler, cheaper, right for WI2–WI3 beginner ice. Leashless tools let you reposition your hands freely, which matters on steep ice and mixed terrain but adds cost and complexity. For your first season, leashed or a versatile leashless-compatible tool at the lower end is the right call. Buy two — you always need a pair.
Ice Tools — what's the difference?
A few common shapes, each making a different trade.
Leashed
Wrist loop prevents drops — simpler system, right for beginner ice.
Wrist connection
Loop or cord
Best grades
WI2–WI3
Best for First-season climbers, cold-weather climbing where dropping a tool is dangerous
Tradeoff Wrist loop interferes with rappels and rope transitions
★★★★★Our rating· Only 12 left in stock - order soon.
The Quark is the textbook first technical ice axe: versatile, comfortable, and built by the most respected name in vertical gear. Leashless-compatible with an optional wrist leash system, it adapts as your climbing evolves. At ~$320 each, it's not cheap — but it's the tool you'll still be climbing on in ten years.
What we like
Petzl's benchmark tool — trusted by guides and serious alpinists worldwide
Leashless-compatible with optional leash system — adapts as skills grow
Modular adze and spike options configure it for ice or mixed terrain
What to know
Sold individually — two axes at ~$320 each is a real upfront cost
Trigger grip takes a few sessions to feel natural on steep ice
Black Diamond's leashed entry-level technical ice axe is the obvious choice for testing the sport before committing fully. At ~$200 each, you can buy a pair for what one premium tool costs. The leash system is simple and effective. If you fall in love with ice climbing, you'll upgrade — but the Viper will get you up WI3 without complaint.
What we like
~$200 each — most affordable technical ice axe from a respected brand
Includes wrist leash — no extra purchase needed for safe beginner climbing
Classic pick geometry is forgiving for beginners learning tool placements
What to know
Heavier than modern leashless tools — you'll notice it on a long day
Leash complicates hand repositioning during rappels and gear transitions
When you're climbing WI4 and harder, the Nomic's aggressive ergonomic bend makes a real difference. The patented handle shape transfers power directly and reduces pump on long overhanging sections. This is the tool elite climbers retire on — not the one they start with.
What we like
Patented ergonomic bend dramatically reduces forearm pump on steep ice
The most widely used tool on WI4+ and mixed routes worldwide
What to know
~$500 per axe — hard to justify until you're regularly climbing WI4+
Aggressive geometry punishes poor technique and feels wrong on moderate ice
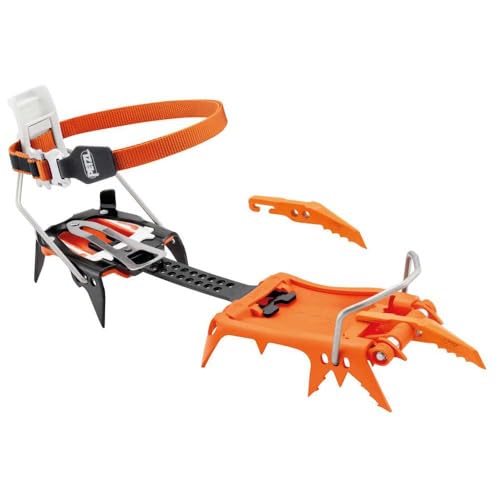
Boot compatibility is the thing beginners miss. Crampons come in three binding systems: step-in (rigid bail, requires a boot with front and rear welts), strap-on (fits almost any boot with a stiff sole), and hybrid (adjustable, works with most technical mountaineering boots). For pure ice climbing, you want horizontal dual front-points — the two forward teeth that bite the ice when front-pointing. Mono-point crampons (single tooth) are for mixed climbing and technical rock — skip them until year two.
Best starter
Petzl
Vasak FlexLock Crampons
$$$
★★★★★Our rating
The Vasak's modular binding system converts between strap, step-in, or hybrid configuration — meaning it'll work with nearly any stiff mountain boot you end up buying. Horizontal dual front-points are the right geometry for pure ice. This is the crampon most rental shops stock, which means the world's ice guides have decided it works.
What we like
Modular binding converts between strap, step-in, and hybrid systems
Horizontal dual front-points — the correct geometry for ice climbing
Widely stocked at guide services — your guide will know this crampon
What to know
Frame compatibility requires setup — watch a setup video before first use
Heavier than specialized mono-point performance crampons
Step-in bail system, aggressive 12-point configuration, and BD's solid build quality at under $160. The strap binding version fits a wider range of boots. A reliable, no-fuss option if your boots have a stiff sole and you want to spend less on the crampon side.
What we like
Aggressive 12-point design handles hard ice and firm snow equally well
Black Diamond's proven build quality at an accessible price
What to know
Step-in version requires boots with pronounced front and rear welts
Front points harder to replace than on modular systems like the Vasak
★★★★☆Our rating· Only 4 left in stock - order soon.
Mono-point design for mixed climbing — when you're moving from pure ice to technical rock sections on M-grade routes. The single front tooth places precisely on small rock edges between ice sections. Don't buy these until you're regularly climbing M5 and above.
What we like
Mono-point front allows precise placements on mixed rock-and-ice terrain
Lighter than dual-point crampons for fast alpine objectives
What to know
Single front point is unstable on pure ice — wrong tool for WI beginners
Niche use: only valuable once you're regularly on M-grade mixed terrain
Ice screws are your protection — you place them in the ice, clip your rope, and they hold you if you fall. You need at least 6 screws to lead a single pitch; 8–10 for a full day out. The main variables are length (13cm is the all-around standard) and rotation system (some have wire cages that spin the screw in faster — worth every penny on steep ice when your forearms are pumped). Buy used if budget is tight; screws are less life-cycle-critical than soft goods and hold up well.
Best starter
Black Diamond
Ultralight Ice Screw 13cm
$134.68 as of Jun 22, 2026
★★★★★Our rating· Only 2 left in stock - order soon.
The most widely used screw in North America. 13cm is the all-around length, and BD's machining quality is exceptional. The wire rotation cage places 30–40% faster than a standard screw — a real advantage when your arms are pumped. Buy a set of 6–8 to build a full rack.
What we like
Wire rotation cage places 30–40% faster than non-rotating screws
13cm handles most standard ice conditions — the versatile default
Black Diamond machining quality is excellent — screws last decades
What to know
Sold individually — a 6-screw rack adds up to $150–$200+
Cage spins freely when bumped and can partially unscrew in a packed bag
The fastest-placing screw on the market — Petzl's knurled rotation handle spins it in with one hand in seconds. Ultralight aluminum saves meaningful grams across a rack of 8–10 screws. For climbers pushing WI4+, the time savings during placements are real and measurable.
What we like
One-handed placement in seconds — fastest-placing screw on the market
Ultralight aluminum saves real weight across a full rack of 8–10 screws
What to know
~$45 each — a full rack of 8 runs $350+, a meaningful premium
Lighter construction requires more care to avoid denting the threads
★★★★☆Our rating· Only 1 left in stock - order soon.
Grivel's most affordable technical screw — rotating handle, solid steel construction, and a lower price per unit than the premium brands. Building a beginner rack of 6–8 Helix screws costs less than four Petzl Laser Speeds. Quality is real; the rotation is slightly slower but it places cleanly.
What we like
Lower per-unit price — the budget option for building a starter rack
Rotating handle still places faster than old-style manual screws
What to know
Slower rotation than Black Diamond Express or Petzl Laser Speed Light
Steel construction is heavier than ultralight aluminum alternatives
Ice climbing requires a dry-treated rope. Untreated ropes absorb water, freeze stiff, and become nearly unmanageable in the cold. You want a single dry rope in the 9.5–10.0mm range and at least 60m (70m is better for modern crags). Dry treatment adds $50–$80 to the price but is genuinely non-negotiable — a wet rope on a cold day is a safety issue, not a comfort issue.
Best starter
Mammut
Crag Dry 9.8mm 60m
$$$
★★★★★Our rating
A 9.8mm single dry rope that hits the sweet spot between durability and weight. Mammut's Protect coating actively sheds water rather than just delaying absorption. The 60m length covers most single-pitch ice. This is what we'd put in a beginner's hands on their first day leading.
What we like
Mammut Protect coating actively sheds water — not just delays absorption
9.8mm diameter is durable and forgiving for beginners learning to fall
Handles and feeds smoothly even when temperatures drop below freezing
What to know
At ~$200, it's the most expensive item on the list outside the tools
Thicker diameter produces more rope drag on longer or wandering leads
Edelrid's Thermo Shield dry treatment is genuinely effective — it's independently tested, not a marketing label. The 9.8mm diameter is durable for beginners still getting comfortable with falls. About $30–$40 less than the Mammut with similar performance in real-world cold conditions.
What we like
Thermo Shield dry treatment is independently tested — not a label claim
Saves $30–$40 vs. the Mammut at comparable weight and diameter
What to know
Slightly less supple than the Mammut — stiffer handling in cold temps
Rope drag increases on routes with multiple direction changes
Seracs calve, ice falls off routes above you, and tools slip. A climbing helmet is not optional in ice climbing — it's the gear you'll be grateful for exactly once, when it counts. You want a UIAA-rated climbing helmet specifically, not a ski or bike helmet. Even the cheapest certified climbing helmet is dramatically better than the most expensive non-climbing alternative.
Best starter
Black Diamond
Half Dome Helmet
$$
★★★★★Our rating
The Half Dome is the most popular entry-level climbing helmet for one reason: it's UIAA-rated, comfortable, well-ventilated, and inexpensive enough that there's no excuse not to own one. The foam shell handles top impacts from falling ice. The sliding-band fit system adjusts quickly with gloved hands.
What we like
UIAA-certified foam shell handles the top impacts ice climbing produces
Under $70 — the cheapest legitimate reason to protect your head properly
Sliding-band fit system adjusts quickly even with gloves on
What to know
Foam shell absorbs water in wet conditions and dries slowly
Heavier and warmer than hardshell or hybrid alternatives
Petzl's entry hardshell meets UIAA standards and adds their ergonomic headband fit system — comfortable for all-day use in a way that cheaper helmets aren't. Around $60 and better ventilated than the Half Dome for warmer approach days.
What we like
Hardshell is more durable against rock and ice abrasion than foam
Petzl's fit-adjustment dial snugs up precisely without fiddling
What to know
Runs warm on approach hikes — less ventilation than hybrid designs
Hardshell is heavier than foam alternatives in the same price range
At 165g, the Sirocco is the ultralight helmet serious alpinists choose when every gram matters. Comfortable for a 10-hour day, well-ventilated for warm approach hikes, and slim enough to fit under a hood. You don't need this for your first season, but it's what you'll want when you start thinking about bigger objectives.
What we like
165g — one of the lightest UIAA-certified climbing helmets available
Excellent ventilation for long approach days and warmer conditions
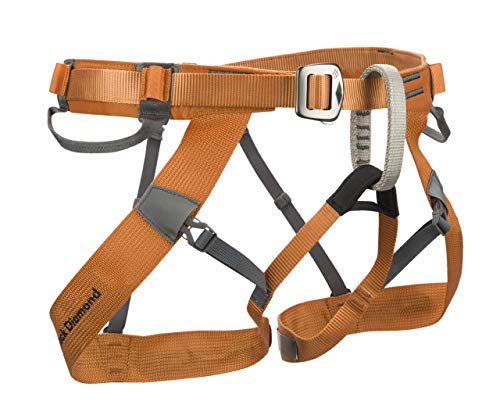
Any quality rock climbing harness works for ice. The things that matter: four gear loops for clipping screws, a haul loop, and enough padding to stay comfortable standing in your harness while placing protection. You do not need an ice-specific harness to start. The one upgrade worth considering as you advance is a harness cut to fit comfortably over a puffy jacket and thick insulated pants — standard sport-climbing harnesses can bind uncomfortably over heavy layers.
Best starter
Black Diamond
Momentum Harness
$$
★★★★★Our rating
Four gear loops, hollow-block padding that stays comfortable when you're hanging mid-pitch placing a screw, and an easy speed-adjust buckle system that works with gloves. The Momentum is the all-around beginner harness that almost every gym and guide service defaults to — for good reason.
What we like
Four gear loops provide enough space for a full rack of 6–8 ice screws
Hollow-block padding stays comfortable during prolonged mid-pitch hanging
Speed-adjust buckle system works reliably with gloves on
What to know
Cut for active movement — can feel snug over thick belay jackets
Minimal haul loop reinforcement — not built for heavy hauling
Petzl's most affordable full-featured harness — adjustable waist and leg loops accommodate thicker ice-climbing layers without needing an upgrade. Under $70, rated for the full range of ice climbing scenarios, and Petzl's build quality means it'll last.
What we like
Adjustable leg loops fit comfortably over thick base layers and pants
Under $70 from the most trusted name in climbing protection
What to know
Padding is thinner than mid-range options — less comfortable on long hangs
Adjustment system requires two hands and deliberate attention to tighten
Cut for alpine and ice use — designed to fit over a full puffy jacket and insulated pants without binding or slipping. Gear loops positioned at the right height for placing screws mid-pitch. When you're doing serious ice objectives and want purpose-built fit, this is the harness.
What we like
Designed to fit over puffy jackets and thick insulated pants without binding
Gear loop placement optimized for mid-pitch screw placements
What to know
Wider alpine cut can feel baggy at the gym or in warmer conditions
Slimmer padding than sport-climbing harnesses — less comfortable on long hangs
Ice climbing has a specific learning sequence, and knowing what that sequence looks like makes the whole first season less intimidating — and more efficient.
Ice climbing is the sport where everything clicks at once and then falls apart the moment you try to explain what you just did. The movement is counterintuitive — you’re swinging sharp metal tools into ice while standing on crampon front-points, and the goal is to make it look relaxed. It takes a season to start feeling natural.
This is what that season actually looks like, milestone by milestone, with the things that actually matter and the things you’ll spend mental energy on that don’t.
Your first day on ice: what to expect
The most important thing about your first day is that you take it with a certified guide. This is not a negotiable suggestion — ice climbing involves real hazards that aren’t visible to a newcomer. A guide manages rope systems, identifies unstable ice, teaches crampon placement, and catches errors before they become accidents. Book through an AMGA-accredited service and let them supply the gear on day one.
Here’s what the experience actually looks like:
The first hour is almost entirely spent on flat ground or gentle ice. You’ll practice walking in crampons — which feels strange, because you have to keep your feet flat to engage all the points rather than rolling your ankle like a normal step. You’ll swing your tools into the ice and learn what a “good placement” feels like: a solid, low-pitched thud, the pick biting cleanly without vibrating back out.
On the ice itself, your guide will top-rope you on a low-angle route to start — something in the WI2 range, which looks almost vertical from the ground but feels gentler once you’re actually climbing. The goal isn’t to reach the top. It’s to understand how front-pointing works: you kick both front-points straight into the ice at hip height, transferring your weight onto the tips of your feet. Then you stand up on those points, swing both tools into the ice above you, and repeat.
The most common beginner error is “chicken-winging” — letting your elbows flare out to the side when you swing, which kills accuracy and tires your arms fast. Keep your elbow tucked close to your body on the swing and let the weight of the tool do the work. Your guide will correct this in real time.
By the end of day one, most people have climbed 30–60 feet of ice and have a basic sense of the movement. You’ll be tired in muscles you didn’t know you had — specifically your forearms, which do far more work than your legs until your technique improves.
The movement sequence: the three basics of front-pointing
Ice climbing reduces to three skills. Everything else is refinement of these three:
1. Tool placement. You want the pick to enter the ice at a slight downward angle so it bites cleanly and doesn’t lever out when you pull down on it. A good swing is smooth and controlled, not a violent chop. The sound of a good placement is a dull, solid thud — not a crack, not a high-pitched ping, not a hollow boom. Beginners tend to swing too hard and bury the pick too deep, which makes it hard to extract and wastes energy. Think of it as a firm but controlled pendulum, not a overhead smash.
2. Front-pointing. Both front-point teeth of your crampons kick into the ice at the same height, toe-down, so you’re standing on the tips of your boots. Your heels drop slightly — counterintuitively, pointing your heels down rather than up keeps the front-points engaged better. Most beginners instinctively keep their heels high, which is wrong and exhausting. Drop the heel. Stand on the front-points. That’s it.
3. Body position. Your hips should be close to the ice, not swung out. Leaning back on steep ice is an instinct that actively makes climbing harder — it levers your front-points out of the ice and puts all the work on your arms. Arms, counterintuitively, are for balance and tool placement, not for holding your weight. Your weight lives on your crampons. This is the insight that separates the people who progress quickly from those who don’t.
These three things — clean tool placements, front-pointing with dropped heels, and hip position — are the first-season curriculum. You won’t master all of them in one day. You’ll have good sessions and bad sessions. The improvement is real, it’s just not linear.
Building your first season: WI2 to WI4
Ice routes are rated on the WI (waterfall ice) scale from WI1 to WI6+. Here’s a realistic first-season progression:
WI2 (days 1–5): Low-angle ice, usually 60–70 degrees. Still requires crampons and tools but is forgiving of technique errors. Most guided introductory days are WI2. You’re learning the mechanics, not testing them.
WI3 (weeks 3–6): Near-vertical sections, sustained front-pointing, beginning to place protection (ice screws) on lead. This is where technique starts to actually matter — good body position makes the difference between climbing comfortably and failing at the same move six times. Most first-season climbers end their season somewhere in the WI3 range.
WI4 (late season or second season): Sustained vertical or slightly overhanging ice, more demanding screw placements, real pump. Reaching WI4 in your first season is possible if you climb frequently and take additional instruction — but it’s not where most people end up, and it doesn’t need to be a goal.
A few things that actually accelerate progression:
Climb often, not just once. The movement wires into your motor memory through repetition. Four short days of climbing builds faster than one long weekend every six weeks.
Take a second lesson around your fifth or sixth time out. Not the same intro lesson — a focused technique session where a guide watches you climb and identifies the two or three things actively limiting you. This is worth more than any gear upgrade.
Climb with partners slightly better than you. Not dramatically better — partners where you can watch them climb and understand what you’re seeing. Watching a WI4 climber work a WI3 route tells you more than any YouTube video.
Learn to build anchors and place screws yourself before you try to lead. Spend a session solely on screw placement technique while top-roped, not on climbing. Fast, solid screw placements on steep ice are a discrete skill that improves dramatically with focused practice.
What doesn’t matter in your first season
Your gear, mostly. The ice tools and crampons matter for fit and safety, but the performance differences between mid-range and premium gear are invisible to a beginner. Don’t spend money upgrading your tools while you’re still learning technique. A WI3 climber on $200 tools is moving the same as a WI3 climber on $500 tools.
Your fitness level, within reason. Ice climbing is technical before it’s athletic. A moderately fit person with good technique climbs harder ice than an elite athlete with poor technique. Get strong eventually — but technique first.
The cold, once you’re dressed for it. Beginners assume cold is the limiting factor. It’s not. Most winter climbing days in North America are manageable at 10–25°F with proper layering. Layering is a skill. The first time you’re dressed wrong is the lesson. After that, you’ll know.
Save your money
What you don't need yet
Beginners get pressured to buy a lot of stuff that doesn't help them play
better. Here's what we'd skip on day one.
Mono-point crampons — For mixed climbing only. Dual front-points are the right tool for learning to front-point on pure ice — mono-points are unstable on vertical water ice.
A full 10-screw rack from day one — Start with 6 screws for single-pitch climbing. Add more as you start leading multi-pitch routes — buying 10 on day one is money ahead of your needs.
A chest harness — Only needed for glacier travel and crevasse rescue in mountaineering contexts. Not required for single-pitch or multi-pitch waterfall ice.
Specialized ice climbing bibs — Durable ski pants or softshell climbing pants work fine for your first season. Ice-specific bibs are nice but a $400 comfort upgrade, not a requirement.
Ascenders / jumars — Used for hauling and fixed-line ascending. You won't need them until you're on expedition-style objectives or very long multi-pitch routes.
First week
Your first seven days
A short, real plan to get from gear-on-doorstep to actually playing.
Book a guided intro ice climbing day with an AMGA-certified guide. · Action
AMGA guide search · Find certified guides by region — the AMGA credential means real training
Get fitted for stiff mountaineering boots at a specialty climbing or outdoor shop — boot fit before crampon purchase. · Action
Order the Petzl Vasak crampons once you know your boot's binding system. · Buy
Practice crampon walking on packed snow or firm ground before you attempt vertical ice — the gait feels strange until it doesn't. · Action
Rent ice tools from your guide or gear shop for the first outing rather than buying — try leashed and leashless side by side if possible. · Action
FAQ
Common questions
Do I really need a guide to start ice climbing?
Strongly yes, at least for the first two or three sessions. Ice climbing involves hazards that aren't intuitive — falling seracs, hypothermia, tool placements that fail — and the learning curve for protection technique is steep. A half-day with a certified guide accelerates your learning and keeps you safe while you build foundational skills.
Can I use my rock climbing harness for ice?
Yes. A standard rock climbing harness works perfectly for single-pitch ice. The only practical limitation is that sport-climbing harnesses can feel tight over thick insulated layers. If you progress to serious alpine objectives, a harness cut for bulky clothing is worth the upgrade.
What kind of boots do I need for ice climbing?
Stiff mountaineering or technical ice boots with a full shank — not hiking boots, not approach shoes. The stiff sole is required for crampons to grip properly and for transferring power to the ice when front-pointing. La Sportiva, Scarpa, and Salomon all make respected options. Buy boots before crampons.
How many ice screws do I need to start?
Six is the practical minimum for leading a single pitch with reasonable protection intervals. Eight is more comfortable. You'll use 13cm screws for most placements; add a 16cm and 19cm once you're climbing in varied ice conditions. Buy used if budget is tight — screws hold up well over time.
What's the difference between leashed and leashless ice tools?
Leashed tools have a wrist loop that prevents you from dropping them — simpler and safer for beginner ice at WI2–WI3. Leashless tools let you freely reposition your hands on the grip, which matters on steep ice and mixed terrain. Most serious ice climbers today use leashless tools, but leashed is the correct starting point until your technique is solid.
Is indoor ice climbing a real option for practice?
Yes, and it's growing. A handful of climbing gyms in North America have permanent or seasonal ice climbing walls that let you practice tool placements and crampon technique year-round. Search for 'indoor ice climbing wall' + your city — it's an excellent way to develop technique before heading outdoors.
American Mountain Guides Association (AMGA) — The US professional guide certification body. Use their guide-finder to locate certified ice climbing instruction in your region — this is the credential that matters.
American Alpine Club — National climbing organization. Excellent resources on safety, local clubs, and the annual American Alpine Journal. Their climbing library is the deepest free reference online.
Mountain Project — Ice Climbing — The most complete crowd-sourced route database for ice climbing in North America. Use it to find rated routes near you and read current conditions from other climbers.
Will Gadd — Ice and Mixed Climbing — World-record ice climber and veteran instructor. His blog and YouTube channel are among the most technically credible free resources for ice technique — from beginner front-pointing to elite dry-tooling.
Alpinist Magazine — The literary climbing publication. Not a gear guide — long-form expedition writing and technical essays. Read it to understand what the sport looks like at the serious end.
r/IceClimbing — Small but knowledgeable community. Good for regional condition reports, gear questions, and finding partners. Search before posting — a lot of beginner questions are answered in the wiki.
As an Amazon Associate, JustBeginning earns from qualifying purchases.
We may also earn commission from other affiliate programs linked on this
page. Editorial recommendations are independent; we don't choose
products based on commission rates.
Product prices and availability are accurate as of the date and time
indicated and are subject to change. Any price and availability
information shown on Amazon at the time of purchase will apply.


 Best starter