Bonsai looks intimidating from the outside — centuries of Japanese tradition, tiny trees that seem to require magic to keep alive. But the actual start is simpler than you think: one tree, a handful of tools, and a willingness to learn by doing. Here's what you actually need.
By Colin B. · Published May 23, 2026 · Last reviewed June 3, 2026
A decent starter tree, basic tools, proper soil mix, and a training pot runs $60–150. Spend most of that budget on the tree — the tools are reusable forever.
We earn commission on qualifying Amazon purchases — see our
affiliate disclosure.
Price tiers and budget totals shown above are editorial estimates;
actual Amazon prices vary.
At a glance
Our top pick in each category
The fastest path through this guide — each best-starter pick by category.
Scroll for the budget and upgrade alternatives.
Don't buy a pre-bonsai from a mall kiosk, gift shop, or grocery store. Those plants are almost always tropical species sold in non-draining containers packed with regular potting soil — a setup optimized for short-term display, not long-term survival. Most die within months because the roots can't breathe. Buy from a bonsai nursery, a specialist online seller (Brussel's Bonsai and Eastern Leaf are both solid), or a garden center with actual bonsai knowledge.
Decide indoor vs. outdoor before you buy anything. Junipers, maples, and Chinese elms are outdoor trees that need actual seasons — cold winters, full sun summers. They will slowly die indoors. Ficus, jade, and serissa tolerate indoor conditions year-round. Figure out where your tree will live first, then choose the species.
Proper soil is not optional. Standard potting soil holds too much moisture in a small pot and suffocates bonsai roots. The right mix — akadama, pumice, and lava rock — drains quickly and keeps roots oxygenated. This matters more than any tool you buy.
The gear
What you actually need
Starter Trees
The tree is the whole thing. Get this decision right and everything else is learnable. Get it wrong and you'll spend six months nursing a dying tropical ficus on a windowsill wondering what went wrong. For most beginners in temperate climates, a juniper or Chinese elm is the answer: tough, forgiving of beginner mistakes, and beautiful. If you're committed to indoor growing, a ginseng ficus is the realistic choice — just know it's a different animal entirely.
Starter Trees — what's the difference?
A few common shapes, each making a different trade.
Outdoor Species
Junipers, elms, maples. Need real seasons; rewarding to style.
Light
Full sun, outdoors
Overwintering
Required (unheated garage or outdoors)
Beginner difficulty
Lower — very forgiving
Best for Most beginners in temperate climates with outdoor space
Junipers are the standard beginner recommendation for outdoor growers — vigorous, drought-tolerant once established, and practically designed to be styled. Brussel's ships healthy stock with established roots: real material, not a mall-kiosk throwaway. Keep it outside in full sun, water when the soil starts to dry, and it will reward you.
What we like
Hardy species tolerates beginner watering mistakes
Chinese elm is the most forgiving beginner species — semi-deciduous, tolerant of minor overwatering, and fast-growing enough that pruning mistakes fill back in quickly. It develops fine branch ramification faster than most species, meaning visible progress within a year. In mild climates it can winter near a bright window; in colder climates it needs to stay outdoors.
What we like
Most forgiving beginner species — recovers from mistakes quickly
Fast branch development shows visible progress within a year
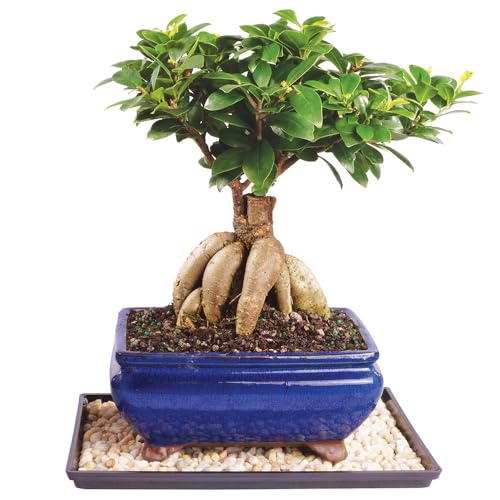
If indoor growing is your only option, this is the realistic choice. Ficus retusa tolerates low light and dry indoor air better than almost any bonsai species. The bulbous aerial roots are dramatic — it looks impressive fast. Note: ficus drops every leaf if you move it (new window, new room), then recovers. It's a great tree; it's just a different hobby from outdoor bonsai.
You need three tools to start: a pair of trimming shears (for removing branches and pruning foliage), a concave cutter (for removing branches flush — this is the one tool with no substitute, it heals wounds cleanly), and a wire cutter (for cutting bonsai wire without damaging bark). A complete beginner set gets you all three for around $30–50. Don't buy individual Japanese tools yet — at beginner level, the difference in feel isn't worth the price premium.
Best starter
BambooMN
10-Piece Bonsai Tool Set
$66.95 as of Jun 22, 2026
★★★★★Our rating· In Stock
BambooMN has been a go-to bonsai tool source for years and their 10-piece set is the smart beginner buy — it includes the concave cutter (the non-negotiable tool for clean branch removal), trimming shears, and wire cutter, plus a few extras. The black carbon steel holds an edge well through a full season of regular use. This is the set we'd hand a first-timer without hesitation.
What we like
Includes concave cutter, trimming shears, and wire cutter
Carbon steel holds an edge through a full growing season
When you've been at it a year and you understand why a sharp, precisely-balanced scissors matters, Kaneshin is where most serious practitioners land. Made in Japan from high-carbon steel, they hold an edge noticeably longer than entry sets and the action stays smooth over years. Buy the starter kit first — these are a reward for actually sticking with it.
What we like
High-carbon Japanese steel holds edge longer than entry sets
Smooth action stays consistent over years of regular use
What to know
Premium price only justified after your first full season
Requires proper oiling and storage to prevent rust
This is where most beginners get killed. Standard potting soil is designed to retain moisture — exactly the wrong property for a bonsai pot, where roots need oxygen as much as water. Bonsai soil is a gritty, fast-draining mix of akadama (a Japanese fired clay), pumice, and lava rock. Water flows straight through; roots stay moist but not wet; gas exchange happens. Buy pre-mixed bonsai soil for your first tree. Mixing your own is fine eventually, but start with something proven.
Best starter
Tinyroots
All-Purpose Bonsai Soil Mix
$46.95 as of Jun 22, 2026
★★★★★Our rating· Only 20 left in stock - order soon.
Tinyroots makes bonsai supplies that are actually designed for bonsai — not repurposed gardening products in bonsai-branded packaging. Their all-purpose soil mix is akadama-based, properly sifted to remove dust, and ready to use out of the bag. One bag handles a 6–8 inch pot repot. If your tree came in potting soil and you're wondering why it looks stressed, this is the fix.
What we like
Akadama-based mix is ready to use straight from the bag
Drains fast enough to prevent root suffocation in small pots
What to know
One bag covers only a 6-8 inch pot; buy two for larger repots
Calcined Clay for Bonsai, Succulent, Cactus | 2 Quarts Bag | 1/8" Particle Size | The Bonsai Supply
$15.68 as of Jun 22, 2026
★★★★☆Our rating· In Stock
Turface is a calcined clay originally made for baseball diamonds that the bonsai community discovered decades ago. Mixed with pumice and lava rock at roughly 1:1:1, it makes excellent bonsai soil for a fraction of the cost of akadama. Not the prettiest material, but it works well and costs much less per gallon than pre-mixed bonsai soil. The move for when you're repotting multiple trees.
What we like
Costs much less per gallon than akadama-based pre-mixes
Works well mixed 1:1:1 with pumice and lava rock
What to know
Not ready to use alone — requires mixing with other components
The beautiful glazed ceramic pot you're picturing is not where your tree lives for the first several years. Beginners work in training pots — usually plastic or mica — that are larger, cheaper, and easier to adjust. The tree develops its trunk, roots, and basic structure in a training pot before it earns a display pot. Mica training pots are the standard: they look decent, drain properly, and come in useful sizes. Plastic nursery containers work too and cost almost nothing.
Best starter
Oval Mica Bonsai Training Pot
$
★★★★★Our rating
Mica pots are the industry standard for development — lighter than ceramic, frost-resistant, and they have proper drainage holes. This oval training pot is the shape you'll see at every beginner workshop. Pick a size one step up from the current root ball. If you're unsure which size, go slightly bigger rather than smaller — roots need room.
What we like
Frost-resistant mica won't crack during cold winters
Lighter than ceramic with proper drainage holes
What to know
No ornamental value — strictly for development, not display
If you just need something with drainage holes while you figure out the rest, a cheap plastic nursery pot works. Under $1 per pot in packs, and they do the functional job. Bonsai purists will shake their heads, but for year one when you're learning watering habits before you've chosen a training pot size, cheap and functional is fine.
What we like
Under $1 per pot for year-one development containers
Drainage holes and 6-inch size work for most starter trees
What to know
No frost resistance — will crack if water freezes inside
No aesthetic value; swap for mica once you're settled
Wire is how bonsai get their shape — you wrap a branch, bend it to where you want it, leave the wire on for a growing season, and remove it before it bites into the bark. Aluminum wire is the beginner standard: softer, easier to work with, and forgiving of mistakes. Copper wire is stronger (used for deciduous trees with thicker branches) but harder to use and more expensive. Start with aluminum in multiple gauges — 1mm for small twigs, 2.5mm for medium branches, 3–4mm for primary branches.
Best starter
Grow a Bonsai
Aluminum Bonsai Wire 5-Size Starter Set
$17.99 as of Jun 22, 2026
★★★★★Our rating
A 147-foot multi-gauge aluminum set covering 1.0mm through 3.0mm — the five sizes that cover nearly every wiring situation a beginner will face. Aluminum is forgiving: you can unwind and redo it if you make a mistake, which you will. Comes with a drawstring canvas bag for storage. This set lasts a couple of seasons of regular wiring.
What we like
Five gauges cover nearly every wiring situation a beginner faces
Forgiving material — easy to unwrap and redo when you make a mistake
What to know
Can loosen in summer heat; check branches monthly during growing season
Copper wire holds its position better than aluminum and is preferred for trees with flexible wood that springs back. Most serious practitioners use copper for deciduous species (maple, elm) once they've outgrown aluminum. It's harder to bend and requires more care removing without bark damage — learn on aluminum first.
What we like
Holds bends better than aluminum on springy deciduous wood
Preferred by serious practitioners for precise branch positioning
What to know
Must be annealed before use — raw copper is too stiff to work with
Harder to remove without bark damage; learn on aluminum first
Most bonsai beginners kill their first tree. Not from neglect — from doing too much, too fast, with the wrong tree in the wrong pot. Here's what the first season actually looks like.
Bonsai has a reputation for being either mystical and ancient or hopelessly fussy. Neither is quite right. It’s a practice — a slow, patient one — and the first season is less about technique than about learning to read one tree. One tree well-understood beats five trees poorly managed, every time.
Here’s what the first year actually looks like, and what you should be focused on at each stage.
Before you touch a tool: choose the right tree
The single most consequential decision in bonsai is species selection. Not because some species are impossible for beginners — but because outdoor species kept indoors, or indoor species left outside in frost, will die regardless of how careful you are. No amount of technique overcomes a species kept in the wrong environment.
For most beginners in temperate climates with outdoor space: juniper or Chinese elm. Junipers are vigorous, drought-forgiving once established, and practically designed for beginners — they recover from mistakes, they show health clearly, and they take wire beautifully. Chinese elm is even more forgiving, fast-growing, and produces fine branch structure quickly. Either is a legitimate first tree.
If you have no outdoor space: a ginseng ficus (Ficus retusa) is the realistic indoor option. It tolerates low light and dry indoor air. It will drop leaves dramatically if you move it — even from one window to another — and then recover. This is normal. It is not, however, the same as working with junipers and maples; think of it as a related but distinct practice.
Don’t buy a pre-bonsai from a mall kiosk, grocery store, or gift shop. Those plants are almost universally tropical species in non-draining containers packed with regular potting soil. Most die within months because the roots suffocate. Buy from a bonsai nursery or a reputable specialist.
Once you have a tree, your job for the first month is simple: learn to water it correctly and otherwise leave it alone.
Watering bonsai sounds trivial. It isn’t. The small pots, the fast-draining soil, and the variation between species, seasons, and microclimates mean there’s no universal schedule. The rule is: check the soil daily and water when it starts to dry — not when it’s completely dry, not on a fixed schedule. Press a finger an inch below the surface. When you feel it starting to lose moisture, water thoroughly until it runs out the drainage holes.
Overwatering and underwatering look similar at first — wilting, leaf drop, general unhappiness. The way to tell them apart is the soil: soggy soil that stays wet for days means overwatering (or, more commonly, wrong soil — see below). Bone-dry soil means underwatering. In both cases, the fix is the same: get the tree into proper fast-draining bonsai soil and learn to read it daily.
If your tree came in regular potting soil — which most beginner purchases do — plan a repot into proper bonsai soil mix at the right time. For most species, that’s late winter just before budbreak. Don’t repot in summer or fall. When in doubt, wait until spring.
What “proper bonsai soil” means: a fast-draining, gritty mix of akadama (fired Japanese clay), pumice, and lava rock, roughly 1:1:1. Water flows straight through; roots stay moist but never waterlogged; oxygen reaches the root zone. This is not optional. Standard potting soil in a bonsai pot is a slow death sentence.
Months two through six: growth and restraint
A healthy tree in spring will flush new growth enthusiastically. This is good news, and it’s also a test. The beginner impulse is to style everything immediately — grab the wire, start bending. Resist this.
Let the tree grow vigorously for the first full growing season. Allowing growth to extend and then pruning it back builds energy in the tree and gradually thickens the branches. A tree that’s constantly pinched and wired before it’s established develops slowly and stays weak.
What you should do during this period:
Observe. Watch where the tree wants to grow. Note the strongest branches, the natural movement of the trunk, what directions new buds emerge. You’re building a mental image of the tree’s character.
Fertilize. A balanced slow-release granular fertilizer (Osmocote or similar) every six to eight weeks through the growing season. Bonsai in small pots exhaust nutrients quickly. Don’t skip this.
Remove obviously bad growth. Branches crossing the trunk, downward-growing branches, suckers from the base. These you can remove without a plan.
Wire only if you’re confident. If a branch is actively growing in exactly the wrong direction and you understand what you’re doing, wire it. If you’re not sure, wait.
By late summer or early fall, your tree will have completed its first full growing season in your care. This is when you step back and actually look at it.
What you’re assessing:
Is the trunk interesting? Does it have movement, taper, character? Or is it a stick that needs years of thickening in a larger container before it becomes a bonsai?
Which branches contribute to a future design? Which are in the wrong place entirely?
What style is this tree pointing toward — upright, slanted, cascading?
Most beginner trees at this stage reveal one of two truths: either they have genuine potential and you’re on the right path, or they need several years in a development container before they’re styleable. Both outcomes are fine. Development is not failure.
If the tree is a juniper or deciduous species, it will need to overwinter properly. Outdoor bonsai must experience cold winter temperatures. Junipers, elms, and maples are not houseplants and cannot be brought inside for winter. An unheated garage or cold frame works well; the tree needs cold dormancy to recover for spring. Beginners who bring their outdoor trees inside in November and wonder why they’re dead by February make this mistake exactly once.
Year one: what you’ve actually learned
At the end of your first year, the skill you’ve built is not technique — it’s attention. You’ve learned the difference between healthy and stressed, between normal leaf drop and something wrong, between growth that serves the tree and growth that fights it.
That’s the foundation everything else rests on. Wiring technique, styling decisions, repotting timing — all of it is easier once you can read a tree.
Once you’ve got one season under your belt, a few things meaningfully accelerate the learning curve:
Find a local club. Bonsai clubs are one of the best-preserved apprenticeship cultures in any hobby. Members will look at your tree, tell you what they see, and show you techniques in person. The learning jump from one workshop with an experienced practitioner is larger than a year of solo reading.
Repot with intention. Spring of year two is the time to assess the root system, trim root mass, and put the tree in the right pot for its stage. If you’ve been growing in potting soil, this is when you get into proper bonsai mix.
Acquire a second species. Not five trees — one more. Different species have different growth habits and teach you different things. A deciduous tree (if you started with juniper) is the natural next move.
Start thinking about the design. Not committing to it. Thinking about it. What are this tree’s strongest features? What are you developing toward? Where is the front?
Bonsai is a genuinely long practice — trees measured in years, sometimes decades. But the first year isn’t slow. It’s when you build the vocabulary for everything that follows.
Save your money
What you don't need yet
Beginners get pressured to buy a lot of stuff that doesn't help them play
better. Here's what we'd skip on day one.
A display pot — Your tree spends its first several years in a training pot developing trunk girth and root structure. A pretty glazed pot is a reward for a tree that's ready — not a day-one purchase.
Grow lights — Outdoor trees need real sun, not artificial light. Indoor ficus needs a bright window, not LEDs. Grow lights are for specific situations (short winter days, no south-facing window) — not a beginner essential.
Specialty fertilizers — A balanced slow-release granular fertilizer (like Osmocote) works fine for the first year. The specialty bonsai fertilizer formulas matter more once you're optimizing an established tree.
Jin and shari tools — Jin pliers and carving tools for creating deadwood effects are advanced styling techniques. You won't be ready for them for at least a year — and doing it wrong on a developing tree sets you back.
A second tree — Master watering one tree before buying more. Bonsai killing happens in batches — the person who buys five trees at once usually loses all five in the first summer.
First week
Your first seven days
A short, real plan to get from gear-on-doorstep to actually playing.
If your tree came in potting soil, plan a repot into proper bonsai soil at the appropriate time of year (late winter for most species, just before budbreak). Don't repot into the wrong season. · Action
Set up a watering routine: check the soil every day by pressing a finger an inch into the surface. Water thoroughly when it starts to dry — don't water on a schedule, water when the tree needs it. · Action
Order proper bonsai soil if your tree came in standard potting mix. · Buy
Read one book before touching the tree with tools. Bonsai Tonight (Jonas Dupuich's blog-turned-reference) is free online and the most practical beginner resource available. · Learn
Bonsai Tonight · Jonas Dupuich's blog — the most practical free resource for beginning bonsai
r/Bonsai · Active community — post photos for species ID and care advice
Place your tree in the right location and leave it alone. Outdoor in full sun for junipers and elms; bright window for ficus. Resist the urge to move it. · Action
FAQ
Common questions
How much should I spend to start bonsai?
Budget $60–150 to start properly: $30–60 for a healthy pre-bonsai tree, $30–50 for a basic tool kit, and $15–25 for proper bonsai soil. The biggest mistake beginners make is spending $5 on a mall tree and wondering why it dies.
Can I keep bonsai indoors?
Only certain species. Ficus, jade, and serissa tolerate indoor conditions. Junipers, maples, and most elms are outdoor trees that need real seasons — they will slowly die inside. Choose your species based on where the tree will actually live.
How often do I water bonsai?
When the soil starts to dry — not on a schedule. Check the soil daily by pressing a finger an inch below the surface. Water thoroughly until it runs out the drainage holes, then don't water again until it starts to dry. This varies enormously by species, pot size, season, and location.
When should I start styling and wiring?
After the tree is established in its pot and growing vigorously — usually after one full growing season. Styling a stressed or newly-repotted tree sets it back significantly. Let it grow first; style second.
What's the difference between a pre-bonsai and a bonsai?
A bonsai is a finished or near-finished specimen that has been trained for years. A pre-bonsai is nursery stock — rooted plant material with potential that you develop yourself. For beginners, pre-bonsai is the right entry point: you get a healthy plant at a fraction of the cost, and developing it is the whole point.
Do I need to repot my new tree right away?
If it came in regular potting soil, yes — but at the right time of year. Most deciduous species repot best in late winter just before budbreak. Junipers can be repotted in early spring. Repotting at the wrong time (mid-summer, mid-winter) stresses or kills the tree. When in doubt, wait until spring.
Bonsai Tonight — Jonas Dupuich's blog and reference site. The best free resource for beginning bonsai in English — practical, species-specific, and updated regularly.
r/Bonsai — Active community. Post a photo of your tree for species ID and care advice. The wiki is worth reading before posting.
Bonsai Empire — Comprehensive reference site covering species guides, styling techniques, and care calendars. The species guides are especially useful for matching care to your specific tree.
Brussel's Bonsai — One of the largest bonsai nurseries in the US. Their online store sells healthy trees and supplies — a trustworthy source for first purchases.
Walter Pall Bonsai Adventures — One of the most respected European bonsai artists. Skip until year two — his work is inspiring and the care philosophy is worth understanding once you have basics down.
Bonsai Mirai (YouTube) — Ryan Neil's channel. Deeply technical — probably too advanced to start with, but the best long-form bonsai content in English once you've got the fundamentals.
As an Amazon Associate, JustBeginning earns from qualifying purchases.
We may also earn commission from other affiliate programs linked on this
page. Editorial recommendations are independent; we don't choose
products based on commission rates.
Product prices and availability are accurate as of the date and time
indicated and are subject to change. Any price and availability
information shown on Amazon at the time of purchase will apply.
Our top pickBrussel's Bonsai Live Green Mound Juniper Bonsai Tree

 Best starter