Beekeeping is one of the most rewarding hobbies you can take on in a backyard, and one of the most gear-confusing to start. You don't need most of what the catalogs push. Here's what actually matters for your first hive.
By Colin B. · Published May 23, 2026 · Last reviewed June 3, 2026
A complete first-year setup (hive, suit, smoker, and tools) runs $300–500. Bees themselves (a nucleus colony or package) add another $120–175. Budget $450–600 all-in before your first inspection.
We earn commission on qualifying Amazon purchases — see our
affiliate disclosure.
Price tiers and budget totals shown above are editorial estimates;
actual Amazon prices vary.
At a glance
Our top pick in each category
The fastest path through this guide — each best-starter pick by category.
Scroll for the budget and upgrade alternatives.
Take a class before you buy anything. Most local beekeeping associations run beginner courses in late winter for $50–100. You'll learn more in a single hands-on inspection session than in a week of YouTube, and you'll meet experienced beekeepers who can mentor you through your first year. Find your local association through the American Beekeeping Federation.
Call your municipality first. Many cities allow backyard hives; some don't. Some HOAs ban them outright. The fine for a surprise hive removal is considerably more than a class.
Start with two hives if you can swing it. It sounds like more work, but two hives let you compare colonies. If one goes queenless, you can take a frame of eggs from the other to rescue it. Solo hive beekeepers have no backup. Two hives means you'll actually learn instead of just worrying.
Buy your bees locally if at all possible. A nucleus colony (nuc) from a local beekeeper means bees already adapted to your climate and a laying queen you can verify before you bring them home. Package bees shipped from out-of-state are the budget option, but local nucs survive their first winter at much higher rates.
The Langstroth 10-frame hive is the right choice for almost every beginner. It's the most common hive type in North America, which means local beekeepers can help you, local suppliers stock compatible parts, and the entire body of beginner literature assumes you have one. Buy a complete kit rather than individual components; the dimensions need to match precisely, and a kit ensures they do.
Hive — what's the difference?
A few common shapes, each making a different trade.
Langstroth (10-frame)
The standard. Rectangular stacked boxes, removable frames, most compatible with existing knowledge and local support.
Frame count
10 per box
Compatibility
Universal
Management
Box-by-box inspection
Best for All beginners. Default choice.
Tradeoff Heavy to lift when full (60–80 lbs per honey super).
Same style, narrower boxes. Popular for beekeepers with back problems; full boxes run 20–30 lbs lighter.
Frame count
8 per box
Compatibility
8-frame parts only
Management
Box-by-box inspection
Best for Beekeepers who want lighter lifts. Still easy to find parts.
Tradeoff Colonies may need to overwinter in more boxes than a 10-frame setup.
Top-Bar Hive
Horizontal hive with no stacked boxes. Natural comb, no foundation required. Beloved by natural beekeepers.
Orientation
Horizontal
Compatibility
Non-standard
Management
Bar-by-bar inspection
Best for Beekeepers committed to a natural/treatment-free approach with mentorship.
Tradeoff Fewer resources, less local support, harder to diagnose problems without comparison. Not recommended for beginners without a mentor who runs the same system.
Best starter
Hoover Hives
Beeswax Coated Beehive Kit
$165.00 as of Jun 22, 2026
★★★★★Our rating· In Stock
A complete unassembled kit (bottom board, two deeps, one medium super, inner cover, outer cover) with beeswax-dipped wood (no painting required), and it'll outlast a painted hive by years. Hoover's joinery is noticeably better than the cheapest kits. We'd start here.
What we like
Beeswax-dipped wood resists rot without painting
Complete kit: bottom board, two deeps, one super, and covers
Better joinery than budget kits for a precise fit
What to know
Ships unassembled; frames need foundation before bees arrive
Queen excluder not included; buy one when adding honey supers
★★★★☆Our rating· Only 12 left in stock - order soon.
The budget entry if cost is the primary constraint. Unfinished pine, some assembly required, but the dimensions are correct and it gets the job done for a first-year colony. Paint it well before use.
What we like
Correct Langstroth dimensions at a lower price point
Unfinished pine takes paint well for long outdoor life
What to know
Frame assembly is more work than advertised
Requires wiring and foundation; budget an extra hour
Comes fully assembled and beeswax-dipped; open the box, set it on your stand, and you're done. If you'd rather not spend an afternoon wrestling with frames and foundation, this is the move. Costs more, but you're paying for setup time you don't have to spend.
What we like
Ships fully assembled and beeswax-dipped, ready to place bees in
Saves an afternoon of frame and foundation work
What to know
Costs significantly more than the unassembled kit
Only worth the premium if your time is genuinely short
A full suit with integrated veil is the right call for your first year. You haven't yet learned to read a colony's temperament, and a calm inspection can turn unexpected quickly. Experienced beekeepers sometimes work without gloves; you are not yet an experienced beekeeper. Buy the suit, wear it every time, and take it off only once you genuinely understand the colony you're working with.
Best starter
VIVO
Professional XL Cotton Full Body Beekeeping Suit with Veil Hood BEE-V106XL
$54.99 as of Jun 22, 2026
★★★★★Our rating
Full coverage from head to ankles, an integrated round veil that gives you a clear field of view without a gap at the neckline, and elastic cuffs that keep bees out of your sleeves. Sized generously so you can wear it over street clothes. The most common beginner suit for good reason: it just works.
What we like
Integrated round veil with no gap at the neckline
Elastic cuffs seal sleeves; pairs well with any gloves
Sized generously to wear over street clothes
What to know
Size up one; zippers are stiff when worn over layers
A lighter-weight polycotton blend that breathes better than 100% cotton on hot inspection days. Humble Bee's integrated fencing veil is well-regarded for sting protection. Slightly more expensive than the VIVO but worth it if you're beekeeping in summer heat.
What we like
Polycotton blend breathes better than cotton in hot weather
Fencing veil is well-regarded for sting protection
What to know
Slightly pricier than the VIVO despite the budget label
Once you're comfortable working hives and want to survive summer inspections without sweating through your suit, this is the upgrade. The layered mesh ventilation significantly reduces heat buildup during long sessions without sacrificing sting protection. Full coverage, fencing veil, and noticeably cooler than a standard cotton suit.
What we like
Layered mesh ventilation cuts heat during long summer inspections
Full coverage and fencing veil without sacrificing sting protection
What to know
Noticeably more expensive than a standard cotton suit
Not worth it if you inspect less than weekly or in a mild climate
A smoker is the most important tool in your kit. Smoke triggers a feeding response in bees that makes them calmer and less defensive during inspections; it works every time, and nothing else replicates it. Buy a quality stainless steel smoker with a guard to protect your hand from the hot barrel. A cheap smoker that won't stay lit is worse than no smoker at all.
Best starter
Mann Lake
HD540 Stainless Steel Smoker with Guard
$$
★★★★★Our rating
Mann Lake is one of the most trusted names in beekeeping supplies, and the HD540 is their well-regarded workhorse smoker. The stainless steel barrel holds a fire reliably for a full inspection, the leather bellows are durable, and the wire heat guard actually does what the ones on cheap smokers don't: it keeps the barrel from burning you. This is what most serious hobbyists use.
What we like
Stainless steel barrel holds a fire reliably for a full inspection
Leather bellows last for years of regular weekly use
Wire heat guard actually works, unlike guards on cheaper models
What to know
More expensive than no-name smokers; worth every dollar
A solid budget smoker for new beekeepers who want to spend less up front. Gets the job done, stays lit through a short inspection, and won't break the bank for a first-year setup.
What we like
Gets the job done for short inspections at a beginner price
Widely available; easy to replace if it eventually wears out
What to know
Bellows may need replacing after a season of weekly inspections
Harder to keep lit during longer inspections than the Mann Lake
Bees glue everything together with propolis, a sticky resin that cements frames to boxes, lids to boxes, and anything else that will sit still for ten minutes. A hive tool is what you use to break these seals and pry frames free for inspection. You'll use it every single time you open the hive. Buy a good one; it'll last decades.
Best starter
Mann Lake
HD620 Frame Lifter and Scraper
$12.93 as of Jun 22, 2026
★★★★★Our rating· In Stock
The J-hook / frame-lifter style gives you a prying end for breaking propolis seals and a hook end for lifting frames out of tight boxes. The most versatile shape for beginners. Stainless steel, easy to clean, and small enough to fit in a jacket pocket.
What we like
J-hook lifts frames out of tight, propolis-sealed boxes easily
Fits in a jacket pocket; you'll never forget it on inspection day
What to know
Less effective than a flat scraper for cleaning burr comb from surfaces
The classic flat-scraper style that experienced beekeepers default to for cleaning burr comb off surfaces and scraping propolis buildup from boxes. Once you've used both styles, you'll want one of each.
What we like
Flat blade excels at scraping propolis and burr comb from box edges
The shape most experienced beekeepers keep as their go-to tool
What to know
Not ideal for lifting frames from a tight box; pair with a frame lifter
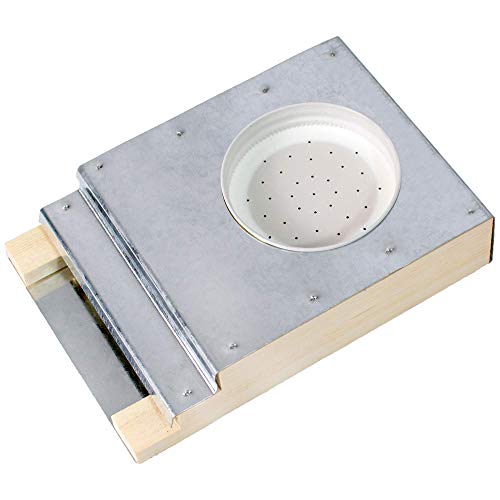
New colonies need supplemental feeding in their first weeks; they arrive without stored honey reserves and need sugar syrup to draw out comb and establish brood quickly. A top feeder that sits on the hive is the most reliable option for beginners: protected inside the hive from robbing bees, holds a large volume of syrup, and easy to refill without fully opening the brood boxes.
Best starter
Mann Lake
10-Frame Top Feeder
$44.10 as of Jun 22, 2026
★★★★★Our rating· Only 1 left in stock - order soon.
Sits on top of your upper hive body under the outer cover, holds a large volume of syrup, and has a galvanized screen so bees access the syrup safely without drowning. Refill without opening the brood boxes. Simple, effective, and the cleanest feeder approach for first-year beekeepers. Use 1:1 sugar-to-water syrup in spring, 2:1 in fall for winter prep.
What we like
Holds large syrup volume; fewer refills during early colony establishment
Galvanized screen prevents bees from drowning in the syrup
Refill from outside the brood boxes without disturbing the colony
What to know
Adds several inches to your hive's height when installed
The old-school choice: a mason jar inverted into a tray that slides into the hive entrance. Dead simple to refill without opening the hive. The limitation is that entrance feeders can trigger robbing if other colonies are in the area, so remove it once the colony is strong.
What we like
Simplest possible refill: swap the mason jar, no hive opening needed
Inexpensive enough to own spares for multiple hives
What to know
Can trigger robbing from nearby colonies if used past early establishment
Beekeeping follows the calendar more than any other hobby. Here's what actually happens from your first hive inspection in spring through your first winter prep — and what separates the colonies that make it through from the ones that don't.
Beekeeping is unusual among hobbies in that your timeline isn’t driven by how much you practice — it’s driven by the calendar. Bees follow the seasons, and so do you. A mistake made in May plays out in November. A colony that goes into winter light on stores doesn’t come out in April.
The good news is that the first season has a clear shape. Here’s what it actually looks like, from installation through overwintering.
Spring: Installation and the first inspections
Most beekeepers install their first colony in April or early May, once daytime temperatures are reliably above 50°F and flowers are blooming. You’ll receive either a package (a screened box of bees with a caged queen) or a nucleus colony (a small working hive with frames of brood, honey, and a laying queen). A nuc is the easier start — the colony is already functioning, the queen is already accepted, and you can see laying patterns immediately.
Your first inspection, three to five days after installation, is mostly about confirming the queen is free and laying. You’re looking for eggs — tiny white grains standing upright in cells. They’re hard to see at first. Hold the frame so sunlight falls over your shoulder into the cells. They’ll be there.
What beginners get wrong in spring: Opening the hive too often. Every inspection chills brood and disrupts the colony. Once a week is plenty in your first season. More than that and you’ll slow your colony’s build-up without learning anything useful.
Keep notes from day one. Write down the date, weather, what you saw, what you did, and any questions. You will not remember the difference between inspection three and inspection five without notes, and patterns only become visible when you can compare them over time.
By June, a healthy colony is exploding. Worker population peaks in summer, which is both exciting and the time beekeeping gets more complicated. Two things will demand your attention:
Swarm prevention. Swarming is how bees reproduce as a colony — half the bees and the old queen leave to start a new hive elsewhere. It’s natural and it’s not a failure on your part, but it does cut your colony’s population in half right before honey flow. Signs a swarm is imminent: the colony is dense and the bees seem restless, you find queen cells along the bottom edges of frames (peanut-shaped, larger than normal cells). Your options: add space (another box), or split the hive with a mentor’s help. Both work. Don’t panic — experienced beekeepers expect to manage swarm pressure every summer.
The honey flow. When nectar sources are abundant, bees bring in more honey than they need. This is when you add a honey super — a shallower box on top of the hive with a queen excluder below it to keep the queen from laying eggs in your honey frames. But here’s the thing: you won’t harvest this honey in your first year. Leave it for the colony. They need every drop to survive winter. Many first-year colonies don’t produce a harvestable surplus at all, and taking what little they’ve made is the most reliable way to lose the hive in February.
Varroa mite monitoring starts now. Varroa destructor is a parasitic mite that attacks bees and is the number-one cause of colony death in North America. Every colony has mites; what matters is the mite load. You need to be doing alcohol washes or sugar rolls every three to four weeks starting in June. If your mite count exceeds 3 mites per 100 bees, you need to treat. This is not optional. Beekeepers who skip mite monitoring lose their colonies — often in late fall, and often in a way that looks like winter losses. The Honey Bee Health Coalition’s Varroa management guide is the best free resource on treatment options.
What you do in August and September determines whether your colony survives winter. Two things matter above everything else:
Mite treatment. Do a late-summer alcohol wash. If your mite count warrants it, treat before the fall bees are raised. The bees that will carry the colony through winter are born in August and September. If those bees are born into a high-mite colony, they’ll be damaged before they ever emerge — and a colony of compromised bees will not make it to spring regardless of how much honey they have.
Winter stores. A colony needs 40–60 pounds of honey to survive a cold winter (less in mild climates). Lift the back of your hive — if it feels light, feed 2:1 sugar syrup now. Bees won’t convert syrup into storable food once temperatures drop below 50°F. Feed early, feed enough.
In late fall, reduce your entrance to keep mice from moving in. Mice will destroy a hive over winter — it takes a mouse about two weeks to chew through a comb and build a nest. A simple entrance reducer or hardware cloth will solve it.
Winter: Mostly leave them alone
Once it’s cold, you’re done. Don’t open the hive — cold air chills the cluster. Don’t move the hive. Heft it occasionally to check stores are holding. In warm spells above 50°F, bees will take orientation flights; this is normal and healthy.
The one exception: if you live somewhere with extended cold winters, consider a moisture quilt or upper ventilation to prevent condensation from dripping on the cluster. Cold doesn’t kill bees in winter — wet cold does.
Your job from November through February is to not interfere. Easier said than done for new beekeepers. Channel the energy into reading and planning your second season.
What actually separates successful first-year beekeepers
The patterns that predict a colony making it through year one are not about what gear you bought. They’re about:
Taking a class and finding a mentor. The beekeepers who lose their first colony almost always tried to figure it out alone. The ones who succeed have someone to call when a frame looks wrong.
Monitoring for Varroa and acting on it. Not debating treatment options — monitoring and treating based on actual mite counts.
Not harvesting in year one. Leaving every drop of honey for the colony.
Writing things down. Patterns are only visible in hindsight with notes.
Spring of your second year is when it all opens up: your colony overwinters successfully, they build into a strong early-season population, and you get your first real honey harvest. Most beekeepers who make it past year two stay for decades.
Save your money
What you don't need yet
Beginners get pressured to buy a lot of stuff that doesn't help them play
better. Here's what we'd skip on day one.
A honey extractor — You won't harvest honey in your first year. Your colony needs all of its stores to survive winter. Buy an extractor (or rent one from your local association) in year two.
A queen excluder — Useful once you're adding honey supers above the brood boxes, but irrelevant in year one when you're just trying to establish a healthy colony. Add one in year two.
An electric or heated uncapping knife — A honey harvesting tool. See above: no honey your first year.
A mite-washing kit beyond the basics — You should learn alcohol wash technique for mite monitoring: a simple cup, some alcohol, and the knowledge to read results is all you need. The elaborate mite-count gadgets are solutions to a problem you haven't encountered yet.
Pricey wooden ware upgrades — A colony doesn't care whether its boxes are painted pine or cedar. Establish a healthy colony first, then invest in equipment upgrades.
First week
Your first seven days
A short, real plan to get from gear-on-doorstep to actually playing.
Join your local beekeeping association and sign up for a beginner course. · Action
Read The Beekeeper's Handbook (Diana Sammataro). The one book worth buying before your first hive. · Learn
FAQ
Common questions
How much does it cost to start beekeeping?
Budget $450–600 all-in for your first year: $150–200 for a hive kit, $80–120 for a protective suit, $50–80 for smoker and tools, and $120–175 for a nucleus colony. Costs drop sharply after year one; you only need to replace bees if a colony fails.
Do I need a lot of space to keep bees?
Surprisingly little. A single hive needs about 4 square feet of footprint. What matters more is orientation (hive entrance facing south or east) and neighbors. A flight path over a sidewalk or shared fence is a problem. Most suburban backyards work fine with a bit of thought about placement.
How much time does beekeeping take?
In active season (spring through early fall), expect 1–2 hours per hive per week for inspections and record-keeping. Winter management takes almost no time; bees cluster and you mostly stay out of their way. It's a seasonal hobby with a genuine off-season.
Will I get stung?
Yes, eventually. Even in a full suit, stings happen, usually when a bee finds a gap in your cuffs or gloves. Most beekeepers develop a reduced reaction to stings over time. Before starting, consider having an allergy test; severe allergic reactions to bee stings (anaphylaxis) are rare but serious.
When is the best time to start beekeeping?
Start planning and ordering gear in fall or winter; install your first bees in early spring. Most beginner courses run January through March specifically for this reason. Don't try to start beekeeping in summer; you'll miss the critical spring buildup period.
Langstroth vs. top-bar: which should a beginner choose?
Langstroth, almost certainly. The support network is vastly larger: your local club, most books, most YouTube channels, and most local mentors all assume Langstroth. A top-bar hive is a fine choice, but only with a mentor who runs one; the learning curve with no support system is much steeper.
American Beekeeping Federation — The national organization. Use their directory to find your state and local club; local mentorship is the single most valuable resource for new beekeepers.
Honey Bee Health Coalition — The best free resource on Varroa mite management, the most common cause of colony loss. Download their Varroa management guide; mite monitoring starts in your first season.
Bee Informed Partnership — Annual colony loss surveys and data. More relevant in year two, but worth bookmarking to understand national trends.
Bee Culture Magazine — The oldest continuously published beekeeping magazine in the US. Practical, grounded, and readable for beginners.
HoneyBeeSuite (blog) — Rusty Burlew's blog. Exceptionally well-written, evidence-based, beginner-accessible. One of the most useful free resources on the internet for new beekeepers.
Scientific Beekeeping (Randy Oliver) — Data-heavy analysis of colony management and Varroa treatment. Intermediate-to-advanced, but Oliver's beginner articles are among the best available.
As an Amazon Associate, JustBeginning earns from qualifying purchases.
We may also earn commission from other affiliate programs linked on this
page. Editorial recommendations are independent; we don't choose
products based on commission rates.
Product prices and availability are accurate as of the date and time
indicated and are subject to change. Any price and availability
information shown on Amazon at the time of purchase will apply.
Our top pickHoover Hives Beeswax Coated Beehive Kit


 Best starter