Canyoneering means descending slot canyons by rappelling, swimming, scrambling, and problem-solving through tight, water-carved passages. The gear is specific: a harness, static rope, a rappel device, and a wetsuit for cold water. A $400-600 starter kit covers everything you need for your first 20 canyons.
By Colin B. · Published June 12, 2026 · Last reviewed June 12, 2026
Black Diamond Momentum Harness
— The Black Diamond Momentum is the reliable, correctly-priced first harness for most new canyoneers.
Adidas Five Ten Canyoneer 3
— Five Ten's Stealth rubber grips wet sandstone like nothing else. The canyon shoe with no real competition.
Black Diamond ATC Guide
— The ATC Guide handles canyon rappels and double-rope drops. One device, the right answer for your first 50 descents.
Budget total
$350
Typical total
$550
The core four (harness, ATC device, wetsuit, canyon shoes) runs $350-550. Rope is often shared with a partner before you invest in your own 200-foot static.
We earn commission on qualifying Amazon purchases — see our
affiliate disclosure.
Price tiers and budget totals shown above are editorial estimates;
actual Amazon prices vary.
At a glance
Our top pick in each category
The fastest path through this guide — each best-starter pick by category.
Scroll for the budget and upgrade alternatives.
Take a course before your first canyon. ACA-accredited canyoneering courses run one to two days and cover rappelling technique, anchor building, and canyon hazards (flash floods chief among them). The American Canyoneering Association lists instructors by region at aca.org.
Don't buy the rope yet. Most beginner groups and guides supply the rope. Buy your personal gear first (harness, ATC, wetsuit, shoes, helmet), then invest in rope once you're committed to the sport.
Wetsuit thickness depends on water temperature. Zion in summer? 2mm. Zion in April? 5mm. Read beta for specific canyons before buying and err toward warmer (thicker) than you think you need.
The gear
What you actually need
Harness
Your harness is the single most critical piece of canyoneering gear. You need a sit harness with double-back buckles and adjustable leg loops so you can put it on over a wetsuit. Canyon-specific harnesses have swiveling leg loops, which make it easy to doff mid-canyon when you strip gear for a long swim. A standard climbing harness works fine for beginner canyons. Whatever you buy, size it while wearing your wetsuit, not in street clothes.
Harness — what's the difference?
A few common shapes, each making a different trade.
Canyon Harness
Swiveling leg loops, built for doffing over a wetsuit mid-descent.
Leg loops
Swivel
Best use
Wet canyons, multi-rappel days
Best for Canyoneers doing more than 10 rappels per season or technical wet canyons
Tradeoff More expensive; the swivel comfort gain is real but beginners won't miss it
The Momentum is the default beginner harness for canyoneering. Double-back buckles on both waist and legs, adjustable leg loops that fit over a 3mm wetsuit, and a comfortable foam waistbelt. Black Diamond's quality control at this price is hard to beat, and this harness has been the right answer for new climbers and canyoneers for years.
What we like
Double-back buckles on waist and legs for a secure, consistent fit
Adjustable leg loops fit over a wetsuit without extra sizing
Black Diamond quality well above the price point
What to know
Waistbelt foam flattens over multiple seasons of heavy use
Not canyon-specific; leg loops don't swivel for mid-swim doff/don
The most affordable harness from a proper climbing brand. Thinner padding and fewer comfort features than the Momentum, but safe and functional under $50. Fine for someone testing the sport before committing to a full gear investment.
What we like
Under $50 from a real climbing brand with proper safety ratings
Lighter and more packable than heavily padded sport harnesses
What to know
Padding thins fast; uncomfortable on long hanging rappels
When you're ready to invest, the Adjama is the harness experienced canyoneers actually use. Swiveling leg loops make it easy to take on and off mid-canyon over a wetsuit. The Wireframe design saves weight while keeping structure. Petzl's ergonomic foam is genuinely more comfortable on long rappels than anything at the entry-level price.
What we like
Swiveling leg loops are a meaningful comfort upgrade for canyon use
Wireframe construction cuts weight without sacrificing padding
Petzl ergonomic foam stays comfortable through full-day descents
What to know
Premium price; more harness than most beginners need on day one
Precise fit is tricky to get right for wetsuit use without trying on
A rappel device controls your descent speed on the rope. For canyoneering, you want a tube-style device with multiple friction modes. The ATC Guide is the industry standard and the right first device. What to avoid: spring-loaded belay devices designed for gym climbing (can't handle double-rope rappels) and figure-8 devices (twist rope badly in wet conditions). The ATC Guide is what most canyon instructors will teach you on.
Best starter
Black Diamond
ATC Guide
$
★★★★★Our rating
The ATC Guide is what most canyon instructors teach on, and there's a good reason for that. Two friction slots let you rappel on double strand for extra control on longer drops. The guide mode is useful for belaying if you start mixing canyoneering with sport climbing. Widely available, under $40, bombproof.
What we like
Two friction modes handle single and double-strand rappels
Guide mode works for belaying when you mix in sport climbing
Under $40, handles 90% of beginner canyon rappels cleanly
What to know
Heats up on fast, long rappels; manage descent speed or wear gloves
No auto-block; you must maintain a brake hand at all times
★★★★☆Our rating· Only 5 left in stock - order soon.
The I'D locks automatically if you let go of the rope, which matters on long free-hanging rappels where you need both hands for a safety check or rope pass. Not necessary for beginners, but when you're doing canyons with 200-foot drops or managing a group through a rappel, the auto-block is worth the premium.
What we like
Auto-block stops descent if you release the brake hand
Anti-panic handle prevents over-gripping that accelerates descent
What to know
Overkill for beginner canyons; the auto-block is rarely needed
Heavier and bulkier than a tube device; noticeable on a full rack
Canyon ropes are static, not dynamic like lead-climbing ropes. Static ropes don't stretch, giving you smooth and controlled rappels. They're also more resistant to water and abrasion on canyon walls. For beginners, a 9-10mm diameter in a 60-meter (200-foot) length covers the vast majority of rappels on moderate canyons. Dry treatment is worth paying for: untreated rope soaks up serious water weight in wet canyon systems.
Best starter
Sterling Rope
9.0mm Static 200ft
$420.99 as of Jun 22, 2026
★★★★★Our rating· Only 1 left in stock - order soon.
Sterling is one of the most trusted rope manufacturers in the US, and their 9.0mm static is the standard recommendation in canyoneering courses and online forums. Smooth handling, strong, and the 200-foot length covers virtually all single-anchor canyon rappels without excess rope to manage.
What we like
Sterling quality trusted by military and rescue professionals
9mm diameter handles smoothly in an ATC and gloved hands
200-foot length covers virtually all moderate canyon rappels
What to know
Investment at $150-200; share with your group before buying your own
No dry treatment on base model; soaks up water weight in wet canyons
For wet canyons (Zion, Buckskin Gulch, most Utah classics), dry treatment on your rope matters. Tendon's Canyon Dry uses a Complete Shield Teflon Eco coating purpose-built for wet canyoneering. An untreated rope absorbs serious water weight in canyon systems and becomes harder to pull through anchor hardware.
What we like
Complete Shield dry treatment purpose-built for wet canyoneering
UIAA and CE certified static rope with real safety documentation
What to know
Dry treatment adds cost vs untreated static of same specs
European brand; availability in the US is more limited than Sterling
Most canyons in the American Southwest involve water, sometimes just wading, sometimes 400 meters of chest-deep swimming. A wetsuit protects against hypothermia in cold runoff, especially spring canyons fed by snowmelt. Thickness is the key variable: 2mm for summer, 3mm for most year-round canyon use, 5mm for early spring or fall when water drops below 58 degrees. Farmer John style (sleeveless) is the canyoneering standard because it keeps core warm while giving full arm range for rappelling.
Wetsuit — what's the difference?
A few common shapes, each making a different trade.
2mm
Summer canyons with warm water above 70 degrees.
Water temp
70°F+
Season
Summer
Best for Warm summer canyons in the desert Southwest, short swim sections
Tradeoff Insufficient insulation for shaded slot canyons or spring snowmelt runoff
3mm
Most versatile, right for most Southwest canyons year-round.
Water temp
58-70°F
Season
Spring through Fall
Best for Utah and Arizona technical canyons from May through October
Tradeoff Not enough for early spring snowmelt; layer a paddling top on cold days
Cold spring and fall canyons with snowmelt water below 58 degrees.
Water temp
Below 58°F
Season
Early spring and late fall
Best for Zion and Utah canyons in April, May, and October
Tradeoff Bulky and harder to move in; overkill for summer use
Best starter
NRS
Men's 3mm Farmer John Wetsuit
$$$
★★★★★Our rating
NRS (Northwest River Supplies) makes gear for kayakers and whitewater paddlers who spend all day in cold water. That's the exact use case for canyoneering. The 3mm Farmer John is the sweet spot for most year-round canyon use in the Southwest: warm enough for the water sections, unrestrictive enough for the scrambling and rappelling.
What we like
3mm handles most Southwest canyon water temps from May through October
Sleeveless cut gives full arm range for scrambling and rappels
NRS whitewater pedigree means the neoprene stretches and lasts
What to know
No arm coverage; need a wetsuit top for cold early-spring canyons
Runs $150-200; more than a comparable surf wetsuit
O'Neill makes real surf wetsuits, not neoprene costumes, and the Reactor II at $80-100 is a legitimate 3mm suit for beginners wanting full arm coverage before spending on a paddling-specific brand. It won't last as long as an NRS, and the back-zip is less convenient for harness layering, but it keeps you warm.
What we like
Full arm coverage in a 3mm suit under $100
Reputable surf brand; real neoprene construction, not a costume
What to know
Back-zip interferes with harness waistbelt and can snag on rock
Surf cut less forgiving for the wide arm movements of rappelling
For cold-water canyons (spring snowmelt, shaded technical slots), a drysuit makes a bigger safety difference than any other gear upgrade. The Kokatat GMER is designed for whitewater rescue professionals, stays completely dry inside, and the GMER cut was built to layer over harness and rescue gear. Essential for April descents in Utah; overkill for summer canyons.
What we like
Completely dry interior makes cold-water canyons significantly safer
GMER cut designed to work over a harness and under canyon gear
What to know
$400+ makes this a year-two purchase for most canyoneers
Less mobile than a wetsuit; bulkier for scrambling sections
Canyon shoes are the canyoneering equivalent of climbing shoes: sticky rubber soles grip wet sandstone in ways that trail runners and approach shoes cannot match. Five Ten's Stealth rubber compound was specifically developed for wet rock, and the Canyoneer 3 has been the standard for decades. Running shoes are genuinely dangerous in technical canyons; EVA foam compresses and provides zero grip on slippery canyon walls.
Best starter
Five Ten
Adidas Five Ten Canyoneer 3
$$$
★★★★★Our rating
The Canyoneer 3 is the canyon shoe. Stealth C4 rubber grips wet sandstone with a margin that no other shoe in the category matches. Drainage ports expel water quickly, the neoprene upper dries fast, and the wide last is comfortable for a full-day canyon. After 20-plus years of refinement, this shoe has no meaningful competitor.
What we like
Stealth C4 rubber is purpose-built for wet sandstone traction
Drainage ports and fast-drying neoprene handle full canyon swims
Wide last stays comfortable through full-day descents
What to know
Stealth rubber wears faster; expect 1-2 seasons of heavy use
Around $100-120; more expensive than approach shoe alternatives
When the Canyoneer is out of stock or out of budget, the TX4's Vibram Megagrip sole is the stickiest non-canyon shoe option available. Not purpose-built for wet canyon use, but canyoneers use them on moderate routes where water sections are brief. The fit is precise and supportive for dry scrambling.
What we like
Vibram Megagrip is the stickiest general-purpose sole available
Excellent on the dry scrambling sections that bookend most canyons
What to know
Meaningfully less grip than Stealth rubber on wet sandstone
Mesh upper holds water longer; uncomfortable after full swims
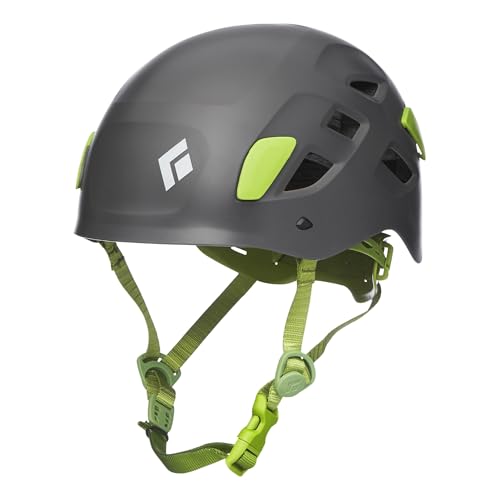
Canyon walls are tight, rocks fall, and rappelling in a confined slot puts your head close to the wall on every descent. A helmet is non-negotiable in any technical canyon, and the American Canyoneering Association requires them in all ACA-sanctioned courses. You want a multi-impact helmet (not a one-hit bike helmet) with a secure chin strap. The Black Diamond Half Dome is the no-drama, correctly-priced starting point.
Best starter
Black Diamond
Half Dome Helmet
$$
★★★★★Our rating
The Half Dome is the most recommended beginner helmet across climbing and canyoneering communities. Multi-directional impact protection, a fully adjustable fit system, ventilated for desert heat, and $60-70. You can overspend on helmets, but the Half Dome does the job correctly at the right price.
What we like
Multi-directional impact protection covers falling rock and wall strikes
Adjustable fit system works over a warm hat in cold weather
The standard beginner helmet recommendation across climbing and canyoneering
What to know
Heavier than foam-shell helmets; noticeable on long hot-canyon days
Ventilation adequate but not the best option for extreme desert heat
At 160 grams, the Sirocco is one of the lightest certified helmets made. You stop noticing it after the first rappel, which matters when you're three hours into a hot August canyon. Petzl's ventilation design is genuinely better than the Half Dome. Worth the extra $40-50 if you're canyoneering frequently.
What we like
160 grams; among the lightest certified climbing and canyon helmets
Best-in-class ventilation for hot desert canyon environments
What to know
In-mold foam requires replacement after any serious impact
$40-50 premium over the Half Dome for benefits beginners won't notice
Your first canyon trip: a complete beginner's guide
Canyoneering is a gear puzzle, a knot lesson, and a flash-flood briefing rolled into one unforgettable day. Here is how to prepare so you can focus on the canyon itself.
Canyoneering attracts people who want more than a hike. More exposure, more commitment, more of that specific thrill that comes from squeezing through a 12-inch slot and dropping off an anchor into open air. The sport is genuinely accessible: you don’t need climbing experience, elite fitness, or expensive instruction. What you need is the right gear, a basic working knowledge of knots and rappelling, and a serious respect for the one risk that kills more canyoneers than anything else: flash floods.
This guide covers how to go from curious to canyon-ready. Read it end-to-end before you buy anything.
The core skill in canyoneering is not the scrambling, not the swimming, and not the routefinding. It is rappelling (descending a fixed rope using a friction device). Every other canyoneering skill builds around that anchor.
The good news: rappelling is learnable in an afternoon under proper instruction. The bad news: improperly learned rappelling kills people. This is not a skill to pick up from YouTube and practice alone. The two-day ACA-accredited course is the right entry point for everyone. What you learn there:
Anchor building. A canyon anchor is usually a natural feature (horn, tunnel, thread) or a bolted anchor. You need to know how to assess an anchor, extend it, and back it up before committing your body to it. This is the skill that keeps you alive.
Rappelling technique. Body position, brake hand, how to pass a knot in a pull cord, how to handle a stuck rope after you pull it. None of this is hard, but all of it requires repetition under supervision before you’re doing it 80 feet above a pool.
Self-rescue basics. A prusik hitch and a carabiner. That’s your emergency ascender if something goes wrong mid-rappel. Practice it on the ground until it’s automatic.
Flash flood awareness. This is the most important thing the course will teach you, and the hardest to internalize. Flash floods happen miles from where you are, triggered by storms you cannot see. You need to understand how to read canyon weather, when to abort, and what “escape route” means in context.
The American Canyoneering Association (aca.org) maintains a directory of certified instructors by region. One-day intro courses run $120-200. Two-day technical courses are $250-400 and include anchor building and multi-pitch rappelling.
Core skills: knots and systems
After your course, you need to own three things mentally before stepping into a technical canyon:
The figure-8 on a bight. Your primary anchoring knot. Ties a fixed loop in the end of a rope that clips to an anchor. Simple to tie, easy to inspect, impossible to confuse with a wrong configuration if you know what a correct one looks like.
The overhand on a bight. Simpler than the figure-8. Used for quick anchor backups and in-rope mid-points. Takes 5 seconds to tie.
The prusik hitch. Your emergency ascender. A loop of thinner cord wrapped around your main rope that grips when weighted and slides when released. This is what you use if you need to ascend back up the rope after a rappel. Practice this until you can rig it in the dark.
These three cover beginner canyon requirements. You do not need to know a dozen knots. You need to know three knots cold.
Beta is the canyoneering word for route information. Before any canyon, you read beta. The go-to resource is Ropewiki (ropewiki.com), a community-maintained database with descriptions, star ratings, water level notes, and recent trip reports for thousands of canyons worldwide.
For each canyon in your area, look at:
Star rating. Most beginner canyons in the American Southwest are rated 2-3 stars. Avoid anything below 2 stars until you have 10 or more canyons under you.
Technical grade. The ACA grades canyons by technical difficulty (1-4) and water (A/B/C). Start at 2B or lower. Grade 3 canyons involve serious vertical and/or water that requires specific skills.
Water level notes. Water depth in canyon pools changes seasonally and after rain events. Ropewiki users post current conditions. A canyon that’s knee-deep in August might be chest-deep in June.
Flash flood risk. Every slot canyon has a watershed (the total land area that drains into it). A canyon with a large watershed can flood catastrophically from a storm that’s 20 miles away and out of sight. Before every canyon, check weather forecasts for the entire watershed, not just your put-in. 72 hours of clean forecast is the minimum for technical slot canyons.
The rule that the canyoneering community repeats constantly: if you are in a slot canyon when a flash flood arrives, there is often nowhere to go. Exit the canyon before a storm system arrives. Do not gamble on speed.
Your first canyon day: what to expect
A typical beginner canyon in southern Utah runs 2-6 hours car-to-car. Here is how the day flows:
The approach. Most canyons require a 20-60 minute hike to the top. This is where you brief your group on the route, assign rope duties, and confirm everyone’s knot setup. Do a gear check here, not at the first anchor.
The first rappel. Expect some adrenaline. Your body has never been asked to trust a rope over an edge before, and it will resist. This is normal. Trust your anchor inspection, your brake hand, and your technique. Keep your weight back, feet flat on the wall, and descend in control. The first 10 feet of every rappel are the hardest; after that, muscle memory takes over.
The water sections. Depending on the canyon and season, you may wade, swim, or traverse above water on stemming moves. Know your wetsuit thickness before you enter cold water. Move through cold water sections efficiently; lingering in 55-degree water without moving accelerates heat loss dramatically.
Pulling the rope. After everyone is down, someone pulls the rope by yanking the pull cord. Stuck ropes are one of the most common beginner problems. Before you descend, always rig the pull cord so the rope will drop on the correct side of any features, and confirm the rig will pull cleanly when the first person is still at the bottom.
The exit. Most canyon routes have a marked exit hike back to a trailhead. Know the exit before you enter the canyon, because you will not have cell service inside.
After 5-10 canyons, patterns emerge. You’ll develop preferences for harness fit, wetsuit cut, and rope diameter. Your knots will feel automatic. You’ll start reading weather forecasts like a canyoneer, not a hiker.
The next skills to develop are:
Multi-pitch rappelling. Longer drops that require passing a knot or downclimbing to an intermediate anchor.
Advanced anchor types. Deadman anchors in sandy soil, contingency anchors for questionable natural features.
Guide mode. Using your ATC Guide to belay other group members through difficult sections.
The canyoneering community is unusually generous with beta and instruction. Regional groups on Facebook and Meetup are the fastest way into the community, and experienced canyoneers are generally happy to take well-prepared beginners on moderate routes.
Save your money
What you don't need yet
Beginners get pressured to buy a lot of stuff that doesn't help them play
better. Here's what we'd skip on day one.
Mechanical ascenders — Prusik knots and a friction hitch handle self-rescue for your first 20 canyons. Mechanical ascenders are a year-two purchase.
A dedicated canyon pack — A regular dry bag or NRS dry case inside any backpack keeps your gear dry. Canyon-specific drybag packs are convenient, not necessary.
Neoprene gloves and socks — Add these when you're doing cold-water canyons regularly. For your first few guided trips in the Southwest summer, you won't miss them.
A dry suit — Dry suits are for winter canyons and extended multi-day water routes. Overkill for 95% of beginner canyon conditions.
A full personal anchor system — A 48-inch sling and two locking carabiners covers your anchor setup on beginner canyons. A full PAS kit is nice to have eventually, not required day one.
First week
Your first seven days
A short, real plan to get from gear-on-doorstep to actually playing.
Register for an ACA-accredited canyoneering course. One or two days of instruction covers rappelling technique, anchor building, and flash-flood safety: the three things that will keep you alive. · Action
Read beta for a beginner canyon near you on Ropewiki. Understand the star rating, water level notes, and gear requirements before committing to a route. · Learn
Ropewiki · Community-maintained route database for canyons worldwide
Learn the figure-8 on a bight and the overhand knot. These two knots cover your basic anchoring needs on beginner canyons. · Learn
Find your regional canyoneering group on Facebook or Meetup. You'll find partners, share rope costs, and get current local beta faster than any website. · Action
FAQ
Common questions
Do I need to know how to rock climb first?
No. Canyoneering focuses on descending (rappelling), not ascending. You need to be comfortable with heights and fit enough for scrambling, but climbing skills are not a prerequisite. An ACA-accredited course covers everything you need from scratch in one or two days.
What is the difference between static and dynamic rope?
Dynamic ropes (used in sport climbing) stretch under load to absorb a fall. Static ropes don't stretch, giving you smoother, more controlled rappels. Using a dynamic rope for rappelling is dangerous and explicitly prohibited by canyon etiquette and ACA guidelines. Always use static rope for canyon rappels.
How thick should my wetsuit be?
3mm handles the majority of canyon use in the American Southwest from May through October. Go 5mm for early spring (April-May) when snowmelt drops canyon water below 58°F. 2mm works for warm summer canyons above 70°F but offers minimal protection against real cold.
Is canyoneering dangerous?
The main risks are flash floods (check forecasts 48 hours before entering a slot canyon), hypothermia from cold water without a wetsuit, and rappelling errors without proper instruction. All three are manageable with preparation. Don't attempt technical canyons without a course first.
Can I start without taking a course?
Technically yes, but it's a bad idea. Flash floods and rappelling errors are the two most serious risks, and both require specific training to manage safely. A one-day ACA course covers the core skills and keeps you from developing habits that are hard to correct later.
How long are beginner canyons?
Most beginner canyons run 2-6 hours car-to-car including the approach hike, with 2-5 rappels of 20-80 feet. The benchmark beginner canyons in the US are in southern Utah (around Kanab and Escalante) and offer gentle introductions to all the technical skills.
American Canyoneering Association — The national organization for canyoneering in the US. Instructor certification, safety standards, and a beginner's guide to the sport. Start here.
Ropewiki — Community-maintained database of canyon beta worldwide. Star ratings, water level notes, gear requirements, and recent trip reports. Essential before any canyon.
Canyoneering USA — Long-running forum and resource site with route descriptions, gear discussions, and a beginner FAQ. The informal internet home of the sport since the early 2000s.
r/canyoneering — Active subreddit with gear advice, trip reports, and current condition updates. Good for beta on specific canyon systems before a trip.
"Canyoneering" by David Black — One of the most-cited beginner guides. Covers gear, technique, anchor systems, and safety in a readable format. Read it before your first course.
As an Amazon Associate, JustBeginning earns from qualifying purchases.
We may also earn commission from other affiliate programs linked on this
page. Editorial recommendations are independent; we don't choose
products based on commission rates.
Product prices and availability are accurate as of the date and time
indicated and are subject to change. Any price and availability
information shown on Amazon at the time of purchase will apply.