Mountaineering sits between hiking and technical climbing. You're going for real summits, on glaciers, in crampons, with an ice axe in your hand. The gear list is specific and non-negotiable. Here's exactly what you need for your first course and your first peak, and why each piece matters.
By Colin B. · Published May 24, 2026 · Last reviewed June 12, 2026
Mountaineering has a high but one-time gear cost. Most critical pieces (boots, ice axe, crampons) are bought once and last a decade with care. A basic course adds $400–800 but is essentially mandatory.
We earn commission on qualifying Amazon purchases — see our
affiliate disclosure.
Price tiers and budget totals shown above are editorial estimates;
actual Amazon prices vary.
At a glance
Our top pick in each category
The fastest path through this guide — each best-starter pick by category.
Scroll for the budget and upgrade alternatives.
Take a course first, buy gear second. Every mountaineering school (the American Alpine Institute, NOLS, REI Adventures) tells you to rent gear for your first course. They're right. You'll learn what fits your body, your goals, and your local terrain before spending $1,000 on gear that might not match.
Not all crampons fit all boots. This is the single most common beginner mistake. Crampons come in strap, step-in (C1), and hybrid (C2) bindings that require specific boot rigidity ratings (B0/B1/B2/B3). Your boot must match your crampon system. Buy them together, ideally in person, so you can check the fit.
The ice axe is not optional. Even on 'easy' glaciated peaks like Rainier or Shasta, you will use your ice axe for balance, self-arrest, and anchor building. Hiking poles do not substitute. If the mountain has a glacier, you need an axe.
Harnesses are for roped travel, not just technical climbing. On most beginner objectives, you'll rope up to cross crevasse zones, and your harness needs to be comfortable for hours of moving travel, not just belaying at a crag.
Your boots are the most consequential gear decision you'll make. They need to accept crampons (a specific rigidity requirement, not just 'sturdy hiking boots'), stay warm on overnight bivouacs, and fit precisely: hot spots become blisters at hour four, and blisters become frostbite risk at altitude. Get properly fitted at a gear shop. Don't buy mountaineering boots online without trying them on first. The crampon-compatibility question (B1 vs. B2 vs. B3) depends on your objective: glacier travel needs B1/B2, technical mixed climbing needs B3. For Rainier or Shasta, a B1 or B2 boot is the sweet spot.
Boots — what's the difference?
A few common shapes, each making a different trade.
B1: Non-technical glacier travel
Semi-stiff, insulated, crampon-compatible for strap systems.
Crampon type
Strap or C1 hybrid
Stiffness
Semi-rigid
Best objective
Rainier, Shasta, Denali (normal route)
Best for First-time mountaineers, glacier travel, moderate snow slopes
Tradeoff Cannot accept step-in crampons, which limits you on vertical ice
Best for Progressing toward technical alpine climbing
Tradeoff Very stiff, uncomfortable for long approaches, and overkill for most beginners
Best starter
La Sportiva
Trango Tech GTX
$$$
★★★★★Our rating
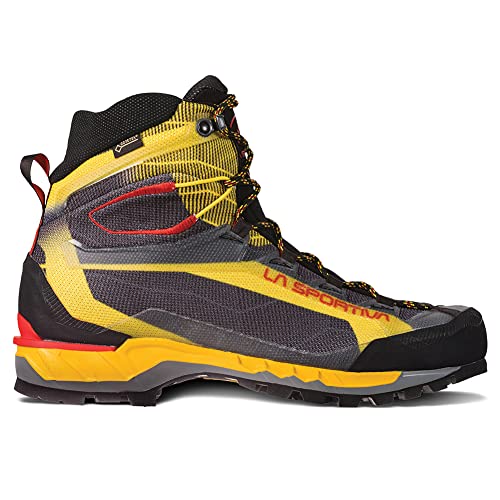
La Sportiva is the gold standard in alpine footwear and the Trango Tech sits at the accessible end of their mountaineering line. B1 rating means it pairs with strap and hybrid crampons, and the Gore-Tex lining and Vibram sole handle everything from wet approach trails to icy slopes. Fits narrower than American boots, so try before buying if you have wide feet.
What we like
La Sportiva's most trusted beginner mountaineering boot
Gore-Tex lining keeps feet dry on wet glaciers and slushy trails
Vibram sole grips well on rock and snow approaches
What to know
Runs narrow, so wide feet should try on first or size up
B1 rating limits you to strap crampons, not step-in
If you know you're going beyond basic glacier travel (planning steeper volcanoes, or wanting one boot that covers serious objectives), the Mont Blanc Pro is where to land. Full B2 rating, wider fit than the La Sportiva, and warm enough for cold bivouacs. Most guides wear some version of this boot.
What we like
B2 rating accepts hybrid crampons, growing with your objectives
Wider last fits most feet without modification
Insulated enough for multi-day high camps
What to know
Heavy compared to B1 boots, tiring on long approaches
Expensive, only justified if you plan to climb beyond basic routes
Technically a hiking boot, but stiff enough to accept strap crampons (C0/B0 rating) and warm enough for spring glacier conditions on lower-angle terrain. Not a mountaineering boot, but a real option if you want to take one introductory course before committing to a $400+ purchase. Don't use these on steep terrain or in cold, sustained conditions.
What we like
Half the price of a real mountaineering boot
Comfortable enough for long trail approaches
Works for one beginner course before committing to mountaineering
What to know
Not stiff enough for technical terrain or serious summits
Strap crampons only, no step-in compatibility at all
The ice axe is your primary safety tool in the mountains. You use it for balance on steep slopes, for self-arrest if you slip (you drive the pick into the snow to stop a fall), and for building anchors. The right length for a beginner is one where, when you hold the spike end and rest it vertically at your side, the head is roughly at your wrist (typically 60-70cm). Curved 'technical' axes are for ice climbing. For beginner mountaineering, you want a classic straight shaft, which gives the best grip and leverage for self-arrest.
Best starter
Black Diamond
Raven Ice Axe
$$
★★★★★Our rating
The Raven is the canonical beginner mountaineering axe. Straight steel shaft, classic pick geometry optimized for self-arrest, and a comfortable grip. Used in more mountaineering courses than any other axe by a wide margin. Buy the right length (measure your arm length: 60cm for under 5'7", 65cm for 5'7"–6', 70cm for over 6').
What we like
The most-used beginner ice axe in mountaineering courses worldwide
Straight shaft with classic pick, ideal for self-arrest
Rugged enough to last decades with basic care
What to know
Steel shaft is heavier than aluminum; you'll feel it on long days
Not suitable for technical ice or steep mixed routes
Lightweight aluminum shaft (about 120g less than the Raven), which adds up on a 5,000-foot summit day. Slightly more technical geometry than the Raven while still being appropriate for glacier travel. Worth the premium if you're planning multiple routes per season or altitude objectives where weight matters.
What we like
Aluminum shaft saves 120g+ over steel, meaningful on altitude days
UIAA-certified for both T (trekking) and B (basic) ratings
Petzl's build quality holds up across multiple seasons
Crampons are steel spikes that attach to your boots to grip snow and ice. For beginner mountaineering, you need 12-point crampons (two front points and ten downward-facing points). The binding system must match your boot's rigidity rating: strap crampons fit almost any boot but move more; step-in (bail) crampons require a stiff, welt-edged boot but stay more secure. For your first glacier objective, strap crampons are fine. The front points are what let you kick steps on steep terrain; without them, you're limited to low-angle snow.
Best starter
Black Diamond
Contact Strap Crampons
$$
★★★★★Our rating
12-point steel crampons with a universal strap binding that fits any boot with a B0/B1/B2 rating, which makes them the right answer for most beginner mountaineers who haven't yet committed to a full-shank boot. Stainless steel resists icing up better than aluminum. This is what most mountaineering courses use as rental gear.
What we like
Fits nearly any boot, no crampon-boot compatibility stress
Stainless steel resists balling up with snow better than aluminum
12-point design handles glacier travel and moderate slopes
What to know
Strap binding takes practice to fit correctly in cold conditions
Heavier than aluminum crampons by about 200g per pair
Step-in bail system attaches in seconds, critical when you're putting crampons on and off repeatedly on technical terrain, or when your hands are cold and the clock is running. Requires a B2 boot with a heel welt. If you're buying the Scarpa Mont Blanc Pro, pair it with these crampons. The Vasak is what alpine guides reach for.
What we like
Step-in bail attaches in seconds, vital in cold conditions
Modular front section accepts mono-point or horizontal front points
Aluminum-steel hybrid keeps weight reasonable
What to know
Requires a stiff B2 boot with heel welt, not universally compatible
More expensive than strap crampons for the same glacier objectives
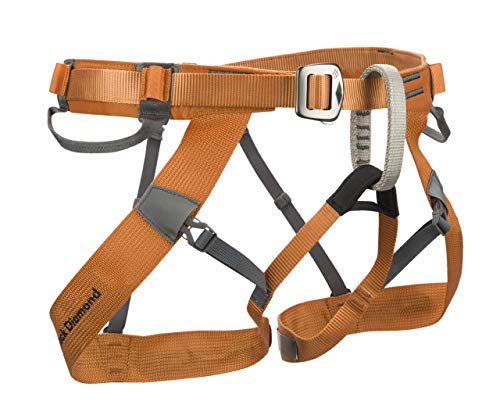
On glaciated routes, your rope team travels roped together to catch each other if someone breaks through a snow bridge into a crevasse. Your harness needs to be comfortable for hours of active travel, not just static belaying at a sport crag. Mountaineering harnesses are lighter, pack smaller, and often have less padding than climbing harnesses (since you're moving constantly rather than hanging). If you already own a well-fitted sport climbing harness, you can likely start with that.
Best starter
Black Diamond
Couloir Harness
$$
★★★★★Our rating
The Couloir is the go-to mountaineering harness because it does one thing exceptionally well: disappear. Featherlight at 165g, packs to the size of a fist, and fits over puffy layers without bunching. The minimal padding feels strange if you're used to sport climbing harnesses, and you'll forget you're wearing it, which is the entire point on a twelve-hour summit day.
What we like
165g, one of the lightest harnesses on the market
Fits over puffy layers without bunching or riding up
Dedicated ice clipper slots for ice screws and tools
What to know
Minimal padding, uncomfortable for long hangs at a sport crag
Takes getting used to if you've only worn padded climbing harnesses
More padded than the Couloir but still slim enough for mountaineering. A better pick if you're planning to use the same harness for both mountaineering and gym or crag climbing: the extra hip padding is noticeable when you're top-roping or sport climbing. Slight weight penalty but more versatile.
What we like
Dual-function: works for both mountaineering and sport climbing
More hip padding than alpine-specific harnesses
Slide-adjust buckles fit easily over layered clothing
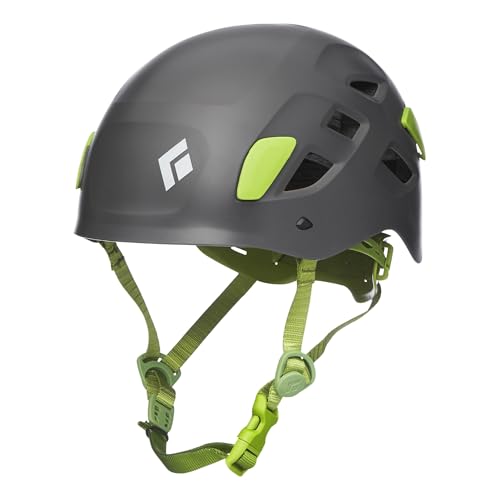
Helmets are non-negotiable in the mountains. Falling ice, rockfall in thaw conditions, and a stumble on steep snow are all real hazards. Modern mountaineering helmets weigh under 250g and fit naturally over a thin beanie. The certification you want is UIAA or CE EN 12492. Don't use a bike helmet: they're not rated for the same impact vectors. Fit matters: the helmet should sit level, not tipped back, with the front brim about two finger-widths above your eyebrows.
Best starter
Black Diamond
Half Dome Helmet
$$
★★★★★Our rating
The Half Dome is the most popular beginner mountaineering helmet in North America because it hits every note: UIAA-certified, comfortable for all-day wear, adjustable to fit over a beanie, and inexpensive enough that you don't feel bad putting it through real use. Heavier than foam helmets but more durable.
What we like
UIAA-certified, the safety standard that matters
ABS shell resists repeated impacts better than foam-only models
Adjustable dial fit works over beanies and thin insulation layers
What to know
Heavier than foam-shell alternatives at ~335g
Ventilation is minimal, warm on long summer alpine days
At 160g, the Sirocco is one of the lightest UIAA-certified helmets made. The in-mold foam construction saves almost 175g over the Half Dome, meaningful on summit days where every gram eventually shows up in your legs. Worth the premium if you're climbing frequently or going to altitude.
What we like
160g, one of the lightest UIAA helmets available
In-mold construction wraps your head rather than sitting on top
Exceptional ventilation for warm approach and summit days
What to know
Foam shell less durable than ABS for repeated daily use
Premium price, hard to justify for occasional climbers
The mountain kills you with temperature swings, not single conditions. At dawn you're hiking up in the cold, by 10am you're sweating on a south-facing slope, and by summit time you're back in wind and dropping temps. The solution is a three-layer system: moisture-wicking base layer (merino or synthetic, never cotton), insulating mid-layer (down or synthetic puffer), and a waterproof hard shell on the outside. Most beginners underinvest in the shell and overinvest in everything else. A good waterproof-breathable hard shell with taped seams is the non-negotiable. The rest can be mix-and-match.
Best starter
Patagonia
Torrentshell 3L Jacket
$$$
★★★★★Our rating
The Torrentshell is a bomber, fully seam-taped rain shell that handles everything from wet glaciers to afternoon thunderstorms on the approach. 3-layer construction means it breathes well enough to wear while moving. Patagonia's repair program means it'll last a decade. Not the lightest shell available, but it won't let moisture in, which is the job.
What we like
Fully seam-taped 3-layer shell at a real price, keeps water out
Patagonia Ironclad Guarantee covers repairs for the life of the jacket
Helmet-compatible hood with single-hand adjustment
What to know
Less breathable than Gore-Tex Pro on high-output ascents
Not as packable as ultralight single-layer wind shells
Gore-Tex Pro 3L, the highest-end waterproof-breathable fabric available. The Beta AR is what serious alpinists wear because it handles heavy precip and sustained high output better than anything else. Helmet-compatible hood with a three-point adjustment that stays put when you move. The price is real, but so is the performance gap over lower-tier shells on technical days.
What we like
Gore-Tex Pro breathes better than any other waterproof-breathable fabric
Three-point helmet-compatible hood stays positioned through all movement
Durable face fabric resists abrasion from pack straps and crampons
What to know
Expensive, requires a real commitment to the sport to justify
Dry cleaning care requirements are inconvenient for field use
Fully seam-taped with AscentShell, OR's in-house waterproof-breathable fabric that performs close to Gore-Tex at significantly lower cost. The Foray has been a trusted budget mountaineering shell for years. A real functional shell, not a fashion item masquerading as one.
What we like
Fully seam-taped shell at 40% less than Gore-Tex alternatives
AscentShell breathes well enough for active mountaineering
Helmet-compatible hood and climbing-specific patterning
What to know
Not as breathable as Gore-Tex Pro on sustained hard efforts
AscentShell face fabric shows wear faster than Gore-Tex Pro
From signing up for a course to standing on your first glacier summit: this is what the learning curve actually looks like, and what to practice before each stage.
Mountaineering has an honest learning curve. It’s not one of those hobbies where you show up and immediately feel competent. But it’s also not as remote or technical as it looks from the outside. Every year, thousands of first-timers summit Rainier, Shasta, and similar peaks after a single beginner course.
The key is knowing what you’re actually preparing for, and in what order. This is what your first season looks like from the outside before you’re in it.
Phase 1: Before the course (weeks 1–8)
Your first obligation is physical. Mountaineering summit days routinely run 10–16 hours, with 4,000–6,000 feet of elevation gain, carrying a pack that starts at 30 lbs and gains weight as you add layers. You need a base level of aerobic fitness that hiking alone won’t build fast enough.
Train specifically. The most effective preparation is weighted-pack hiking (30–40 lbs) on real terrain with real elevation gain. Do this twice a week for two months before your course. If you don’t have terrain nearby, stair-climbers with a loaded pack are a real alternative. The goal is building the cardiovascular engine and the specific leg strength for sustained uphill.
Learn the vocabulary. Read at least the first four chapters of Freedom of the Hills (The Mountaineers, 9th edition). This isn’t academic: your course will use this language constantly, and having it already loaded into your brain means you absorb technique faster rather than decoding jargon. The ice axe chapters, the crampon chapter, and the rope travel chapter are the ones worth reading twice.
Get your boots broken in. If you bought mountaineering boots, wear them on your training hikes starting now. Six weeks of regular hiking breaks them in enough that blisters are less likely to ruin your first course day.
A standard beginner mountaineering course is 3–5 days. The first day or two are classroom and practice on a training glacier or snowfield. The final days are the summit attempt.
Here’s what the course actually teaches:
Self-arrest. You’ll spend hours practicing falling on a snow slope and stopping yourself with your ice axe. It feels redundant until it doesn’t: this is the survival skill, and muscle memory is how it works. Some courses have you do 50+ self-arrests before the summit push. That’s correct.
Crampon walking. Crampons change how you move. The technique (flat-footing on moderate slopes, front-pointing on steeper ones) takes most people half a day to internalize. The common beginner error is catching a crampon point on your gaiter or other leg. Go slow until it’s automatic.
Rope team travel. On a glacier, your team ropes together with 15–20 feet of coils between each person. You practice moving in sync, managing rope tension, and what happens when someone falls into a crevasse (the rest of the team drops into self-arrest position immediately). This is physical and mental coordination, not just technique.
Crevasse rescue. Your guide will explain the pulley system for hauling a fallen team member out of a crevasse. You won’t need to execute this on your first course (your guides carry everything and manage the rope), but knowing it intellectually makes you a better rope-team partner.
Weather reading. On summit day, you’ll learn to watch for afternoon thunderstorms, cloud development, and wind changes. Most beginner mountaineering accidents happen because teams push through deteriorating conditions. The single most important judgment skill is knowing when to turn around.
Summit day starts early, typically 2–4am. The reason is twofold: snow is firmer and more stable before the sun softens it, and you want to clear the summit before afternoon thunderstorms arrive. You’ll eat before you sleep and eat again immediately on waking.
The first hour in the dark is mentally the hardest. Everyone’s headlamps are bobbing, the cold is real, and it doesn’t look like the photos. Push through the first hour. By the time the sky starts lightening, you’ll be warm and moving.
Pace matters more than speed. The single biggest mistake beginners make on summit day is going too fast in the first two hours. Your guide will set a pace that feels almost too slow; this is called “rest stepping,” where you lock your downhill knee straight for a brief moment each step, letting the bone and not the muscle bear your weight. Follow the guide’s pace exactly. People who push faster in the morning are the ones who bonk at the crux.
Altitude effects. On peaks above 10,000 feet (Rainier summits at 14,411), most beginners feel at least mild altitude effects: headache, nausea, or just a vague sluggishness above 10,000 feet. This is normal. Stay hydrated, keep eating, and tell your guide if symptoms worsen. Severe headache plus discoordination is the signal to descend immediately; mild symptoms that don’t worsen are part of the experience.
The descent takes roughly half the ascent time, but this is when most accidents happen: tired legs, softening snow, and lowered alertness combine. Stay roped, stay focused, and do not treat the downhill as done-and-over.
Most beginner mountaineering courses don’t teach you to climb mountains; they teach you the specific skills to safely attempt one guided objective. Here’s what to internalize before you show up:
Ice axe grip and arrest position. You can practice the arrest position in your living room without snow. Hold the head of the axe in your uphill hand, spike down, pick pointing behind you. Drop to your chest, drive the pick in. The muscle memory for which hand goes where is worth building before you’re on a 35-degree snow slope trying to remember it.
Packing your pack efficiently. Know where your crampons, extra layers, food, water, headlamp, and sunscreen live in your pack without looking. Summit day involves putting on crampons in the dark on a cold slope. If you have to excavate your pack to find the crampon bag, you’re slowing down your whole team.
Navigation basics. On most glacier routes, visibility can drop to near zero quickly. Knowing how to take and follow a compass bearing (and how to read a topographic map) is worth practicing before you need it. The Mountaineers’ Wilderness Navigation is the companion to Freedom of the Hills and covers this specifically.
Rope coiling. Your guide will teach you this on the course, but if you can already coil a rope cleanly, you won’t be the slowest person on the team when it’s time to move.
After the course: building toward your second peak
Most people who complete a beginner mountaineering course want to do it again immediately. This is the right instinct: your second route is where you actually start retaining skills rather than relearning them from scratch.
The progression most people follow: Rainier or Shasta for the first objective, then a harder route on the same peak or a different glaciated peak (like Mount Baker or Glacier Peak in the North Cascades). After two or three guided routes, you’ll have the skills to start leading your own rope teams with more experienced partners.
The climbing community is welcoming to people who are serious about learning. Find a local mountaineering club (The Mountaineers in Seattle and the Colorado Mountain Club are two of the best) and get on their beginner course waitlists. These courses are cheaper than guide services, run multiple times per year, and build a local community that carries on well past your first summit.
Save your money
What you don't need yet
Beginners get pressured to buy a lot of stuff that doesn't help them play
better. Here's what we'd skip on day one.
Technical ice tools — Curved, aggressive ice axes are for vertical ice climbing. For your first glacier routes, the straight Black Diamond Raven is right and the technical tools are wrong.
Crevasse rescue kit — You need to know crevasse rescue: that's taught in every beginner course. But you don't need to own the pulleys, prusiks, and carabiners until your guide isn't carrying them for you.
Avalanche beacon — Beacon, probe, and shovel are essential for off-piste skiing and backcountry travel in avalanche terrain. Many beginner mountaineering routes don't expose you to significant avalanche hazard; your guide will brief you before the approach if they're needed.
Double-plastic boots — Old-school double boots are for Himalayan expeditions and extreme cold. Modern single-shell mountaineering boots are warmer and lighter for the objectives most beginners pursue.
Rope — Your guide carries the rope on guided courses. When you graduate to leading your own rope teams, buy then: a 50m 8.5mm dry-treated rope is the standard.
GPS device — Navigation on glaciers matters, but most beginner routes follow tracks. A map and compass (and knowing how to use them) is more valuable than a GPS gadget you haven't learned.
First week
Your first seven days
A short, real plan to get from gear-on-doorstep to actually playing.
Sign up for a beginner mountaineering course. The American Alpine Institute, NOLS, and REI Adventures all offer excellent intro courses. Do this before buying gear. · Action
Read 'Freedom of the Hills', the definitive beginner mountaineering manual. It covers every skill, term, and technique you'll encounter in your first course. · Learn
Follow @mountaineers_org on Instagram and spend an evening reading trip reports for your target peak on SummitPost. · Learn
SummitPost · Community-written peak guides and trip reports, essential research before any summit attempt
Get aerobically fit before the course: mountaineering is cardiovascular. Hiking with a loaded pack (30–40 lbs) on local hills twice a week is the most specific preparation. · Action
FAQ
Common questions
How much does it cost to get started in mountaineering?
Expect $600–1,200 for gear (boots, axe, crampons, harness, helmet, shell jacket) plus $400–800 for a beginner course. It's a high upfront cost, but the gear is bought once and lasts years. Rent on your first course to figure out what you actually need before spending full price.
Do I need a course, or can I teach myself?
You need a course. Self-arrest, crevasse rescue, glacier travel, and rope team protocols are safety skills that require supervised practice on real terrain. Mountaineering without these skills isn't adventurous; it's just dangerous. Every mountaineering fatality investigation has 'inadequate training' somewhere in it.
What's the difference between mountaineering, hiking, and rock climbing?
Hiking stays on trails without technical terrain. Rock climbing is about vertical rock faces with ropes and specific protection gear. Mountaineering combines both: you're on glaciated peaks using ice axe, crampons, and ropes, with both hiking approaches and technical terrain. Rainier or Shasta is a classic beginner mountaineering objective.
What peak should I start with?
In the Pacific Northwest: Mount Rainier (normal route) and Mount Shasta are the canonical beginner peaks, with excellent guiding infrastructure. In Colorado: most of the 14ers are non-technical. In the Alps: the Monte Rosa standard route or the Haute Route traverse are popular first objectives. Start with a peak that has an established beginner route and guide services.
How fit do I need to be?
Considerably fitter than hiking. Summit days on a glaciated peak often run 10-16 hours, carrying 30-40 lbs, gaining 4,000-6,000 vertical feet. The best training is weighted-pack hikes on local terrain. Start 3-4 months before your objective and build to 12+ mile days with elevation gain.
Can I rent gear instead of buying?
Yes. For your first course, rent crampons and an ice axe from the school or a local gear shop. Boots are harder to rent well (fit is critical), so if you're going to own one thing from the start, own the boots. Harnesses and helmets are cheap enough that renting versus buying is a wash.
The Mountaineers — Seattle-based climbing club with one of the most respected beginner mountaineering course curricula in the world. Their book 'Freedom of the Hills' is the definitive beginner text.
American Alpine Institute — Premier guiding and education school for mountaineering, with courses on Rainier, Baker, and beyond. Where serious beginners learn.
SummitPost — Community-written peak guides and trip reports. Essential research before any summit attempt; read the current season's reports.
American Alpine Club — National mountaineering organization with a gear library (free/cheap gear rentals for members), accident reports, and grants for expeditions.
r/Mountaineering — Active community. Good for trip reports, gear Q&A, and finding partners. Read the wiki before asking beginner questions.
Freedom of the Hills (book) — The Mountaineers' 9th edition. If you read one thing before your first course, make it this.
Mountain Project — Route database with user reviews. More focused on rock climbing but increasingly useful for alpine routes and conditions.
As an Amazon Associate, JustBeginning earns from qualifying purchases.
We may also earn commission from other affiliate programs linked on this
page. Editorial recommendations are independent; we don't choose
products based on commission rates.
Product prices and availability are accurate as of the date and time
indicated and are subject to change. Any price and availability
information shown on Amazon at the time of purchase will apply.


 Best starter