Cake decorating looks overwhelming from the outside: shelves of piping tips, six kinds of fondant, tutorials that assume you know what a bench scraper is. Beautiful cakes start with three things: a ball-bearing turntable, a solid piping set, and a good offset spatula. Here's what to buy first and what to leave at the store.
By Colin B. · Published May 23, 2026 · Last reviewed June 3, 2026
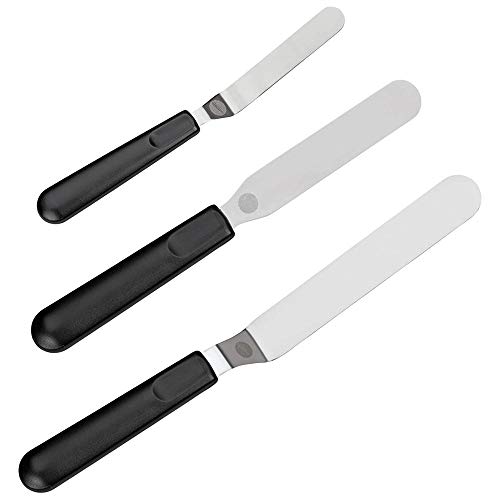
Wilton Icing Spatula Set, 3-Piece
— Wilton's offset spatula, the right shape for spreading frosting without dragging knuckles through the cake.
Budget total
$80
Typical total
$160
A beginner cake setup is mostly tools, not expensive ingredients. A solid turntable, piping set, good pans, and an offset spatula gets you to your first real decorated cake without overspending.
We earn commission on qualifying Amazon purchases — see our
affiliate disclosure.
Price tiers and budget totals shown above are editorial estimates;
actual Amazon prices vary.
At a glance
Our top pick in each category
The fastest path through this guide — each best-starter pick by category.
Scroll for the budget and upgrade alternatives.
Get your buttercream skills before you buy a single piece of fondant. Fondant looks flawless in photos, but it's harder to work with than it looks and most beginners prefer the taste of buttercream anyway. Learn to smooth buttercream first — it's the harder skill and the more useful one.
A ball-bearing turntable is not optional. The free-spinning base is what makes smooth frosting possible — you hold the scraper still and spin the cake into it. A wobbly plastic turntable will fight you at every step. Spend $35 on the Ateco 612 and never think about it again.
You don't need 100 piping tips. A round tip (#1A), a large open star (#1M), and a closed star (#2D) cover 80% of everything in beginner tutorials. Buy a set for the variety, but start with those three and learn them well before exploring the rest.
The turntable is the most important piece of cake-decorating equipment — more important than piping tips, more important than the spatula. A smooth-spinning ball-bearing base lets you hold your scraper or spatula perfectly still while the cake rotates into it, which is how you get those glass-smooth sides. A cheap plastic turntable wobbles, sticks, and makes everything harder. Buy the Ateco 612 once and use it for the next decade.
Turntables — what's the difference?
A few common shapes, each making a different trade.
Standard Ball-Bearing
Smooth, stable, the default for 90% of cake decorators.
Top diameter
12 inches
Material
Cast aluminum
Tilt
None
Best for All buttercream work, ganache drips, most fondant applications
Tradeoff Can't tilt — you have to move around the cake, not the other way around
The Ateco 612 is the default recommendation of professional pastry chefs and serious home bakers alike. Cast aluminum base, smooth ball-bearing mechanism, and a 12-inch top that accommodates standard layer cakes. It spins freely, stops cleanly, and doesn't wobble. This is the turntable you'll still be using in ten years.
What we like
Ball-bearing mechanism spins effortlessly, never sticks mid-rotation
Heavy cast aluminum base stays put on the counter
12-inch top fits standard and oversized cakes
What to know
Weighs about 3 lbs, heavier than plastic options
Costs $35, but worth every cent over the budget alternatives
If $35 is too much to commit before you know whether cake decorating will stick, the Kootek is the best budget aluminum option. It doesn't spin as smoothly as the Ateco, but it's a real improvement over plastic and keeps your first cakes from being a frustrating battle with the equipment.
What we like
Real aluminum, a big step up from any plastic turntable
Good for occasional bakers not ready to commit to the Ateco
What to know
Bearing noticeably coarser than the Ateco, you'll feel the difference
Worth upgrading once you're baking more than once a month
★★★★☆Our rating· Only 1 left in stock - order soon.
The PME PT464 raises your cake 5 inches off the counter, the height professional decorators work at, eliminating back strain during long sessions. The 12-inch aluminum top spins on a smooth bearing and the all-metal construction is sturdier than budget options. Worth it if you're decorating regularly.
What we like
Raises cake 5 inches to professional working height, reduces back strain
All-metal construction sturdier than any budget or mid-range option
Piping tips are cheap and there are hundreds of them. The overwhelm is real, but the solution is simple: buy a set once and learn three tips first. The large round #1A makes clean dots, blobs, and smooth writing. The large open star #1M makes the rosettes you see on every grocery-store cupcake. The closed star #2D makes the tighter, more detailed star swirls. Those three cover 80% of beginner tutorials. The rest of the set is there when you're ready.
Best starter
Wilton
Master Cake Decorating Piping Tips Set
$53.19 as of Jun 22, 2026
★★★★★Our rating· In Stock
55 tips, piping bags, couplers, and a storage case — everything in one box. Wilton's numbering system is the industry standard, so every tutorial you'll ever watch uses these tip numbers. Start with tips #1A, #1M, and #2D and work outward. The set will grow into you rather than you growing out of it.
What we like
55 tips covers every beginner technique and most intermediate ones
Wilton numbering matches every tutorial you'll find online
Includes bags, couplers, and storage case in one box
What to know
Specialty tips like basketweave take real practice to master
The 55-tip selection can feel overwhelming at first
If you already have a basic set but don't have the 1M in a large size, get it separately. This is the tip that makes those cloud-puff swirls on cupcakes and the dramatic rosette borders on layer cakes. Having a spare is smart — you'll use this one more than any other.
What we like
The single most-used piping tip for rosettes and swirl borders
Having two lets you swap frosting colors without stopping to wash
What to know
Only useful if your kit doesn't already have a large 1M tip
You need two things to frost a cake smoothly: an offset spatula to spread frosting and a bench scraper to smooth the sides. The offset spatula's bent handle keeps your knuckles above the frosting so you can spread evenly without dragging. The bench scraper — a flat metal rectangle — gets pulled against the spinning turntable to create that perfectly smooth finish. Together, they cost about $20 and make a bigger difference than any piping tip.
Best starter
Wilton
Icing Spatula Set, 3-Piece
$29.99 as of Jun 22, 2026
★★★★★Our rating· Only 12 left in stock - order soon.
Includes both an 9-inch offset and a straight spatula in one pack. The offset is your main frosting tool; the straight spatula handles the top of the cake and filling layers. Comfortable handle, flexible blade that gives you real tactile feedback, and priced at about $12. This is your daily driver.
What we like
Offset and straight in one pack, the two shapes you actually need
Flexible blade gives real tactile feedback while spreading frosting
What to know
9-inch offset is on the shorter side for very large cakes
★★★★☆Our rating· Only 19 left in stock - order soon.
The bench scraper is how you get the smooth, straight sides you see on professional cakes. Hold it against the cake at 90 degrees while spinning the turntable — the frosting piles up against the scraper and levels off. Ateco's version is thicker and stiffer than cheap plastic options, which means less flex and a cleaner finish.
What we like
Thicker, stiffer steel than cheap plastic scrapers for a cleaner finish
The right tool for achieving glass-smooth buttercream sides
What to know
Takes a few cakes to calibrate the right angle and pressure
Only effective when paired with a ball-bearing turntable
Standard decorated layer cakes use two or three 8-inch round pans, 2 inches deep. That combination is what every tutorial assumes, and it's what cake boards and boxes are sized for. Fat Daddio's pans are the industry standard for a reason: straight aluminum sides (no nonstick coating to scratch off), precise 90-degree corners that hold their shape bake after bake, and even heat distribution. Buy two 8-inch rounds and one 6-inch round and you're covered for everything in your first year.
Best starter
Fat Daddio's
Round Cake Pan 8-Inch (2-pack)
$24.69 as of Jun 22, 2026
★★★★★Our rating· In Stock
Fat Daddio's is the default recommendation for bakers who want professional results without professional prices. Anodized aluminum heats evenly with no hot spots, the straight sides give you clean layers, and they last forever if you hand-wash them. Two 8-inch rounds gets you the most common layer cake setup.
What we like
Anodized aluminum heats evenly with no hot spots
Straight sides produce clean, stackable layers for layer cakes
Lasts indefinitely with hand washing, a lifetime pan purchase
What to know
Hand-wash only, dishwashers will oxidize the aluminum
No nonstick coating means parchment paper is required
Slightly thinner than the Fat Daddio's but very widely available, often on sale, and a genuine step up from nonstick coated pans. Good first pans if you're not ready to commit to the Daddio's price.
What we like
Widely available and frequently on sale at craft stores
Real improvement over thin nonstick coated consumer pans
What to know
Thinner aluminum can overbake edges before the center is done
Worth upgrading to Fat Daddio's once you're baking regularly
When you're ready to make a two-tier cake, you need a smaller set. 6-inch rounds are the standard top tier for an 8-6 two-tier — a classic combination. Same quality as the 8-inch pans, sized for a smaller audience (or a more dramatic presentation).
What we like
Standard top-tier size for the classic 8-and-6 two-tier cake
Same anodized aluminum quality as the 8-inch pans
What to know
Only worth buying when you're ready for tiered cakes
Fondant is optional until you want it. Most beginner cakes look beautiful in smooth or textured buttercream, and buttercream is easier to work with, tastes better, and forgives more mistakes. When you're ready to try fondant, Wilton's ready-to-use white fondant is the accessible entry point — knead it until pliable, tint with gel color, roll to 1/8-inch, and drape. A fondant smoother removes air bubbles and wrinkles after draping. That two-tool combo is all you need to get started.
Best starter
Wilton
White Fondant, 5 lb
$$
★★★★★Our rating
Widely available, easy to work with for beginners, and consistent in texture batch to batch. It's not quite as pliable as some premium fondants (Satin Ice is the pro upgrade), but for your first several fondant cakes it's the right tool. One 5-lb block covers a standard 8-inch two-layer cake with enough leftover to practice.
What we like
Sold at most craft stores so you can restock mid-project
Consistent texture batch to batch, reliable for first fondant cakes
What to know
Dries out fast once opened, must keep unused fondant wrapped in plastic
Not as pliable as professional fondants like Satin Ice
After draping fondant over the cake, you need to work out the air bubbles and smooth the surface without tearing. The Easy Glide Smoother covers large areas in circular motions and gets into the top corners. Used in smooth, overlapping passes, it's how you get that porcelain finish. Essential if you're doing fondant — skippable if you're not.
What we like
Gets into top corners that flat-hand smoothing misses
Essential for achieving the porcelain fondant finish
What to know
Only useful if you're doing fondant, skip if sticking to buttercream
Most beginners overbuy piping tips and underspend on a turntable. Here's what the first weekend of real cake decorating actually looks like — the skills that move the needle, the mistakes everyone makes, and when it starts clicking.
Cake decorating has a reputation for being either easy (slap some frosting on it) or impossibly hard (those wedding cakes on YouTube). The truth is closer to: it’s a craft with a real learning curve and a handful of specific techniques that, once they click, make everything else easier.
The first ten hours are mostly about getting those fundamentals locked in. This is what they actually look like.
Hours 1–2: Bake the cake, make the buttercream
Before any decorating happens, you need something worth decorating. The single most common beginner mistake is trying to frost a warm or even room-temperature cake. Warm cake sweats. Warm cake causes frosting to slide. Warm cake is a losing battle.
Rule one: bake in advance. Cake layers baked the day before and chilled overnight in the refrigerator (wrapped in plastic) are easier to work with than same-day layers in every possible way — firmer, less crumbly, easier to level. If you can’t do overnight, minimum two hours cooling on the counter before you touch them.
Your first buttercream should be American buttercream: butter + powdered sugar + a splash of heavy cream + a pinch of salt. It’s the most forgiving. Swiss and Italian meringue buttercreams are silkier and less sweet, but they require a stand mixer and careful temperature management. Learn American first; you’ll recognize the upgrade path when you’re ready for it.
Make more than you think you need. A two-layer 8-inch cake requires about 4–5 cups of buttercream for a proper crumb coat, final coat, and some decoration. Beginners consistently underestimate this and run out mid-cake. Extra buttercream keeps in the fridge for two weeks.
The crumb coat is the secret move that separates cakes that look polished from cakes that look like someone got impatient.
Here’s what it is: a thin first layer of buttercream applied over the entire cake — top and sides — that traps all the loose crumbs before your final coat. It doesn’t have to be pretty. It has to be complete. Once you’ve crumb-coated the entire cake, put it in the refrigerator for 15–20 minutes. The buttercream sets, the crumbs are locked in, and your final coat goes on over a clean base.
Without the crumb coat, you spend your final coat trying to push stray crumbs back under the frosting. They win. They always win.
The turntable changes everything. Put your chilled crumb-coated cake on the Ateco, load a big glob of buttercream on top, and spread it with your offset spatula as you spin the turntable slowly with your other hand. For the sides, hold the bench scraper at 90 degrees, press it gently against the frosting, and slowly rotate the turntable one full revolution. The scraper skims the high spots and leaves a smooth surface.
This technique takes a few cakes to calibrate — everyone’s first smooth-sided cake still has some visible ridges. That’s expected. The important thing is that you understand why it works: you’re using the rotation to create a mechanical advantage over your own hand wobble. Practice the motion before you do it for real.
Hours 6–8: Piping basics
Piping is the part that looks complicated and turns out to be manageable. The three-tip starter kit covers most of what you’ll need:
The round tip (#1A): Fill the piping bag, hold it straight above the surface, squeeze steadily without moving, and lift straight up when you stop pressure. That makes a clean blob — the building block of dots, writing, and simple borders. Practice on parchment paper until you can make blobs of consistent size without “tails” at the top (tails mean you moved the tip as you lifted).
The large open star (#1M): Hold the bag straight above the surface, start squeezing, slowly swirl outward and then back to center while lifting — that’s a rosette. Hold it vertical and pipe while moving in a straight line — that’s a shell border. These two movements make up 90% of what you see on decorated cakes in bakeries.
The closed star (#2D): Same swirl motion as the 1M, tighter result. Good for more intricate decorations where the 1M rosettes would overpower the design.
The common beginner mistakes are all about pressure: too much pressure makes blobs that spread flat; too little makes blobs that look stringy. The right pressure holds its shape. Parchment paper practice costs you nothing — spend 15 minutes on it before you touch the real cake.
By hour nine you’ve baked, crumb-coated, smoothed, and piped a few test runs on parchment. Put it all together:
Crumb coat, chill 20 minutes.
Final coat of buttercream, smoothed with the turntable-and-scraper method.
Chill 20 minutes again so the final coat sets.
Pipe your border (shell border with the 1M on the top edge is the classic) and any decoration.
Your first cake will have imperfections — a slightly uneven top, a spot where the scraper dug in too deep, a rosette that started well and ended wobbly. This is normal. The standard isn’t perfection; the standard is “noticeably better than someone who’s never tried.” You will clear that bar.
The thing about cake decorating is that it improves faster than almost any craft because you get real, visual feedback every single cake. You can see exactly what went wrong and why. The mental model updates quickly.
The mistakes everyone makes (in order of frequency)
Frosting a warm cake. Bake the day before. Chill before frosting. No exceptions.
Thin buttercream. If your buttercream is so soft it slides off the spatula, it’s too thin to frost a cake smoothly. Add more powdered sugar, tablespoon by tablespoon, until it holds its shape when you pull the spatula away.
Pressing too hard with the scraper. The scraper should barely touch the cake — let the rotation do the work. Pressing hard digs troughs.
Skipping the crumb coat. Yes, it’s an extra step. It’s the step that matters most.
Overfilling the piping bag. Half-full is correct. A full bag squeezes unpredictably from the top and makes your hand tired.
What to do at hour eleven
The fastest way to improve between sessions is to watch a single technique video focused on one specific thing you want to fix — smooth sides, better rosettes, writing on a cake — and practice just that thing next time. Chelsweets and Preppy Kitchen both have clear, step-by-step videos for every technique a beginner encounters.
The second thing that moves the needle is baking for someone. A birthday cake has an occasion attached, which adds stakes, which forces focus. Make cake for people and you’ll improve twice as fast as practicing alone.
You’re not a beginner anymore at hour ten. You’re a baker who knows what smooth buttercream feels like and why the crumb coat matters — which is most of the job.
Save your money
What you don't need yet
Beginners get pressured to buy a lot of stuff that doesn't help them play
better. Here's what we'd skip on day one.
An airbrush kit — Stunning results once you know how to use one. But airbrushing has a real learning curve and adds cleanup time. Master buttercream and piping first — the airbrush is a year-two tool.
Sugar flowers and gum paste tools — Gum paste flowers look incredible and take serious practice to make well. A single sugar rose takes 30–45 minutes when you're learning. Not the place to start.
A cake leveler — A long serrated knife and a ruler accomplishes the exact same task. Learn to level by hand before adding a gadget.
Specialty pans (bundt, sculpted, character molds) — Fun for themed cakes, but they don't teach you the fundamentals. Start round, get your layers and frosting right, then branch out.
Luster dust and edible glitter — Genuinely beautiful, genuinely easy to misuse. The instinct to add sparkle before the base decoration is solid is a real beginner trap.
First week
Your first seven days
A short, real plan to get from gear-on-doorstep to actually playing.
Order the turntable so it arrives before baking day. · Buy
Bake two 8-inch round layers and let them cool completely — at least two hours, or overnight in the fridge. Frosting a warm cake is a losing battle. · Action
Watch one smooth-buttercream tutorial before your first frosting session. · Learn
Apply a crumb coat first — a thin layer of frosting that seals in the crumbs before your final coat. Chill it for 15 minutes before continuing. · Action
Pipe a practice round on parchment paper before putting tips to the real cake. Pressure, speed, and angle all affect the result, and parchment paper is free. · Action
FAQ
Common questions
Do I need a stand mixer to decorate cakes?
You need a stand mixer or a powerful hand mixer to make good buttercream — American buttercream can be done with a hand mixer, but Swiss or Italian meringue buttercream really needs a stand mixer. The decorating tools (turntable, tips, spatulas) work the same regardless. If you're just starting out, a good hand mixer gets you there.
Should I start with buttercream or fondant?
Start with buttercream, always. It tastes better, it's more forgiving, and it teaches you the actual skills (smooth application, piping pressure, color mixing) that make fondant easier when you get there. Most decorated cakes you see in the wild are buttercream, not fondant.
How do I get perfectly smooth sides on a cake?
Three-part answer: (1) a ball-bearing turntable, (2) a stiff bench scraper held at 90 degrees while you spin, and (3) the right buttercream consistency — not too soft, not too stiff. Chill the crumb coat for 15 minutes before adding the final layer. It takes a few cakes to calibrate, but the technique clicks quickly.
What piping tips should a beginner start with?
Three: a large round (#1A) for blobs and writing, a large open star (#1M) for rosettes and swirls, and a closed star (#2D) for tighter star borders. Those three cover nearly everything you'll see in beginner tutorials. Buy a set for the variety but don't try to learn all 55 tips at once.
How far ahead can I bake and decorate a cake?
Cake layers can be baked 2–3 days ahead, wrapped tightly in plastic, and stored at room temperature (or up to a week in the freezer). A fully frosted buttercream cake keeps at room temperature for 2–3 days. Fondant-covered cakes should not be refrigerated — condensation ruins the surface.
How much does it cost to start cake decorating?
Around $80–160 for the tools — turntable, piping set, offset spatula, and pans. Ingredients (butter, powdered sugar, eggs, flour) are kitchen staples. The tools are a one-time purchase that lasts years; budget closer to $160 to do it right the first time and avoid replacing cheap equipment.
Chelsweets — Chelsea Monroe-Cassel's blog. The best beginner-friendly cake decorating resource on the internet. Step-by-step photos, clear technique explanation, and recipes that actually work.
Sugar Geek Show — Liz Marek's site. Scientific approach to baking — explains the why behind techniques, which makes troubleshooting much easier. Especially good for buttercream troubleshooting.
Preppy Kitchen (YouTube) — John Kanell's channel. Exceptionally well-produced recipe and technique videos. Start here for layer cakes and buttercream tutorials.
How to Cake It (YouTube) — Yolanda Gampp's channel. More advanced and sculptural, but her foundational technique videos are solid and entertaining. Watch after you've got smooth buttercream down.
r/cakedecorating — Active community. Post your first attempts — the feedback is genuinely helpful and the community is encouraging. The wiki has good beginner resource links.
Wilton School — In-person Wilton Method courses are offered at many Michaels locations. Course 1 (decorating basics) covers buttercream application, borders, and basic flowers in four sessions. Worth it if you learn better hands-on.
As an Amazon Associate, JustBeginning earns from qualifying purchases.
We may also earn commission from other affiliate programs linked on this
page. Editorial recommendations are independent; we don't choose
products based on commission rates.
Product prices and availability are accurate as of the date and time
indicated and are subject to change. Any price and availability
information shown on Amazon at the time of purchase will apply.