Torch enameling fuses powdered glass onto metal using nothing but a butane flame — no kiln, no chemistry degree, just heat and color. The results look like tiny stained-glass jewelry, and the learning curve is gentler than it looks. Your starter setup runs $150–300. Here's what actually matters and what you can skip.
By Colin B. · Published May 31, 2026 · Last reviewed May 31, 2026
A butane torch, enamel powder sampler, copper blanks, and basic tools run $150–280. Powders and blanks are the consumable costs — budget $30–50 a month as you practice.
We earn commission on qualifying Amazon purchases — see our
affiliate disclosure.
Price tiers and budget totals shown above are editorial estimates;
actual Amazon prices vary.
At a glance
Our top pick in each category
The fastest path through this guide — each best-starter pick by category.
Scroll for the budget and upgrade alternatives.
Start with copper, not fine silver. Copper blanks cost $10–20 for a pack of 20. Fine silver blanks cost $3–8 each. You will burn through your first ten pieces practicing temperature control — make those mistakes on cheap copper.
Ventilation is not optional. Torch enameling produces fumes from heated metal and glass powder. Work near an open window or in a garage with the door open. A small fan blowing fumes away from your face is worth adding.
Temperature control is the real skill. You're learning to read when enamel has fused correctly — it should go glossy and smooth, not bubbly or dull. No tool substitutes for your eye. The good news: a single color on a copper blank takes 30–90 seconds, and you'll do dozens of practice pieces.
The gear
What you actually need
Torches
Your torch is your oven. For small copper blanks up to about 1.5 inches, a micro butane torch is genuinely ideal — controllable, compact, and cheap to run. For anything larger (2–3 inch copper plates, brooches), you'll want the extra heat of a propane canister torch. Start with micro butane unless you already know you want to work at scale.
Torches — what's the difference?
A few common shapes, each making a different trade.
Micro butane
Precise, compact, best for small jewelry pieces up to 1.5 inches.
Fuel
Butane cartridge
Best size
Up to 1.5" blank
Flame
Pencil-thin
Best for Pendants, earrings, rings — standard jewelry scale
Tradeoff Insufficient heat for brooches or copper bowls
The GB2001 is what jewelry instructors hand students on day one. Adjustable flame, piezo ignition, stable base, consistent output. Runs on standard butane — refills in 30 seconds at any hardware store. The flame is precise enough for small copper blanks and forgiving enough that you're learning the material, not fighting the tool.
What we like
Adjustable, precise flame — the standard in jewelry instruction
Piezo ignition with reliable one-click start
Stable flat base frees your hands between firings
What to know
~35 min burn time per fill — have extra butane cans ready
Small tank runs dry mid-session if you forget to fill it
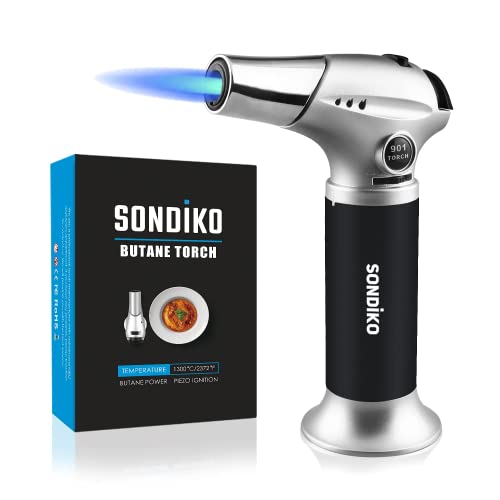
Under $20 and the lowest-risk way to find out if torch enameling clicks before spending more. The flame is less refined than the Blazer — a bit wider, harder to dial precisely — but adequate for single-layer opaque work on 1-inch copper discs. Buy it if you're not yet sure this hobby sticks.
What we like
Under $20 — lowest-risk way to try the hobby first
Refillable with standard butane, same as premium torches
What to know
Wider flame makes precise heat harder to control
Not reliable for larger pieces or layered enamel techniques
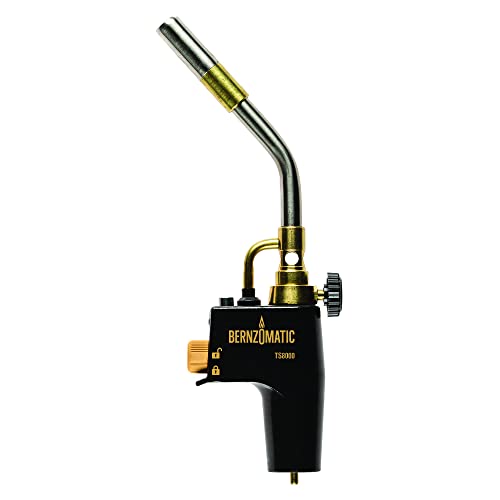
When you're ready to enamel larger copper forms — 2-3 inch brooches, small bowls, cuff-size pieces — the TS8000 with a propane canister is the upgrade. Far more BTUs than any butane micro torch, self-igniting, and the swirl-flame pattern heats large surfaces more evenly than a pencil flame ever could.
What we like
Propane power handles larger copper forms that butane can't heat
Swirl-flame heats wide surfaces evenly — no cold spots
Self-igniting trigger — no lighter needed
What to know
Far too hot for 1-inch blanks — will burn enamel or copper
Requires a separate propane canister, bulkier to store
Enamel powder is finely ground glass, colored with metal oxides. You sift a thin layer onto metal, then heat it until it melts and fuses. Opaque enamels are vivid and forgiving — the right starting point. Transparent enamels let the metal show through for a jewel-like depth, but require cleaner metal prep. Buy a small opaque assortment first; you'll know within a few firings which colors you want to expand.
Best starter
Sundance Art Glass
Warm Opaque Enamel Assortment for Metals, 8 Colors
$65.00 as of Jun 22, 2026
★★★★★Our rating· Only 2 left in stock - order soon.
An 8-color warm opaque assortment is the ideal entry point — opaques don't require a clean base layer and fire predictably on copper. Each jar holds enough powder for a dozen practice pieces, and a warm-toned set gives you real information about which color families you'll want to expand before committing to full jars.
What we like
Opaque colors are the most forgiving for beginners
Vivid on copper without needing a base layer first
8-color variety reveals which families you'll want to stock up on
What to know
Warm-tone set only — you'll want cool colors eventually too
Runs out faster than you expect — stock an extra jar of favorites
Transparent enamels let the copper glow through the glass layer, producing a jewel-like depth opaques can't match. More demanding — metal needs to be cleaner, the layer thinner — but distinctly more sophisticated. Worth buying once you've fired 15–20 opaque pieces and want to explore the second technique.
What we like
Jewel-like depth impossible to achieve with opaque enamel
Coordinated palette means colors layer well together
What to know
Requires cleaner metal prep — copper oxidation ruins the effect
Clear flux is the transparent base layer fired onto bare metal before colored enamels. On copper it creates an oxide-free foundation so transparent colors read true. Not required for opaque work, but it's the unlock for using transparents reliably on copper. One jar lasts through many pieces since flux goes on thin.
What we like
Creates a stable base that makes transparent enamels pop on copper
One jar lasts through many pieces — flux goes on very thin
What to know
Unnecessary for pure opaque-only work
Fires slightly greenish on first layer — alarming but normal
Copper is the ideal starter metal — cheap, widely available, and forgiving of beginner temperature mistakes. You want pre-cut discs at 20–24 gauge, polished or lightly sanded. The 1.5-inch disc is a versatile practice size: enough surface to see your technique, and heatable with a micro torch. Start with copper and upgrade to fine silver (from a jewelry supplier) once your firings are consistent.
Best starter
Copperlab
1.5-Inch Round Copper Disc Blanks (15-pack)
$19.99 as of Jun 22, 2026
★★★★★Our rating· Only 19 left in stock - order soon.
Pre-polished round copper discs in 16-oz copper weight, consistent and ready to clean and fire. Fifteen discs gets you well into learning firing stages without reordering. The 1.5-inch size is heatable with a micro torch and large enough to practice simple two-color designs.
What we like
Pre-polished, consistent copper weight — ready to clean and enamel
15-pack covers a full month of regular practice sessions
1.5" size suits micro torch heat output and beginner designs
What to know
Edges may need light sanding to prevent enamel crawling off the rim
Handle with gloves from the bag — fingerprints are invisible and ruinous
Once you can land a clean single-color firing, having a pre-drilled hole means you can string your pieces immediately — no drill needed. ImpressArt's copper circles are stamping-grade (consistent gauge, polished face) and the 24-pack gives plenty of room to experiment.
What we like
Pre-drilled hole — pieces are wearable straight off the firing block
24-pack keeps sessions going without reordering interruption
What to know
Stamping-grade thickness heats slower than thin enameling blanks
1" diameter is small — technique errors are more visible at scale
Beyond the torch and metal, you need four things: a sifter to apply enamel powder evenly, a trivet to rest the piece on during firing, copper or plastic tongs for the pickle bath, and a citric acid pickle to clean firescale off copper between layers. None of these are expensive — the full tool setup runs under $60.
Best starter
Schlabach Woodshed
Enamel Sifter, ½-Inch Mesh
$17.79 as of Jun 22, 2026
★★★★★Our rating· Only 17 left in stock - order soon.
Sifting is the standard method for applying enamel powder — you tap the small mesh screen over your blank to get a thin, even layer. This ½-inch sifter is the right size for 1-1.5 inch copper discs. Buy two or three if you plan on working with multiple colors, so you're not cleaning between every application.
What we like
Sifting gives the most even, controllable powder application
Small enough to work precisely over 1-inch copper discs
What to know
One sifter = one color at a time — buy 2-3 to avoid cleaning mid-session
Mesh can clog with very fine enamel grits — tap gently
Trivets support your piece above the firebrick so heat reaches the metal evenly from below. The three-point design minimizes contact with the enamel surface and lets you fire and rotate pieces safely. This 2-inch diameter suits most beginner-scale copper blanks.
What we like
Three-point contact minimizes marks on the enamel surface
Allows even underside heating — fewer cold-spot bubbles
What to know
Glass drips fuse to the trivet — buy a few extras for multi-color work
2" diameter is the right size for discs; larger work needs bigger trivets
★★★★☆Our rating· Only 1 left in stock - order soon.
After firing copper, a dark oxide layer (firescale) forms on any unprotected metal. Pickle dissolves it and leaves clean copper ready for the next layer. Citric acid is the safe, modern option: it works at room temperature, produces no harsh fumes, and you can mix it with water in any plastic container.
What we like
Safer than sulfuric-acid pickle — no harsh fumes at all
Works at room temperature, no warming pot required
2 lb lasts a long time; a little goes a long way mixed with water
What to know
Steel tools poison the solution — use copper or plastic tongs only
Exhausted pickle turns blue-green and stops working — replace it
Torch enameling has a reputation for being fussy — temperature-sensitive, chemistry-dependent, and unforgiving of mistakes. Some of that reputation is earned, but most of it belongs to kiln enameling, which is a different discipline. With a butane torch and copper blanks, the feedback loop is short enough that most beginners fire their first successful piece in the first session.
Here’s what your first five hours actually look like.
Hour 1: Your first firing
Before you touch the torch, set up your workspace properly. You need a firebrick or soldering block as a heat-resistant surface, a copper mesh trivet to support your piece during firing, your sifter loaded with a single enamel color, and a cup of water nearby. Work near an open window. This isn’t optional — heated copper and glass powder both produce fumes.
Your first piece is a single color on a 1-inch copper disc. That’s it. No design, no stencil, no multiple layers.
Clean the blank first. Degrease it with dish soap and rinse it thoroughly, then handle it with gloves or tweezers — fingerprints leave oils that cause enamel to pull away from the surface. This step takes 30 seconds and will save you from mystifying failures later.
Sift the enamel. Hold the sifter over the blank and tap it lightly. You want a thin, even layer — thin enough that you can see the copper color through the powder. If the layer is too thick, the enamel will bubble and crawl rather than fusing smooth. More powder is the single most common beginner mistake.
Fire it. Place the blank on the trivet and move the torch flame in slow circles under and around the piece. Don’t focus the flame directly on top of the enamel — heat the copper from the sides and below. Watch the powder as it heats: it will go through three stages. First it turns white and rough (the glass particles are fusing). Then it goes bumpy and orange-peel. Then — the moment you’re waiting for — it goes smooth, glossy, and liquid-looking. That’s full fusion. Hold for two more seconds and remove the heat.
If you pull the torch at orange-peel, the surface looks textured and matte. If you push past glossy, the enamel starts to crawl, burn, or change color. The glossy stage is a 5–10 second window. You’ll miss it a few times before you catch it reliably — that’s normal and why you start with 30 copper blanks.
After your first session, the biggest skill to develop is recognizing the three firing stages — white, orange-peel, glossy — before they pass. This is an eye-skill, not a technical one, and it develops through repetition.
Fire five more single-color pieces. Try a different color. Notice how different colors behave differently: some opaques fuse quickly and show glossy early, others need a few more seconds. Blues tend to fuse slightly later than reds. Whites can be deceptive. None of this is in any guide; it comes from watching your own materials under your specific torch.
On your fifth or sixth piece, try a two-layer firing. Fire the first color to glossy. Let it cool completely (5 minutes on the trivet). Then sift a second color — or the same color in a different area — and fire again. Layering is where the depth of enameling begins.
The firescale problem. After firing, the bare copper areas of your blank will develop a dark, patchy oxide layer — firescale. This is normal and unavoidable. To clean it, drop the cooled piece into your citric acid pickle solution for 5–10 minutes. It will come out bright copper again. Never put steel tools into the pickle — use copper or plastic tongs only, or the bath turns green and deposits copper onto everything.
On fine copper, the transition between fresh-pickled brightness and re-fired darkness happens every layer. By your second session, you’ll have a rhythm: fire, cool, pickle, sift, fire again.
Hours 4–5: Your first real design
By hour four, you can land a clean single-layer firing consistently. Now you can make something intentional.
Stencil work. The simplest design technique: cut a shape out of a piece of aluminum foil and lay it on your fired blank. Sift a second color over it, then lift the foil carefully. The shape stays. Fire to glossy. The result is a two-color piece with clean hard edges, and the technique takes about five minutes to set up.
Sgraffito. Sift a thin layer of powder over a previously fired surface, then scratch a design into the unfired powder with a toothpick or dental tool. The scratches expose the color underneath. Fire to glossy and the scratched lines hold. This is low-stakes drawing — the mark is just powder before firing, and you can brush it off and start again.
What won’t work yet. Don’t attempt cloisonné (bending fine wire into cells) or liquid enamel painting yet. Those techniques require the foundation skills you’re still building. The rewarding work at this stage is single and two-color compositions, and there’s more range in those than it sounds.
At hour five, you will have fired somewhere between ten and twenty pieces. Some will be beautiful. Some will have crawled edges, wrong temperature, or fingerprint ghosts. All of them taught you something. This is how enameling works — every piece is either a success or data, and usually a little of both.
A few things that change the slope of your improvement significantly:
Buy fine silver blanks for your best designs. Once you can land consistent firings on copper, firing on fine silver (.999) is immediately more satisfying. No firescale. Transparent enamels read true. You’ll use fewer layers to get the effect you want. It’s worth the extra cost per blank once your technique is solid.
Learn counter enamel. Firing enamel on the back of a piece (counter enamel, usually a neutral color) prevents the piece from warping or cracking on larger forms. Not necessary for 1-inch discs, but relevant once you’re working at 2 inches and above.
Find a class. Torch enameling is one of the few crafts where a single hands-on session with someone better than you is worth more than ten hours of solo practice. Jewelry schools and bead stores often offer introductory workshops. The specific feedback you get on your temperature habits in a two-hour class is hard to replicate any other way.
Save your money
What you don't need yet
Beginners get pressured to buy a lot of stuff that doesn't help them play
better. Here's what we'd skip on day one.
A kiln — Torch enameling is specifically designed to work without one. Kilns add even heat for large or complex pieces — you're well over a year away from needing that.
Cloisonné wire — Bending fine wire into cells and filling them with enamel is one of enameling's most complex techniques. Learn to fire a flat even layer first.
Liquid painting enamel — A different discipline — applied with a brush, more like watercolor — that requires its own learning curve. Master sifted powder first.
Counter enamel — Firing enamel on the back of a piece prevents cracking on larger work. Completely unnecessary for 1-inch discs. Learn the front face first.
Gold foil (keum-boo) — Fusing fine gold foil under enamel is a beautiful advanced technique requiring fine silver substrate and precise temperature. Not day one.
A professional bench torch — Studio bench torches ($150–300) are for production work. The Blazer GB2001 is sufficient for years of serious enameling.
First week
Your first seven days
A short, real plan to get from gear-on-doorstep to actually playing.
Order copper blanks and a butane torch so they arrive before the weekend. · Buy
Watch a 10-minute torch enameling basics video to understand the three firing stages — rough/white, orange-peel, glossy. Recognizing those stages is the whole skill. · Learn
Set up your workspace near an open window with your firebrick, sifter, and pickle container before touching the torch. · Action
Fire five copper discs in one sitting — single color, no design. You're learning the temperature, not making jewelry yet. · Action
On day three, try a two-color piece using a stencil cut from aluminum foil. · Action
Post a photo of your first pieces to r/Enameling — the feedback is genuinely useful for catching temperature mistakes early. · Action
FAQ
Common questions
Do I need a kiln to do torch enameling?
No — torch enameling is specifically designed for flame rather than kiln heat. A butane micro torch reaches the necessary 1400–1500°F. Kilns are used for larger work and production enameling, but beginners have no use for one.
What's the difference between copper and fine silver for enameling?
Copper is the practice metal: $10–20 for a pack of blanks, forgiving of temperature mistakes, widely available. Fine silver (.999) has no firescale problem and makes transparent enamels read true color, but at $3–6 per blank it's your finish metal, not your learning metal. Buy fine silver from a jewelry supplier like Rio Grande once your firings are consistent.
Is torch enameling safe to do at home?
Yes, with precautions: work near an open window, keep a fan blowing fumes away from your face, and don't inhale enamel powder dust. The citric acid pickle is safe to handle with copper tongs. It's more cautious-craft than it is genuinely hazardous.
How long does it take to fire a single piece?
30–90 seconds of active flame for one enamel layer on a 1.5-inch copper disc with a micro torch. A first session of five practice pieces, including setup and pickle time, runs about an hour.
Why is my enamel coming out bumpy, not smooth?
Either the layer was too thick, or you pulled the torch before the enamel reached full flow. A thin, even sifted layer that shows the copper color through it is correct. Watch for the surface to go fully glossy before removing heat.
Can I enamel on brass or sterling silver?
Brass is problematic — the zinc causes off-gassing bubbles that ruin the enamel layer. Sterling (.925) has copper in it, which causes firescale just like bare copper. Stick with fine copper or fine silver (.999) for predictable results.
Torch Enameling on YouTube — Dozens of free beginner tutorials. Search 'torch enameling basics' and 'sifting enamel copper' for the most useful starting points.
As an Amazon Associate, JustBeginning earns from qualifying purchases.
We may also earn commission from other affiliate programs linked on this
page. Editorial recommendations are independent; we don't choose
products based on commission rates.
Product prices and availability are accurate as of the date and time
indicated and are subject to change. Any price and availability
information shown on Amazon at the time of purchase will apply.
Our top pickBlazer GB2001 Self-Igniting Butane Micro-Torch