Blacksmithing is one of the oldest crafts alive, and one of the most underserved by good beginner guides. The startup cost is real ($400–800 for a functional shop), but once you have a forge, an anvil, and a hammer that fits your hand, you're set for years. Here's what to buy first.
By Colin B. · Published May 24, 2026 · Last reviewed June 12, 2026
The forge, anvil, and basic hand tools are the real cost. After that initial outlay, consumables (propane, stock) are modest and the tools last indefinitely.
We earn commission on qualifying Amazon purchases — see our
affiliate disclosure.
Price tiers and budget totals shown above are editorial estimates;
actual Amazon prices vary.
At a glance
Our top pick in each category
The fastest path through this guide — each best-starter pick by category.
Scroll for the budget and upgrade alternatives.
The biggest beginner mistake is buying a cheap cast iron anvil. Cast iron doesn't rebound hammer energy back into your work; it absorbs it, making every strike harder and less effective. Spend a bit more on a cast steel anvil, even a small one. The difference is immediately obvious.
Gas forges (propane) are the right choice for almost every beginner. Coal forges run hotter and have a romantic following, but they require fuel sourcing, fire management skills, and serious ventilation. A propane forge heats your garage shop in 15 minutes and shuts off when you close the valve.
Start with one hammer and learn it before adding more. Most beginners go too heavy: a 2–2.5 lb hammer is right for most people. Heavier hammers tire your arm fast and teach sloppy technique.
The gear
What you actually need
Forge
Your forge is where steel becomes workable, and for beginners the choice is simple: propane gas forge. A single-burner propane forge heats to welding temperature (2300°F) in about 15 minutes, runs on standard 20 lb tanks, and works in a garage with the door cracked. Coal forges are hotter and have a loyal following, but they demand solid-fuel management, coal sourcing, and more ventilation than most home shops can handle. Master gas first.
Forge — what's the difference?
A few common shapes, each making a different trade.
Single-Burner Gas
Efficient, beginner-friendly, fits most starter projects.
Fuel
Propane
Chamber
~350 cu in D-shape
Max temp
~2300°F
Best for Knife making, hooks, decorative ironwork, stock under 1.5"
Tradeoff Can't weld long stock or heat multiple pieces simultaneously
Traditional, hotter, demands real fire management skill.
Fuel
Coal or coke
Setup
Blower + coal source required
Max temp
~2500°F+
Best for Traditional smithing, welding heats, experienced smiths
Tradeoff Steep learning curve, smoke and ventilation requirements; not for beginners
Best starter
Hell's Forge
Portable Propane Forge Single Burner
$$$
★★★★★Our rating
The most recommended beginner propane forge, and for good reason. Single .5 PSI burner heats the D-shaped chamber to welding temperature in about 15 minutes. Works on a standard 20 lb propane tank. Well-built, simple to set up, and sized right for beginner projects: knives, hooks, and decorative ironwork up to about 1.5" diameter stock.
What we like
Reaches welding temp in ~15 minutes on a standard 20 lb tank
Single-knob operation, no learning curve on the forge itself
D-shaped chamber fits most beginner project sizes
What to know
Floor brick wears faster than hard firebrick; plan to upgrade
★★★★☆Our rating· Only 2 left in stock - order soon.
When you're ready for longer stock and forge welding, a double-burner forge is the upgrade path. NC Tool has been supplying serious blacksmiths for decades: the heat distribution is even, the door seals properly, and the chamber handles stock that a single-burner forge can't.
What we like
Even heat across longer stock, critical for forge-welding projects
NC Tool quality: used by serious hobbyists and professional smiths
What to know
Burns through propane fast; budget extra fuel costs
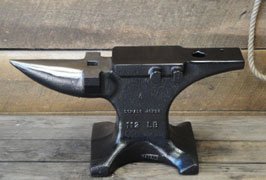
The anvil is where you do your work, and the most important thing to know: cast iron anvils are a trap. They look right, they're cheap, and they're everywhere on Craigslist, but cast iron absorbs hammer energy instead of bouncing it back. You work twice as hard for half the result. You want cast steel. A 70–100 lb steel anvil is the sweet spot: heavy enough to hold steady under hard strikes, manageable to move around your shop.
Best starter
NC Tool
Calvary Anvil 112 lb
$1,044.55 as of Jun 22, 2026
★★★★★Our rating· Only 1 left in stock - order soon.
NC Tool makes the most respected entry-level anvils in the US. The 112 lb Calvary is cast steel (not iron), so hammer blows rebound back into the work efficiently. Hardy and pritchel holes accept standard tooling. At 112 lb, it holds steady under hard strikes and won't walk across your shop floor.
What we like
Cast steel: hammer energy rebounds back into the work, not wasted
Hardy and pritchel holes accept standard smithing tooling
112 lb weight holds steady under hard strikes
What to know
Shorter horn than London pattern, limits tight decorative curves
Still needs a stand; budget for a stump or welded stand separately
VEVOR sells both cast iron and cast steel anvils; this is the cast steel version, explicitly labeled as such. At 44 lb it's the most portable beginner option. You'll feel it move under hard strikes more than a 112 lb anvil, so chain it to a stump. But it won't teach bad technique the way a cast iron anvil will.
What we like
Cast steel at a budget price, avoiding the cast iron trap
44 lb is easy to move and store between sessions
What to know
Light enough to walk under heavy strikes; chain or bolt it down
Batch-to-batch QC variation; inspect carefully on delivery
Get one good hammer and learn it before adding more. For most beginners, a 1.5–2 lb cross-peen is right: heavy enough to move hot steel efficiently, light enough to use all day without wrecking your elbow. The cross-peen face draws metal out lengthwise; the flat face moves it broadly. Swedish and German patterns both work well. Buy quality the first time; a good blacksmithing hammer is a one-time purchase.
Best starter
Picard
Swedish Pattern Blacksmith Hammer 1500g
$76.68 as of Jun 22, 2026
★★★★★Our rating· In Stock
Picard is the benchmark for blacksmithing hammers. The 1500g (3.3 lb) Swedish cross-peen comes factory-polished so the face is ready to work without grinding, and the balance is right out of the box. German-forged steel that will outlast you. The most common first-hammer recommendation in every serious smithing community.
What we like
Factory-polished face: no prep work needed out of the box
German-forged steel used by professional blacksmiths worldwide
Swedish pattern balance well-suited to the cross-peen stroke
What to know
~$80, the most expensive beginner hammer option
3.3 lb may fatigue new smiths faster than a lighter 2 lb option
Estwing makes tool-grade hammers used by American tradespeople for generations. The 32 oz (2 lb) weight is gentler on beginner forearms than 1500g, and Estwing's steel is properly hardened, so you won't dent the face on your first session. Not a traditional smithing pattern, but it'll get metal moving while you develop technique.
What we like
2 lb weight is forgiving for beginners still building arm endurance
Properly hardened steel, holds up to real smithing work
What to know
Steel handle transmits vibration, uncomfortable on long sessions
Not a traditional smithing pattern; you'll want a cross-peen eventually
★★★★☆Our rating· Only 4 left in stock - order soon.
Once you've got your cross-peen technique dialed in, a rounding hammer opens up a different movement vocabulary: the domed face compresses and spreads metal in a way flat faces don't. Great for knife work, leaf shapes, and decorative touches. This is hammer number two, not hammer number one.
What we like
Domed face ideal for spreading metal and creating organic shapes
1.5 lb is light enough for detailed, deliberate finishing work
What to know
A second-hammer purchase; master your cross-peen first
Less versatile than a cross-peen for general beginner projects
Tongs are how you hold hot metal safely, and the wrong pair for your stock makes every heat frustrating. The jaw profile needs to match your stock shape and size: V-bit for round stock, flat jaw for flat bar. Buy tongs sized for the stock you'll actually work: a ½" jaw opening for ½" round stock. Most beginners start with two pairs and add more as projects demand them.
Best starter
Yoursme
17" V-Bit Bolt Knife Making Blacksmith Tongs Wolf Jaw Bladesmith Anvil Forge Tools
$24.99 as of Jun 22, 2026
★★★★★Our rating· Only 8 left in stock - order soon.
V-bit tongs grip round stock, the shape you'll work most often as a beginner (rebar for practice, round bar for knives and hooks). NC Tool's tongs are properly fitted and hold stock without slipping under hammer blows. Order in the jaw size that matches your most common stock diameter.
What we like
Grips round stock securely, won't rotate under hammer strikes
NC Tool quality used by hobbyists and working smiths alike
What to know
Size-specific; won't grip flat bar stock well
Must be ordered in the correct jaw size for your stock
Once you move to flat bar stock (S-hooks, hinges, leaf work), you need flat jaw tongs. They grip flat bar face-to-face where V-bit tongs spin it. This is tong pair number two in most beginner shops, added once you move beyond round stock.
What we like
Grips flat bar securely, essential for hooks, hinges, and leaf work
Pairs with V-bit tongs to cover most beginner stock shapes
What to know
Can't grip round stock; V-bit tongs still required
Hot steel radiates UV light, forges generate sparks and fumes, and a dropped piece of 2000°F metal is a medical emergency. The protective gear costs under $150 total and is not optional. You need: shade-5 eye protection that blocks UV from the forge and hot metal, gloves that won't melt or kill your dexterity, and leather or denim covering your legs and torso from sparks and scale.
Best starter
Lincoln Electric
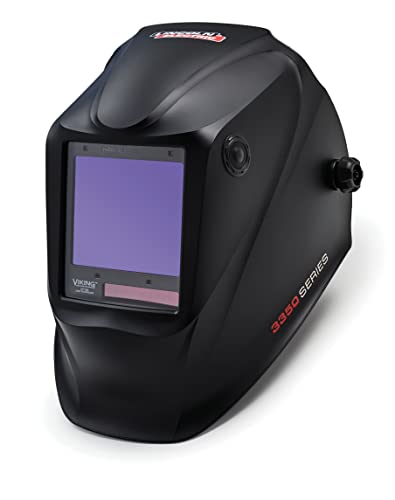
VIKING 3350 Auto-Darkening Welding Helmet
$422.95 as of Jun 22, 2026
★★★★★Our rating· In Stock
UV from a glowing forge and hot steel damages eyes more than most beginners realize. A welding helmet at shade 5 protects eyes, face, and neck completely. Lincoln Electric's VIKING 3350 auto-darkens, has wide viewing area, and doubles as your grinding shield if you ever work adjacent processes in the same shop.
What we like
Auto-darkening lens handles both forge light and grinding sparks
Protects eyes, face, and neck, more coverage than glasses alone
What to know
Overkill for beginner blacksmithing only; glasses suffice
Can feel warm and heavy after long sessions in a hot shop
You don't want full leather welding gauntlets for blacksmithing: they kill the dexterity you need for tong work. Mechanix M-Pact gloves protect against impact and brief heat contact without making your hands clumsy. Use them for everything except reaching near the forge mouth itself.
What we like
Enough dexterity to work tongs without fumbling
Impact protection for the occasional hammer miss
What to know
Synthetic material; not for sustained contact near forge mouth
Not a substitute for leather gauntlets in forge-welding setups
Once you're doing heavier forge work (long sessions, welding, or larger stock), a leather jacket replaces the hole-pocked cotton clothes you're currently burning through. Steiner's leather jacket covers torso and arms completely, tolerates forge sparks, and lasts years. Many smiths call it the piece of safety gear most worth overspending on.
What we like
Full leather protection, sparks bounce off instead of burning through
Sleeve coverage a simple apron misses entirely
What to know
Heavy and warm, uncomfortable for long summer sessions
A leather apron solves most of the problem at half the price
The first time you pull glowing orange steel from a forge, everything else makes sense. Here's what your first four weeks actually look like, and what separates smiths who keep going from the ones who don't.
Blacksmithing has a reputation for being hard to start. It’s not wrong exactly, but it is misleading. The physical skills are learnable fast; you’ll be making real things in your first session. What takes time is the heat reading: knowing from the color of glowing steel exactly what it’s ready to do. That comes with reps, not YouTube.
This is what your first month actually looks like.
Week 1: Fire and first heats
Before your first hammer session, there’s a setup step most beginners underestimate: ventilation. A propane forge is burning fuel and producing carbon monoxide. Work outdoors, or in a garage with the door fully open and cross-ventilation going. This isn’t optional. CO is odorless and sneaks up on you.
Light the forge. The procedure is: turn on the propane to low, light the burner with a long lighter or striker, then dial up the pressure. Give it 10–15 minutes to heat the refractory lining; don’t rush the first heat of the day. The lining needs to absorb heat before the chamber holds consistent temperature.
Your first stock should be ½” mild steel round bar (or rebar in a pinch). Get it glowing orange-yellow. That’s working heat: somewhere between 1800–2100°F depending on your steel. At that temperature, mild steel moves like clay under the hammer. If it’s too dark, it won’t move. If it’s sparkling (forge-welding temperature), back off the pressure.
Your first project: an S-hook.
Heat the last 3 inches of a 10” bar. Pull it out, put it on the anvil face, and work quickly; you have about 30 seconds before it cools below working temperature. Curl one end into a hook shape with the peen of your hammer. Flip the bar, heat the other end, curl it the opposite direction. Done. It’s crude. It’s also a real object you made from raw steel.
Make ten of them before you try anything else. The repetition builds heat-reading faster than any exercise you can design.
Week 2: Hammer technique and drawing out
The most common beginner mistake is hitting too hard. A strong swing on cool steel does nothing but ring the anvil and shake your elbow. A controlled strike on properly-heated steel (not a strong one, a placed one) moves the metal.
Drawing out is the first real technique. You’re moving metal lengthwise: making a bar longer and thinner, like flattening a cylinder into a taper. Work across the anvil horn for round tapers, or on the flat face for flat tapers. Use overlapping strikes moving down the bar, rotating a quarter-turn between passes. Each strike should dent, not bounce.
A few mechanics that matter:
Grip the hammer loosely. A death grip transmits shock up your arm. Hold it like you’re shaking hands: firm enough to control it, not white-knuckled.
Let the hammer fall. The weight does the work. You’re guiding it, not driving it.
Work at working heat, not red heat. Cherry red is the edge of your window. Orange is where you want to be. Return to the forge often: three to five strikes, back in the fire.
By the end of week two you should be able to make a pointed taper on round bar, useful for hooks, leaves, and knife tangs.
Week 3: Bending, twisting, and your first finished piece
Once you can move metal lengthwise, you can start shaping it. Bending over the horn is how you make curves: the curved surface of the horn acts as a radius form. Hardy bending (using the anvil’s corner as a fulcrum) makes sharper angles.
Twisting is the technique that makes beginners feel like smiths. Heat a square bar section evenly, clamp one end in a vise, grip the other with tongs, and rotate. The twist sets in the hot section. Control the rate by working slowly and watching the metal. One full twist looks dramatic; two looks intentional.
Try a decorative hook: a taper to a curl at the top, a punched or bent hole for wall-mounting, and a right-angle bend for the hook itself. This combines everything from weeks one and two. Plan to make three: the first will be rough, the second better, the third is the one you’ll hang up.
By week four, you’re reading the fire. You know what orange means, you know what dark red means, and you’re starting to feel in your hands when a piece has cooled below working temperature before the color tells you.
This is when blacksmithing starts feeling less like a physical puzzle and more like a conversation. The steel tells you what it’s ready to do. You learn to ask the right questions with the hammer.
A few things that make week four better than the first three:
Quench intelligently. You don’t need to quench mild steel between heats; it air-cools fine. Quenching is for hardening high-carbon steel (tool steel, knife steel) and for controlling temperature on specific sections. Dropping mild steel in water to cool it fast does nothing useful and can warp it.
Grind your hammer face flat if you’re getting divots in your work. A hammer face with any convexity will mark the steel. A 4” angle grinder and 10 minutes flattens it.
Join the community. ABANA affiliate chapters run hammer-ins: one or two days at a working smith’s shop where beginners work alongside experienced smiths. The feedback you get in an afternoon there is worth months of solo practice. Find your nearest chapter.
Things every beginner gets wrong
A few patterns show up in every new smith’s first month. Knowing them in advance won’t prevent them, but it might shorten them:
Working steel too cold. You pull it from the forge, walk to the anvil, line up your strike, and by the time you hit it the piece is dark red. Move faster, or keep the anvil closer to the forge.
Hitting the same spot repeatedly. The instinct is to hammer where the work needs to happen. But steel moves in three dimensions; you need to rotate, flip, and rearrange your strikes systematically or you’ll just make a lump.
Neglecting the forge floor. Scale (iron oxide) falls from hot steel and piles up on the forge floor. A thick scale bed insulates the chamber and drops your temperature. Brush it out every few sessions.
Using the wrong tongs for the job. If you’re constantly fighting your tongs to hold the stock, the jaw profile is wrong. Right tongs, right stock: it feels completely different.
Nobody who’s been smithing for six months remembers what it’s like to not know these things. They will feel completely natural by the end of your first month.
What to do after month one
You’re not a beginner at month one. You’re a smith with forty or fifty heats under your belt who is getting more comfortable. A few things that compound from here:
Take a class. One weekend class with a professional instructor is the single highest-leverage thing you can do. You’ll get hand corrections on grip and strike angle that are very hard to self-diagnose.
Start a simple knife project. Even a basic utility knife involves every technique from your first month (tapering, shaping, hardening) plus heat treatment. It’s the canonical second project for a reason.
Join a hammer-in. ABANA chapter events are free or cheap and the community is genuinely welcoming to beginners. Show up once and you’ll have five people offering to let you work on their equipment.
The forge is ready when it’s orange. The steel is ready when it matches. The rest is reps.
Save your money
What you don't need yet
Beginners get pressured to buy a lot of stuff that doesn't help them play
better. Here's what we'd skip on day one.
A power hammer — Pneumatic and mechanical power hammers move metal fast, but they're thousand-dollar shop fixtures. Hand forging is how you learn to read the steel; skip the shortcut until you've built real technique.
A post vise — Useful for bending and twisting work, but not essential in your first six months. A standard bench vise handles most beginner projects.
A coal forge — Better for some advanced work, but the learning curve is steeper than the heat advantage is worth for beginners. Master gas first.
Swage blocks and specialized tooling — Hardy tools, swages, and fullers open up new techniques, but they're enhancements to a working shop, not requirements for starting.
A second anvil — Smiths collect anvils obsessively. Resist the urge. One good anvil is all you need to make real things for years.
First week
Your first seven days
A short, real plan to get from gear-on-doorstep to actually playing.
Order your forge first; shipping takes 3–5 days and you'll want to test-fire it before your first hammer session. · Buy
Source your practice stock before your first heat. Rebar is everywhere and inexpensive; check a local steel supplier or home improvement store for ½" mild steel round bar. · Action
Watch Black Bear Forge on YouTube. Will Dowd's beginner tutorials are the clearest free resource online: patient, methodical, and project-focused. · Learn
r/blacksmithing · Active beginner-friendly community with a solid setup wiki
Your first project should be an S-hook. Heat a piece of ½" round bar, bend one end into a hook, flip it, bend the other end in the opposite direction. Every beginner makes fifty of them. · Action
Find a local ABANA affiliate chapter or community college smithing class. One session with an experienced smith watching your hammer technique beats ten YouTube videos. · Action
Set up your forge outdoors or with serious ventilation; propane combustion produces CO. Never work in an enclosed space without meaningful airflow. · Action
FAQ
Common questions
How much does it cost to get started blacksmithing?
A functional beginner setup (propane forge, cast steel anvil, hammer, tongs, and safety gear) runs $400–800. The forge ($200–350) and anvil ($150–300) are the big costs. After that initial outlay, consumables (propane, stock) cost $30–60 a month for a weekly hobbyist.
What's the difference between a gas forge and a coal forge?
Gas forges run on propane, light instantly, and are safe in a home garage with the door open. Coal forges are traditional, run hotter, and are preferred by some smiths for forge welding, but they require fire management skills, a coal source, and serious ventilation. Start with gas. Most hobbyists never switch.
Are cheap Amazon anvils OK?
It depends entirely on the material. Cast iron anvils (common on Amazon and Craigslist) absorb hammer energy instead of reflecting it, making your work twice as hard. Cast steel anvils (HFS, NC Tool) work correctly. Check the listing carefully; 'cast steel' should be explicitly stated. If the price is under $100 for a 55+ lb anvil, assume cast iron.
Is blacksmithing dangerous?
It has real hazards: UV radiation from hot steel, sparks, CO from the forge, and the obvious risk of 2000°F metal. None of these are exotic; proper eye protection, ventilation, and leather or denim clothing manage the main risks. Burns are the most common injury and are almost entirely preventable with the right gear.
What should my first project be?
An S-hook. Heat a piece of ½" round bar, bend one end into a hook, flip it, bend the other end in the opposite direction. That's it. You'll make fifty of them and they're genuinely useful. After S-hooks: a leaf on a stem, a bottle opener, and a simple knife blank are the classic beginner sequence.
How much space do I need for a beginner blacksmithing shop?
A one-car garage works. You need room for the forge (3 feet clearance from combustibles), your anvil on a stand, a small workbench, and somewhere to store your tongs and stock. Ceiling height matters; a low ceiling above a propane forge is a real problem.
r/blacksmithing — Active, beginner-friendly community. The wiki covers setup questions well. Search for technique posts; skip the 'rate my anvil' threads.
Black Bear Forge (YouTube) — The clearest beginner blacksmithing channel online. Patient, methodical tutorials from basic S-hooks through intermediate knife and tool making.
Alec Steele (YouTube) — Technically advanced and extremely entertaining. Watch for inspiration; the scale of his work isn't beginner territory, but his fundamentals videos are worth your time.
The Complete Modern Blacksmith — Alexander Weygers — The classic beginner text. Covers tool-making, forge-building, and technique from first principles. Dated in some tool recommendations but foundational reading.
As an Amazon Associate, JustBeginning earns from qualifying purchases.
We may also earn commission from other affiliate programs linked on this
page. Editorial recommendations are independent; we don't choose
products based on commission rates.
Product prices and availability are accurate as of the date and time
indicated and are subject to change. Any price and availability
information shown on Amazon at the time of purchase will apply.
Our top pickHell's Forge Portable Propane Forge Single Burner

 Best starter