Electric skateboards unlock a genuinely different way to move through a city: faster than a bike, more fun than a scooter. But the $400-to-$1500 price range hides real choices: motor type, deck flex, wheel size, remote quality. Get those calls right on day one and you'll love it. Get them wrong and you'll resell at a loss.
By Colin B. · Published May 28, 2026 · Last reviewed June 20, 2026
Budget board + basic helmet + wrist guards gets you riding for around $525. Budget up to $750 for a solid starter board, a proper dual-certified helmet, and a full pad kit.
We earn commission on qualifying Amazon purchases — see our
affiliate disclosure.
Price tiers and budget totals shown above are editorial estimates;
actual Amazon prices vary.
At a glance
Our top pick in each category
The fastest path through this guide — each best-starter pick by category.
Scroll for the budget and upgrade alternatives.
Motor type is the most important decision: more than brand. Hub motors (motor inside the wheel) are lighter, quieter, and maintenance-free. Belt-drive motors give you more torque and better hill performance but need periodic belt replacement. If you live somewhere flat and commute, hub motor. If you ride hills or want more expressive carving, belt drive.
Buy the helmet before you buy the board. Most people wear bike helmets when they e-skate, which are single-impact only. You need a skate-certified dual-impact helmet: the kind that handles the repeated lower-g falls you'll have while learning. The Triple Eight Sweatsaver costs $65 and covers you properly.
You don't need a skateboarding background. E-boarding is a different balance than pushing a traditional board: the motor keeps you at a consistent speed, which actually makes balancing easier. Most beginners are riding independently within 30 minutes of their first session.
The gear
What you actually need
Electric Skateboards
The board is the entire experience: everything else is accessory. The most important choice isn't brand, it's motor type. Hub motors sit inside the wheel: quieter, maintenance-free, lighter. Belt-drive motors connect via a belt: more torque, better hill climb, louder, need occasional belt changes. For flat-city commuting, hub motors win. For hills or expressive carving, belt drive is worth it. Range matters more than top speed for new riders: 10-15 miles real-world is plenty. Don't buy a brand with no US warranty support; boards fail and you need someone to answer the phone.
Electric Skateboards — what's the difference?
A few common shapes, each making a different trade.
Hub Motor
Quieter, lighter, maintenance-free. Best for flat-city commuting.
Noise
Quiet
Maintenance
None
Hill climb
Moderate
Best for Flat urban commutes, beginners who want simplicity
Tradeoff Less torque on hills; wheel cores wear faster under heavy daily use
Pneumatic tires handle rough roads and light trails. Expensive.
Noise
Loud
Maintenance
Belts + tire pressure
Hill climb
Best
Best for Mixed surfaces, suburban sidewalks with cracks and roots
Tradeoff Heavy (18-25 lbs), expensive ($800+), overkill for smooth pavement
Best starter
Meepo
V5 Go Electric Skateboard
$549.00 as of Jun 22, 2026
★★★★★Our rating· In Stock
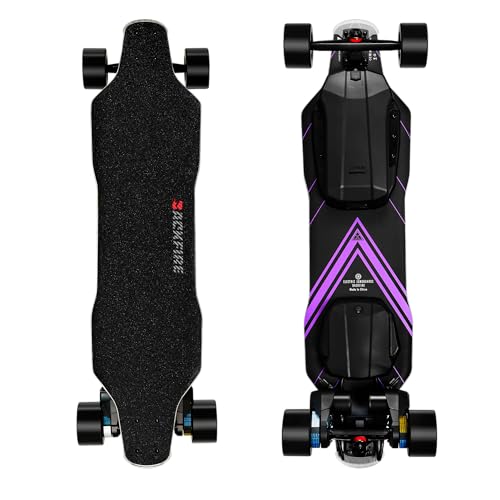
The V5 Go is Meepo's current flagship and the right entry into belt-drive e-boarding. Smooth ESC that won't throw you off at low speeds, strong customer support, and a remote with four speed modes: start on mode 1 and work up. More torque than hub-motor boards means hills aren't an obstacle. It's the most supported beginner board you can buy without overspending.
What we like
Meepo's flagship board with the best beginner-focused customer support
Four speed modes: start conservative, unlock full power as skills improve
Belt drive handles hills and steep grades that hub-motor boards struggle with
What to know
Belt maintenance every 300-500 miles: minor but real ongoing cost
Louder than hub-motor boards: audible in quiet lobbies and parks
If you want to try e-skating before committing to a flagship board, the WowGo 2S MAX is honest value. Real dual-hub motors, around 14 miles of range, and a remote that works. Hub motors mean zero maintenance. Ride quality is simpler than the Meepo, but it will tell you whether you love e-boarding before you spend more.
What we like
Sub-$300 entry to real e-skating: not a toy board
Dual hub motors with regenerative braking included
What to know
Stiffer deck absorbs less road vibration than pricier boards
Remote pairing takes patience; support response is slow
Belt drive changes the riding feel: more responsive acceleration, better braking, and torque that handles inclines hub motors won't touch. The Zealot S hits 25 mph, gets 18 miles of range, and the deck flex is dialed: enough give to absorb cracks without feeling bouncy. The right step up once you know you're committed.
What we like
Belt drive delivers far more torque: hills are a non-issue
25 mph top speed with 18 miles real-world range
Deck flex absorbs vibration better than most hub-motor boards
What to know
Belt maintenance every 300-500 miles: minor but real ongoing cost
Louder motor sound stands out in quiet environments
Most people show up to their first e-board session in a bike helmet. Bike helmets are single-impact certified: designed to crumple once and get replaced. E-skateboarding produces multiple lower-impact falls over time. You need dual-certified: CPSC (bike) AND ASTM (skate). That certification is not marketing: it means the helmet survives repeated impacts. Any helmet that isn't dual-certified is not the right choice for this sport. The price difference between certified and uncertified is about $30. That's not a real tradeoff.
Best starter
Triple Eight
Certified Sweatsaver Helmet
$$
★★★★★Our rating
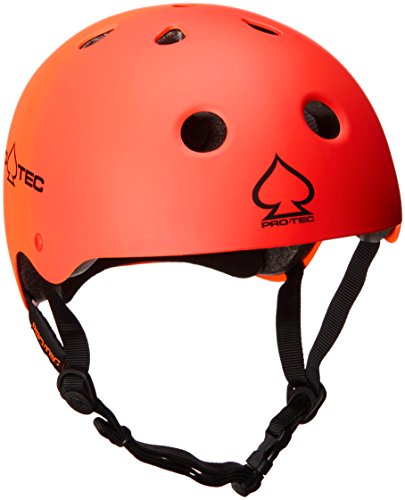
Dual-certified for CPSC and ASTM: this is the right helmet for e-skateboarding. The Sweatsaver liner keeps it comfortable through a full commute without the clammy feeling of foam liners. Triple Eight is the most trusted brand in street safety gear. This helmet is what we'd put on a friend before their very first session.
What we like
Dual CPSC + ASTM certified: the correct standard for e-boarding
Sweatsaver liner stays comfortable over a full commute
Triple Eight's two decades of proven street safety gear
What to know
Runs warmer than vented helmets: a real issue in summer heat
Wide sizing: measure your head carefully before ordering
The OG skate helmet brand, ASTM-certified, and often under $45. More ventilation than the Triple Eight Sweatsaver and a lower-profile look. ASTM only (not dual CPSC), but it meets skate standards. The right call if you're confident in the fit and want to save $20.
What we like
More ventilation than foam-lined lids: cooler in summer riding
Pro-Tec's consistent sizing makes online ordering reliable
What to know
ASTM-only certification: not the dual-standard ideal for e-boarding
Hard shell shows scuffs faster than matte-finish competitors
Thousand builds helmets for urban cyclists and e-board commuters specifically. CPSC certified, magnetic buckle that clips one-handed, and it looks like an adult helmet rather than borrowed sports gear. Better ventilation than most skate lids. When you're riding daily, the details matter: including not looking like you forgot to buy a real helmet.
What we like
Designed specifically for urban e-board and cyclist riders
Magnetic buckle clips one-handed: no fumbling before the commute
What to know
CPSC only, not dual ASTM: not ideal for skate-specific fall patterns
E-board falls happen fast. Unlike bicycle falls where you might have time to react, e-board falls at 15 mph often go from fine to ground in under a second. Wrist guards are the single most important piece of gear after the helmet: your natural fall instinct is to catch yourself, and wrist fractures are the most common e-board injury. Knee pads come second. Elbow pads are useful but less critical. A full kit from a trusted brand costs $50-80 and will pay for itself the first time you go down.
Best starter
Triple Eight
Saver Series 3-Pack Pad Set
$49.01 as of Jun 22, 2026
★★★★★Our rating· In Stock
Wrist guards, knee pads, and elbow pads from Triple Eight in one purchase. This is the kit we'd put on a first-timer before session one. The wrist guards have a hard sliding cap: exactly what you want when your hand hits pavement at speed. Wear the full kit for your first dozen sessions without debate.
What we like
Complete protection kit: wrists, knees, elbows in one purchase
Hard sliding wrist cap protects against the most common e-board injury
Triple Eight quality on every joint that matters
What to know
Knee pads size small: go up one size from the chart
Elbow pads need strap adjustment to stay put during faster riding
Under $25 for the full three-joint set. The wrist guards are the standout: adequate hard-cap protection for learning-speed falls. The knee pads are thin but cover you at low speeds. If budget is tight, buy this and upgrade the knee pads once you know you'll stick with the sport.
What we like
Full three-joint coverage for under $25
Wrist guards are genuinely capable at learning speeds
What to know
Thin knee cups insufficient above 15 mph: plan to upgrade
Velcro straps wear faster than buckle-style competitors
187 Killer Pads are what skate park regulars use, and the Pro knee pad is what you want once you're consistently riding above 20 mph. The hard-shell cap is larger than the Triple Eight equivalent, and the foam backing is significantly denser. One hard fall on these versus thin pads is a revelatory difference.
What we like
Hard-shell cap sized for serious impact: skate park pro standard
Dense foam backing that actually absorbs slam energy at speed
What to know
Knee pads only: buy wrist and elbow protection separately
Bulkier than minimalist pads; needs a break-in period to fit naturally
E-boards are quiet and fast: at 15 mph on a city street, you are genuinely invisible to drivers and pedestrians if you're not lit. Front white and rear red lights are essential for any commute or dusk riding. E-board lights need to mount without damaging the deck and run on their own battery so you're not draining the board. The Shredlights system is the community standard: magnetic mounts clip to any deck in under a minute and last 4-6 hours on a charge.
Best starter
Shredlights
SL-200 Skateboard Lights
$$
★★★★★Our rating
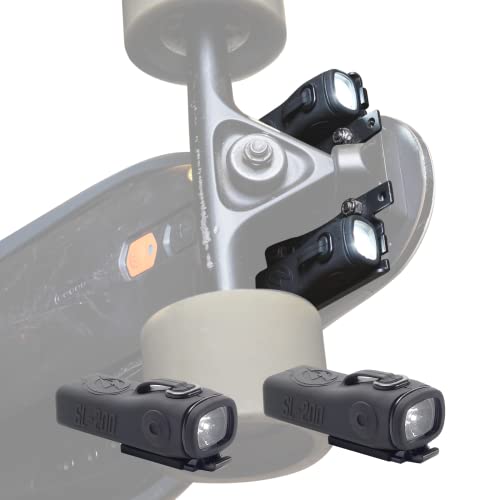
The SL-200 is the e-board community's standard answer for visibility. Magnetic mounts snap onto any truck with no tools and no deck damage. Battery lasts 4 hours on solid, 8+ on flash: long enough for a daily commute week on one charge. Each set includes front white and rear red.
What we like
Magnetic clip-on mounts: no tools, no deck damage
Front and rear in one purchase, 4+ hour battery life
What to know
Magnetic mount can dislodge over large bumps at higher speeds
SL-200 brightness adequate for streets; underpowered for fast night riding
If you want minimal-profile lights without the Shredlights magnetic system, KNOG's Blinder Niner set is the alternative. Front and rear USB-rechargeable lights in one purchase. Compact silicone straps mount in seconds, and the 9-LED output is visible from 200 meters. Urban cyclists have used KNOG for years; they adapt well to e-board use.
What we like
USB rechargeable, extremely compact, 200-meter visibility
Silicone strap mounts to almost any surface in seconds
What to know
Silicone strap mounting to truck hardware is less clean than magnetic
Less waterproof than Shredlights: don't ride through puddles
E-boards weigh 14-20 pounds and are awkward to carry without a handle or strap. You'll pick the board up for stairs, transit, buildings, and anywhere else you can't ride. A dedicated carrying bag protects the deck and makes transit vastly more comfortable. A shoulder strap is the minimum viable solution; a bag is better if you use public transit regularly.
Best starter
BZ
Longboard Carry Backpack
$$
★★★★★Our rating
A proper board bag with padded shoulder straps, deck protection, and a zippered pocket for your remote and charger. Accommodates decks up to 46 inches: fits most e-boards. Makes subway and bus travel vastly less awkward, and protects the board from knocks during transit.
What we like
Padded shoulder straps make stairs and transit manageable
Side pocket fits remote and charger: one bag for the full kit
What to know
Soft-sided padding only: not crush protection
Measures to 46-inch max: verify your board length first
When you just need to pick the board up without carrying it flat under your arm, a shoulder strap is the minimum-viable solution. YYST's universal strap is adjustable, fits any deck width, and clips on in 30 seconds. Under $20 and genuinely useful for commuters who only carry the board occasionally.
What we like
Under $20: minimum viable solution for board carrying
Fits any deck width, clips on and off in 30 seconds
What to know
No padding: board edges exposed to scuffs and bumps
Most people step on an e-board for the first time and think they've got it. That feeling lasts until the remote does something unexpected. Here's what actually happens — session by session — between unboxing and feeling like a confident rider.
Electric skateboarding has a reputation for being plug-and-play. It mostly is. But “mostly” is doing real work in that sentence. The first fall tends to happen when the rider forgets they’re holding a remote that controls sudden deceleration, not a passive board that stops when you step off. One accidental thumb movement and you’re on the pavement before your brain registers the fall.
That’s not a reason to avoid e-boarding. It’s a reason to spend your first session intentionally — specifically, practicing the brake before you ever try to ride fast.
Here’s what the first month actually looks like for most riders, and what separates the ones who are riding confidently at day 30 from the ones who sold their board at a loss.
Before your first ride: the setup that matters
Before you step on the board, do three things.
Charge everything fully. Your board and your remote. A new board with a partially charged battery behaves differently at low charge — the speed modes become inconsistent and the braking softens. Full charge gives you consistent, predictable behavior for your first session.
Set the remote to its lowest speed mode. Every reputable e-board remote has multiple speed modes. On the Meepo V5, that’s mode 1 of 4. Mode 1 tops out around 10 mph and provides gentle acceleration that won’t pitch you off the back when you press the throttle too aggressively. Do not ride in a higher mode until you can reliably brake from mode 1.
Find a flat, empty parking lot. Not a neighborhood street, not a park path with pedestrians. A shopping center lot on a Sunday morning is ideal. You need space to practice stopping without obstacles.
And — seriously — put the helmet on before the board leaves the ground.
Day one: the parking lot session
Your first 30 minutes should be devoted entirely to braking.
Stand on the board but do not push the throttle yet. Just feel the balance — an e-board is heavier than a traditional skateboard (14-20 lbs) and sits lower to the ground. The deck stance that feels natural on a push board is probably the right stance here too: front foot angled about 45 degrees toward the nose, back foot perpendicular to the deck. Shoulder-width apart.
Now, from a standstill, slowly press the thumb throttle on your remote. Roll at about 5 mph. Then brake. Feel how the remote brake works — it’s a trigger squeeze or a reverse-thumb motion depending on your board. The regenerative braking on most hub-motor boards is progressive; a light squeeze gives gentle braking, a hard squeeze gives hard braking. The board will not stop the moment you brake — it decelerates over 10-20 feet depending on your speed. Know this before you approach anything you can’t stop before.
Repeat this ten times. Accelerate gently. Brake. Accelerate gently. Brake. You’re building the muscle memory that keeps you from accidentally braking too hard at speed.
After you’re comfortable braking, practice carving. Weight your heels to turn toward your heel side, weight your toes to turn toward your toe side. The board carves like a longboard — smooth, wide arcs. Don’t try to make sharp turns; at speed, sharp turns throw riders. Make wide, smooth S-curves across the parking lot.
By the end of your first session, you should be able to ride in a straight line, carve wide turns, and brake consistently from about 10 mph. That’s a genuine success for day one.
After two or three parking-lot sessions, real streets feel like a different sport.
The first thing you notice is surface variation. Parking lots are smooth and uniform; sidewalks and bike lanes have cracks, raised pavement edges, wet leaves, and surprise gravel. At 10 mph, a half-inch crack can transmit a jolt that surprises you enough to lose the remote. At 20 mph, the same crack can throw you.
Foot position matters more on rough terrain. Beginners ride with too much weight on their back foot, which is comfortable on smooth surfaces but unstable on rough ones. Shift weight forward — roughly 60% front foot, 40% back — and bend your knees slightly more than feels natural. You’re absorbing vibration through your legs, not your ankles.
Start encountering people. Your board is quiet; pedestrians and cyclists won’t hear you coming. Get into the habit of giving obvious, generous right-of-way. An e-board at 15 mph in a crowded bike lane is not a fun place for anyone involved. Slow down early, not at the last second.
Spend week one in mode 1 or 2, keeping your speed under 15 mph. Speed mode 3+ unlocks more of the motor’s power curve — the acceleration becomes faster and the top speed higher. Both of these demand faster reflexes and more riding confidence than you have in week one.
Weeks two through four: building real confidence
By week two, the mechanics feel mechanical. You’re not thinking about how to hold the remote; you’re thinking about where to go. This is when e-boarding starts feeling like an actual mode of transport rather than a controlled experiment.
A few things that happen in weeks two through four:
You’ll figure out your range reality. The manufacturer’s claimed range is a lab number. Your number depends on your weight, the terrain, the temperature, and how hard you accelerate. Most riders find their real range is 60-70% of the advertised figure. If your board is rated for 15 miles and you weigh 180 lbs, plan routes around 9-10 miles of real range. Build in margin — running a battery to 0% in a battery-powered vehicle is bad for long-term cell health.
You’ll want to go faster. Mode 3 and 4 feel very different from mode 1. The acceleration is more aggressive and the braking distance is longer. Move to higher modes only in familiar territory where you know the surface, know the turns, and aren’t sharing space with pedestrians. Going 20+ mph on a surface you don’t know is the fastest way to end your month on crutches.
You’ll start having opinions about your board. You’ll notice whether the flex is right for your weight, whether the stock wheels handle your commute’s pavement, whether the remote ergonomics suit you after 30 minutes of riding. These are real data points. Hold them until month two before spending any money — initial reactions are often just unfamiliarity.
Every beginner makes the same handful of mistakes. None of them are catastrophic if you know they’re coming:
Riding in too high a gear too soon. Speed mode 4 on a Meepo V5 is genuinely fast — faster than most beginners realize. The fall from unexpected acceleration in a high mode is worse than anything you’ll encounter in mode 1. Keep modes 3-4 for week three or later.
Forgetting to check truck bolts. E-boards vibrate. New boards especially can have bolts that weren’t torqued quite right from the factory. A loose kingpin bolt or axle nut at speed is a serious hazard. Buy a skate tool on day one and check all hardware after your first three sessions.
Riding in rain before you’ve mastered dry. Wet decks reduce grip, wet pavement extends braking distance, and water damages bearings and electrical connections over time. Save wet-weather riding for after you’re fully comfortable — and even then, only on boards rated for it.
Going too fast for your gear. If you’re in mode 4 without a dual-certified helmet, wrist guards, and knee pads, you’re gambling on not falling. You will fall at some point. The gear is the bet you make that the fall won’t be the one that matters.
What to do at month two
By the end of your first month, you have a genuinely useful vehicle and a real skill. Here’s what changes the slope of your improvement:
Join the community. r/ElectricSkateboarding has real troubleshooting help and real-world reviews of the exact upgrades you’ll want to make. It’s one of the better hobby subreddits for honest gear talk.
Consider wheel upgrades. If your pavement is rough, moving from 90mm to 105mm wheels reduces road buzz significantly and improves obstacle clearance. Under $50 and about 20 minutes to swap.
Learn basic maintenance. Cleaning and re-lubing your wheel bearings every few months extends board life meaningfully. A bearing press costs $15 and a bearing kit is $10. Your board will thank you.
You’re not a beginner at day 30. You’re a new rider who knows your board’s quirks, has felt what a fall feels like, and has survived your first month intact. That’s a different thing entirely.
Save your money
What you don't need yet
Beginners get pressured to buy a lot of stuff that doesn't help them play
better. Here's what we'd skip on day one.
Remote controller upgrade — The stock remote that comes with your board is purpose-designed for it. Third-party remotes add cost and pairing complexity for no real benefit at the beginner stage.
Second battery pack — 11-18 miles covers most sessions. Buy a second battery only if you're doing multi-segment commutes that consistently exceed range in one direction.
All-terrain wheel upgrade — Street wheels handle pavement fine. AT wheel conversions cost $80-150 and add weight: ride the board stock for at least a month before deciding your terrain demands them.
Board display stand — Your board leans against a wall just fine. The stands are $15 of injection-molded plastic solving a non-problem.
Wheel LED lights — The Shredlights system already covers your visibility needs. Wheel LEDs are fun but contribute nothing to safety and require battery management.
First week
Your first seven days
A short, real plan to get from gear-on-doorstep to actually playing.
Order your board and helmet at the same time: the helmet is as important as the board. Don't ride without one. · Buy
Find an empty parking lot or smooth path for your first session: no traffic, no pedestrians, no pressure. · Action
Spend your first 20 minutes practicing braking only. Not riding fast: stopping. The throttle is intuitive; the brake takes muscle memory to trust. · Action
Ride in speed mode 1 for your entire first session, even if it feels slow. Mode 2+ before you've built comfort is how people crash. · Action
Read the community beginner guide before your first ride: technique tips that prevent the most common early mistakes. · Learn
After your first session, check all truck bolts and wheel screws: they can loosen on a new board's break-in rides. · Action
FAQ
Common questions
Do I need skateboarding experience to ride an electric skateboard?
No. E-boarding is a different balance than pushing a traditional board: the motor keeps you at a consistent speed, which actually makes balancing easier than traditional skateboarding. If you can ride a bicycle, you can learn to e-skate. Most beginners are riding independently within 30 minutes of their first session.
Hub motor or belt drive: which should I start with?
Hub motor for flat cities; belt drive for hills. Hub motors are quieter, lighter, and need no maintenance. Belt-drive motors deliver more torque for inclines but require occasional belt changes. The Meepo V5 Go's belt drive handles most terrain fine. If you want the simplest possible board on flat ground, the WowGo 2S MAX hub motors are maintenance-free.
Can I ride an electric skateboard in the rain?
Technically possible on boards rated IP55 or higher, but not recommended as a habit. Water shortens bearing life, corrodes battery connectors, and makes the deck slippery. If you're caught in a drizzle you'll survive: don't commute daily through puddles.
How much should I realistically budget to get started?
Around $525 minimum (budget board + decent helmet + wrist guards). Our recommended setup runs $750-800: Meepo V5 + Triple Eight helmet + full pad kit + lights. Don't buy the board without budgeting for helmet and pads: they're not optional.
How far can I actually go on one charge?
Assume 60-70% of the manufacturer's advertised range in real conditions. A board rated at 15 miles delivers about 10-11 miles with a real rider on real streets. For a daily commute, your one-way distance should be under 40% of the advertised range to safely make the round trip.
Is e-skateboarding legal on public roads?
It varies by city and state. California legalized e-boards on paths and bike lanes in 2015 (max 15 mph). Many cities have no specific regulations, creating a gray-area similar to e-bikes. Check your local rules; in practice, most riders treat e-boards as they would bicycles on bike infrastructure.
r/ElectricSkateboarding — The best community resource for gear questions, troubleshooting, and real-world range reports. Search before posting: most beginner questions are covered in the wiki.
Electric Skateboard HQ — Independent review and comparison site. Good for side-by-side spec comparisons and long-term durability reports.
E-Board School (YouTube) — Beginner technique and safety videos. Start here for first-ride stance, braking drills, and carving basics before your first session.
Electric Skateboard School (YouTube) — Gear reviews and comparison videos with real-world range testing. Useful once you know what kind of riding you want to do.
Endless Sphere (forum) — The technical deep-dive forum for DIY e-vehicle builds. Overkill for beginners, but invaluable if you want to understand battery chemistry or build your own board eventually.
As an Amazon Associate, JustBeginning earns from qualifying purchases.
We may also earn commission from other affiliate programs linked on this
page. Editorial recommendations are independent; we don't choose
products based on commission rates.
Product prices and availability are accurate as of the date and time
indicated and are subject to change. Any price and availability
information shown on Amazon at the time of purchase will apply.

 Best starter