A home bouldering wall is the climber's version of a home gym — messy to build, embarrassing to explain to guests, and completely worth it. The lumber and plywood come from your hardware store. This guide covers everything else: the holds, hardware, and the crash pad that keeps you off the concrete.
By Colin B. · Published May 29, 2026 · Last reviewed July 17, 2026
Lumber and plywood ($200–400) come from the hardware store — this guide covers climbing-specific gear. The crash pad and holds are the big-ticket items.
We earn commission on qualifying Amazon purchases — see our
affiliate disclosure.
Price tiers and budget totals shown above are editorial estimates;
actual Amazon prices vary.
At a glance
Our top pick in each category
The fastest path through this guide — each best-starter pick by category.
Scroll for the budget and upgrade alternatives.
Design before you buy anything. Sketch your wall first — dimensions, angle (vertical, 30-degree slab, or 45-degree overhang), and which studs or joists you'll anchor to. The angle determines your lumber needs, how many holds you'll need, and how hard the climbing will be. A vertical wall is the beginner-friendly choice.
T-nuts are the hidden tax. Drill a hole every 8 inches on a 4×8 sheet and you're looking at 70–80 holes per sheet. Budget one T-nut per hole plus 20% extra — they fall out, you drill more holes. Order 200 minimum for a small wall, 500+ for anything over two sheets.
Don't cheap out on the crash pad. A concrete garage floor with a yoga mat is a hospital visit waiting to happen. A real crash pad costs $200–350, earns its keep on the first hard fall, and outlasts three sets of holds. Buy it before you buy holds.
Holds determine the routes, the grades, and whether your wall trains you or frustrates you. A beginner mix of jugs (big positive edges) and mid-size edges gives you enough variety to set 10–15 problems on a single 4×8 plywood sheet. As your climbing improves, add textured slopers and small crimps to raise the difficulty. All standard holds use 3/8-16 bolt hardware — you need matching T-nuts and carriage bolts installed in your plywood before the holds arrive.
Climbing Holds — what's the difference?
A few common shapes, each making a different trade.
Jugs & Edges
Open-hand holds. Forgiving and beginner-friendly.
Grip style
Open hand / jug
Best grades
V0–V2
Best for Starting out, warming up, kids' routes
Tradeoff Won't build contact strength — supplement with smaller holds
Atomik is the default recommendation in every serious home-wall community for good reason — commercial polyurethane, consistent texture, and a beginner-friendly mix of jugs and mid-size edges. A 50-piece set covers a full 4×8 sheet with room to set 10–15 problems. These holds are what you'd find in actual commercial gyms and they'll outlast three sets of cheap alternatives.
What we like
Commercial polyurethane — same material as gym holds, built to last
Beginner jug/edge mix gets you setting real routes on day one
Consistent texture across every hold in the set
What to know
Bolts and T-nuts sold separately — budget an extra $40–60
More expensive than budget sets; only wrong if you quit within a month
★★★★☆Our rating· Only 6 left in stock - order soon.
If you're not sure the wall habit will stick, Escape Climbing's starter pack gets you going for under $90. Fifty-one bolt-on polyurethane holds in a jug-heavy beginner mix — enough to set real problems while you decide whether to invest in a bigger library. Escape ships fast and the holds are purpose-designed for first-time wall builders.
What we like
Under $70 — the right bet before committing to a full hold library
Jug-heavy mix is forgiving while your technique is still rough
What to know
Thinner polyurethane — expect some spin and wear after 6 months of heavy use
Limited shape variety; you'll want crimps and slopers quickly
Once you've set a few routes and know what movements you want to train, a 100-piece set with slopers, small edges, and pinches builds a real grade range on your wall. Buy this after six months when your starter set feels limited — you'll now be setting V3–V5 problems instead of just getting off the floor.
What we like
Adds slopers, crimps, and pinches — real grade range beyond beginner jugs
Same commercial Atomik quality consistent across every hold
What to know
Overkill for week one — wait until you've maxed out your starter set
You'll still want volume holds on top for macro-features
Volume holds are large faceted 3D shapes that bolt to the wall and create macro-features — a prow, an undercut, a corner. Sold individually, most builders buy 2–4 to reshape their wall. This Atomik Volume 7 triangle is a popular first piece. A second-phase buy for when flat-wall routes feel predictable.
What we like
Transforms a flat wall into a 3D training environment instantly
Four volumes add dozens of new movement patterns and angles
What to know
Expensive second-phase buy — not day-one gear
Need longer bolts than standard holds; easy to overlook
T-nuts are threaded inserts that let holds bolt directly into your plywood — without them, nothing stays put. Use stainless steel barrel T-nuts, 7/16" ID, 3/8-16 thread (the climbing standard). Hammer them in from the back of the plywood before mounting the wall; you cannot install them after. Roughly one T-nut per 64 square inches. You also need 3/8-16 carriage bolts in 1", 1.25", and 1.5" lengths since hold thickness varies. A 7/16" brad-point bit cuts clean holes without tearing wood fibers.
Best starter
Bolt Dropper
3/8-16 T-Nuts (200-Pack)
$
★★★★★Our rating
The Bolt Dropper 200-pack is the most popular T-nut choice among home-wall builders — the right size (3/8-16 thread, 7/16" barrel), 4-prong design that locks into plywood, and a count that covers one full wall section with spares. Hammer them in from the back of the plywood before mounting. A dab of wood glue on the prongs prevents spinning under load.
What we like
4-prong design bites into plywood — holds don't spin under load
Consistent threading; holds bolt in and out cleanly every time
What to know
Zinc-plated, not stainless — can rust in a very damp garage over years
Installation is permanent — plan your hole grid layout before drilling
★★★★☆Our rating· Only 11 left in stock (more on the way).
One bolt per hold. The 1-inch length works for most beginner and intermediate bolt-on holds. Keep 1.25" and 1.5" lengths on hand too — hold thickness varies and you'll need them when you add volumes. A 100-pack at each common length runs around $15 and you'll run out faster than you expect when resetting routes.
What we like
100-pack covers a full holds set with bolts to spare for resets
Standard 3/8-16 thread fits every T-nut and climbing hold
What to know
Buy multiple lengths — 1" doesn't work on thick volumes
Zinc can rust in damp garages; go stainless if your space gets wet
★★★★☆Our rating· Only 3 left in stock - order soon.
A clean 7/16-inch hole is what lets T-nuts seat flush. A regular twist bit wanders and tears wood fibers; a brad-point cuts clean with a centered tip every time. IRWIN's version is sharp enough to drill an entire wall without dulling. One bit costs under $10 and saves you stripped T-nuts and crooked holes.
What we like
Brad-point tip centers perfectly — no wandering on plywood
Under $10 and handles a full wall build without dulling
What to know
7/16" is a specialty size not found in standard bit sets
Requires high-torque drill; cheap cordless models will struggle
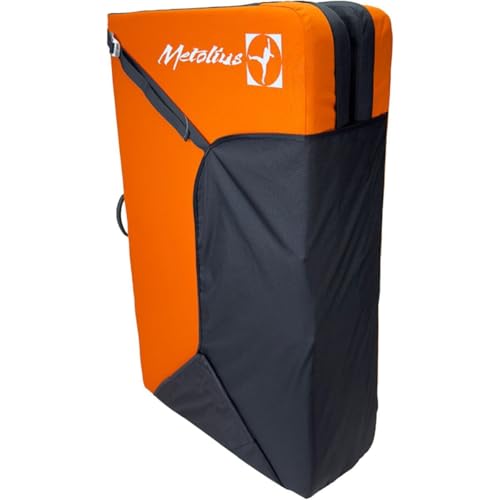
A crash pad is non-negotiable if your wall has any overhang. Falling onto concrete — even padded concrete — causes injuries that sideline you for months. A home bouldering pad needs to be large enough to cover your typical fall zone, firm enough to not bottom out on a hard fall, and foldable for wall storage. Standard home pads run 3×4 to 4×5 feet unfolded. This is the one category where buying cheap is a genuine mistake — the foam quality matters on fall number one.
Best starter
Mad Rock
Drone Crash Pad
$219.00 as of Jun 22, 2026
★★★★★Our rating
Mad Rock's Drone shows up constantly in home-wall builds — layered foam construction, a foldable hinge design, and a price that's serious without being absurd. At 4×3 feet unfolded it covers the typical fall zone for a garage-height bouldering wall. Shoulder straps double as backpack loops for outdoor sessions. Trustworthy protection at a realistic price.
What we like
3.5-inch layered foam — real protection, not yoga-mat padding
Folds flat for wall storage; shoulder straps for outdoor portability
What to know
One Drone may not cover a steep overhang fall zone — measure first
Cover wears where it rubs concrete; a rubber mat underneath helps
Smaller and lighter at around $180 — the right choice for low-angle walls or someone not yet sure the wall habit will stick. The Session II is adequate for sub-8-foot vertical walls. Not what you want under a serious 45-degree overhang, but a reasonable starting point before committing to a bigger pad.
What we like
Around $180 — the accessible entry point for crash pad protection
Lighter and more portable; easy to move around or take outside
What to know
Thinner foam limits protection under steep overhangs
Smaller footprint may not cover the full fall zone on wider walls
When you're pushing serious roof moves and dyno attempts, the Mondo's extra coverage (4×5 feet unfolded) and 4-inch foam let you try things. The hinged fold-flat design stores neatly against the wall. Worth it once you've graduated from beginner problems — your bolder attempts deserve better protection.
What we like
4×5 feet unfolded — full coverage for steep overhang fall zones
4-inch layered foam handles hard falls without bottoming out
What to know
Heavy — not ideal if you double-use it for outdoor sessions
Overkill for vertical walls; buy when the wall gets real overhang
Chalk is mandatory on a home wall — sweaty hands slip off even the biggest jugs. You have two formats: chalk balls (a porous fabric bag — cleaner, more controlled, less mess on your floor and holds) and loose chalk (powder — better coverage, but you'll be vacuuming regularly). Either works. A chalk bag clips to your shorts or sits open on a ledge between attempts; the drawstring version keeps chalk from spilling during falls. Replace a chalk ball insert when it stops coating your hands well.
Best starter
Black Diamond
White Gold Refillable Chalk Shot
$
★★★★★Our rating
The chalk shot is the cleanest format for a home wall — squeeze the permeable mesh against your palm and you get exactly enough chalk without a cloud of white dust landing on everything in your garage. Black Diamond's White Gold formula is the benchmark for grip consistency and longevity. One shot lasts two to three months of regular sessions; refill with loose chalk when it runs low.
What we like
Minimal mess — no chalk clouds in your garage or on your floor
White Gold formula is the benchmark for grip in climbing chalk
What to know
Less coverage than loose chalk on very sweaty hands
Ball needs replacing every 2–3 months of regular use
If you want the best grip money can buy, FrictionLabs' fine-grind chalk stays on longer and covers more surface area than generic chalk. Available in multiple sizes (5oz and 10oz are the common standalone options). A real upgrade once you're pushing hard moves where grip is the limiting factor.
What we like
Fine grind stays on longer than standard chalk — noticeable on hard crimps
170g lasts months of regular use; price per session is negligible
What to know
Loose chalk creates mess — vacuum regularly and ventilate the garage
Premium price over bulk generic chalk, though modest per use
A good chalk bag stays open when you need it and cinches shut when you don't. The Kulshan Bucket does both — a stiff-rim opening that holds its shape, and a magnetic roll-down closure. Clips to your shorts or sits on a ledge while you session. The quality is noticeably better than the $8 bag that came with your holds set.
What we like
Stiff rim holds bag shape open — one-hand dipping without looking down
Build quality clearly better than budget clip-on bags
What to know
Belt loop only — no waist strap for wearing on outdoor crags
Minimal exterior pockets; not for climbers who carry extras mid-session
A hangboard mounts above a doorframe and lets you do targeted finger-strength training between sessions — it's the single highest-leverage climbing tool you can add to a home gym. Fifteen focused minutes three times a week improves contact strength faster than two extra hours of wall time. The catch: finger tendons adapt four times slower than muscles. Never dead-hang to failure, never add weight in the first three months, and rest a full day between sessions. Always start on the biggest jugs and work down over months, not weeks.
Best starter
Metolius
Project Training Board CNC
$89.95 as of Jun 22, 2026
★★★★★Our rating
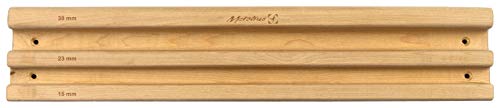
The Project is the most widely used beginner hangboard in North America — jugs, shallow 20mm edges, two pinch blocks, and a curved profile that protects your wrists. Mount it above a doorframe with a 2×6 wood spacer for clearance. Twenty minutes three times a week and you'll notice your contact strength improve within a month. Not flashy; works.
What we like
Industry-standard beginner board — jugs, edges, and pinches all covered
Contoured profile protects wrists during longer hanging sets
What to know
Textured synthetic resin is harder on skin than wood boards
Requires a 2×6 wood spacer for proper wrist-safe doorframe mounting
★★★★☆Our rating· Only 2 left in stock - order soon.
If you want to test a hangboard before committing to a permanent install, the Prime Rib covers the basics at a lower cost — a pair of jugs and a couple of shallow edges. Good for a temporary setup or as a supplement on a second doorframe. Not enough variety to train on long-term, but the right size for a casual introduction.
What we like
Smaller and cheaper than the Project — good test run before permanent mount
Covers the basics: jugs and shallow edges for beginner hangs
What to know
Limited positions; outgrow it within a year of consistent training
No pinch blocks — a real gap for all-around finger development
The Beastmaker 2000 is a wooden hangboard that's become a training staple for intermediate and advanced climbers. Wood is genuinely easier on finger tendons than synthetic resin over long training cycles, and the 2000 has enough edge variety — deep pockets down to 5mm crimps — to progress through for years. Buy this when the Metolius jugs feel easy.
What we like
Wooden board — gentler on tendons than synthetic resin over long sessions
Edge variety from deep jugs to 5mm crimps; progressable for years
What to know
No beginner holds — injurious for untrained fingers
Import shipping from the UK adds cost and lead time
A home bouldering wall takes a weekend to build and years to master. Here's what to expect in month one — from hammering the first T-nut to sticking that problem you couldn't do last week.
Most people build a home wall twice. The first time they skip the planning, drill the T-nuts in the wrong places, mount everything at a terrible angle, and spend the first month frustrated. The second time they nail it in a weekend and never look back. This guide is the second time.
Week 1: The build
You don’t need carpentry experience to build a bouldering wall. You need a drill, a saw (or a hardware store that will cut your plywood), and two free days.
The frame comes first. Use 2×6 lumber for the main studs and anchor them into your garage studs or ceiling joists — never just drywall. The frame determines your wall’s angle. Vertical is the beginner choice: forgiving, holds go further, easier on your body. A 30-degree overhang is the most popular home-wall angle. Forty-five degrees and beyond is where things get serious.
Plywood is 3/4-inch minimum. Thinner sheets bow under dynamic loads and the T-nut prongs pull through. Baltic birch or MDO are the standard choices. Most hardware stores will rip sheets to size for $0.50 per cut — take the cut list, not a tape measure.
T-nuts before mounting. This is the step most first-time builders get wrong. Drill your hole grid (8-inch spacing is standard) and hammer the T-nuts in from the back of the plywood before the panel goes up. Once the wall is mounted, getting behind it to install missed T-nuts is a project in itself. Use a dab of wood glue on the prongs to keep them from spinning under load.
Mount the plywood, then set holds. The first time you bolt on a hold and stand back, the wall looks embarrassingly sparse. That’s normal. Set 3–4 beginner problems on your first session and actually climb them before adding more. You’ll immediately see what’s working and what angles need adjustment.
Week 2: First real sessions
The first thing most people discover on a home wall is that climbing is harder than it looks in the gym. That’s not a wall problem — that’s what happens when you’re on unfamiliar holds at a route someone (you) just set without a clue about movement quality yet.
Don’t set everything at once. A wall covered in holds looks exciting and reads as chaos. Leave room. Set one route, climb it ten times, then decide if it’s interesting. Three dialed routes teach you more than thirty mediocre ones.
Grades are made up until they’re not. Setting V1 on your home wall doesn’t mean you’re climbing V1 in the gym. Home-wall grades are personal and subjective until you’ve set dozens of problems and have a feel for what your body finds hard. Don’t get attached to the numbers — get attached to the movement.
The reset is part of the hobby. Unscrewing all your holds and setting new problems is called a reset, and it’s genuinely satisfying. Most home-wall climbers reset every 4–8 weeks when problems start feeling stale. Budget 2–3 hours and treat it as a creative session, not a chore.
If you ordered a hangboard, week three is when it earns its mount. Install it above a doorframe with a 2×6 wood spacer so your wrists clear the frame — without the spacer, your knuckles hit the wall every rep and you’ll stop using it within a week.
Start on the biggest jugs. Not the edges. Not the pockets. The jugs. Dead-hang for 10 seconds, rest 50 seconds, repeat for five sets. That’s your week-one protocol. Finger tendons are not like muscles — they adapt slowly and fail quietly, then loudly. The injury you get from going too hard in month one takes months to heal. The strength you’d gain by being patient compounds for years.
Train three days on, one day off. Hangboard work taxes the same tissues as wall climbing. If you’re climbing three days a week and hangboarding three days a week with no rest, something is going to pull. Two to three hangboard sessions per week, never the day before or after a hard wall session.
The payoff is real and fast. Three weeks of consistent beginner hangs and you’ll notice your contact strength on the wall — holds that slipped feel grippable, problems that required two tries start going first go.
Week 4: The first real breakthrough
Around week four, something clicks. It’s different for every person — a problem you’d been failing on suddenly feels possible, a movement pattern you’d been fighting starts to feel natural, a hold that seemed tiny is now something you can actually use.
This is the moment the wall pays off. Not because you’re suddenly a good climber, but because the feedback loop is finally tight enough to feel. Gym climbing gives you dozens of routes set by other people. Your home wall gives you the same fifteen problems you’ve been working all month, and you know every hold.
The frustrating problems from week one are now warm-up territory. That’s a month of real progress, visible.
What to keep doing
A few things that determine whether month two is better than month one:
Reset regularly. Stale problems mean stale sessions. New problems — even if they’re just your existing holds in different positions — reset your motivation.
Film yourself. A 30-second phone video of a problem you’re projecting shows you things you can’t feel from inside the move. Arm position, foot placement, weight distribution — it’s all visible from outside.
Get to a gym occasionally. Home walls make you strong. Gyms make you technical. The movement variety at a bouldering gym — different textures, different hold brands, different setters — rounds out what a home wall can’t provide.
Track your hangboard. Write down dates, hold sizes, and durations. Finger-strength progress is slow enough that without records you won’t believe it’s happening. The log makes it visible.
Save your money
What you don't need yet
Beginners get pressured to buy a lot of stuff that doesn't help them play
better. Here's what we'd skip on day one.
Moonboard or Kilter Board — Smart training boards are incredible once you're climbing V4+. At $3,000+ installed, they're completely unnecessary when your beginner wall already has everything you need.
Campus board rungs — Campus training builds explosive contact strength but destroys undertrained finger tendons. A year of consistent climbing first, then revisit.
Auto-belay system — Home walls are bouldering walls — no rope, no belay needed. Auto-belays are for commercial top-rope setups.
LED route-lighting strips — Cool for gyms and Insta photos. Your overhead garage lights work fine to start; this is a furniture-polish problem.
Liquid chalk — Useful in gyms where loose chalk is banned. In your own garage, regular chalk is cheaper and works better.
First week
Your first seven days
A short, real plan to get from gear-on-doorstep to actually playing.
Sketch your wall before buying anything — dimensions, angle, and which studs or joists you'll anchor to. · Action
r/climbingwalls wiki · Community build guide with framing specs, angle advice, and T-nut layout diagrams
Order T-nuts (200 minimum) and carriage bolts (3/8-16 × 1") so they arrive before your plywood does. · Buy
Buy 3/4" plywood (MDO or Baltic birch) at the hardware store and have them cut it to size — most stores charge $0.50 per cut. · Action
Drill your T-nut holes on a grid (8" spacing), hammer T-nuts in from the back, then mount the plywood to your frame. · Action
Set 3–4 beginner routes with your holds and run your first session. Nothing is final — reposition freely. · Action
FAQ
Common questions
How much plywood do I need for a home climbing wall?
A single 4×8 sheet gets you a functional training wall. Most builders start with 2–3 sheets for a wall that fills a standard garage bay (8×8 to 8×12 feet). At 45 degrees overhang you'll need more holds per sheet; vertical walls need fewer.
What angle should I build my wall at?
Start vertical or at 20–30 degrees for a beginner-friendly wall. Forty-five degrees and steeper is where roof-style overhangs begin — fun, but harder on your body and requiring more holds. Vertical walls are also cheaper to populate and easier to learn movement on.
Do I need to anchor into studs?
Yes, always. Wall studs or ceiling joists are load-bearing; drywall alone cannot handle the dynamic loads from a person falling onto holds. If studs aren't where you need them, sister new lumber into the framing first.
How many holds do I actually need to start?
A 50-piece set is enough to set 10–15 routes on a single 4×8 sheet — figure 6–10 holds per route. You'll want more within six months as you level up and need new movement patterns. That's expected; think of holds as a growing library.
Can I use screw-on holds instead of T-nuts?
Screw-on holds work well for small footholds and edges and require no T-nuts. The tradeoff: they can't be repositioned without leaving holes, and they strip over time under heavy use. A hybrid approach — T-nuts for main handholds, screw-ons for footholds — is practical.
How long does it take to build a basic wall?
One to two weekends for a first-time builder doing a 2–3 sheet wall with basic framing. Budget a full Saturday for the frame and a Sunday for plywood mounting, T-nut installation, and your first holds. The drilling is repetitive but faster than it sounds once you're in rhythm.
r/climbingwalls — The most active home-wall building community. Build logs, angle debates, T-nut layouts, and hold recommendations from people who've made every mistake before you.
99Boulders — Climbing Holds Reviews — Thorough hold reviews with photos of actual texture and shape. Most useful resource for comparing holds before buying.
Power Company Climbing (YouTube) — Training-focused coaching channel. Hangboard protocols, finger-strength progressions, and injury-prevention primers for home trainers.
Kilter Board — The leading smart training board. Useful as a reference for route-setting ideas even if you don't own one — their app shows hold placements by grade.
As an Amazon Associate, JustBeginning earns from qualifying purchases.
We may also earn commission from other affiliate programs linked on this
page. Editorial recommendations are independent; we don't choose
products based on commission rates.
Product prices and availability are accurate as of the date and time
indicated and are subject to change. Any price and availability
information shown on Amazon at the time of purchase will apply.
Our top pickAtomik 50-Piece Facet Climbing Holds Set


 Best starter