Barebow recurve and traditional longbow shooting are a different world from compound archery. No sights, no release aids, no bow press. Just you, a strung limb, and matched arrows. The form takes real time to build, but when it clicks, nothing else shoots quite like it.
By Colin B. · Published June 18, 2026 · Last reviewed June 18, 2026
A solid starter setup runs $220-320: a recurve, two sets of matched arrows, finger tab, hip quiver, and a block target. Upgrading limbs later is cheap; the riser lasts years.
We earn commission on qualifying Amazon purchases — see our
affiliate disclosure.
Price tiers and budget totals shown above are editorial estimates;
actual Amazon prices vary.
At a glance
Our top pick in each category
The fastest path through this guide — each best-starter pick by category.
Scroll for the budget and upgrade alternatives.
Draw weight is everything. A 45 lb recurve feels manageable in the store and unbearable after 50 shots in your first week. Start at 30-35 lb. You can buy heavier limbs in three months once your muscles have developed. A bow you can shoot for an hour is worth more than one that will eventually be strong enough.
Match arrows to your draw weight, not your ego. An arrow that's too stiff (wrong spine) will fly left or right regardless of your form. Most bow sellers include a spine chart in the listing. For a 30-40 lb recurve at a 28" draw, 600 spine carbons are a safe starting point.
Join a club or find a range before setting up in your backyard. The first time an experienced archer watches your grip and anchor point will save you months of practicing bad habits. Traditional archery has a welcoming community and most clubs are inexpensive.
For traditional archery, the bow choice sets the whole direction of your practice. ILF takedown recurves let you swap limbs as you progress and dominate barebow competition. Traditional longbows and one-piece recurves are simpler, quieter, and have a loyal following. Start with a 30-45 lb draw weight: light enough to shoot for an hour without fatigue, heavy enough to reach a standard 20-yard target. You can always add heavier limbs later. Do not start at 50+ lb. Experienced archers learn this the hard way, not beginners.
Bows — what's the difference?
A few common shapes, each making a different trade.
ILF Takedown Recurve
Swappable limbs, competition-ready, the most upgradeable path.
Length
62-68"
Draw weight range
25-55 lb
Limbs
Interchangeable
Best for Beginners who want a growth path or plan to shoot barebow competitively
Tradeoff More pieces to manage; riser and limbs must be correctly paired
The Sage has been the default beginner recurve recommendation on r/archery for over a decade. Solid ILF riser, decent limbs, available in draw weights from 25 to 55 lb, and compatible with better limbs down the road when you want to upgrade without buying a new bow.
What we like
Decade-long track record as the go-to beginner recurve recommendation
ILF-compatible riser accepts better limbs when you're ready to upgrade
Available in every draw weight from 25 to 55 lb
What to know
Ships unstrung; bow stringer is a required separate purchase
Stock string is adequate but most archers replace it within a few months
Another widely recommended ILF starter at a slightly lower price. If the Sage is sold out in your draw weight, the Spyder is the right next call. Same ILF concept, comparable quality, and similarly easy to upgrade with aftermarket limbs.
What we like
Frequently in stock when the Sage is backordered in your draw weight
ILF-compatible riser accepts aftermarket limbs for future upgrades
What to know
Limb quality is a small step below the Sage at similar draw weights
Slightly heavier riser than competitors; tires out new archers a bit faster
The Grizzly is what a lot of traditional archers graduate to after their first takedown. A one-piece recurve with fiberglass-over-maple construction, a forgiving brace height, and a heritage pedigree. No ambiguity about what you're holding; it is just a bow that has worked for 60+ years.
What we like
Heritage recurve design that serious traditional archers actually use
One-piece construction is quieter and simpler than takedown designs
Forgiving brace height makes it more beginner-friendly than most longbows
What to know
Can't swap limbs; need to buy a new bow if you want a different draw weight
Premium price means less room to experiment early in your development
Spine is the most important arrow spec. A spine number describes how stiff the shaft is, and the right spine depends on your bow's draw weight and your draw length. Mismatched arrows fly poorly regardless of your form. For 30-45 lb recurves with a 28" draw length, look for arrows in the 500-600 spine range. Most bow sellers post a spine chart in the listing. Buy six arrows to start, not a dozen; you will lose some and won't need the extras until your form is consistent.
Best starter
Carbon Express
Heritage Carbon Arrows (6-pack)
$$
★★★★★Our rating
Carbon Express Heritage arrows split the difference between traditional aesthetics and modern forgiveness. Real feather fletching, a wood-print shaft, and carbon durability that wood can't match. Order 500 spine for draw weights 40-55 lb and 600 spine for 30-40 lb.
What we like
Real feather fletching flies cleaner out of a stick bow than plastic vanes
Carbon durability survives the tree hits and ground shots wood can't
Wood-print finish looks traditional without the fragility of actual wood
What to know
More expensive per shaft than plain wood arrows
Spine still must be matched to your draw weight; don't guess
Cedar shafts are the classic traditional arrow and genuinely lovely to shoot. Cheaper per dozen than carbon, but they crack or split when they hit something hard. Good for a dedicated straw bale setup where miss-shots stay on soft material.
What we like
True traditional feel and aesthetics; pairs naturally with a longbow
Cheaper per shaft than carbon options
What to know
Wood splits on hard impacts; inspect every shaft before every session
More sensitive to humidity; store flat and indoors to prevent warping
When you're shooting consistently and want arrows that group tighter, Gold Tip Traditional delivers. Tighter straightness tolerance, better balance, and real feather fletching. The step up that makes a noticeable difference once your form is actually there.
What we like
Tighter straightness tolerance than budget carbons isolates form from gear
Consistent weight and balance help identify technique issues clearly
What to know
Overkill until your groups are already 4-5 inches at 20 yards
Higher cost means each lost arrow is a more expensive mistake
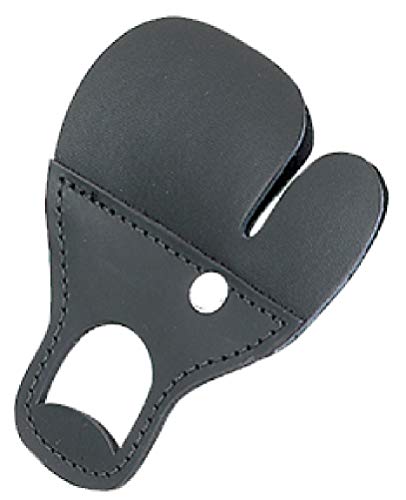
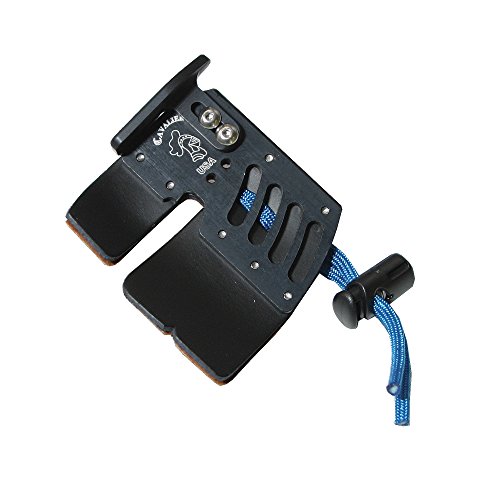
You will draw and release a string hundreds of times in your first week. Without protection, the string will shred the first three fingers of your draw hand within an hour. A leather tab or a three-finger shooting glove fixes this completely. Tabs are more common among recurve and barebow archers; gloves are popular with longbow and instinctive shooters. Both work. Either way, buy before you pick up the bow.
Best starter
Neet Archery
Traditional Leather Tab
$19.12 as of Jun 22, 2026
★★★★★Our rating· In Stock
Simple, durable, and adjustable. The Neet tab is what most beginner recurve archers start with and many never replace. Leather backing, adjustable finger separator, and a design that has been working for decades. Buy a medium; most hands fit.
What we like
Leather molds to your fingers after a few sessions for a custom feel
Finger separator keeps the string centered, eliminating a common flinch
What to know
Tabs take a few sessions to break in and feel stiff at first
Sizing matters; too big and it shifts position during the draw
A three-finger shooting glove is quicker to put on and more comfortable for casual sessions. Less precise than a tab but the right call for longbow archers who prefer a more traditional feel in the draw hand.
What we like
Easier to put on and take off than a tab; more natural feel
Well-suited for longbow and instinctive shooting styles
What to know
Less consistent release than a tab; can affect groupings at distance
Finger pads wear through after a season of heavy use
The step up most barebow competition shooters make once their anchor point is consistent. The shelf gives your anchor finger a fixed reference point that improves release consistency dramatically over a basic tab.
What we like
Shelf gives the anchor finger a fixed reference point at every draw
Stiff leather platform produces a cleaner, more repeatable release
What to know
Overkill for recreational shooting; the gains show up at 30+ yards
Requires more fitting and adjustment than a basic tab
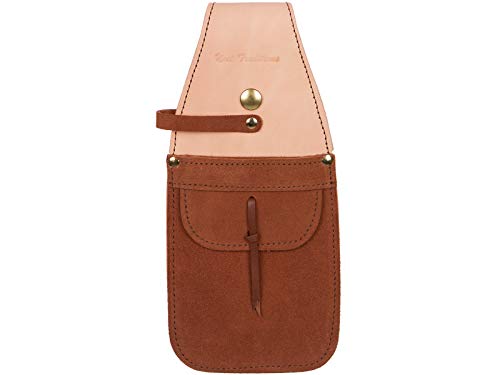
A quiver keeps your arrows organized and accessible at the shooting line. Belt hip quivers are the standard for target and field archery: they sit at your hip and you draw from them without breaking your stance. Back quivers look iconic and work well for roving and 3D archery courses. For practicing at a stationary target, a basic hip quiver is all you need.
Best starter
Neet Archery
Neet Traditional Hip Quiver
$33.99 as of Jun 22, 2026
★★★★★Our rating· Only 4 left in stock - order soon.
Does exactly what a quiver needs to do: holds 12-15 arrows within easy reach, clips to your belt or slings on a shoulder strap, and costs very little. The most practical form factor for beginners at a target range.
What we like
Holds 12-15 arrows within easy reach at the shooting line
Belt clip plus carry strap works on a range, hiking, or a 3D course
What to know
Arrows rattle slightly in transit; a foam insert quiets them
Tube diameter limits you to standard-diameter shafts; check sizing
The look most people picture when they imagine archery. Back quivers work well for roving and 3D courses where you cover ground. Less practical at a stationary target line, but if the aesthetic matters to your enjoyment, it matters.
What we like
The classic archery aesthetic; deep enough to hold 20+ arrows
Good for 3D and roving courses where you walk between targets
What to know
Drawing over your shoulder takes practice compared to a hip quiver
Arrows shift on uneven terrain; less practical at a stationary range
Unless you have access to a club range, you will need a target and a safe backstop at home. Foam block targets are excellent: arrows penetrate and stop cleanly, easy to pull, and they handle thousands of shots. Straw bales work but arrows become harder to remove as the bale packs down over time. Always know what is behind your target. For traditional draw weights of 30-50 lb, a standard block target rated for field points handles the load easily.
Best starter
Field Logic
Block Classic 4-Sided Archery Target
$89.99 as of Jun 22, 2026
★★★★★Our rating· In Stock
The Block is the standard backyard foam target for a reason. Four shootable faces, easy arrow removal, handles 30-50 lb recurve shots cleanly, and lasts for thousands of shots. Set it on a straw bale as an extra backstop and you are fully set up.
What we like
Four shooting faces extend lifespan significantly versus single-face targets
Easy arrow removal; foam grips shafts less tightly than straw
Self-healing foam handles thousands of shots from traditional weights
What to know
Heavy and awkward to move around a range alone
Field points only; broadheads will destroy the foam quickly
A bag target works well when you want something lighter to hang or move around. Slightly messier (filler needs occasional fluffing) but a fraction of the weight of a block target and easier to store in a small garage.
What we like
Lightweight and easy to hang on a fence post or portable stand
Lower price point than comparable foam block targets
What to know
Arrows are harder to pull when filler packs tight after heavy use
Needs occasional fluffing as fill settles; shorter lifespan than foam
Two items most beginners forget until they learn the hard way. The armguard protects your forearm from the string slap that is almost guaranteed in your first hour of shooting, especially with a recurve. The bow stringer is how you safely string and unstring your bow without torquing the limbs. String a recurve by hand and you risk a twisted limb or a bow flying into your face when it slips. Both cost under $20 combined and belong in your range bag from day one.
Best starter
Neet Archery
Leather Arm Guard
$30.99 as of Jun 22, 2026
★★★★★Our rating· In stock
The string will hit your forearm. It will hurt. An armguard turns that from a bruise-raising welt into something you barely notice. Buy one before your first session, not after. Any sturdy leather or padded armguard works; the Neet is inexpensive and sized correctly.
What we like
Prevents the forearm string slap that stops beginners in their first hour
Elastic strap fits most arm sizes and stays put through a full session
What to know
Position it on the inner forearm; placing it wrong leaves a gap
Cheaper straps can slip over a long session; check the elastic quality
A stringer is two pockets connected by a cord that levers the bow's flex to safely string it without torquing the limbs. Takes 30 seconds. Stringing a recurve by hand can twist the limbs out of alignment or send the bow into your face. Buy one with the bow.
What we like
Strings a recurve safely in 30 seconds with no risk of limb twist
Required tool for any takedown recurve; no good substitute
What to know
Most stringers fit 90% of bows but may not work on every longbow
Check string tips monthly; wear shows up at the pocket contact points
Most beginners expect traditional archery to feel like darts. It doesn't. Here's what the first month actually looks like, and how to build the foundation that makes it click.
Traditional archery has a reputation for being meditative and slow. In one sense that is true. In another, the first few sessions are pure chaos: arrows going everywhere, form collapsing under draw weight, and the creeping realization that every compound archer who ever told you “archery is easy” was using a sight.
It gets better. The path from scattered to consistent follows predictable stages, and knowing them in advance makes the confusion easier to absorb.
Week 1: The basics are not where you expect them
You will be tempted to focus on aim. Don’t. In week one, aim is almost irrelevant. What you’re actually building is a repeatable draw cycle: the same grip on the bow, the same hook on the string, the same path from bow arm up to anchor point, the same release. Until those steps are automatic, you don’t have enough consistency to aim at anything.
Here’s what to drill in your first week:
Stance. Square up to the target, feet shoulder-width apart, body perpendicular to the target line. Think of your bow arm as a shelf you’re resting the bow on, not a lever you’re pushing. A tense bow arm transfers torque to the riser and sends arrows sideways.
The hook. Your draw-hand fingers curl around the string, not gripping it. The string sits in the first groove of your fingers, between the first and second joints. Deep gripping causes painful string slap on release and inconsistent draws.
Anchor. Pick one and stick with it. Most barebow archers anchor with the index finger at the corner of the mouth or under the chin. Under-chin is more precise; corner-of-mouth is more intuitive early on. Whichever you choose, the anchor must be identical on every shot.
Release. Let the string go by relaxing your fingers. You are not “releasing” the string in an active sense; you’re removing the tension. A plucking or jerking motion is the single most common reason for wild arrows in week one.
By week two, if you’re shooting 50+ arrows per session, the arrow patterns start communicating. Traditional archery has a body of knowledge around “arrow flight diagnosis” that is extraordinarily useful once you have the vocabulary.
Arrows consistently going left (for a right-handed archer): bow arm is collapsing inward. Keep your elbow rotated out so the string clears your arm.
Arrows consistently going high: you’re anticipating the release and raising the bow arm. This is called “shooting over” and is almost universal in beginners. The fix is to focus on your anchor point, not on the target, during the draw.
Arrows inconsistently scattered: your anchor point is moving. Film yourself from the side. If your draw-hand position varies by even a centimeter, your arrows go wherever the geometry sends them.
Set up at 10 yards for the entire first two weeks. This is closer than feels productive, and it is exactly right. At 10 yards, the arrow tells you immediately what your form did. At 25 yards, the information degrades into noise.
Week 3: Instinctive aiming begins (sort of)
Instinctive aiming is the technique most associated with traditional archery. You look at the target, not the arrow tip, and your unconscious calibration takes over. It sounds mystical. It isn’t; it’s muscle memory that hasn’t developed yet.
In week three, you will not be shooting instinctively. What you’re doing is closer to “gap shooting” or “string walking” depending on your approach. Gap shooting means using the arrow tip as a rough reference: at 10 yards, you might aim the tip a few inches below the bullseye, and over time you learn exactly how much to compensate at each distance. It is deliberate and teachable.
The important thing in week three is not to switch methods. Pick gap shooting or instinctive and stick with it for at least two months. Switching methods mid-development resets the calibration you’ve been building.
If your groups at 10 yards are landing in a 4-5 inch circle consistently, you’ve earned 20 yards. If they’re not, wait. Distance amplifies form errors; every problem you haven’t fixed at 10 yards will be larger and harder to diagnose at 20.
At 20 yards, two things change. First, the arrow’s arc becomes significant. The arrow rises during the first half of its flight and drops through the target. Your gap reference shifts accordingly. Expect to spend a week recalibrating what you already learned.
Second, the physical demand increases. A 35 lb draw weight at 20 yards, shot 50 times, will fatigue muscles you didn’t know you had. The muscles between your shoulder blades, specifically, take 4-6 weeks to develop for consistent use. If your draw feels harder at session’s end than it did at the start, that is normal. Do not push through shoulder pain.
The thing nobody tells beginners
Traditional archery has an honest learning curve, but it also has a payoff that compound archery doesn’t: every arrow you land is entirely yours. No release aid. No sight. No mechanical advantage. Just calibration you built with your body, repeating itself correctly.
The moment that clicks typically comes around week six to ten: a session where you stop thinking about form and just shoot, and the arrows start going where you’re looking. Most traditional archers describe this as the moment the hobby became a practice. The gear is almost beside the point from there.
Keep a shot log. Record your draw weight, distance, group size, and one form note per session. The feedback loop of watching your groups tighten over three months is the single best thing you can do to stay motivated through the early plateau.
Save your money
What you don't need yet
Beginners get pressured to buy a lot of stuff that doesn't help them play
better. Here's what we'd skip on day one.
Sights, stabilizers, or a clicker — These are Olympic recurve and compound accessories. Traditional and barebow archery specifically excludes them.
A release aid — Release aids are for compound bows. Traditional archers shoot with fingers, and that is the skill you are here to develop.
Custom-spined or premium aluminum arrows — Your form isn't consistent enough in month one to reveal the difference. Stock carbon arrows in the right spine will tell you everything you need to know.
An arrow rest — Traditional archers typically shoot off the shelf (the riser shelf or their knuckle). An add-on arrow rest changes the dynamic in ways beginners don't need.
A dozen arrows — Buy six. You will lose two and damage one before you've built the accuracy to need more. Restock once you stop losing arrows.
First week
Your first seven days
A short, real plan to get from gear-on-doorstep to actually playing.
Order your bow, arrows, tab, armguard, and bow stringer together so everything arrives at once. · Buy
Shoot 50 arrows in your first session focusing on form, not where the arrows land. · Action
Introduce yourself on r/tradarchery and post a form-check video once you have 20 arrows on video. · Action
r/tradarchery · Welcoming subreddit for barebow and longbow archers
FAQ
Common questions
What draw weight should I start with for traditional archery?
Start between 30 and 35 lb. That's light enough to shoot for a full practice session without fatigue, and heavy enough to reach a 20-yard target. Many beginners are tempted by 45-50 lb and regret it within a week. For an ILF bow, you can buy heavier limbs in three months once your muscles have developed.
What is the difference between traditional and compound archery?
Compound bows use cams and cables to let you hold a fraction of the draw weight at full draw, plus sights, stabilizers, and release aids to make aiming mechanical. Traditional archery means none of that: you feel the full draw weight, aim instinctively or with reference points, and everything is you. The skill ceiling is higher, the learning curve is steeper, and that is most of the appeal.
Should I start with an ILF recurve or a traditional longbow?
For most beginners, an ILF takedown recurve (like the Samick Sage) is the better start. The limbs are swappable, so when you want more draw weight you buy new limbs instead of a new bow. Longbows are beautiful and have a devoted following, but the instinctive aiming curve is steeper and they can't be tuned in pieces the way an ILF setup can.
How far should I set up my target as a beginner?
Start at 10-15 yards. The goal in your first month isn't accuracy at distance, it's building consistent form. At 10-15 yards you can clearly see what your arrows tell you about your form. Move to 20 yards once you're grouping four or five arrows consistently. Most beginners rush to 20+ yards too early and lose the feedback that closer shooting provides.
How long does it take to shoot consistently in traditional archery?
Honest answer: 3-6 months to land consistent groups at 20 yards. The first week you'll be scattered across the target. By month two, form starts to feel natural. By month four, instinctive aiming begins to click. Traditional archery has a longer development arc than compound precisely because you're building a feel that mechanics can't aid. This is what the community loves about it.
Do I need to join a club, or can I shoot in my backyard?
You can legally shoot in your backyard in most areas, but joining a club accelerates improvement dramatically. Having an experienced archer watch your form for 30 minutes saves months of practicing bad habits. Most archery clubs have cheap membership, open shooting lanes, and genuinely welcoming cultures for new archers.
USA Archery — The national governing body. Club finder, member rankings, and the official rulebook for barebow competition.
Lancaster Archery Supply — The largest archery retailer in the US. Excellent spine charts, setup guides, and how-to videos. The bow-tuning library alone is worth bookmarking.
NUSensei (YouTube) — By far the clearest archery instruction on YouTube. Start with the beginner playlist. Watch before you shoot, not after.
r/tradarchery — Active community focused on recurve and longbow shooting. Gear questions, form checks, and a welcoming culture for new archers.
World Archery — International governing body. Official competition rules for barebow recurve. Worth reading once you decide to compete.
Archery Talk — The largest US archery forum. Decades of archived posts on equipment, tuning, and technique. Search before posting; most beginner questions are already answered.
As an Amazon Associate, JustBeginning earns from qualifying purchases.
We may also earn commission from other affiliate programs linked on this
page. Editorial recommendations are independent; we don't choose
products based on commission rates.
Product prices and availability are accurate as of the date and time
indicated and are subject to change. Any price and availability
information shown on Amazon at the time of purchase will apply.


 Best starter