Espresso is the most equipment-dependent way to make coffee at home. It's also, for the people who get into it, the most rewarding. A shot pulled exactly to your taste is a specific kind of daily pleasure that no other method quite delivers. Here's what you actually need, where the investment is, and what you can skip.
By Colin B. · Published May 8, 2026 · Last reviewed July 13, 2026
The spread is in the grinder. A Baratza Encore ESP ($180) works at its finest settings; a Fellow Opus ($195) handles espresso more comfortably. Machine, tamper, knock box, and scale are the same either way.
We earn commission on qualifying Amazon purchases — see our
affiliate disclosure.
Price tiers and budget totals shown above are editorial estimates;
actual Amazon prices vary.
At a glance
Our top pick in each category
The fastest path through this guide — each best-starter pick by category.
Scroll for the budget and upgrade alternatives.
The grinder matters even more here than for pour-over. Espresso is extracted at 9 bars of pressure through coffee ground finer than anything else in your kitchen, and the tolerances are tiny, and inconsistent grind size shows up immediately in the shot. A blade grinder is completely unusable. Don't compromise here.
Skip the all-in-one machines with built-in grinders, especially the Breville Barista Express. The concept sounds practical: one machine, one price, one footprint. The problem is the built-in grinder is the weakest component, and when you outgrow it, you have to replace the whole machine. A separate machine and separate grinder at the same total price makes better espresso and gives you somewhere to go.
Espresso has a real learning curve, so budget two weeks of daily pulling before your shots are reliably good. The dial-in process (adjusting grind to hit the right extraction time) is learnable, but it requires repetition. The reward for getting through it is a skill that compounds: every morning, a shot that tastes exactly the way you like it.
The machine is the biggest decision and the biggest upfront cost. Two machines cover almost all beginner needs: the Breville Bambino Plus for people who want a smooth onramp with helpful automation, and the Gaggia Classic Evo Pro for people who want more manual control and a commercial-standard 58mm portafilter from day one. Both make real espresso. The Bambino Plus is easier to start with; the Gaggia has more ceiling. You'll also see the Breville Barista Express everywhere: built-in grinder, ~$700, looks convenient. We don't recommend it: the built-in grinder is the machine's weakest part, and when you want to upgrade it, you have to replace the whole machine. Buy them separately.
Machine — what's the difference?
A few common shapes, each making a different trade.
The Bambino Plus hits a difficult combination: it makes real espresso (9 bars of pressure, pre-infusion, thermocoil temperature control), fits on almost any counter, heats up in 3 seconds, and has an auto-steam wand that produces textured milk at the press of a button. The learning curve is actually about the coffee; the machine stays out of the way. Around $350.
What we like
Heats up in 3 seconds, no waiting around for warm-up
Auto-steam wand handles milk texture without manual technique
Compact footprint fits tight counter situations
What to know
54mm portafilter limits accessory options vs. 58mm machines
Small water tank empties fast when making multiple drinks
★★★★☆Our rating· Only 4 left in stock (more on the way).
The Italian benchmark for entry-level serious espresso. The 58mm commercial-standard portafilter means all professional-grade baskets and accessories fit. The manual steam wand produces better milk texture than any auto-steam once you've learned it. Highly hackable: a PID temperature controller mod is a $50 upgrade that transforms extraction consistency. Around $450.
What we like
Commercial 58mm portafilter fits all professional accessories
Manual steam wand produces better milk texture at mastery
Deep upgrade path: PID mod transforms extraction for $50
What to know
~5 minute heat-up time requires planning ahead
Manual steam takes weeks of practice to consistently nail
Espresso requires finer, more consistent grinding than any other coffee method. The gap between a pour-over grind and an espresso grind is huge. Espresso grounds are almost powder-fine, and the extraction happens so fast at such high pressure that any inconsistency in particle size registers immediately in the cup. A grinder that works well for pour-over may only be marginal for espresso. A blade grinder is completely unusable. This is where spending more money has the most impact.
Best starter
Fellow
Opus Conical Burr Coffee Grinder
$$$
★★★★★Our rating
Designed explicitly to handle both espresso and filter coffee without compromise. 41 grind settings, 40mm stainless steel conical burrs, and a stepped-dial design that makes returning to your espresso setting repeatable. Quiet motor, small footprint, under $200. The grinder most home espresso setups should start with.
What we like
Handles espresso and pour-over without compromising either
Stepped dial makes returning to your espresso setting repeatable
Quiet motor and compact footprint for a 40mm burr grinder
What to know
Stepped adjustment, not stepless (fine but not infinite)
Pricier than pour-over-only burr grinders in the same range
★★★★☆Our rating· Only 12 left in stock - order soon.
A pour-over grinder first, but it works for espresso at its finest settings. If you're already starting with the Encore ESP for pour-over, you can begin pulling espresso shots with it before upgrading to a dedicated espresso grinder. Honest caveat: the adjustment steps are coarser than ideal for espresso dialing; you'll want to upgrade eventually.
What we like
Works for espresso at finest settings, genuinely dual-purpose
Solid Baratza build quality; widely serviced and repairable
What to know
Coarser adjustment steps make espresso dial-in fiddly
You'll want a dedicated espresso grinder as your shots improve
Four small items that you'll want almost immediately: a tamper sized to your portafilter, a knock box to dispose of spent pucks, a milk pitcher if you're making lattes, and nothing else for the first month. The tamper is the only one that's machine-specific: the Bambino Plus takes a 53.3mm tamper, the Gaggia Classic takes a 58.5mm tamper. Everything else is universal.
Best starter
Normcore
53.3mm Spring Loaded Tamper V4
$42.29 as of Jun 22, 2026
★★★★★Our rating· In Stock
For Breville Bambino Plus users (54mm portafilter). Spring-loaded design clicks at a consistent pressure so you're not guessing how hard to tamp, and tamping pressure variability is a real source of shot inconsistency for beginners. Around $35.
What we like
Spring-loaded click removes tamping pressure as a variable
Solid stainless steel, a real upgrade over the included plastic
What to know
54mm only, not compatible with Gaggia or any 58mm machine
For Gaggia Classic Evo Pro users (58mm portafilter). Same spring-loaded design as the 53.3mm, which clicks at a set pressure, removes tamping consistency as a variable while you're learning everything else.
What we like
Same spring-loaded consistency as the 53.3mm Bambino version
Fits the Gaggia Classic and all commercial 58mm portafilters
What to know
58mm only, not compatible with Breville Bambino Plus
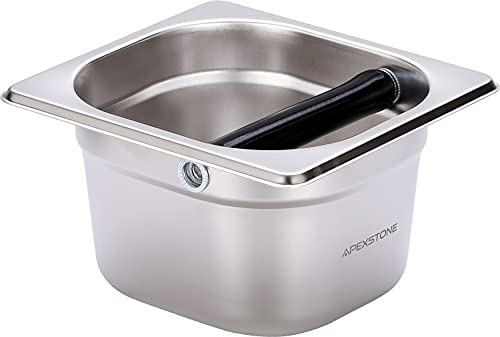
You knock the spent puck out of your portafilter after every shot. A knock box (a small bin with a padded crossbar) is the right tool: one sharp knock, puck goes in, you reload. The Apexstone has a solid metal crossbar (some cheaper boxes use flimsy plastic) and a rubber base that stays put. Under $20.
What we like
Metal crossbar won't crack like cheap plastic versions
Rubber base stays planted on the counter during knocking
What to know
Small capacity, needs emptying after about 10-15 pucks
★★★★☆Our rating· Only 4 left in stock - order soon.
If you're making lattes or cappuccinos, you need a pitcher. The 12oz size is right for one or two drinks: small enough to control the pour, large enough to steam without the wand touching the bottom. Rattleware pitchers have a narrow, drip-resistant spout that makes latte art attempts possible once you've got the milk texture dialed in.
What we like
Narrow drip-resistant spout gives control for latte art pours
12oz size is right for learning, not too large to manage
What to know
Too small if you regularly make drinks for more than two people
Espresso is measured by weight in and weight out. The standard starting ratio is 1:2, 18g of coffee in to 36g of espresso out, pulled in 25-30 seconds. Pulling by eye (filling a shot glass to 'looks about right') introduces enough variability to make dialing in nearly impossible. A scale with a built-in timer is especially useful here: you start the timer at first drip and stop when you hit your target yield, reading both numbers without touching your phone.
Best starter
OXO
Brew 6 lb Precision Coffee Scale with Timer
$56.00 as of Jun 22, 2026
★★★★★Our rating
0.1g resolution, 6-lb capacity, and a built-in timer button accessible with a tap while your hands are occupied with the portafilter. Reads clearly in a dim kitchen. Around $55. If you already have a kitchen scale, use that and your phone timer. The OXO's convenience is real but it's not a requirement.
What we like
0.1g resolution is accurate enough for precise espresso ratios
Built-in timer accessible with one tap while portafilter is busy
What to know
Auto-off is aggressive and can cut out mid-shot if you're slow
If you already own a kitchen scale, use it. If you need to buy one, this is $20 and reads in grams to one decimal place. Use your phone's stopwatch alongside it. The OXO's built-in timer is a convenience; this handles the actual weighing just fine.
What we like
0.1g resolution handles espresso weight tracking for $20
Gets the job done without paying for built-in timer convenience
What to know
No built-in timer, pair with your phone's stopwatch
Espresso has the steepest learning curve of any home coffee method. It also has the tightest feedback loop: a shot runs in 25 seconds, and within that window you can tell exactly what went wrong and what to change next. Here's what your first week looks like, dial-in to dial-in.
Before you pull your first shot, you need to understand the game you’re playing. Espresso is an extraction under pressure: hot water forced through finely ground, compacted coffee at around 9 bars. That pressure is what creates the crema, the intensity, the texture. It’s also what makes everything so sensitive. A slightly coarser grind slows things down; a slightly finer grind speeds them up. Small changes, big effects. The loop is fast, the feedback is clear, and calibration is genuinely learnable.
Here’s what your first week actually looks like.
Before shot one: three numbers
Every espresso shot is defined by three variables. Commit these to memory before you touch your machine:
Dose: the weight of ground coffee going into the portafilter basket. Start with 18g.
Yield: the weight of liquid espresso that comes out. Target 36g, exactly double your dose.
Time: how long from first drip to reaching your yield target. Target 25-30 seconds.
These numbers form your benchmark. A shot that hits all three and tastes good is a dialed-in shot. When a shot tastes wrong, you identify which number was off and adjust the grind to fix it.
One adjustment at a time. This is not a suggestion.
Your first shot will probably not taste great. That’s fine; you’re collecting data, not brewing your daily coffee.
Before you pull it:
Grind 18g of coffee into your portafilter. Distribute it evenly. A gentle tap on the counter helps. Tamp once, straight down, with consistent pressure. The Normcore spring-loaded tamper clicks when you’ve reached the right pressure.
Lock the portafilter into the group head. Start your scale timer. Start pulling.
Watch the first drop appear: that’s when you start your timer if you’re not using the scale’s built-in.
Stop the shot when your scale reads 36g. Note the time.
Now taste it. Note the time, the flavor, and the appearance. A good shot has a tawny crema, streams evenly from both spouts (if double-spouted), and tastes concentrated but not harsh (rich, with a clean finish).
What you actually got on shot one is almost certainly either fast and sour or slow and bitter. Both are fixable.
The diagnostic loop
This is the core skill of espresso, and once you learn it, the hobby opens up.
Shot ran fast (under 20 seconds) and tastes sour or thin: under-extraction. The water moved through too quickly and didn’t pull enough from the coffee. The fix: grind finer. A finer grind creates more resistance, slows the flow, and gives the water more surface area to extract from.
Shot ran slow (over 35 seconds) or barely dripped and tastes bitter, harsh, or hollow:** over-extraction. The coffee is too compacted, water is moving too slowly, and too much is being pulled out. The fix: grind coarser.
Shot ran in the right time but tastes weak: your dose is too low or your yield target is too high. Try 19g in, keep the same yield.
Shot looks channeled (streams of crema that wander or blonding happens very early): the water found a path of least resistance through the puck. Usually a distribution problem: make sure grounds are level before tamping, and tamp straight.
The grind is your primary control. Dose and yield stay constant while you dial in; moving multiple variables simultaneously just creates confusion.
Shots two through ten: closing in
Most people need 3-7 grind adjustments to dial in a new bag of coffee. Here’s how to move efficiently:
Large adjustments first. If your first shot was wildly off (under 15 seconds or basically not moving), make a significant grind change before trying to hit specific seconds. Once you’re in the right neighborhood (20-40 seconds), make smaller adjustments.
Keep notes. Write down your grind setting, the shot time, the yield, and a one-word taste note. You’ll start to see a pattern: finer = longer = fuller, coarser = faster = thinner. These notes also mean you can return to a setting that worked when you open the next bag.
Taste as you go. A shot that hits 27 seconds and tastes great is a dialed-in shot. A shot that hits 27 seconds and tastes bitter isn’t fixed by adjusting time; something else is off. The clock tells you about flow; your palate tells you about extraction.
By shot seven or eight, you’ll pull a shot that hits all three numbers and tastes like the espresso you were chasing. That moment (when the timing, the crema, and the flavor all come together) is when this hobby announces itself.
Learning to steam milk
If you’re making lattes or cappuccinos, milk steaming is its own skill loop, parallel to shot dialing.
The goal is microfoam: milk heated to 140-150°F with a texture like wet paint: glossy, no visible bubbles, pourable. Here’s the sequence:
Fill your 12oz pitcher about a third full of cold milk (cold milk gives you more time to work with).
Purge the steam wand for one second to clear condensate.
Submerge the wand tip just below the milk surface. Open the steam valve fully.
In the first 1-2 seconds, lower the pitcher slightly to introduce air; you’ll hear a soft tearing or hissing sound. This is where the foam is made.
Once you have the volume you want (milk will expand as you steam), submerge the tip deeper and tilt the pitcher to create a swirling vortex. This incorporates the foam into the milk rather than letting it pile on top.
Stop steaming when the pitcher feels hot to hold (around 140-150°F). The steam wand carries heat; pull it off before you’re fully at temp.
Tap the pitcher on the counter to pop any large bubbles. Swirl to maintain the texture.
The most common mistake is over-foaming: too much air in the first phase, producing dry foam instead of microfoam. If your milk is bubbly and stiff rather than glossy and pourable, you introduced too much air too late in the process. Try again with the air introduction tighter (1 second max) and earlier.
On the Bambino Plus, the auto-steam handles the air introduction automatically. You’ll still benefit from understanding what it’s doing. If you ever switch to a manual wand (or want to dial in the auto-steam settings), this is the mental model.
When the ritual forms
Somewhere in your second week, the process stops feeling like a checklist. You lock the portafilter in without thinking about it. You start the timer without looking for the button. You taste the shot and know immediately whether it’s right (not by comparing it to a reference, but because you’ve built a sensory baseline).
That’s the transition: from procedure to practice. Espresso is a daily ritual that compounds. Every morning’s shot teaches you something about the coffee, the machine, and your own preferences. The first week is just the ramp up to that.
Save your money
What you don't need yet
Beginners get pressured to buy a lot of stuff that doesn't help them play
better. Here's what we'd skip on day one.
A bottomless portafilter — A useful diagnostic tool: it lets you see the extraction pattern under the basket, which reveals channeling and uneven tamping. Buy it after you've dialed in your first 50 shots, when you have enough baseline to interpret what you're seeing.
A PID temperature controller — A PID mod ($50-80 kit for the Gaggia Classic) gives you precise temperature control and is a real upgrade. It's also a third variable to manage before you've learned the first two. The Bambino Plus already has good temp stability; Gaggia users should get one eventually, not immediately.
VST precision baskets — Higher-tolerance filter baskets that extract more evenly than stock baskets. Genuinely useful at an advanced level. Irrelevant until you've ruled out grind, dose, and tamping as your variables, which takes months.
A WDT distribution tool — A wire tool you stir through the grounds before tamping to break up clumps and distribute evenly. Costs $10-15 and helps. Also adds a step. Learn to tamp first; add the WDT later if you're still seeing uneven extractions.
A pressure gauge or manometer — Lets you read your machine's pump pressure during extraction. Useful for diagnosing specific problems in machines that are running off-spec. Not a beginner tool; if you need it, you'll know why.
Specialty water recipes — Water mineral content does affect espresso taste. Filtered tap water is fine for your first hundreds of shots. Third-wave water recipes (Barista Hustle Water, etc.) are a refinement for later.
First week
Your first seven days
A short, real plan to get from gear-on-doorstep to actually playing.
Learn your three numbers before you pull your first shot: dose (18g of coffee in), yield (36g of espresso out), time (25-30 seconds from first drip to target yield). Every adjustment you make will be in service of hitting all three. · Action
Pull your first shot without adjusting anything. Watch the time and weigh the yield. You'll almost certainly be off, and now you know which direction. · Action
If your shot ran fast (under 20s) and tastes sour: grind finer. If it ran slow (over 35s) and tastes bitter or harsh: grind coarser. Change grind only. Don't touch dose or yield targets until your timing is right. · Action
Read James Hoffmann's espresso explainer and watch his home espresso series. His coverage of dialing in is the clearest available and will save you days of guesswork. · Learn
For milk drinks: submerge the steam wand tip just below the surface and introduce air in the first 1-2 seconds (you'll hear a paper-tearing sound), then lower the wand to swirl and heat. Target 140-150°F. Pull the wand before you hit temp; residual heat carries you the rest of the way. · Action
FAQ
Common questions
How much does it cost to start making real espresso at home?
Realistically, $585 minimum: Bambino Plus ($350) + Baratza Encore ESP ($180) + Normcore tamper ($35) + knock box ($20). Add an OXO scale ($55) if you don't have a kitchen scale, bringing the typical kit to around $650. These aren't luxury prices; they're the floor for equipment that actually extracts espresso correctly.
Can I use pre-ground coffee for espresso?
No. Espresso requires a grind so fine and consistent that it has to happen right before extraction. Pre-ground coffee, even labeled for espresso, stales within minutes of grinding. The aromatic compounds that make espresso taste like espresso disappear quickly. More practically: you can't adjust pre-ground coffee when your shot is pulling wrong. The grinder is how you dial in.
What coffee should I buy for espresso?
Start with a medium roast espresso blend from any reputable specialty roaster: Counter Culture, Onyx, Intelligentsia, or a local roaster. Blends are designed to taste good across a range of extraction variables, which is exactly what you want while you're still learning. Light single-origin espresso is harder to dial in and more unforgiving of errors; save it for after your first 50 shots.
Why does my espresso taste sour?
Under-extraction. The most common cause is a grind that's too coarse; water moved through too fast and didn't pull enough from the coffee. Grind finer, pull again, taste again. If it's still sour at a very fine grind, your dose might be too low or your water temperature too cool.
Why does my espresso taste bitter?
Over-extraction. Grind is too fine, shot took too long, water pulled too much from the coffee. Grind coarser. If it's still bitter at a coarse grind, check your water temperature (too hot extracts bitter compounds) or your dose (too much coffee in the basket can choke the shot).
What's the difference between a latte, flat white, and cappuccino?
Milk ratio and texture. A cappuccino is equal parts espresso, steamed milk, and milk foam: small, strong, airy. A latte is mostly steamed milk with a thin layer of foam, larger and milder. A flat white is like a small latte with microfoam throughout, very velvety, no foam layer. All start with the same espresso; the milk texture and ratio changes everything.
James Hoffmann (YouTube) — The clearest espresso explainer content available. His home espresso series covers machine choice, dialing in, and milk steaming with a scientist's rigor and a teacher's clarity.
Home Barista — The most technically serious home espresso forum online. The fundamentals section and machine-specific threads are invaluable. Search before posting; decades of troubleshooting is archived here.
r/espresso — Active community with a good beginner's guide in the wiki. Post your shot details (dose, yield, time, grind setting, machine) and the community will usually diagnose the problem accurately.
Barista Hustle — Professional-level extraction science made readable. The articles on extraction theory and the 'percolation vs. immersion' piece are particularly useful once you're past the basics.
European Coffee Trip (YouTube) — Travel-focused channel documenting specialty coffee culture worldwide. Less instructional than Hoffmann, more inspirational. Good for understanding what people are chasing with serious espresso.
As an Amazon Associate, JustBeginning earns from qualifying purchases.
We may also earn commission from other affiliate programs linked on this
page. Editorial recommendations are independent; we don't choose
products based on commission rates.
Product prices and availability are accurate as of the date and time
indicated and are subject to change. Any price and availability
information shown on Amazon at the time of purchase will apply.
Our top pickBreville Bambino Plus Espresso Machine


 Best starter