Fossil collecting puts millions of years of natural history in your hands. Before you head into the field, you need the right hammer, some ID knowledge, and a plan for what to do once you find something. Here's exactly what to buy, and what to skip until you know you're in this for real.
By Colin B. · Published June 4, 2026 · Last reviewed June 4, 2026
Estwing Rock Pick 14 oz (E3-14P)
— The Estwing Rock Pick is the standard first hammer: forged steel, perfect balance, built for decades of field use.
ASR Outdoor Geology Rock Hounding Kit
— A proper geology starter kit with canvas collecting bag, hammer, and chisels covers your first outing in one purchase.
A geology hammer, field bag, and one good ID guide gets you into the field for under $100. Add display cases and prep tools after your first handful of finds.
We earn commission on qualifying Amazon purchases — see our
affiliate disclosure.
Price tiers and budget totals shown above are editorial estimates;
actual Amazon prices vary.
At a glance
Our top pick in each category
The fastest path through this guide — each best-starter pick by category.
Scroll for the budget and upgrade alternatives.
Know the rules before you dig. BLM land allows casual surface collection of common invertebrate fossils without a permit. National parks and monuments are strictly off-limits. Private land requires the landowner's permission. State rules vary. The Fossil Forum has a US state-by-state legality guide worth reading before you go anywhere.
Start with soft-matrix sites. Fossils in shale, marl, or soft chalk come out with a dental pick and a brush. Sites with hard silicified or calcite-replaced fossils require real chisels and experience. Your first dozen finds should come from the easy stuff.
Don't buy prep tools until you have something worth cleaning. Most beginner finds are fragmentary invertebrates that need minimal work. Air scribes ($200-800) are for serious vertebrate prep. A dental pick set handles everything you'll encounter in year one.
Your rock hammer is the single most important tool in fossil collecting. The Estwing line has been the industry standard for decades: forged one-piece steel head, shock-reduction grip, and a balance that works better than anything else at the price. A 14 oz pick point is the right starter weight, heavy enough to crack shale, light enough to carry for hours. The chisel end pries layers apart; the flat face drives chisels. Buy a real one from a real brand. Cheap hammers have loose heads that become dangerous the moment they connect with rock.
Rock Hammer — what's the difference?
A few common shapes, each making a different trade.
Pick Point
Best for prying shale layers apart. The starter choice.
Head shape
Chisel pick
Best for
Shale, marl, soft limestone
Weight
14-22 oz
Best for Prying apart bedded rock and digging into soft sediment matrix
Tradeoff Less effective for cracking large concretions or nodules
Best for striking chisels and breaking concretions.
Head shape
Flat hammer face
Best for
Driving chisels, cracking nodules
Weight
20-32 oz
Best for Driving steel chisels and breaking large limestone nodules open
Tradeoff Cannot pry layers apart without a separate chisel
Best starter
Estwing
Rock Pick 14 oz (E3-14P)
$40.50 as of Jun 22, 2026
★★★★★Our rating· In Stock
Estwing has made this hammer in Rockford, Illinois since 1923. The 14 oz pick is the right weight for all-day fossil collecting: enough force to split shale and soft limestone, not so heavy you're exhausted by noon. The forged steel head will never loosen, and the shock-reduction grip handles hours of impact. This is the hammer most fossil hunters carry their whole lives.
What we like
Made in USA since 1923, the industry standard in fossil collecting
Forged one-piece steel head never loosens like cheaper alternatives
14 oz is ideal weight for all-day use across most terrain types
What to know
Classic leather grip wears faster than the shock-reduction model
Does not ship with a sheath; buy one separately for safe carrying
Under $25 and capable for soft to medium rock. The SE is heavier than the Estwing 14 oz but still a sensible first purchase if you want to try fossil hunting before committing to a name-brand hammer. Once you are going regularly, the Estwing upgrade is obvious and worth it.
What we like
Under $25, a low-stakes way to try fossil hunting before committing
One-piece construction keeps the head from loosening in normal use
What to know
22 oz is heavier than ideal for all-day use on soft shale
Build quality noticeably below Estwing once you compare them
When you're working harder rock (sandstone nodules, chert layers, heavy limestone concretions), the extra weight pays off. The 22 oz pick delivers noticeably more force per swing. Most serious field collectors own both weights and choose based on the site.
What we like
Extra force makes a real difference cracking hard limestone concretions
Same legendary Estwing build quality as the 14 oz
What to know
Too heavy for all-day work on soft shale; buy the 14 oz first
Overkill if most of your sites are chalk, marl, or soft shale
Field collecting requires more than a hammer. A dedicated collecting bag keeps specimens padded and separate on the hike back. Safety glasses are non-negotiable once you start swinging that hammer, rock chips travel fast. A bamboo skewer and soft brush cost almost nothing and remove loose matrix in the field without risking damage to what you found. Budget about $40-50 for the three together, and carry all of them every time.
Best starter
ASR Outdoor
Geology Rock Hounding Kit
$
★★★★★Our rating
Includes a canvas musette collecting bag, rock hammer, chisels, and a magnifier in one affordable kit. If you want to try fossil hunting before buying individual tools separately, this covers the essentials in one purchase. The bag is the standout: durable canvas, single compartment, fits a solid day of finds.
What we like
Canvas collecting bag included alongside basic hammer and chisels
Single purchase covers your first outing without separate orders
What to know
Hammer quality is below Estwing; plan to upgrade it if you stick with the hobby
Kit bundles things you may already own or not need
Rock chips fly at speed when a hammer connects. Sunglasses don't protect from side impact. The Pyramex clear lens works in shade and low light, and a 3-pack means one for the bag, one for the car, one spare. Inexpensive protection for something you only get one of.
What we like
ANSI Z87.1+ impact rated, and actually protects from rock chip impact
3-pack: keep one in the bag, one in the car, one spare at home
What to know
Clear lenses in bright sunlight get uncomfortable, not a substitute for sunglasses
Fogging on humid days; bring a spare set on hot outings
Soft flat paintbrushes remove loose surface sediment from fresh finds without scratching fossil underneath. Pack a few in the bag and brush off matrix before wrapping specimens. Under $10 for 10 brushes, and they handle a surprising amount of basic field cleaning before you need proper prep tools at home.
What we like
Under $5, the lowest-risk tool in all of fossil collecting
Soft bristles remove surface dirt without scratching fossil surfaces
What to know
No use on hard matrix; you need metal picks for that
Bristles wear out fast on gritty sediment; pack extras
Knowing what you found doubles the satisfaction of finding it. The best fossil field guides are regional, a Texas-specific guide is five times more useful in Texas than a general one, because every page applies to what you'll actually encounter. Start with one good national overview. Regional guides from state geological surveys are sometimes available free as PDFs. Most field guides run $15-30 and stay useful for years.
Best starter
Knopf
National Audubon Society Field Guide to North American Fossils
$12.49 as of Jun 22, 2026
★★★★★Our rating· Only 1 left in stock - order soon.
The standard starting point for North American fossil hunters. Over 500 species with color photographs, organized by geological period and taxonomy. Clear enough for a beginner to follow, comprehensive enough to stay useful for years. If you buy one fossil book, this is the one.
What we like
500+ species with color photos, the broadest single-volume US coverage
Organized by period and taxonomy, so narrowing down unknowns is fast
Compact enough to carry in a field bag
What to know
National scope means many pages won't match your specific region
Vertebrate bones require separate specialist references
Fossil Shark Teeth of the World: A Collector's Guide
$85.76 as of Jun 22, 2026
★★★★☆Our rating· Only 1 left in stock - order soon.
Shark teeth are the most commonly found vertebrate fossil in the US, turning up on beaches, rivers, and roadcuts from Florida to South Dakota. Joe Cocke's guide is the collector gold standard: identification by species and geological age, plus a global scope useful wherever you travel. If you collect near marine formations, this outperforms any general guide.
What we like
Best reference for the most commonly found vertebrate fossil in the US
Covers global species, so useful beyond North American collecting
What to know
Narrow scope: not useful for plant fossils, shells, or invertebrates
Some ID entries require comparing similar species side by side
Fossils of the World: A Comprehensive, Practical Guide
$8.97 as of Jun 22, 2026
★★★★☆Our rating· In stock
A serious desk reference for collectors who want geological and evolutionary context for what they find. High-quality photography, worldwide species coverage, and period-by-period organization. Too heavy to carry in the field but earns its shelf space quickly once your collection develops beyond the basics.
What we like
Museum-grade photography useful for comparing against your specimens
Geological context turns identification into a learning experience
What to know
Too heavy to carry in the field; a home reference only
Global scope means some regions covered more deeply than others
Most beginner finds need minimal cleaning: a soft brush and some patience. But if you want to reveal detail hidden in matrix rock, preparation tools become the skill that separates interesting finds from display-worthy specimens. Hand tools handle soft sediment; rotary tools handle medium hardness; pneumatic air scribes handle the hardest matrix and the most delicate vertebrate prep. Start with hand tools. Add rotary when you have specimens that demand it. Pneumatic tools ($200-800) are for collectors preparing vertebrate material regularly.
Prep Tools — what's the difference?
A few common shapes, each making a different trade.
Hand Tools
Dental picks and brushes. Start here, always.
Cost
$15-30
Best for
Soft shale, chalk, marl
Skill
Beginner
Best for Beginners cleaning soft-matrix invertebrates and shark teeth
Tradeoff Ineffective on hard limestone, sandstone, or calcite replacement
★★★★★Our rating· Only 8 left in stock - order soon.
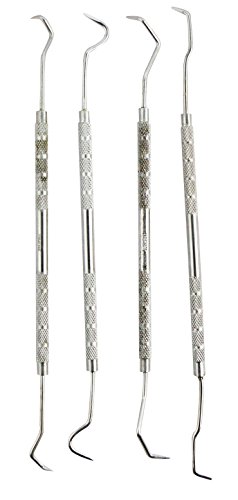
SE's double-ended picks include straight, angled, and hooked profiles that reach different matrix shapes and pocket geometries. The set handles almost everything a beginner encounters in soft shale, chalk, or marl. Under $10 and the right first step before any powered tool investment. Pair with soft brushes for complete basic prep.
What we like
Multiple pick angles reach different matrix types and pocket shapes
Brushes clear sediment without scratching soft fossil surfaces
Under $10, the right first step before any powered tool investment
What to know
No use on hard limestone or concretions; need rotary for that
Slow going on anything harder than soft shale or chalk matrix
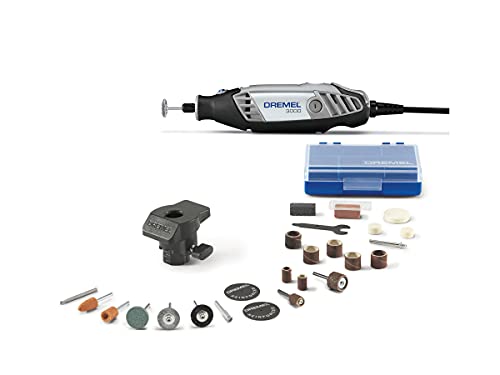
Once you have specimens needing matrix removed from harder rock, a rotary tool with carbide or diamond bits is the right next step. The Dremel 3000 is reliable, widely available, and has a full accessory ecosystem. Variable speed is critical: use the lowest speed that works, and stop often to let the specimen cool.
What we like
Variable speed lets you work near fossils without heat damage
Huge accessory ecosystem: diamond, carbide, and abrasive bits
What to know
Takes real practice before you trust it near a good specimen
Generates fine silica dust; always wear a respirator when using
Pneumatic air scribes are what museum preparators use for serious vertebrate fossils. This pen delivers precise, controllable chipping with no heat and minimal vibration. At roughly $80-150 for the pen alone (plus a compressor), it is more accessible than branded fossil-prep scribes while doing the same work. Widely recommended in fossil prep communities for hard-matrix vertebrate work.
What we like
Museum-grade precision with no heat, safe for fragile vertebrate bone
Precise chipping action removes matrix without cracking delicate surfaces
What to know
Requires an air compressor: budget $150-300 more if you don't own one
Steep learning curve; practice on worthless rock before touching real specimens
Fossils that sit loose in a box lose half their value and tell no story. A proper display shows off preservation quality, makes ID comparisons easy when new finds come in, and gives anyone who visits something worth pointing at. Riker mounts are the universal fossil display format: a hinged case with cotton backing that holds specimens visible and dust-free. Label everything with location and date. Provenance is what transforms a rock into a record.
Best starter
Southern Star Displays
Riker Mount Display Cases 12-Pack
$144.89 as of Jun 22, 2026
★★★★★Our rating· Only 12 left in stock - order soon.
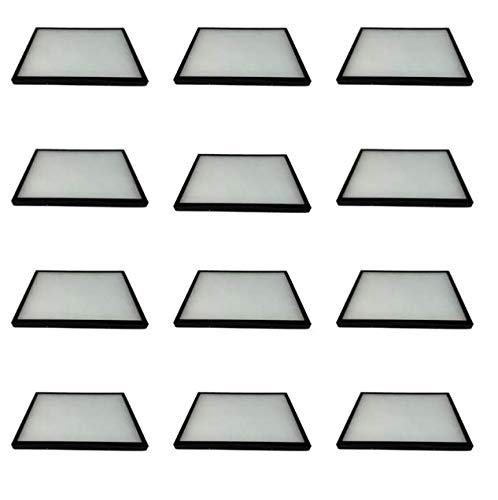
Riker mounts are the standard fossil display format used by collectors and museum gift shops everywhere. A set of 12 in mixed sizes handles everything from small shells to a four-inch vertebra. The hinged glass top displays the specimen while keeping dust out, and the cotton pad backing holds each piece in place without adhesive. Get these early and label as you go.
What we like
Glass top displays the specimen while protecting it from dust
Mixed sizes in one set handles most specimens you'll collect
Cotton pad backing holds specimens in place without glue
What to know
Glass lid breaks if dropped; handle with care on hard surfaces
Not stackable for bulk storage; display-only, not a filing system
Medium Utility Parts Organizer, Hardware Tools Crafts Sewing Supplies and Embellishments Carrying Case with Adjustable and Removable Dividers, Pink
$
★★★★☆Our rating
Before a fossil earns a Riker mount, it needs a safe home. This IRIS organizer has adjustable dividers that fit any specimen shape, keeps finds from knocking against each other, and stacks cleanly on a shelf. Buy two or three: one for unsorted material, one for keepers awaiting ID, one for labeled collection.
What we like
Adjustable dividers fit any specimen shape, no wasted space
Stackable and closable for safe shelf storage and transport
What to know
Not display-ready; for sorting and storage, not showing off
Dividers shift over time; recheck padding for long-term storage
When you find a specimen worth showing at eye level, a proper display case makes all the difference. UV-filtering acrylic slows fading of porous bone and shell over years, a velvet-lined interior provides a neutral background for photography, and a locking lid keeps the piece secure. This is the destination for your best finds.
What we like
UV-filtering acrylic slows fading of porous bone and shell over years
Velvet lining creates a clean background for specimen photography
What to know
Acrylic scratches easily; use microfiber only, never paper towels
Most beginners go into the field with the wrong hammer, no idea what they're looking at, and no plan for what happens next. Here's what actually matters in your first month.
Fossil collecting has an unusually steep learning curve in one specific way: the first few outings often produce nothing recognizable, and beginners conclude either that there are no fossils where they went or that they’re bad at this. Neither is usually true. They went to the wrong kind of rock, or they didn’t know what they were looking at when they walked over it.
A month of intentional field time, paired with some basic geological knowledge, changes everything. Here’s how to build that knowledge fast.
Week 1: Learn to read the rock before you swing anything
The single biggest mistake new fossil hunters make is choosing a site based on proximity rather than geology. Fossils form in sedimentary rock: sandstone, shale, limestone, chalk, marl. If you’re hiking over granite, gneiss, or basalt, you’re not going to find anything. Understanding your local geology takes a few hours and changes every future outing.
Start with your state’s geological survey website. Most of them have free interactive maps showing what rock formations exist at the surface near you. Look for Cretaceous, Jurassic, Carboniferous, or marine formations, which are the periods most likely to have dense invertebrate deposits accessible to beginners. Shale and chalk beds are the friendliest: fossils tend to be more complete and the matrix is soft enough to work with hand tools.
Once you know what geological period you’re working in, you know what to expect to find. Cretaceous marine shale in Kansas will have ammonites, clams, and shark teeth. Pennsylvanian limestone in Ohio will have crinoids and brachiopods. This narrows your search from “anything” to something specific you’re scanning for.
The Fossil Forum’s site directory, organized by US state, is the best shortcut if you don’t want to learn geology first. Other collectors have already documented productive sites with directions and what they’re finding. This is legitimately the fastest way to your first find.
Week 2: Your first field trip
Go with modest expectations. Fragments are finds. Even a broken crinoid stem or a partial bivalve is a real fossil. You found something that hasn’t been disturbed in 300 million years, and that’s worth something.
Here’s how to actually look:
Scan float before you dig. Float is loose rock that’s already weathered out and tumbled downslope. Walk the base of any exposed rock face before you swing a hammer. Fossils that are harder than their surrounding matrix will erode out intact and concentrate in float fields below outcrops. Many collectors find 80% of their specimens in float without ever touching the parent rock.
Follow the bedding planes. Fossils tend to lie parallel to the rock layers they were deposited in. When you see a horizontal layer that looks different from the layers above and below it (slightly darker, finer-grained, with a different texture), that’s often a productive zone. Pry the layers apart gently with your chisel end, working along the plane rather than across it.
Take your time. Fossil hunters who cover ground fast find less than those who slow down and look carefully at every surface. Put your face close to the rock. Fossil surfaces have different texture from the surrounding matrix: smoother, more patterned, sometimes with a slight iridescence from mineral replacement.
Safety glasses go on before the hammer comes out. Always.
Week 3: What to do when you find something
Finding a specimen is the beginning of the work, not the end.
Document first. Before you touch anything, take a photograph in place. Note the GPS coordinates or at minimum a detailed description of where and in what rock layer it was found. This provenance data makes the specimen scientifically and personally meaningful. Without it, you just have a rock.
Extract conservatively. The cardinal rule: remove more matrix than you need to now and leave preparation for home. A fossil that’s 80% uncovered and intact is infinitely better than a complete one you broke trying to free it in the field. Work around the specimen, leaving a generous skirt of matrix to protect it during transport.
Wrap it properly. Tissue paper, then newspaper, then more newspaper. Don’t put multiple specimens in the same wrap. Don’t let them touch each other in the bag. Fragile material can be placed in a small plastic box with cotton padding before wrapping.
At home, let anything that got wet dry slowly in open air before working on it. Thermal expansion and contraction can crack specimens that were fine in the field. Give them at least 24 hours.
Week 4: Identification and building your collection
Post your finds to the Fossil Forum’s identification section. The community is active and knowledgeable, and responses are usually fast for common finds. Include a photo in natural light from multiple angles, and note the geological formation you collected from if you know it. That context dramatically speeds up an ID.
Your ID guide comes in here too. The Audubon Field Guide to Fossils organizes by geological period and major groups, so you can narrow down an unknown by knowing what era you were in and what phylum the overall shape suggests. Most beginner finds will be marine invertebrates (bivalves, gastropods, brachiopods, crinoids, ammonites), and these are well-covered in the national guides.
Label everything you keep. Index cards, label tape, or a simple spreadsheet. At minimum: location, date, geological formation, and your best ID guess. Provenance is what transforms a box of rocks into a collection.
The first month teaches you to see. By the end of it, you’ll walk past features you completely missed on your first outing. You’ll notice float patterns, recognize productive bedding planes, and start to understand what each formation in your area tends to hold. The learning compounds fast.
Save your money
What you don't need yet
Beginners get pressured to buy a lot of stuff that doesn't help them play
better. Here's what we'd skip on day one.
Pneumatic air scribe — Essential for vertebrate prep in hard matrix, but not what your first year of finds will require. Start with dental picks.
Consolidants like B-72 or PaleoBond — Epoxy consolidants stabilize cracked specimens. Most beginner finds are solid enough to handle without stabilization.
Acid preparation kit — Acid baths dissolve carbonate matrix from acid-soluble fossils but require fume hoods and safety training. Not a beginner process.
Fossil club membership — Worth joining after your first field trip, but you don't need it before you've committed. Many clubs offer free public digs first.
UV lamp for fluorescence checking — Useful for spotting matrix repairs on purchased specimens, but irrelevant when you're finding your own in the field.
First week
Your first seven days
A short, real plan to get from gear-on-doorstep to actually playing.
Research your region's fossil-bearing formations. Knowing what geological period of rock exists near you narrows the search from 'anywhere' to specific roadcuts, riverbanks, and BLM parcels. · Learn
Find legal collecting land near you. BLM land, some state parks, and designated fossil parks allow casual collection. Check the BLM's land status maps or your state geological survey for what's accessible. · Action
BLM Paleontology · Official BLM guidance on legal fossil collecting rules
Pack your bag and make your first field trip. Expect mostly fragments on day one. Finding your first identifiable fossil rarely happens immediately, and that's normal. · Action
Post your finds to the Fossil Forum for identification help. The community is generous and accurate, and learning what you found is half the point. · Action
Label your first finds with location and date right away. Provenance makes a specimen scientifically valuable and personally meaningful. Don't skip it. · Action
FAQ
Common questions
Where can I legally collect fossils?
BLM (Bureau of Land Management) surface land allows casual collection of common invertebrate fossils without a permit. State parks vary widely (some allow it, many don't). National parks and monuments are strictly off-limits. Private land requires the landowner's explicit permission. Always check the rules for your specific site before collecting. The Fossil Forum has a state-by-state legality guide.
Do I need a permit to collect fossils?
For casual invertebrate collection on most BLM land, no permit is required. Vertebrate fossils on federal land require a permit regardless of size or completeness. Commercial collection (selling what you find) always requires a permit. Check the relevant agency (BLM, US Forest Service, or your state land authority) for site-specific rules.
What should I do if I find a dinosaur bone or large vertebrate fossil?
Stop digging and document the location precisely with photos and GPS coordinates. On federal land, significant vertebrate fossils belong to the government and must be reported. Collecting them without a permit is illegal under the Paleontological Resources Preservation Act. Contact your state's geological survey or the nearest natural history museum. The site may warrant professional excavation.
How much does fossil collecting cost to start?
A solid starter kit (Estwing hammer, field bag, safety glasses, and an ID guide) runs $80-120. Add display cases and a dental pick set and you're around $180 total. The expensive gear (pneumatic prep tools, air compressor) can wait until year two when you know you have specimens worth the investment.
Can I sell the fossils I find?
Fossils collected from private land, with the landowner's permission, can be sold legally. Commercial sale of fossils from federal land without a permit is illegal. The ethics of fossil sales are a real debate in the paleontology community, and selling significant vertebrate material removes it from potential scientific study. Most collectors keep what they find or trade within the community.
Do I need to join a club to get started?
No, but clubs are genuinely worth it once you're committed. Local fossil clubs have group digs on private land you'd never access alone, bulk supply buys, and experienced members who ID finds on the spot. Find your nearest club through the American Federation of Mineralogical Societies at amfed.org.
The Fossil Forum — The largest English-language fossil identification and community forum. Post your finds for free ID help from experienced collectors and professional paleontologists.
American Federation of Mineralogical Societies — Directory for finding your local rock and fossil club. Member clubs run guided digs, ID nights, and annual shows. The fastest way into the physical fossil hunting community.
Paleontological Research Institution — Educational resources on fossil identification, geological time, and the science behind collecting. The Museum of the Earth in Ithaca, NY is worth visiting if you're nearby.
r/fossilid — Active subreddit for quick fossil identification requests. Response time is fast, accuracy is generally high for common finds. Good first stop for a quick ID.
As an Amazon Associate, JustBeginning earns from qualifying purchases.
We may also earn commission from other affiliate programs linked on this
page. Editorial recommendations are independent; we don't choose
products based on commission rates.
Product prices and availability are accurate as of the date and time
indicated and are subject to change. Any price and availability
information shown on Amazon at the time of purchase will apply.


 Best starter