Mead is the oldest fermented drink humans ever made: honey, water, and yeast. That simplicity is the point. Your first 1-gallon batch costs about $30 in ingredients, fits in a glass jug on your kitchen counter, and produces around five bottles of something drinkable. Here's exactly what you need.
By Colin B. · Published May 24, 2026 · Last reviewed June 11, 2026
A 1-gallon glass jug kit runs $20–25. Add honey ($12–18), yeast ($2–3), nutrients ($8–12), and a hydrometer ($8). Most of this you reuse for every batch after.
We earn commission on qualifying Amazon purchases — see our
affiliate disclosure.
Price tiers and budget totals shown above are editorial estimates;
actual Amazon prices vary.
At a glance
Our top pick in each category
The fastest path through this guide — each best-starter pick by category.
Scroll for the budget and upgrade alternatives.
Start with 1 gallon, not 5. A 1-gallon batch makes four to five bottles and costs about $20 in ingredients to mess up. If your first batch is sour or off, you've lost an afternoon and learned something. If you start with 5 gallons and fermentation stalls, you're nursing a 24-bottle mistake for months.
Mead takes longer than you expect. A basic 1-gallon batch needs at least three to four weeks to ferment, then another two to four weeks to clear. Mead made in November is Christmas gifts. Factor this in before your first brew day.
Honey quality matters more than equipment. Cheap supermarket honey makes serviceable mead. Good raw wildflower honey from a farmers market makes noticeably better mead — cleaner flavor, more complexity. Same yeast, same process. The honey is the difference.
The vessel determines batch size, and batch size is the most important first decision. Start with 1 gallon — it produces four to five bottles, costs about $15 in honey, and if something goes wrong you've lost an afternoon and $20. Glass is better than plastic for long ferments: it's non-porous, easy to sanitize, and lets you see what's happening inside. When you've made three batches and you like what you're making, step up to 5 gallons.
Fermentation Vessels — what's the difference?
A few common shapes, each making a different trade.
1-Gallon
For experimenting. Makes 4–5 bottles; cheap to fail.
Volume
1 gallon
Yield
4–5 bottles
Honey needed
2.5–3 lbs
Best for First batches, recipe testing, limited space
Tradeoff Small yield — won't supply you through a season
Comes with everything you need in one box: a 1-gallon glass jug, a drilled stopper, and an airlock. No sourcing individual pieces or wondering if your stopper fits. Glass keeps odors from previous batches out, and the narrow neck makes it easy to seal. This is the kit we'd hand a friend who said they wanted to try mead.
What we like
Comes as a kit — no separate airlock or stopper hunting required
Glass is non-porous, easy to sanitize, and shows the ferment visually
1-gallon size is the right scale for experimenting
What to know
Narrow neck makes adding fruit additions tricky
Kit doesn't include Star San sanitizer — buy a small bottle separately
A 1-gallon Ball jar with a drilled lid and a grommet-seated airlock costs about $10 total and is functionally identical to a dedicated carboy. Hardware stores carry the jar; homebrew shops or Amazon carry the airlock and drilled lids. Not glamorous, but it works exactly as well as anything fancier.
What we like
Wide mouth makes adding ingredients and cleaning much easier
Available at hardware and grocery stores — no shipping wait
What to know
Need to source drilled lid and airlock separately
Wide mouth harder to seal with a solid stopper for cold-crashing
When you have a recipe you trust and want to make 23–25 bottles at once, the FastRack 5-gallon carboy is the standard vessel. Made with Italian glass, food-grade, heavy, and virtually indestructible if you don't drop it. Buy a carboy brush, a drilled stopper, and an airlock separately — they're cheap.
What we like
Standard vessel for experienced meadmakers — 23–25 bottles per batch
Glass construction lasts decades if handled carefully
What to know
Heavy and fragile if dropped — needs careful handling when full
Honey is both your fermentable sugar and your primary flavor — the grape-variety equivalent in mead. For batch one, a mild honey (clover or orange blossom) lets you taste the fermentation without the distraction of a strong varietal. Raw honey ferments more reliably than ultra-filtered supermarket honey because it retains trace nutrients. You'll need about 2.5 to 3 pounds per gallon for a session mead finishing around 10–12% ABV.
Best starter
Nature Nate's
Raw & Unfiltered Honey (32 oz)
$14.47 as of Jun 22, 2026
★★★★★Our rating· In Stock
Raw, minimally processed, and mild enough that your first batch will be defined by the fermentation, not an overwhelming floral profile. Nature Nate's is consistent, widely available, and priced fairly for a 32 oz jar — enough for a 1-gallon batch with a little left over. The raw and unfiltered label means it keeps the trace nutrients your yeast will thank you for.
What we like
Raw and unfiltered — keeps trace nutrients that help fermentation
Mild, clean flavor lets the fermentation process shine on batch one
Consistent batch to batch — no surprises in a learning batch
What to know
32 oz jar (~2.7 lbs) — need two for a full dry traditional mead
A 5-pound container of raw clover honey covers two full 1-gallon batches and leaves some for your coffee. GloryBee is a well-regarded bulk honey brand, and clover is the most neutral varietal — a good way to learn the process without a strong flavor variable.
What we like
5 lbs covers two full 1-gallon batches at bulk pricing
Neutral clover flavor isolates fermentation variables — good for learning
What to know
Bulk container is messier to work with than a squeeze bottle
Buckwheat honey makes one of the boldest, most distinctive meads you can produce — dark, earthy, almost molasses-like. Save this for batch three or four, once you know the process. When you make a buckwheat mead, you'll understand why people get obsessed with varietal honey.
What we like
Bold, earthy flavor that produces a genuinely distinctive mead
High antioxidants and trace minerals compared to light honeys
What to know
Very strong flavor — not the right choice for your first batch
13.5 oz jar — you'll need 2-3 jars for a full 1-gallon traditional mead
Yeast determines fermentation speed, alcohol tolerance, and how much of the honey's aromatics survive into the glass. Lalvin 71B is the community's default for first batches: fruity esters, good temperature tolerance (59–86°F), and it softens malic acid, making the finished mead less sharp. EC-1118 is the bulldozer — it ferments fast, dry, and strong, but can strip delicate aromatics. Never use bread yeast; it produces off-flavors above about 6% alcohol.
Best starter
Lalvin
71B-1122 Wine Yeast, 5g (10-Pack)
$
★★★★★Our rating
The community's standard recommendation for first-time meadmakers. 71B produces fruity esters, tolerates wide temperature swings, and softens malic acid — which makes a drier mead less mouth-puckering. Ferments to about 14% ABV and is forgiving of slight temperature and nutrient miscalculations. At about $2 a packet, keep a few in the fridge.
What we like
The meadmaking community's default first-batch recommendation
Fruity esters and malic acid softening — cleaner, more approachable mead
Tolerates temperature swings beginners inevitably create
What to know
Must be rehydrated before pitching — skipping this tanks cell viability
EC-1118 is the most tolerant yeast you can buy: it ferments fast, handles high alcohol (up to 18% ABV), and almost never stalls. The tradeoff is that it strips fruit aromatics and produces a very dry mead. Use it when a fermentation is stuck, when you want something bone-dry, or when you're in a hurry.
What we like
Almost never stalls — tolerates 18% ABV, cold temps, and neglect
Great rescue yeast for a stuck fermentation
What to know
Strips fruit aromatics and esters — produces thin, very dry mead
Higher H2S risk if nutrients aren't added on schedule
A Saccharomyces bayanus strain that ferments clean and dry with minimal off-flavors. Less common than 71B or EC-1118, but preferred by some meadmakers for its neutral profile — it gets out of the way and lets the honey speak. Good choice when you want a dry traditional mead without the stripping quality of EC-1118.
Honey is naturally low in the nitrogen and vitamins yeast need to stay healthy. Without additions, fermentation stalls or produces off-flavors — most commonly hydrogen sulfide, the egg smell. The TOSNA protocol (Staggered Organic Nutrient Addition) adds Fermaid-O in small doses on days 0, 1, 2, and 3 of fermentation. For a 1-gallon batch you'll use about 1.5 grams total. Fermaid-K adds inorganic nitrogen for high-demand fermentations; most beginners won't need it until making fruit meads.
Best starter
Lallemand
Fermaid-O Organic Yeast Nutrient (2 oz)
$9.99 as of Jun 22, 2026
★★★★★Our rating· In Stock
The standard nutrient used in the TOSNA protocol and recommended across every mead forum. Fermaid-O is an organic nitrogen source that yeast assimilate cleanly with minimal off-flavor risk. A 50g bag costs about $12 and lasts through a dozen 1-gallon batches. Add staggered: day 0, 1, 2, and 3 at 0.375g per addition for a 1-gallon batch.
What we like
The TOSNA protocol standard — used by the entire online mead community
Organic source means lower H2S and off-flavor risk than inorganic nutrients
2 oz bag covers many 1-gallon batches at the TOSNA dosing rate
What to know
Needs to be measured by weight — requires a precision scale
Works best as a staggered schedule, not a single addition
Fermaid-K adds inorganic nitrogen alongside vitamins and minerals. Used alongside Fermaid-O in the TOSNA+ protocol for high-gravity or difficult fermentations. Not needed for a straightforward 1-gallon session mead, but worth having when you start pushing higher ABV or adding fruit.
What we like
Adds inorganic nitrogen that organic-only protocols sometimes lack
Standard supplement for high-gravity or challenging yeast strains
What to know
Risk of harsh off-flavors if over-used — stay within TOSNA+ dosing
Overkill for a basic 1-gallon session mead with 71B
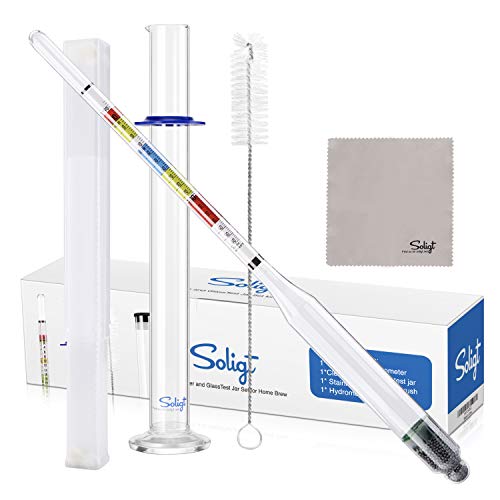
A hydrometer is the only reliable way to know if fermentation is actually done. It measures the density of your must before and after fermentation — the math tells you alcohol content and when yeast have finished their work. Bottling before fermentation is done means bottle bombs: jars that build up CO2 pressure and eventually crack. A $10 hydrometer prevents that. A refractometer does the same job with two drops of liquid instead of a test-tube's worth, but requires a correction factor once alcohol is present.
Best starter
SOLIGT
Triple Scale Hydrometer with Glass Test Jar
$18.98 as of Jun 22, 2026
★★★★★Our rating· In Stock
Reads gravity, Brix, and potential alcohol all at once — the three numbers a beginning meadmaker needs to track fermentation. The included plastic test tube lets you take a reading without pulling liquid from your full vessel. This is the $10 piece of equipment that prevents the $50 mistake of bottling too early.
What we like
Reads gravity, Brix, and potential alcohol simultaneously
Included test tube avoids dipping the hydrometer into the fermenter
Standard brewing instrument — every tutorial assumes you have one
What to know
Requires a full test-tube sample — wastes more must than a refractometer
Glass is fragile — buy a spare if you're accident-prone
A digital refractometer reads sugar content from 2–3 drops instead of a full test-tube sample. Faster and less wasteful for checking progress. The catch: once alcohol is present, refractometer readings require a correction formula — most meadmakers use an online calculator. A useful upgrade once you're making multiple batches and checking gravity frequently.
What we like
Only needs 2–3 drops — faster checks with minimal sample waste
Digital readout eliminates parallax reading error of analog instruments
What to know
Requires correction formula once fermentation begins — extra math step
More expensive — not necessary until you're checking frequently
Racking is moving mead from one vessel to another while leaving the yeast cake (lees) behind. You'll rack at least once before bottling — typically from the primary fermenter to a clean vessel for a few weeks of clearing. An auto-siphon makes this one-person work: you pump once to start the flow. Swing-top bottles skip the cork-and-corker step entirely — fill, flip the lid, done. Add a bottle filler wand for clean, drip-free bottling.
Best starter
Fermtech
Auto-Siphon with Tubing (3/8")
$12.99 as of Jun 22, 2026
★★★★★Our rating· In stock
The 3/8" auto-siphon with food-grade tubing is all you need to rack a 1-gallon batch cleanly. Pump once to start the flow — no mouth-siphoning required, which matters for sanitation. The spring-tipped racking cane stops near the bottom without pulling up lees.
What we like
Self-starting — pump once, no mouth contact, stays sanitary
Spring-tipped cane stops above the lees layer automatically
3/8" size is right for 1-gallon carboys and mason jars
What to know
O-ring seal needs occasional replacement after heavy use
Too short for deep 5-gallon carboys — buy the longer version then
A bottle filler attaches to the end of your siphon tubing and fills bottles from the bottom up, stopping flow when you lift it out. Eliminates splashing, reduces oxidation, and produces a consistent fill level every time. A small accessory that makes bottling day noticeably cleaner.
What we like
Fills from the bottom up — less splashing and less oxidation
Spring tip stops flow on release — clean fill line every bottle
What to know
One more piece to sanitize before bottling day
Not necessary if using swing-top bottles — can pour directly
Swing-top bottles skip the cork-and-corker step entirely — fill, flip the lid, done. A 12-pack covers two full 1-gallon batches and leaves extras for gifting. Bormioli Rocco's swing tops have a reliable seal that won't leak in the fridge and look presentable on a shelf.
What we like
No cork, no corker — just fill and flip the lid closed
12-pack covers two full 1-gallon batches; extras make good gifts
What to know
Swing-top seal less airtight than a cork — not for long-term aging
12-pack is more than one batch needs — but you'll use them all
Mead is forgiving, slow, and deeply satisfying. Here's what actually happens between mixing your first must and opening your first bottle.
Mead is the easiest fermented beverage to make at home. There’s no grain to mash, no hops to add, no complex timing. You dissolve honey in water, add yeast, and wait. The mead figures out the rest.
What beginners underestimate is the patience part. Unlike beer, which can be drinking-ready in two weeks, mead takes a minimum of 30 days — and is usually better at 60 or 90. This guide walks you through the first batch: what you do, what you don’t, and what’s normal at each stage.
Brew day: the first hour
Everything in mead-making lives or dies on sanitation. Before you touch your must, sanitize every piece of equipment that will contact it: the vessel, the airlock, the stopper, the spoon, the funnel, the hydrometer tube. Use Star San no-rinse sanitizer — mix about 1 oz per 5 gallons of water, splash everything liberally, and don’t rinse. The residue is harmless.
Your must (the pre-fermentation liquid) is simple: 2.5 to 3 pounds of honey dissolved in enough water to reach 1 gallon total. You don’t need to heat it — just add warm water to your vessel, add the honey, and stir aggressively until fully dissolved. This takes longer than you expect; give it a good 5 minutes.
Before you add yeast, take your original gravity reading with your hydrometer. Fill the test tube, float the hydrometer, read the scale at the meniscus. A typical starting gravity for a 1-gallon traditional mead is around 1.090–1.110. Write this number down — it’s what you’ll compare against at the end.
Pitching yeast and the first three days
Lalvin 71B needs to be rehydrated before pitching. Heat about 4 oz of water to 104°F (it should feel hot but not scalding), dissolve the yeast packet in it, and wait 15 minutes. Then slowly add small amounts of your must to the yeast slurry to equalize the temperature — this reduces shock. Pour the rehydrated yeast into your must, seal with the airlock, and set it somewhere between 65–75°F.
Within 12–24 hours you’ll see activity: bubbles in the airlock, foam on top, or visible movement in the liquid. That’s fermentation starting. Good.
The next three days are the most active period — and the most important for nutrients. The TOSNA protocol calls for four equal additions of Fermaid-O spaced 24 hours apart, starting on brew day:
Day 0 (brew day): 0.375g
Day 1: 0.375g
Day 2: 0.375g
Day 3: 0.375g
Set phone reminders. These staggered additions keep your yeast well-nourished during the most vigorous phase and dramatically reduce the risk of hydrogen sulfide off-flavors. Each time you add nutrients, stir the must vigorously to degas CO2 — CO2 buildup stresses yeast.
If your mead develops an egg smell during this phase, stir more aggressively and add your next nutrient dose. The smell usually clears on its own.
Days 4–21: waiting, checking, not worrying
After day 3, your main job is to leave it alone. Check the airlock periodically to make sure it has liquid in it (top up with vodka or Star San if it evaporates). Make sure the temperature stays stable.
Around day 7, airlock activity will slow noticeably. Around day 10–14, it may stop entirely. This does not mean fermentation is done. It means the most active phase is over. Fermentation continues slowly at gravity levels the airlock can’t detect.
Do not taste it yet. New mead at day 14 tastes sharp, hot, and nothing like what it becomes. The alcohol is there but the flavors haven’t integrated. It’s normal to feel like you made something terrible. You probably didn’t.
Day 21+: taking final gravity, deciding when to rack
Around day 21, take a gravity reading. If your must started at 1.100 and it’s now at 1.020, fermentation is still going. If it’s at 1.000 or below, it might be done. Take another reading 48 hours later. If it hasn’t changed, fermentation is complete.
A final gravity around 0.990–1.000 is typical for a dry traditional mead made with 71B. Anything above 1.010 at rest for 48 hours means something is stuck — check temperature, add a small nutrient dose, and give it more time.
Rack (transfer to a clean vessel) once fermentation is done and you want to let it clear. Use your auto-siphon to move the mead off the lees into a second clean container, leaving the yeast cake at the bottom. Seal it back up and give it another 2–4 weeks to clear and settle.
Bottling and first taste
Bottle when the mead is visually clear — you should be able to read text through the vessel. Use your auto-siphon and bottle filler wand to fill your bottles cleanly. Cork or seal immediately.
Your first taste at bottling will be promising but rough. Mead undergoes substantial change in the bottle over the first few weeks. Wait at least two weeks after bottling before evaluating the batch seriously.
If it’s thin and sharp, age it longer — 60–90 days from brew day is more typical of a polished result. If it’s sweet, the fermentation stopped early; check your final gravity and consider re-pitching if you wanted a dry mead.
Save your money
What you don't need yet
Beginners get pressured to buy a lot of stuff that doesn't help them play
better. Here's what we'd skip on day one.
A 5-gallon first batch — Three 1-gallon batches teach you more than one 5-gallon batch — each costs $20 in ingredients to experiment with and takes one jug of counter space.
Campden tablets — Potassium metabisulfite kills wild yeast before fermentation. Useful for fruit meads; unnecessary for a simple honey-water-yeast batch.
A pH meter — Experienced meadmakers track pH to prevent stuck fermentations. On batch one, following the TOSNA nutrient schedule does this work for you.
A wine pump degasser — Vigorous stirring with a long sanitized spoon degasses a 1-gallon batch fine. Save the drill attachment for 5-gallon batches.
Pectic enzyme — Only needed for fruit melomels to break down pectin haze. Your first batch is honey and water — skip it entirely.
First week
Your first seven days
A short, real plan to get from gear-on-doorstep to actually playing.
Order your 1-gallon fermentation kit (jug, airlock, stopper). · Buy
Make your must: dissolve 2.5 lbs of honey in water to fill 1 gallon. Take an original gravity reading. · Action
Rehydrate 71B yeast in 104°F water for 15 minutes, then pitch it and seal with the airlock filled with Star San. · Action
Add Fermaid-O on days 0, 1, 2, and 3 (0.375g per addition for 1 gallon). Set a reminder — this is the TOSNA protocol. · Action
FAQ
Common questions
How long does mead take to ferment?
A 1-gallon session mead with Lalvin 71B typically finishes primary fermentation in 2–4 weeks. After that, you'll want 2–4 more weeks of clearing before bottling. Mead is not a weekend project — plan for 4–8 weeks minimum from brew day to first bottle.
My mead smells like eggs. Did I ruin it?
Probably not. Hydrogen sulfide (egg smell) is a sign of stressed yeast — usually from insufficient nutrients. Degas vigorously by stirring, add a small dose of Fermaid-O, and continue fermenting. The smell usually dissipates. If it persists after bottling, adding a sanitized copper fitting to the mead for 24 hours can help bind the sulfur.
Can I use bread yeast?
Technically yes, but the result will be noticeably worse. Bread yeast produces off-flavors above about 6% alcohol and is optimized for CO2 production, not clean fermentation. Wine yeast packets cost $2–3 and make a meaningfully better mead. Don't use bread yeast.
How do I know when fermentation is done?
Take two hydrometer readings 48 hours apart. If the gravity hasn't changed, fermentation is done. Don't rely on airlock activity — airlocks stop bubbling before fermentation ends, and a slow fermentation can fool you into thinking it's done early.
What's the TOSNA protocol?
TOSNA stands for Tontitown Staggered Organic Nutrient Addition. It adds Fermaid-O in small doses on days 0, 1, 2, and 3 of fermentation rather than all at once. The staggered approach keeps yeast healthier and reduces off-flavor risk. GotMead.com has a free TOSNA calculator.
Do I need to heat the honey?
No. Many meadmakers heat the must to dissolve honey faster, but heating also drives off delicate aromatics. The current community consensus is no-heat — just mix honey into room-temperature water thoroughly, add nutrients, and pitch. It takes more stirring but produces better flavor.
GotMead.com — The oldest and most comprehensive mead resource online. Forum, wiki, TOSNA calculator, and recipe database. Start with the NewBee Guide in the wiki.
r/mead — Active subreddit with a detailed wiki covering nutrient calculations, starter recipes, and troubleshooting. Better signal-to-noise than most homebrew forums.
American Mead Makers Association — Trade group for commercial meaderies with beginner resources and a meadery finder — useful if you want to taste the range before committing to a style.
Doin' the Most (YouTube) — One of the most thorough beginner-oriented mead channels. Covers TOSNA, fruit additions, and troubleshooting in plain language. Start here for visual walkthroughs.
Bray's One Month Mead recipe — The classic introductory recipe. Designed to produce a drinkable traditional mead in 30 days without specialized nutrients. A good first batch option before you dive into TOSNA.
As an Amazon Associate, JustBeginning earns from qualifying purchases.
We may also earn commission from other affiliate programs linked on this
page. Editorial recommendations are independent; we don't choose
products based on commission rates.
Product prices and availability are accurate as of the date and time
indicated and are subject to change. Any price and availability
information shown on Amazon at the time of purchase will apply.
Our top pickHome Brew Ohio 1-Gallon Glass Carboy Kit