From-scratch ramen is one of the most rewarding things you can cook at home. The gear story is simpler than the recipe suggests: a heavy stockpot for broth, a pasta roller for noodles, and a few squeeze bottles for tare. Skip the gadgets. Most of the magic is in the technique, and the right tools get you there without a kitchen overhaul.
By Colin B. · Published June 17, 2026 · Last reviewed June 17, 2026
A stockpot, pasta machine, and bowls cover the basics. The pressure-cooker route costs similar but saves 8 hours per batch.
We earn commission on qualifying Amazon purchases — see our
affiliate disclosure.
Price tiers and budget totals shown above are editorial estimates;
actual Amazon prices vary.
At a glance
Our top pick in each category
The fastest path through this guide — each best-starter pick by category.
Scroll for the budget and upgrade alternatives.
Make the broth at least once before buying a dedicated stockpot. Your first chicken shoyu batch can happen in whatever large pot you own. The dedicated pot matters when you are making ramen seriously, not before.
Buy noodles for your first batch. Sun Noodle brand (Asian grocery stores, sometimes Whole Foods) gives you a real baseline to cook against. Making noodles is a separate skill from broth, and learning both at once is too much.
Tonkotsu is not the place to start. It tastes incredible but takes 10-12 hours and requires sustained boiling to emulsify. Start with shoyu or shio tare, which come together in 3-4 hours and are far more forgiving on your first run.
The broth is the backbone of ramen, and it needs room. A proper tonkotsu batch uses 3-4 pounds of pork bones plus enough water to cover them by several inches, which means a minimum of 12 quarts. Most home cooks try to squeeze this into an 8-quart pot and spend the first hour dealing with overflow. Get the bigger pot. The stovetop versus pressure-cooker question is really about time: stovetop gives you aroma control over 10-12 hours; a pressure cooker cuts that to 2-3 hours with nearly identical flavor.
Broth Pot — what's the difference?
A few common shapes, each making a different trade.
Traditional Stockpot
8-12 hours stovetop. Full aroma control and classic depth.
Volume
12-16qt
Cook time
8-12 hrs
Broth styles
Tonkotsu, shoyu, shio
Best for Cooks who want full control and the meditative long-simmer process
Tradeoff Requires planning; first 30 minutes of foam skimming is mandatory
Small-batch shoyu and miso broths, 2-3 hours stovetop.
Volume
5-7qt
Cook time
2-3 hrs
Broth styles
Shoyu, shio, chicken
Best for Starting with lighter broths before committing to a full tonkotsu build
Tradeoff Too small for a proper pork-bone tonkotsu batch
Best starter
Cooks Standard
Multi-Ply Clad 12-Quart Stockpot
$97.99 as of Jun 22, 2026
★★★★★Our rating· Only 13 left in stock (more on the way).
Multi-ply clad construction spreads heat evenly along the base and sides, which matters on a 10-hour bone broth simmer where scorching is the main failure mode. The 12-quart size fits a full batch of bones with room for aromatics and enough water. Under $70, works on induction, and doubles as a pasta pot. The lid seals tightly for trapped aromatics.
What we like
Multi-ply base prevents scorching during long low-heat simmers
12-quart fits a full bone batch with room for water and aromatics
Induction-compatible stainless with no coating to degrade over years
What to know
Heavy when full; use a ladle rather than tilting to pour broth
Stainless shows discoloration from prolonged soy-based broth simmers
Under $35 and large enough for a big batch. Single-ply stainless with an aluminum-encapsulated base, so heat distribution is adequate but not as even as multi-ply. It runs hotter at the bottom, which means you watch the simmer more closely. Worth it if you are not yet sure ramen will become a regular thing and don't want to spend $70 on a dedicated pot.
What we like
Under $35, lowest-risk way to start ramen making
16-quart is generous; excellent for large batches or meal-prep scale
What to know
Single-ply stainless runs hotter on the bottom, needs more attention
The pressure-cooker route cuts 12-hour tonkotsu to 3 hours at high pressure. The broth emulsifies into a rich, cloudy stock most people cannot distinguish from the traditional version. The Pro model has the pressure control and timer precision you want for broth. Seal in bones and water, run high pressure for 3 hours, release and strain. Close enough to be a weeknight move.
What we like
Cuts tonkotsu broth from 12 hours down to 3 hours at high pressure
Repeatable results: same pressure and time yields the same broth each time
Earns counter space as a full-time pressure cooker beyond ramen
What to know
8-quart is bulky; serious counter-space commitment
Ramen noodles are wheat noodles made with kansui, an alkaline salt solution that gives them their yellow color, springy bite, and ability to hold up in hot broth. The noodle-making process is identical to fresh pasta: mix, rest, sheet, cut. A standard pasta machine handles ramen dough beautifully. The only difference from Italian pasta is the dough, not the equipment.
Best starter
Marcato
Atlas 150 Pasta Machine
$113.23 as of Jun 22, 2026
★★★★★Our rating· Only 6 left in stock - order soon.
The Atlas 150 has been the home pasta standard for decades. Nine thickness settings, built-in cutters for spaghetti and fettuccine widths (both work for different ramen styles), and all-steel construction that lasts indefinitely. Start at setting 1, work to 6 or 7 for thin ramen noodles. Under $75 and available everywhere.
What we like
Nine thickness settings cover thin ramen to thicker wavy noodle styles
All-steel gears and frame, no plastic parts to strip under stiff dough
Built-in cutter for two noodle widths, no extra parts needed
What to know
Clamp mount needs firm counter edge; some countertops are incompatible
Hand-crank only; arm fatigue on large batches (motor attachment sold separately)
At under $40, this gets you through a batch of ramen noodles without the Marcato commitment. Nine thickness settings, steel rollers, and a cutter attachment that handles standard noodle widths. Build quality is noticeably lighter than the Atlas, but it does the job for someone trying fresh noodles before deciding whether to invest in better equipment.
What we like
Under $40, lowest-commitment way to try making fresh noodles
9-setting roller and included cutter handle standard ramen widths
What to know
Adjustment knob slips under stiff kansui dough; check between passes
Lighter build; less stable when pressing thick noodle sheets
If you own a KitchenAid stand mixer, this attachment makes noodle rolling hands-free. The mixer drives the rollers while you feed the dough, which is a meaningful improvement over cranking by hand through stiff ramen dough. Eight thickness settings. The spaghetti cutter makes thin ramen noodles; the fettuccine cutter works for thicker wavy styles. Only worth it if you already have the stand mixer.
What we like
Hands-free rolling is far easier with stiff, dense ramen dough
8 thickness settings; spaghetti cutter suits standard ramen width
What to know
Only useful if you already own a KitchenAid stand mixer
Roller is narrower than Atlas 150, fewer noodles per pass
Ramen is served in a 32-36oz bowl, significantly larger and deeper than a standard soup bowl. You need the depth for broth volume, the width to layer toppings (chashu, soft egg, nori, bamboo) without everything collapsing, and the mass to hold heat for 8-10 minutes of eating. A standard 16oz soup bowl turns a beautiful bowl of ramen into an engineering problem. Ceramic or stoneware is right for heat retention; skip the melamine.
Best starter
DOWAN
Ceramic Soup Bowls 30oz (Set of 4)
$$
★★★★★Our rating
At 30oz, this is exactly the right size for ramen: deep enough for a full serving of noodles and broth, wide enough to layer toppings without stacking them awkwardly. Porcelain holds heat well, the matte finish looks good on the table, and the set of four covers two people eating ramen twice a week without constant washing. Dishwasher safe and chip-resistant on normal use.
What we like
30oz is the right ramen serving size, with room for broth and full toppings
Porcelain retains heat through 8-10 minutes of eating
Set of 4 covers regular ramen nights without constant rewashing
What to know
Matte finish shows fingerprints and water spots; wipe before serving
The 28oz size is slightly under ideal for tonkotsu with a full toppings stack, but it works well for lighter ramen styles (shoyu, shio) and is the right call if you are not yet committed to ramen as a regular thing. Porcelain, dishwasher and microwave safe, and available in color options. A set of six covers dinner parties without scrambling for extras.
What we like
Set of 6 covers a ramen dinner party without scrambling for extras
Microwave-safe; useful for reheating broth and noodles separately
What to know
28oz is tight for tonkotsu with full toppings; better for lighter styles
Narrower diameter makes layering toppings harder than a wider bowl
A proper Japanese donburi bowl: 40oz, high sides, wide lip for resting chopsticks, and heavy stoneware that retains heat noticeably longer than porcelain. This is the shape and scale used in Japanese ramen shops. Once you are making ramen regularly, serving it in the right bowl changes the whole presentation in a way that is hard to explain until you experience it.
What we like
40oz capacity handles tonkotsu with a generous toppings stack
Heavy stoneware retains heat longer than porcelain through a full meal
What to know
Handwash only on most stoneware; confirm before purchasing
Higher per-bowl cost; buy once you are committed to regular ramen
Ramen broth involves two distinct straining moments: skimming foam and fat during the simmer, and straining the finished broth through a fine mesh to remove bone fragments and spent aromatics. A spider strainer handles the first (and also lifts noodles, blanches toppings, and scoops aromatics for tasting mid-cook). A fine mesh strainer handles the second. Together they cost under $30 and are the difference between a clear, refined broth and a cloudy, sediment-heavy one.
Best starter
OXO
Good Grips Scoop & Strain Skimmer
$17.95 as of Jun 22, 2026
★★★★★Our rating· In Stock
The spider strainer is the most versatile tool in ramen prep. Use it to lift noodles from boiling water without a colander, remove bones mid-simmer for tasting, skim foam in the first 30 minutes, and blanch toppings like bean sprouts. OXO's version has a comfortable handle and fine mesh that catches pieces without passing sediment. The 8-inch head covers a lot of surface per scoop.
What we like
Lifts noodles from boiling water without a colander, preserving starchy water
Doubles as a skimmer for foam and fat during early broth simmering
OXO grip stays secure with wet hands over a steaming pot
What to know
8-inch head is large; 6-inch is easier inside a narrow-rim stockpot
Mesh traps small bone fragments; rinse between skimming passes
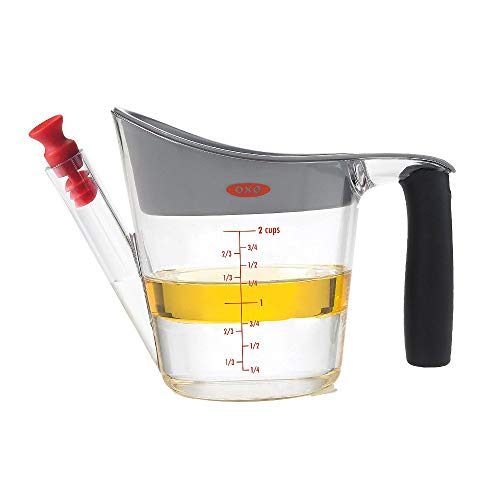
Tonkotsu and pork bone broths produce a significant fat cap. The fat separator lets you pour finished broth from the bottom while fat floats at the top, giving you control over how much fat stays in (some is flavor; too much is greasy). OXO's version has a strainer insert to catch sediment in the same step, and a stop-pour lever that lets you stop at the fat layer without spilling.
What we like
Separates fat cleanly without turkey basters or extended ladle skimming
Built-in strainer catches sediment and fat in one pour
What to know
2-cup capacity means multiple passes for a full batch
Do not pour near-boiling liquid directly in; let broth cool slightly first
After a long simmer, you strain the finished broth through a fine mesh to remove small bone fragments and spent aromatics that a spider strainer misses. A good 8-inch fine mesh strainer over a large bowl does this in one pass and gives you the clear, refined broth that ramen deserves. This three-piece set gives you sizes for broth, toppings blanching, and smaller tasks.
What we like
Fine mesh catches bone fragments that spider strainers pass through
Three sizes cover straining broth, blanching, and small toppings prep
What to know
Fine mesh clogs with gelatinous tonkotsu; rinse between batches
Needs a wide enough bowl or pot to rest above the bottom
Tare is the seasoning concentrate that goes into each bowl before the broth is ladled in. A shoyu tare might be a reduction of soy sauce, mirin, sake, and kombu. A shio tare is salt-based with dried fish. You make tare in a small saucepan, store it in squeeze bottles in the fridge, and dispense 1-2 tablespoons per bowl. The key insight is that tare keeps for weeks, so you only make it every few batches. A kitchen scale makes tare and noodle dough reproducible; without one, you are guessing on hydration every time.
Best starter
Tablecraft
Clear Squeeze Bottles 4oz (6-Pack)
$
★★★★★Our rating
Fill one bottle per tare type (shoyu, shio, miso), dispense 1-2 tablespoons per bowl before adding broth, and store in the fridge for weeks. The 4oz size fits a full home tare batch. Tablecraft bottles are clear so you see exactly what is in them, durable, and the same dispensers used in actual ramen shops. A pack of six covers all tare types plus extras for other condiments.
What we like
Clear bottles let you see tare level and remaining volume at a glance
Standard restaurant dispensers used in actual ramen shops
6-pack covers multiple tare types plus leftovers for other condiments
What to know
Narrow tip clogs with thick miso or garlic-heavy tare; strain first
Plastic absorbs strong flavors after extended use; replace seasonally
Tare and noodle recipes are measured by weight for the precision that makes batches reproducible. A gram-accurate scale is the difference between consistent tare and a sauce that varies every time. The OXO has a pull-out, angled display that you can read even with a large bowl sitting on the platform, and it switches between grams and ounces without lifting anything off.
What we like
Pull-out angled display is readable with a large bowl on the platform
1g precision covers tare seasoning, noodle flour ratios, and more
What to know
Requires AAA batteries; no rechargeable option
11-pound limit; not for weighing full broth batches directly
Tare is made by reducing soy sauce, mirin, sake, and aromatics in a small pan over medium heat. A 1.5-quart heavy-bottomed saucepan is the right size for a home batch that yields 6-8 servings. Cuisinart's stainless construction handles a soy-sauce reduction without scorching on low heat, and the lid is useful for steeping dried kombu and bonito flakes before straining.
What we like
1.5-quart is the right size for a home tare batch, 6-8 bowl servings
Stainless construction handles soy-sauce reductions without scorching
What to know
Skip this if you already own a decent small saucepan
Not nonstick; soy sauce reduction needs attention to avoid stuck spots
Making ramen from scratch sounds like a project. It is. But it breaks down into three distinct skills (broth, noodles, tare), and you can tackle them one weekend at a time.
Ramen has a reputation for being either instant-noodle-simple or chef-level-impossible. Neither is right. From-scratch ramen is three separate skills that happen to end up in the same bowl: broth, noodles, and tare. The intimidation comes from trying to learn all three at once, on your first try, expecting restaurant results.
The fix is to do them one at a time, in the order they matter.
What ramen actually is (before the gear)
A bowl of ramen has four components:
Broth: the base liquid. Can be chicken, pork bone (tonkotsu), dashi, or combinations.
Tare: the seasoning concentrate. This is what gives each style its character: shoyu (soy sauce), shio (salt), or miso. The broth itself is intentionally under-seasoned; tare finishes each bowl.
Noodles: alkaline wheat noodles. The kansui (alkaline agent) gives them their springy texture and pale yellow color. Without kansui, you have pasta, which is fine but not ramen.
Aroma oil: optional but common. A few drops of sesame oil, scallion oil, or mayu (charred garlic oil) that float on the surface.
The four components are combined in the bowl at assembly: tare goes in first, broth ladled over, noodles nested in, toppings arranged on top. This happens fast. Have everything ready before the noodles hit the water.
Your first weekend should produce a bowl of shoyu ramen using store-bought noodles. This isolates the two skills that matter most and removes the noodle variable entirely.
Shoyu broth is the right starting point. Chicken backs and wings, aromatics (onion, ginger, garlic, leek), and kombu for depth. Four hours on a low simmer. Clear, golden, and far more interesting than it sounds.
Start with your largest pot and cold water. Add the chicken, bring to a boil, and drain everything after 3 minutes. This is the blanch step: it removes the blood and impurities that would otherwise cloud the broth and create foam you spend an hour chasing. Rinse the chicken, rinse the pot, start fresh with cold water and all your aromatics. Now simmer on the lowest heat your burner allows for 3-4 hours.
The broth should barely tremble at the surface. A hard boil creates a cloudy, murky broth from the emulsified fat. Keep it gentle.
Shoyu tare takes 20 minutes and keeps for 6 weeks. Heat soy sauce, mirin, and sake in a small saucepan with a piece of kombu and a handful of bonito flakes. Bring to a gentle simmer, steep 10 minutes, strain. That is it. Refrigerate in a squeeze bottle. Use 1.5 to 2 tablespoons per bowl.
When the broth is done, strain it through a fine mesh strainer into a clean pot. Taste it. It should have depth and a clean chicken flavor, but feel under-seasoned. That is correct. The tare completes it.
Put 1.5 tablespoons of shoyu tare in the bottom of your largest bowl. Ladle in 300ml of hot broth. Taste. Adjust. This ratio is personal and batch-dependent. Add Sun Noodle fresh ramen noodles (cook in unsalted boiling water, 60-90 seconds), arrange your toppings, and eat immediately.
Once you have a broth you are happy with, add noodle making.
Ramen noodle dough is: bread flour, water, kansui (alkaline salt solution), and a small amount of table salt. The ratios that work for most beginners: 100g flour, 38g water, 1g salt, 1g potassium carbonate and sodium carbonate (kansui), or 2g baked baking soda as a substitute.
Baked baking soda is made by spreading regular baking soda on a sheet pan and baking at 250°F (120°C) for 60-75 minutes. It converts to sodium carbonate, which is closer to true kansui than unbaked baking soda. Store in an airtight jar. Use the same weight as kansui called for in recipes.
Dissolve the kansui and salt in the water first. Combine with the flour and mix until shaggy. The dough will feel dry and rough. That is correct. Ramen dough is much stiffer than pasta dough and needs rest time to hydrate properly.
Rest the dough for 30 minutes wrapped in plastic. Then divide, sheet through your pasta machine starting at setting 1, folding and re-sheeting twice, then work progressively to setting 6 or 7 for thin ramen noodles. Cut with the spaghetti attachment.
Cook in aggressively boiling unsalted water for 60-90 seconds. The noodles cook fast. Have everything else assembled and ready before they go in.
Toppings worth learning
Toppings separate a good bowl from a great one. In rough priority order:
Soft-boiled egg (ajitsuke tamago): Six and a half minutes in boiling water, ice bath for 5 minutes, peel, marinate in a 2:1 mix of soy sauce and mirin for 4-24 hours. The longer the soak, the darker and more seasoned the white. The yolk should be jammy and orange.
Chashu pork: Pork belly, rolled and tied, braised in soy sauce, mirin, sake, and sugar for 2-3 hours until tender. Rest overnight in the braising liquid. Slice to order. The braising liquid doubles as a base for your shoyu tare.
Nori, bamboo shoots, scallions: Low effort, high visual impact. Bamboo shoots from a can are fine. Nori sheets from any Asian grocery.
Cloudy broth when you wanted clear: You either skipped the blanch step or simmered too hard. A rolling boil emulsifies fat into the broth and you cannot undo that. If you want clear broth, you need a gentle simmer. If you want the classic white tonkotsu opacity, you want a hard boil, by design.
Noodles too soft or falling apart: Ramen noodles are cooked in under 90 seconds. If they are soft, they were overcooked. Pull them 15-20 seconds earlier. Fresh noodles cook far faster than dried.
Bowl feels flat and unseasoned: Add more tare, a small amount at a time, until the flavor comes forward. Every batch of broth concentrates differently. The tare ratio in recipes is a starting point.
Dough is crumbly and won’t come together: Under-hydrated, or the resting time was too short. Wrap and rest another 30 minutes. Do not add water directly to the dough; it creates uneven hydration and wet patches.
Save your money
What you don't need yet
Beginners get pressured to buy a lot of stuff that doesn't help them play
better. Here's what we'd skip on day one.
Automatic pasta extruder — Machines like the Philips Pasta Maker cost $200+ and make softer, extruded noodles with a different texture than rolled ramen noodles. The Atlas 150 gives you better control for under half the price.
Sous vide circulator for soft-boiled eggs — A stovetop 6.5-minute soft-boil with an ice bath gives you 90% of the result. Sous vide is a nice upgrade for absolute precision, but not where your first $150 should go.
Dedicated tare dispensing gun — Restaurant tools for high-volume tare service. A $10 set of squeeze bottles does the same thing in a home kitchen.
Japanese clay pot (donabe) — Beautiful for hot pot, but a standard stockpot produces identical ramen broth. The clay does not change the broth chemistry.
Commercial broth concentrator — Restaurant equipment for vacuum-reducing broth. Simmer uncovered to reduce, or just make a stronger initial batch.
First week
Your first seven days
A short, real plan to get from gear-on-doorstep to actually playing.
Order your stockpot if you don't own one large enough (12qt minimum for tonkotsu). · Buy
Get kansui from an Asian grocery store. It is labeled 'lye water' or 'kansui.' Baked baking soda (spread on a sheet pan, bake at 250°F for 1 hour) works as a substitute. · Action
Make a chicken shoyu broth your first weekend. Chicken backs, wings, aromatics, 3-4 hours on low. This is far more forgiving than tonkotsu and teaches you the technique without a 12-hour commitment. · Action
Buy Sun Noodle brand fresh ramen noodles from an Asian grocery for your first bowl. Focus on broth and tare first; add noodle making once broth is dialed in. · Action
Order your pasta machine so it arrives before your second batch. · Buy
Make your first batch of fresh noodles. Mix flour, water, kansui, and salt; rest 30 minutes; roll to setting 6 or 7; cut. Cook in unsalted boiling water for 60-90 seconds. · Action
Mise en place before plating. Ramen gets cold in 2 minutes if you are still slicing chashu when the noodles finish cooking. Have everything ready before the noodles go in the water. · Action
FAQ
Common questions
What is tare and why does every bowl need it?
Tare is the seasoning concentrate that gives each style of ramen its character. Shoyu tare (soy sauce base) makes shoyu ramen. Shio tare (salt base) makes shio ramen. Miso tare makes miso ramen. The broth itself is often underseasoned by design; the tare in each bowl brings it to full flavor. Think of it as the seasoning that completes the bowl rather than a sauce added on top.
Do I need kansui to make proper ramen noodles?
You need something alkaline. Traditional kansui is potassium carbonate and sodium carbonate. Baked baking soda (sodium carbonate) is a widely used home substitute that costs almost nothing and gives you similar results. The alkaline environment changes the protein structure of the dough, creating the springy bite and pale yellow color that distinguish ramen noodles from regular egg pasta.
What is the difference between tonkotsu, shoyu, shio, and miso ramen?
These are different broth and tare combinations, not just flavor names. Tonkotsu is a rich, milky pork bone broth (the broth defines it). Shoyu, shio, and miso are tare types (seasoning concentrates) that can be used with any broth. A shoyu ramen might use chicken broth or pork broth, seasoned with shoyu tare. The naming system is not always consistent between regions or shops.
How long does homemade ramen broth keep?
Refrigerated in an airtight container: 5-7 days. Frozen in quart containers: 3-6 months. Tonkotsu broth solidifies into a thick gelatin when cold, which is a sign of high collagen content, not spoilage. Tare keeps refrigerated for 4-6 weeks. Most home ramen cooks make a big broth batch and freeze portions.
Can I skip the pasta machine and buy noodles?
Absolutely, and we recommend it for your first few batches. Sun Noodle brand fresh ramen noodles (found in Asian grocery stores, sometimes Whole Foods) are the same noodles many top US ramen shops use. Once you have your broth and tare dialed in, then add noodle making as a separate skill.
Why does tonkotsu broth need to boil hard while other broths simmer gently?
Tonkotsu's signature milky-white opacity comes from fat and collagen being physically emulsified into the broth through sustained agitation. This only happens at a full rolling boil. Most broths are kept at a gentle simmer to stay clear; tonkotsu intentionally breaks that rule. If you simmer tonkotsu gently, you get a clear, light broth rather than the rich white one you are aiming for.
Serious Eats — The Ramen Lab — J. Kenji López-Alt's deep-dive series on tonkotsu, shoyu, and shio ramen. The most thorough English-language technical resource for home ramen cooks.
Ivan Ramen (book) — Ivan Orkin's memoir and recipe book. An American chef who opened a ramen shop in Tokyo and made it work. Both the philosophy and the recipes are worth reading.
Ramen_Lord Book of Ramen (Reddit) — Mike Satinover's obsessively detailed beginner guide. Covers kansui, broth chemistry, tare ratios, and topping technique. The most accessible technical resource for serious home cooks.
Way of Ramen (YouTube) — The best English-language ramen YouTube channel for beginners. Detailed process videos for every major broth style with clear technique explanations.
r/ramen — Active community for shop recommendations, homemade bowl feedback, and recipe questions. The wiki has beginner resources worth reading before your first batch.
NoRecipes — Marc Matsumoto — Detailed guides to Japanese cooking including ramen components. Matsumoto explains the why behind each step, which helps when things go wrong mid-batch.
As an Amazon Associate, JustBeginning earns from qualifying purchases.
We may also earn commission from other affiliate programs linked on this
page. Editorial recommendations are independent; we don't choose
products based on commission rates.
Product prices and availability are accurate as of the date and time
indicated and are subject to change. Any price and availability
information shown on Amazon at the time of purchase will apply.
Our top pickCooks Standard Multi-Ply Clad 12-Quart Stockpot


 Best starter