Making ice cream at home is genuinely easy, easier than most people expect. You need a machine, a few pantry staples, and about 30 minutes of active time. The result beats almost anything from the grocery store, and you control every ingredient. Here's exactly what to buy first, and what you can skip.
By Colin B. · Published May 24, 2026 · Last reviewed June 15, 2026
The machine is the main purchase. An $80 Cuisinart plus $15 in storage containers gets you fully set up. Everything else (better scoops, vanilla beans, cookbooks) is optional enrichment.
We earn commission on qualifying Amazon purchases — see our
affiliate disclosure.
Price tiers and budget totals shown above are editorial estimates;
actual Amazon prices vary.
At a glance
Our top pick in each category
The fastest path through this guide — each best-starter pick by category.
Scroll for the budget and upgrade alternatives.
Don't overthink the machine. The Cuisinart ICE-21 and its equivalents are genuinely capable at $75–80. The compressor upgrade is real, but it's for people already making ice cream weekly and tired of planning around the bowl pre-freeze. Start with the affordable freezer-bowl machine.
Make a simple no-egg recipe first. Philadelphia-style ice cream (heavy cream, whole milk, sugar, vanilla) takes about 10 minutes of prep and will taste great. After two batches, you'll have the confidence to try custard bases, swirled flavors, and creative mix-ins.
The bowl needs 24 hours to freeze, not 4 or 8. This is the most common beginner mistake. The bowl must be completely solid before churning, or it won't work. Most people who get hooked keep the bowl permanently in the freezer.
The gear
What you actually need
Ice Cream Machines
The machine is the whole hobby; everything else is secondary. The core choice: a freezer-bowl machine ($60–100) where you freeze the bowl 24 hours ahead and churn in about 20 minutes, or a compressor machine ($250–400) that chills as it goes and lets you do batch after batch. Freezer-bowl is the right starting point. Almost everyone who makes ice cream regularly owns a Cuisinart. The upgrade path is obvious: when you want to do three batches in a Sunday afternoon without planning ahead, that's when a compressor makes sense.
Ice Cream Machines — what's the difference?
A few common shapes, each making a different trade.
Freezer-Bowl
Freeze bowl 24 hrs ahead. Affordable, one batch per session.
Capacity
1–2 quarts
Prep required
24-hr pre-freeze
Price range
$60–100
Best for Beginners, occasional batches, small kitchens
Tradeoff One batch per session; must plan a day ahead
Freeze a pint solid, then spin smooth. Denser texture, different process.
Capacity
1 pint (16 oz)
Prep required
24-hr pint freeze
Price range
$170–230
Best for Protein-heavy or low-sugar recipes, TikTok trends
Tradeoff Denser texture than churned, not traditional ice cream
Best starter
Cuisinart
ICE-21P1 Frozen Yogurt, Ice Cream & Sorbet Maker
$89.95 as of Jun 22, 2026
★★★★★Our rating· In Stock
The Cuisinart ICE-21 is the most popular home ice cream maker in the country for a reason: it works, it's simple, and the $75–80 price is fair. Freeze the bowl overnight, add your base, churn for 20–25 minutes. You get about 1.5 quarts per batch. The motor is quiet and the bowl seals well, two things cheap knockoffs tend to get wrong.
What we like
Best-selling home ice cream maker: proven, reliable, widely reviewed
The Dash My Pint is a 1.6-cup single-serving machine that costs around $30 and fits in a drawer. Same freezer-bowl principle as the Cuisinart but makes enough for one or two people, perfect for testing flavors or households where you don't want 1.5 quarts of ice cream in the freezer at all times.
What we like
Around $30, the cheapest path into machine churning
Single-serving size makes flavor testing cheap and low-waste
What to know
1.6 cups only, not enough for a dinner party
Same 24-hour pre-freeze requirement as full-size machines
When you're making ice cream every week and tired of planning around the bowl pre-freeze, a compressor machine is the upgrade. The Whynter ICM-200LS has its own refrigeration unit: no pre-freezing, ever. Batch after batch. The motor is strong, the bowl holds 2.1 quarts, and it stores upright. Expect to pay around $250–300.
What we like
No pre-freezing ever: churn on demand, batch after batch
2.1-quart capacity; upright storage saves counter space
What to know
Around $250–300, a real commitment
Heavy and bulky; not something you move around easily
The Ninja CREAMi takes a different approach: freeze your base in a pint container, then process it through the machine's blade. The result is dense and smooth, excellent for protein-heavy recipes and viral flavor combos. The caveat: it produces a firmer, denser texture than churned ice cream, which some people love and others find too compact.
What we like
No churning: freeze a pint solid, process in 60 seconds
Excellent for protein-based or low-sugar recipe variations
What to know
Dense, compact texture, different from traditional churned ice cream
Extra pint containers needed for batch experimenting (sold separately)
Freshly churned ice cream needs 2–4 hours in the freezer to firm up before it's properly scoopable. A dedicated container with a tight lid prevents ice crystals and freezer burn. Standard loaf pans work fine short-term; purpose-built ice cream containers with lids make storage and portioning noticeably easier.
Best starter
Tovolo
Glide-A-Scoop Ice Cream Tub Containers, Set of 2
$
★★★★★Our rating
Tovolo designed these specifically for ice cream: the angled base channels toward the scoop to reduce drag, the tight-seal lid prevents freezer burn, and the containers stack cleanly. They hold about 1.5 quarts each, exactly one Cuisinart batch per container. Worth every penny of the $15 and eliminates the 'plastic wrap over a mixing bowl' workaround.
What we like
Angled base guides the scoop for less tearing and cleaner portions
Tight-seal lid blocks freezer burn far better than cling wrap
Holds exactly one Cuisinart batch per container
What to know
More expensive than a basic loaf pan
Rigid plastic, won't survive a hard drop on tile floors
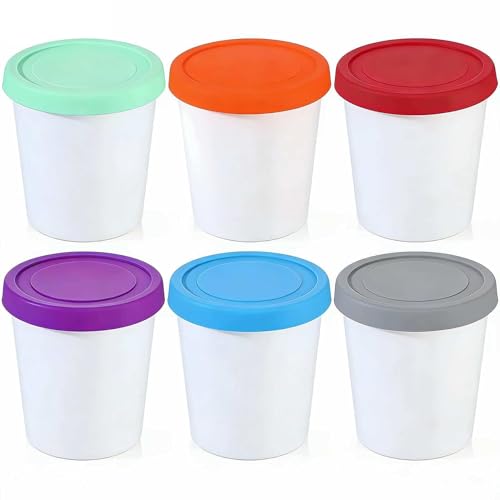
Individual pint containers let you store ice cream in single-serving sizes, the same format as store-bought. Handy for gifting, testing small-batch flavor variations, or single-serving pull-from-freezer convenience. A 6-pack runs $10–15 and stores flat when empty.
What we like
Individual pints perfect for gifting or side-by-side flavor tests
6-pack for $10–15, cheap enough to stock a full freezer drawer
What to know
Lid seal less airtight than Tovolo, best used within one week
Shorter and wider than you expect; check freezer shelf height first
Three tools make ice cream making noticeably better: an ice cream scoop that releases cleanly instead of tearing, an instant-read thermometer for making custard bases (you need to hit exactly 170–175°F to pasteurize the eggs without scrambling them), and a fine-mesh strainer to remove any egg bits from a custard base. None are essential for simple no-egg recipes, but the thermometer pays for itself on the first custard batch you don't scramble.
Best starter
Zeroll
1010 Original Ice Cream Scoop
$25.99 as of Jun 22, 2026
★★★★★Our rating· In Stock
The Zeroll has been the professional standard for 80+ years because it works differently: a heat-conductive fluid in the handle transfers warmth from your grip into the scoop, releasing ice cream without forcing or twisting. The oval-shaped bowl makes consistently sized portions. This is the scoop that diner operators and ice cream shops reach for.
What we like
Heat-transfer handle releases ice cream without forcing or twisting
Oval bowl makes clean, uniform portions every time
Used by professional ice cream shops for 80+ years
What to know
Hand-wash only: dishwasher destroys the internal fluid
Premium price for a scoop; basic scoops are a quarter of the cost
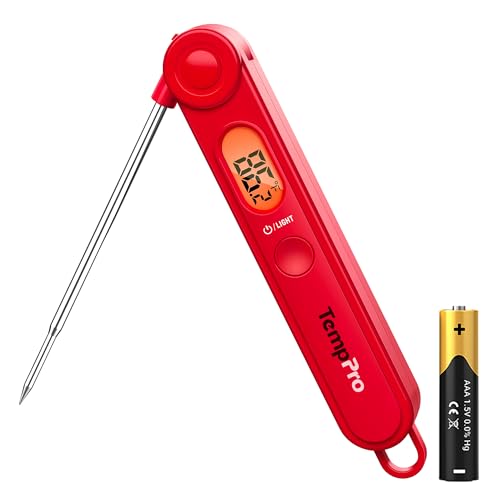
Custard-based ice creams require cooking the egg-cream mixture to 170–175°F: below that is unsafe, above that scrambles the eggs. An instant-read thermometer removes the guesswork entirely. This one is accurate to ±0.9°F, reads in 3 seconds, and folds flat for drawer storage. It doubles for candy making, baking, and anything else in your kitchen.
What we like
Reads in 3 seconds, accurate to ±0.9°F, eliminates custard guessing
Folds flat for drawer storage; doubles for all cooking tasks
What to know
Not needed for simple no-egg recipes; save it for when you go custard
Requires a small battery that's easy to lose in a kitchen drawer
After cooking a custard base, you strain it through a fine-mesh sieve to remove any bits of cooked egg, the ones that didn't incorporate perfectly, even with careful stirring. The OXO's stainless mesh is tight enough to catch even small bits, the bowl rest keeps it elevated above the straining bowl, and the handle locks so it sits balanced hands-free.
What we like
Catches cooked egg bits that make custard grainy or lumpy
Bowl rest keeps strainer elevated, hands-free and stable
What to know
Only needed for custard bases; skip if you're staying egg-free
Hand-wash recommended to protect the stainless mesh weave
Vanilla is the foundation of ice cream, not just vanilla ice cream, but most flavors use it as a backbone. The difference between imitation vanilla and real vanilla extract is genuinely noticeable in something as delicate as homemade ice cream. Start with a good vanilla; everything else (chocolate, fruit, mix-ins) you almost certainly already have in your pantry.
Best starter
Nielsen-Massey
Pure Vanilla Bean Paste, 4 oz
$18.90 as of Jun 22, 2026
★★★★★Our rating· In Stock
Vanilla bean paste gives you the flavor of whole vanilla beans (including the visible specks) without the cost and effort of splitting and scraping pods. Nielsen-Massey uses a cold extraction process that's noticeably more complex than imitation vanilla. A 4-oz jar runs $15–20 and gets you through 30–40 batches of ice cream.
What we like
Visible vanilla specks signal real vanilla without scraping beans
Richer, more complex flavor than grocery-store extract
What to know
$15–20 for 4 oz, noticeably more than imitation vanilla
Paste consistency can settle; stir before each use
Whole vanilla beans make a visibly different ice cream: deep specks throughout the base and a layered flavor that paste and extract can't fully replicate. Split the pod, scrape the seeds into your cream, then steep the pod itself for 30 minutes. Two or three beans make one spectacular batch of vanilla ice cream. A 10-bean pack runs $8–12 and keeps for months in an airtight jar.
What we like
Seeds and pod both flavor the cream: deepest vanilla possible
Steeping the pod infuses layers that paste and extract can't match
What to know
Adds 30+ minutes of steeping time to the base prep
Ice cream recipes are abundant online, but the two books that dominate the home ice cream world each solve a different problem. Jeni's is a structured recipe collection that demystifies the process and teaches reliable technique. Lebovitz's is an inspiration book that makes you want to make everything. Between them, they cover every flavor direction you'll want to go.
Best starter
Artisan Books
Jeni's Splendid Ice Creams at Home
$22.59 as of Jun 22, 2026
★★★★★Our rating· In Stock
Jeni Britton Bauer developed a distinctive base (cream cheese plus a corn syrup trick) that produces ice cream with an unusually silky texture. The book teaches this method thoroughly, then applies it to 100 flavors. Beginners love it because the technique is specific and reproducible. You'll make good ice cream on your first attempt.
What we like
Foolproof base method with 100 flavor variations, great for beginners
Written for home cooks, no professional equipment assumed
What to know
The cream-cheese method is distinctive, not traditional custard
Limited to the Jeni's house style, not a broad technique reference
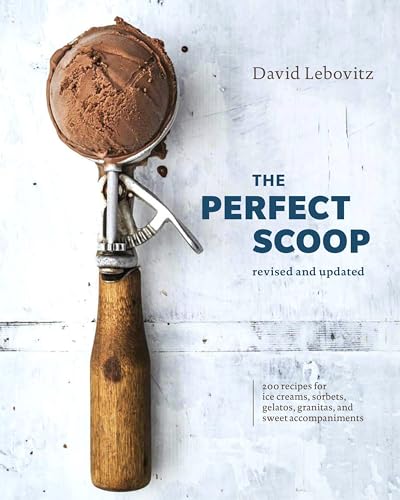
David Lebovitz spent years as pastry chef at Chez Panisse before becoming a food writer, and this book shows it. It covers custard bases, fruit sorbets, gelato, sherbets, and 200+ flavors with flavor intelligence that comes from a serious professional background. The revised edition adds new recipes. This is where serious home ice cream makers tend to land after Jeni's.
What we like
200+ recipes covering ice cream, gelato, sorbet, and sherbet in one book
Deep flavor intelligence from a former Chez Panisse pastry chef
What to know
More advanced than Jeni's; custard experience helps before reading
Some older recipes need adapting for modern dietary preferences
The learning curve on ice cream is mostly just one thing: understanding your machine. After that, the world opens up fast.
Ice cream making has a reputation for being a project hobby, something that requires special techniques, careful timing, exotic ingredients. It doesn’t. Your first batch is maybe 30 minutes of active work and results in something genuinely better than what you’d buy from most grocery stores. The skill isn’t in the difficulty; it’s in understanding the logic, which this guide will walk you through.
Batch 1: Start with no eggs
There are two styles of ice cream base. The Philadelphia style has no eggs: just cream, milk, sugar, and flavoring. No cooking, no tempering, no thermometer required. You make it in about 10 minutes, chill it, and churn. This is your first batch.
The French style (custard base) cooks egg yolks with cream, which produces a richer, denser result. It’s also more complex; you’re watching temperature, worrying about scrambling eggs, straining out bits of cooked protein. It’s worth learning, but not on batch one.
Stir until the sugar fully dissolves, about 2 minutes. Pour it into the frozen bowl of your machine and turn it on. That’s the whole prep. The machine does the rest.
What’s happening while it churns: The paddle agitates the mixture while the frozen bowl extracts heat. As the base cools, tiny ice crystals form. The agitation keeps those crystals small, which is what makes ice cream smooth instead of a block of flavored ice. After 20–25 minutes, the machine will produce something with the consistency of soft serve.
Transfer it to a container and freeze for 2–3 hours to firm up to a scoopable texture.
Your first batch will be good. Maybe not revelatory (vanilla is a simple flavor and the technique is new). But good. Make it twice before you start experimenting.
Batch 2: Add something
Mix-ins go in during the last 2 minutes of churning, not at the start. This is the most important timing rule in ice cream making. If you add chocolate chips at the beginning, they get pulverized. Added at the end, they stay whole and distributed.
What works well in batch two:
Mini chocolate chips: the miniature size distributes more evenly than full-size
Crushed cookies or graham crackers: add texture and flavor
Ribbon swirl: pour in caramel, jam, or hot fudge in the last minute and fold gently, don’t mix fully
What’s trickier than it looks:
Whole fruit: adds water, which creates ice crystals. Roast fruit first to concentrate it, or fold in small pieces after churning
Peanut butter: tends to freeze hard and become chewy. Fold in as a swirl, sparingly
Alcohol: lowers the freezing point, which means your ice cream may never fully firm up in the freezer. Keep it to 1–2 tablespoons per batch max
Batch 3: Try a custard base
Once you’ve made two successful simple batches, the French-style custard is worth trying. The payoff is a noticeably richer, more velvety texture. The technique is approachable with one tool: an instant-read thermometer.
The basic process: warm cream and milk in a saucepan, whisk sugar with egg yolks in a separate bowl until pale, pour the warm cream slowly into the egg mixture while whisking (tempering), then return it all to the pot and cook over medium-low heat until it reaches 170–175°F. Strain through a fine-mesh sieve, chill completely, then churn.
The two things that go wrong for beginners:
Scrambling the eggs: happens when you heat too fast or skip the tempering step. An instant-read thermometer solves this. Pull off heat at 175°F, not a degree higher.
Not chilling the base cold enough: custard fresh from the pot at 80°F won’t churn well. It needs to get down to 40°F or below, which means at least 4 hours in the fridge, or a quick ice bath.
The custard will taste noticeably richer than your first Philadelphia batches. It’s the difference between “good ice cream” and “this is better than what I buy.”
Once you understand the base, flavor is mostly improvisation with pantry staples. A few things worth knowing:
Fat carries flavor. Richer bases amplify flavors like chocolate, coffee, and brown butter far more than lean bases. If a flavor tastes muted, increase the cream ratio.
Sugar affects texture, not just sweetness. Less sugar = harder freeze. More sugar = softer, scoopable even from the freezer. Most recipes are calibrated; if you reduce sugar for health reasons, expect a denser, harder result.
Cold dulls flavor. Frozen food tastes less sweet and less intense than the same food at room temperature. Season your base more aggressively than feels right when you taste it warm. It will be exactly right frozen.
Steep your flavors. Coffee, vanilla beans, citrus zest, herbs: they all release more flavor when steeped in warm cream for 20–30 minutes before churning. This is where the best ice creams start.
What you’re working toward
By your fifth or sixth batch, you’ll have a preferred base ratio, a flavor or two you return to, and a sense of what mix-ins you like. The skill from here is repetition and curiosity: trying herbs and salts and unexpected flavor combinations, learning which fruit needs to be roasted and which works fresh.
Most serious home ice cream makers end up with a couple of go-to recipes that they’ve refined over years. That’s what this hobby produces: not mastery of a craft, but a kitchen capability that surprises people every time you pull a container out of the freezer.
Save your money
What you don't need yet
Beginners get pressured to buy a lot of stuff that doesn't help them play
better. Here's what we'd skip on day one.
A commercial soft serve machine — Consumer soft serve machines run $1,000+ and still don't produce commercial results. Enjoy scoop-style ice cream for the first year.
Liquid nitrogen setup — Makes ultra-smooth ice cream, but involves cryogenic materials that require real training. A well-churned batch is excellent.
Commercial stabilizers and emulsifiers — Carrageenan and guar gum keep commercial ice cream shelf-stable for months. Homemade ice cream is best eaten fresh within two weeks anyway.
A separate gelato attachment or machine — Good gelato is achievable in a standard machine with the right recipe; the paddle speed difference matters less than the fat and air ratios.
Specialty toppings and cones — Your grocery store has everything you need. Don't fill your pantry with specialty items before you've made a few successful batches.
First week
Your first seven days
A short, real plan to get from gear-on-doorstep to actually playing.
Order the Cuisinart ICE-21 so it arrives before the weekend. · Buy
The night it arrives, put the bowl in the freezer: you need 24 hours before your first batch. · Action
Make a simple Philadelphia-style vanilla base: 2 cups heavy cream, 1 cup whole milk, ¾ cup sugar, 1 tsp vanilla. Stir until sugar dissolves. No cooking required. · Action
Churn your first batch. It takes 20–25 minutes. Taste it straight from the machine (soft-serve consistency), then transfer to a container and freeze 2–3 hours to firm up. · Action
Order dedicated storage containers so future batches have a proper home. · Buy
Make a second batch with one mix-in: chocolate chips, swirled jam, or crushed cookies. Add them in the last 2 minutes of churning, not at the start. · Action
Read a few recipes from Jeni's Splendid Ice Creams at Home to understand what else is possible before your third batch. · Learn
No. There are two styles: Philadelphia-style (no eggs, just cream and sugar, about 10 minutes of prep, no cooking) and French-style (cooked egg custard, richer and more complex). Start with Philadelphia-style. The texture difference is real but subtle; you'll barely miss the eggs when the flavor is strong.
Why does my ice cream come out icy?
Usually three causes: not enough fat in the base (use heavy cream, not half-and-half), too much water-heavy fruit added directly, or eating it after two weeks when crystallization sets in. Homemade ice cream is best in the first week. Make smaller batches and eat them fresh.
How long can I store homemade ice cream?
One to two weeks at peak quality. Without commercial stabilizers, it crystallizes and gets icy after about two weeks. Make smaller batches and eat them fresh: that's the whole point of making it at home.
What's the difference between ice cream and gelato?
Gelato has more milk and less cream (lower fat), is churned more slowly (less air incorporated), and is served at a slightly warmer temperature. It's denser and more intensely flavored. You can make a version of it in a standard machine with the right recipe.
Can I make ice cream without a machine?
Yes. The stir-freeze method works: pour base into a shallow pan, freeze 45 minutes, stir vigorously, repeat 3–4 times over 2 hours. Texture is icier than churned, but it's workable. The Ninja CREAMi also produces decent results without traditional churning.
How much does it cost to start making ice cream?
An $80 Cuisinart machine is the main purchase. Add $15 for storage containers and you're fully set up. The ingredients for a batch of vanilla ice cream (cream, milk, sugar, vanilla) run about $4–6. Each batch works out to roughly $0.50 per scoop, less than a third of what you'd pay at a shop.
Jeni's Splendid Ice Creams Blog — Free recipes and behind-the-scenes technique posts from one of the country's best ice cream makers.
David Lebovitz: Ice Cream Recipes — Former Chez Panisse pastry chef turned food writer. Deep recipe archive, well-explained technique, free to read.
Serious Eats: Ice Cream — The most thorough technical breakdowns of ice cream science online. Essential if you want to understand why recipes work, not just follow them.
Reddit: r/icecreamery — Active community of home ice cream makers. Great for troubleshooting (icy texture, soft-set failures) and for flavor inspiration.
As an Amazon Associate, JustBeginning earns from qualifying purchases.
We may also earn commission from other affiliate programs linked on this
page. Editorial recommendations are independent; we don't choose
products based on commission rates.
Product prices and availability are accurate as of the date and time
indicated and are subject to change. Any price and availability
information shown on Amazon at the time of purchase will apply.

 Best starter