Spoon carving is one of the most satisfying crafts you can pick up — all you need is a sharp hook knife, a piece of fresh-cut wood, and an afternoon. The slow-living crowd is onto something: no machine noise, no fancy studio, just you and the grain. Here's what to buy, what matters, and what to skip for the first year.
By Colin B. · Published June 1, 2026 · Last reviewed June 1, 2026
A hook knife and sloyd knife from Mora runs $50–70 — all you need for your first spoons. Budget $200 once you add a hatchet and sharpening gear.
We earn commission on qualifying Amazon purchases — see our
affiliate disclosure.
Price tiers and budget totals shown above are editorial estimates;
actual Amazon prices vary.
At a glance
Our top pick in each category
The fastest path through this guide — each best-starter pick by category.
Scroll for the budget and upgrade alternatives.
Green wood matters more than you think. Dry lumber from the hardware store is much harder to carve with hand tools. Start with fresh-cut green wood if you can — birch, willow, or cherry from a recent branch fall. Pre-cut basswood blanks are softer and a reasonable substitute if you can't source green wood locally.
Don't underestimate sharpening. A dull hook knife is genuinely dangerous — it forces you to use enough pressure that any slip becomes a cut. Plan to strop your tools every 20 minutes and read one tutorial on basic bevel sharpening before your first session.
The hook knife and the straight knife do different jobs — you need both. The sloyd knife shapes the handle and back of the spoon; the hook knife hollows the bowl. Buying just one leaves you stuck halfway through every project.
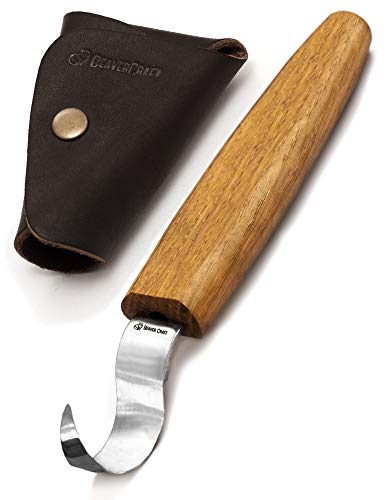
The hook knife is the tool that makes spoon carving what it is — nothing else hollows the bowl of a spoon so cleanly and efficiently by hand. The curved hook traces the bowl while your pull stroke drives it through the wood. Most beginners should start with Mora's 162: it's the most-recommended starter hook knife in the community. If you already know you want to carve large ladles or deep-bowled spoons, start with a deeper-radius knife instead.
Hook Knives — what's the difference?
A few common shapes, each making a different trade.
Shallow Radius
For everyday spoons and dessert spoons — the standard starting choice.
Curve depth
Shallow
Best for
Spoons, spatulas
Best for Most beginners — works for everyday spoons and small serving pieces
Tradeoff Too flat for deep ladles or serving bowls
Mora's 162 is the universal recommendation for beginner spoon carvers, and there's a reason it has stayed that way for decades. Laminated steel holds an edge without being fussy about sharpening, the sweep radius works for everyday spoons, and the $35 price is honest about what a first hook knife should cost. It's the knife we'd hand a friend on day one.
What we like
Laminated steel edge holds a keen edge and resharpens easily
Sweep radius sized right for everyday and dessert spoons
$35 price won't sting if carving interest doesn't stick
What to know
Single-bevel, right-handed only — left-handers need the 163L
Supplied sheath is minimal; a leather strop is the real edge tool
If you want to spend the absolute minimum to test whether spoon carving is for you, BeaverCraft's SK1S gets you there for under $25. The steel is softer than Mora's laminate but also easier to resharpen, and the handle geometry is solid for a beginner. Not a lifetime tool — a perfectly decent first one.
What we like
Under $25 — the cheapest credible entry into hook-knife carving
Softer steel makes resharpening more forgiving for beginners
Handle fits most hand sizes straight out of the box
What to know
Edge dulls faster than Mora laminate — strop more frequently
Not a lifetime knife; most carvers upgrade once committed
The 163 is the wider-radius sibling of the 162 — its 0.9-inch internal radius sweeps broader, making it the right tool for ladles, salad spoons, and deeper-bowled pieces that the 162's tighter curve struggles with. Worth adding after you've carved a dozen spoons with the 162 — not before.
What we like
Wider 0.9-inch radius handles ladles and deep-bowled pieces
Laminated steel — same quality as the 162 at the same price
Natural second knife once you've mastered the 162
What to know
Too wide for everyday spoons — not a first-knife replacement
A second knife to buy, not a first; master the 162 before adding this
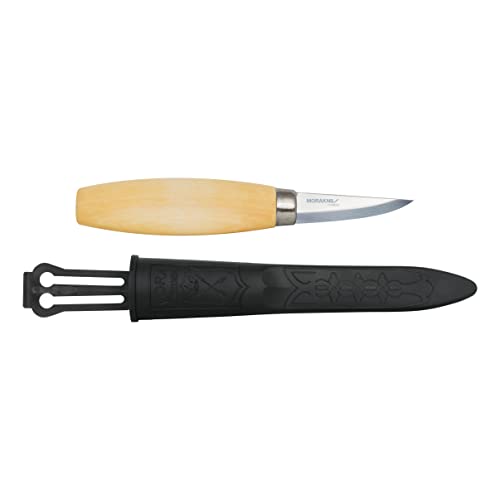
The straight carving knife — called a sloyd knife in Scandinavian woodworking tradition — handles everything outside the bowl: shaping the handle, beveling the back, and making the rough cuts after splitting your blank. You'll spend more time with the sloyd knife than any other tool. The Mora 120 is the standard recommendation, and there's little reason to look elsewhere for your first knife.
Best starter
Mora
120 Carving Knife
$29.99 as of Jun 22, 2026
★★★★★Our rating
The Mora 120 is the go-to first carving knife for most beginner spoon carvers. It handles initial shaping, straight cuts, and all the detail work the hook knife can't reach. Laminated steel, a flat grind that's easy to sharpen, and a comfortable handle for long sessions. Under $20 — just buy it alongside the 162.
What we like
Laminated Swedish steel — holds an edge and resharpens easily
Flat grind handles both push cuts and draw cuts cleanly
Under $20 — the most cost-effective knife in the entire kit
What to know
Handle finish can feel slightly rough; a light sand and oil helps
Plastic sheath isn't safe storage for transport — get a roll or sleeve
BeaverCraft's C4 is one of the most popular budget sloyd knives on Amazon, and it earns it. Full-tang construction makes it more robust than most economy options, the handle is comfortable, and the edge comes surprisingly sharp from the factory. Many carvers keep it even after buying a Mora.
What we like
Full-tang construction — more robust than most budget knives
Arrives sharp from the factory; usable immediately
Widely available and easy to replace if lost or damaged
What to know
Handle finish attracts moisture; wipe with linseed oil monthly
Blade geometry less refined than Mora — needs more frequent stropping
A longer 3.2-inch blade compared to the 120's 2.4 inches, with more belly for the powerful push cuts you'll use once you're working with bigger green-wood blanks. Most serious spoon carvers end up here eventually. Not worth the step up until you've outgrown the 120, but when you do, you'll know it.
What we like
Longer blade handles bigger blanks and deep shaping cuts
Stiffer spine suits powerful push cuts without flexing
Same laminated Mora steel — consistent quality step-up
What to know
Trickier for fine detail near the bowl transition
Overkill until you're working blanks bigger than a small spoon
Most beginners skip the axe for the first month, and that's fine — you can start with pre-split blanks or dry basswood. Once you're carving regularly, the carving axe is a revelation: it lets you rough out a spoon from a green branch in five minutes, making the whole process dramatically faster. You don't need a full axe — a hatchet with carving geometry (longer, thinner bit) is ideal.
Best starter
Gransfors Bruks
Wildlife Hatchet
$175.85 as of Jun 22, 2026
★★★★★Our rating· Only 3 left in stock - order soon.
Expensive for a hatchet, but this is the one the spoon-carving community keeps recommending for good reason. Hand-forged Swedish steel, ground at the forge to carving-specific geometry, with a handle shaped for control rather than chopping. A tool that will outlast you if you maintain it. Buy once, cry once.
What we like
Hand-forged Swedish steel holds a razor edge through long sessions
Carving-specific bit geometry makes roughing out blanks efficient
Lifetime tool — will outlast you with minimal maintenance
What to know
~$130 is real money — skip if you're not yet committed to the hobby
Needs handle oiling and proper storage — not a toss-in-a-bag tool
If $130 for a Gransfors feels premature, the Fiskars X7 gets you roughing capability for under $40. It won't deliver carving precision, but for splitting billets and knocking off corners, it works. Upgrade when you're sure this hobby is sticking.
What we like
Under $40 — the honest test-the-waters hatchet
Plastic handle survives rough handling better than raw wood
Light enough for extended splitting without arm fatigue
What to know
Chopping geometry rather than carving — less efficient for shaping
Plastic handle can't be replaced when worn unlike wooden-handled axes
Sharp tools are safe tools — this is not a cliché in spoon carving. A dull hook knife requires so much force that the blade can slip unpredictably. Plan to strop your knives every 20–30 minutes of carving, and resharpen from scratch every few sessions. The good news: spoon-carving tools are small and the bevels are simple, so sharpening from scratch takes only a few minutes once you know the motion.
Best starter
BeaverCraft
Leather Strop Kit with Compound
$17.99 as of Jun 22, 2026
★★★★★Our rating· In Stock
A leather strop loaded with polishing compound is the single most important maintenance tool in spoon carving. After every 20–30 minutes of work, a few strokes on the strop restores a mirror edge and keeps cuts clean and controlled. BeaverCraft's kit ships both the strop and compound together — nothing else to source on day one.
What we like
Combo kit includes strop and compound — nothing else needed on day one
Regular stropping is faster and more effective than re-sharpening
Strop works for both straight and hook knife bevels
What to know
Compound runs out before the strop wears — budget for a refill
Not a substitute for proper sharpening when the edge is truly dull
The polishing compound most professional carvers end up using long-term. Applied to bare leather or smooth cardboard, it puts a mirror edge on laminated steel faster than most compounds. A tube lasts a full year of regular carving. This is what you load onto any strop once the supplied compound runs out.
What we like
Industry-standard compound used by professional carvers worldwide
A single tube lasts a full year of regular carving sessions
Works on leather, bare cardboard, or MDF — very versatile
What to know
Compound only — you still need a leather strop as the substrate
Small quantity for the price compared to general abrasive compounds
For sharpening from scratch when your edge is genuinely dull, the DC3 is a compact dual-grit stone that works beautifully on the small bevels of carving knives. Diamond side removes steel quickly; ceramic side polishes. Small enough to tuck inside your kit bag.
What we like
Dual-grit: diamond for fast reprofiling, ceramic for polishing
Compact enough to carry in any kit bag alongside your knives
Works on the tight angles of both sloyd and hook knife bevels
What to know
~$60 for a whetstone — budget alternatives work fine while learning
Freehand angle consistency takes weeks of practice to master
Green (freshly cut) wood is what makes spoon carving work — it's soft enough to carve with hand tools and hardens as it dries. Birch, cherry, willow, and sycamore are traditional choices. If you can't source green wood locally, pre-cut basswood blanks from craft suppliers get you started without needing a log or an axe. Ask a local arborist for offcuts — free, and often excellent quality.
Best starter
BeaverCraft
Spoon Carving Kit
$36.99 as of Jun 22, 2026
★★★★★Our rating· In Stock
If you want one box that gets you carving your first spoon today, BeaverCraft's kit ships a hook knife, a sloyd knife, a leather strop, and two basswood blanks together. Nothing you'd skip for a first session. The tools aren't Mora quality, but they're competent enough for your first dozen spoons — and the basswood blanks mean you can start immediately.
What we like
One purchase covers hook knife, sloyd knife, strop, and blanks
Basswood blanks mean no need to source green wood on day one
Under $50 all-in — the easiest way to test the hobby
What to know
Tool quality lower than buying Mora + BeaverCraft individually
Basswood is soft and easy but not how traditional green-wood carving feels
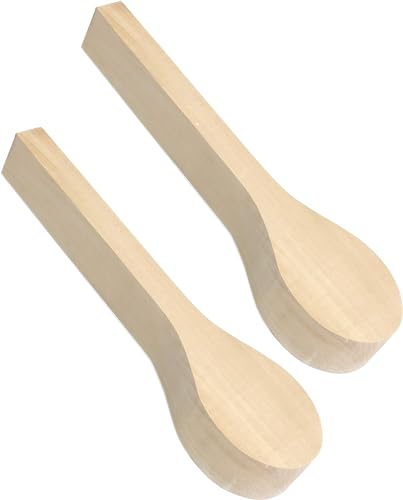
Once you have your knives, a pack of pre-cut basswood blanks removes the wood-sourcing barrier entirely. Basswood is soft, consistent, and very forgiving — ideal for learning cuts and muscle memory before you move to green wood. A 6-pack gives you enough to make real mistakes and recover from them.
What we like
Pre-cut outline removes the need for an axe or green wood source
Basswood is forgiving — ideal for learning cuts without fighting the grain
Cheap enough to practice aggressively and ruin a few without guilt
What to know
Softer than green wood — transitions to real timber can feel harder
Uniformity of blanks can feel less authentic than hand-split billets
You can carve a functional spoon in a single afternoon. Here's what the first weekend actually looks like — the cuts, the mistakes, and the moment it starts to feel like craft instead of struggle.
There’s a reason spoon carving has become a quiet obsession for a certain kind of person. It’s tactile, slow, and satisfying in the way that most hobbies stopped being once everything moved to a screen. You start with a lump of wood and you end with something you can eat with. The learning curve is real but forgiving, and you don’t need a workshop — just a knife, a piece of wood, and an afternoon.
Here’s what your first weekend actually looks like.
Saturday morning: tools and wood
Before you touch a knife, you need two things: the right tools and the right wood.
The tools. You need a hook knife and a sloyd knife. That’s it for now. The hook knife hollows the bowl; the sloyd (straight) knife shapes everything else — the handle, the back, the transition. Buy both before you start. Carving with only a straight knife leaves you stuck at the bowl. The Mora 162 and Mora 120 together cost about $50 and are the most-recommended starter combination in the carving community. Get them before the weekend.
You also need a leather strop loaded with polishing compound. Dull tools are the number-one beginner frustration — and the number-one cause of the kind of slipping cuts that end sessions early. Plan to strop (five to ten strokes per bevel, per knife) every twenty minutes of carving.
The wood. Green (freshly cut) wood carves dramatically easier than dry wood. If you can source it — a birch log, a willow branch from a recent windfall, cherry from an arborist — that’s ideal. If you can’t, buy basswood blanks. Basswood is soft, consistent, and very forgiving, and pre-cut blanks skip the splitting step entirely. Either way, don’t start on dry hardwood. Oak and maple will exhaust you before you’ve learned anything.
Set yourself up well before the first cut. Sit low with your elbows braced against your knees or thighs — you want your body as an anchor, not just your wrists. Never cut toward your fingers or your face.
The pull cut. This is your primary carving motion. Draw the knife toward you, with your thumb or forearm as a brace point depending on the cut. It gives you control: you’re pulling with your shoulder and arm, not just pushing with your wrist. Spend your first hour exclusively on pull cuts with the sloyd knife, shaping the outside of the spoon — the handle profile, the back curve, the basic silhouette.
A few things beginners get wrong in the first session:
Taking too much off. Cuts should be thin, shaving-like. If you’re prying rather than slicing, your knife isn’t sharp enough or your angle is too steep.
Not stopping to strop. If a cut that felt smooth suddenly feels like it’s dragging, that’s your edge telling you something. Strop immediately; don’t push through.
Skipping the silhouette. Don’t start hollowing the bowl until you’ve shaped the outside of the spoon. The bowl cut is easier when you know roughly where the bowl is.
By the end of Saturday afternoon, you should have a rough spoon silhouette — recognizably spoon-shaped, clunky at the details, but a real object. That’s the first win.
The hook knife is the tool that separates spoon carving from whittling. Learning to use it takes most beginners a session or two, and that’s normal.
Hook knife technique. Hold the spoon handle in one hand and the hook knife in the other. Pull the hook through the bowl, rotating your wrist slightly as you go to follow the curve. Short strokes, consistent depth. The motion is more like scooping than slicing. Keep strokes aligned with the grain where possible — cutting across the grain on green wood works fine, but against the grain will tear fibers and leave a ragged surface.
On Sunday, focus on these in order:
Refine the bowl shape with the hook knife
Blend the bowl edge into the back of the spoon with the sloyd knife
Clean up the handle with pull cuts until it fits your hand
Sand or leave rough — rough is fine for a first spoon
The first spoon. It will be thick. The handle will be slightly crooked. The bowl might be off-center. None of that matters. What matters is that you understand the relationship between the two knives, you’ve felt the pull cut click into place, and you made something functional with your hands from a piece of wood. That feeling is why people keep doing this.
The learning curve in spoon carving is front-loaded. Sessions two through five are where the technique solidifies:
Thin it down. The most common critique of beginner spoons is that they’re too thick. The handle should flex slightly; the bowl walls should be close to 3–4mm. Practice removing wood you think you can’t.
Practice on failures. When a spoon goes wrong — splits, wrong proportion, bad grain — don’t throw it away. Keep cutting. Understanding how wood fails is as useful as knowing how it yields.
Watch your wood dry. Leave your first carved spoon on the counter and watch it for a few days. Green wood checks (cracks) as it dries — most small spoons are fine, but a ladle from a thick billet will crack more dramatically. That’s normal and part of the process.
Find green wood directly. Once the hook knife feels natural, sourcing your own green wood is the next unlock. Ask local tree surgeons for offcuts after a job — most are happy to give fresh birch or cherry away. That’s when the craft opens up.
Save your money
What you don't need yet
Beginners get pressured to buy a lot of stuff that doesn't help them play
better. Here's what we'd skip on day one.
Power carving tools (Dremel, flex-shaft) — The whole point of spoon carving is the slow, meditative hand-tool process. Power tools remove material faster but skip everything that makes people love the craft.
A carving vise or spoon mule — Useful eventually for stabilizing awkward pieces, but your free hand and body mechanics handle it for the first several months. Add one when a specific frustration tells you to.
Exotic or figured wood — Carve at least 20-30 spoons on cheap basswood or local green wood before touching expensive material. Hard exotics are unforgiving of technique gaps.
A full set of carving chisels — That's woodcarving, not spoon carving. Hook knife + sloyd knife + axe is the complete spoon-carving toolkit. Chisels are a different craft.
Wood sealers or drying chemicals — Green wood dries naturally over days to weeks. Anchor Seal can slow checking on larger pieces, but it's unnecessary for spoon-sized work.
First week
Your first seven days
A short, real plan to get from gear-on-doorstep to actually playing.
Order the Mora 162 hook knife and Mora 120 sloyd knife — the two essential tools. · Buy
Source green wood: ask a local arborist for offcuts, check the free section on Craigslist, or order basswood blanks if you want to start this weekend. · Action
Carve your first rough spoon this weekend. It will be clunky. That's the point. · Action
Join r/Spoon_Carving and post your first spoon. The community is unusually encouraging. · Action
r/Spoon_Carving · Active beginner-friendly community with critique threads
FAQ
Common questions
What kind of wood should I start with?
Green (freshly cut) wood is ideal — birch, willow, cherry, or sycamore. It's dramatically easier to carve than dry lumber. If you can't source green wood, basswood blanks are the next best thing. Avoid construction lumber; it's kiln-dried to a hardness that will exhaust you and dull your tools fast.
Is spoon carving dangerous?
Less than it looks, more than drawing. The main risk is a slipping blade from a dull knife or poor body positioning. The safety rules are simple: cut away from your body, use controlled pull cuts, and keep tools sharp. Sharp tools require less force, which means less pressure behind any potential slip. A leather thumb guard is useful during hook-knife hollowing.
Do I need a carving axe to start?
No. An axe lets you rough out a spoon from a green branch in minutes, but you can get the same result with a purchased blank. Get the knives and the strop working first. Add an axe when you're ready to source your own green wood directly from branches.
What's the difference between spoon carving and whittling?
Spoon carving focuses on fresh green wood and specific tools — hook knife, sloyd knife, often an axe. Whittling is typically done on dry wood with a single penknife, and finished pieces tend to be figures and animals rather than functional objects. The communities overlap but the techniques differ significantly.
How long does it take to carve a first spoon?
Most beginners finish a rough first spoon in a single afternoon — two to four hours for the basic shape. The first spoon will be clunky. The second will be better. After ten spoons, you'll have real control. The learning curve is steep for the first five spoons and then flattens out considerably.
Can I use dry wood instead of green wood?
Yes, especially basswood. It's softer than most dry hardwoods and very beginner-friendly. Avoid dry oak, maple, or walnut until you have solid technique — they're far harder to carve by hand. Green wood is the traditional choice because it's soft, then hardens as it dries into its finished shape.
Barn the Spoon — Barnaby Carder is the most influential figure in modern revival spoon carving. His book 'Spoon' is the definitive beginner text; his shop in London offers courses.
Robin Wood — Traditional craftsman and educator. His YouTube videos are patient and technically precise — some of the best free carving instruction available.
r/Spoon_Carving — Active, beginner-friendly community. The wiki covers wood species, tool recommendations, and the pull-cut safety guide. Post your first spoon — the feedback is genuinely useful.
The Spoon Crank — Community site and resource hub for spoon carvers. Good tool reviews and wood sourcing guides.
Country Workshops — North Carolina school offering intensive green-woodworking courses with top carvers. If you want to go deep fast, a weekend workshop here beats months of solo practice.
As an Amazon Associate, JustBeginning earns from qualifying purchases.
We may also earn commission from other affiliate programs linked on this
page. Editorial recommendations are independent; we don't choose
products based on commission rates.
Product prices and availability are accurate as of the date and time
indicated and are subject to change. Any price and availability
information shown on Amazon at the time of purchase will apply.


 Best starter