Dollhouse building is one of the most satisfying craft hobbies you can start: you're building a whole world at 1:12 scale, one room at a time. The good news is that a wood kit, some LED string lights, and basic craft supplies are all you need to get started for under $150.
By Colin B. · Published June 17, 2026 · Last reviewed June 22, 2026
A wood kit ($50–120), a basic LED lighting set ($20–30), and craft glue and paint supplies ($20–30) gets you building the same weekend your order arrives.
We earn commission on qualifying Amazon purchases — see our
affiliate disclosure.
Price tiers and budget totals shown above are editorial estimates;
actual Amazon prices vary.
At a glance
Our top pick in each category
The fastest path through this guide — each best-starter pick by category.
Scroll for the budget and upgrade alternatives.
Start with a wood kit, not a plastic one. Wood kits from Greenleaf or Real Good Toys let you sand, stain, paint, wallpaper, and modify however you want. Plastic kits look finished out of the box and feel that way forever — there's nowhere to take them.
1:12 scale is the standard. Everything made for dollhouses — furniture, wallpaper, flooring, tiny books — is calibrated to 1:12 (one inch equals one foot). This scale has the biggest supply chain of any miniatures genre. Start here.
Lighting is not a luxury. A single warm-white LED strip tucked behind a ceiling trim turns a plywood box into something magical. Budget $20–30 for a battery-powered micro-light set before you seal the roof. Adding it later is a pain.
Finishing supplies matter more than the kit price. The kit itself is just the shell. Budget $30–50 for paint, wallpaper, flooring paper, and glue on top of the kit cost — that's what makes the result look intentional.
The kit is your canvas. Wood kits from Greenleaf and Real Good Toys dominate the beginner market because they're laser-cut, pre-scored, and designed to go together with basic craft glue and no power tools. Aim for something with 2-4 rooms for your first build — small enough to finish, big enough to decorate properly. Avoid anything marketed as 'pre-painted' or 'snap-together'; the whole point is to make it yours.
Starter Kits — what's the difference?
A few common shapes, each making a different trade.
1:12 Scale (Standard)
The universal standard. Every furniture brand makes 1:12.
Scale
1 inch = 1 foot
Door height
~7 inches
Supply availability
Widest selection
Best for All beginners; the only scale with a truly deep accessory market
Tradeoff Houses are medium-large; need shelf or table space
Half the size, half the shelf space, half the accessory options.
Scale
0.5 inch = 1 foot
Door height
~3.5 inches
Supply availability
Moderate — growing
Best for Limited display space, or a second project after a 1:12 build
Tradeoff Fewer furniture options; delicate details harder to work at this size
Best starter
Greenleaf
Storybook Cottage Dollhouse Kit
$69.95 as of Jun 22, 2026
★★★★★Our rating· In Stock
The Storybook Cottage is the friendliest first build in the Greenleaf lineup. It is small enough to finish without overwhelm but has real character, with a steep roof and cozy rooms to decorate. The wood is precut and laser-cut, so no saw is needed, and it assembles with craft glue. A great way to learn the basics before committing to a big multi-story house.
What we like
Small, characterful first build you can actually finish
Precut laser wood, no saw required, assembles with craft glue
Takes all standard 1:12 scale furniture and accessories
What to know
Unfinished wood needs sanding and priming before any finish coat
Instructions are clear but minimal, search YouTube for walkthroughs
A two-story Colonial kit from Real Good Toys, one of the oldest and best-built names in the category. Vermont-made, well-cut wood, and a facade that actually looks like a house from day one. Better fit and finish than most imports in this price range.
What we like
Vermont-made wood with noticeably cleaner laser cuts than imports
Two-story Colonial look reads as finished even before decorating
What to know
Very small scale leaves little room to decorate interiors richly
Limited opening access makes painting the back wall tricky
★★★★☆Our rating· Only 18 left in stock - order soon.
The Willowcrest is the statement piece for someone who has finished a starter kit and wants a real project. It is a multi-level Victorian with bay windows and intricate trim, the kind of house people display in the living room. Plan 30 to 50 hours across building, painting, wallpapering, and furnishing. Ambitious, but the payoff is an heirloom-quality dollhouse.
What we like
Multi-level Victorian with bay windows and intricate trim
Scope for serious interior design across several rooms
The benchmark display piece in the Greenleaf lineup
What to know
40-plus hours from kit to finished display, not a weekend project
Larger footprint requires a dedicated display space
Lighting does more for a dollhouse than any single decorating decision. A warm-white LED strip tucked behind ceiling trim, or micro bulbs wired into each room, turns raw plywood into something you'll want to photograph. The key is low voltage — battery packs are fine, and avoid hot-running bulbs in enclosed rooms. Plan your wiring routes before the roof goes on; it's much harder to route wire through a finished house.
Best starter
Sanniu
Copper Wire Fairy Lights (Warm White)
$5.99 as of Jun 22, 2026
★★★★★Our rating· In Stock
Warm-white micro LEDs on ultra-thin copper wire — the standard battery-powered solution in the dollhouse community. No soldering, no wiring diagram: route the wire through rooms, tuck the battery case out of sight, and the whole interior glows. The copper wire is thin enough to hide under baseboard trim or flooring edges.
What we like
Copper wire is thin enough to hide under wallpaper or flooring trim
Warm white tone reads as natural light inside a finished room
No soldering — battery pack with on/off switch out of the box
What to know
Batteries need replacing every few weeks of regular display use
Fixed wire length; plan room routing before gluing walls closed
A complete hardwired lighting system: 20-watt transformer, tape wire, and socket connections for ceiling and wall fixtures. This is the system serious builders use for a permanent display piece. Individual room fixtures look like real lamps rather than fairy lights, and the brightness is consistent on AC power.
What we like
Individual room fixtures look like real lamps and ceiling lights
12V transformer means consistent brightness for a display piece
What to know
Must plan and route wiring before walls are closed — no retrofitting
Bulbs generate some heat; don't use in rooms sealed with no ventilation
A 1-meter LED strip cut to size and stuck behind ceiling or baseboard trim. USB-powered so it runs off any phone charger. Doesn't look like miniature lighting, but it's the fastest way to flood a room with warm light for photography or display.
What we like
USB power means no batteries to replace during long displays
Cut to exact length with scissors; adheres to wood with included tape
What to know
Requires a USB cable routing out of the house — less tidy than batteries
Strip is wider than dollhouse-specific lights; harder to hide in tight trim
You have two options: build furniture from tiny wood kits, or buy ready-made. Kit furniture gives you more control over finish color and style and costs half as much; ready-made ships looking good from day one. Most hobbyists use both: ready-made for the pieces they don't want to fuss over (beds, sofas), kit furniture for statement pieces they want to match their color scheme exactly. All of these are 1:12 scale.
Best starter
35-Piece 1:12 Scale Dollhouse Furniture Set
$12.99 as of Jun 22, 2026
★★★★★Our rating· In Stock
A complete multi-room furniture bundle — living room, bedroom, kitchen, and bathroom pieces — all in matching scale and style. Ready-made plastic furniture that reads as furniture, not toys. Good for filling out your first kit while you get a feel for the hobby before investing in individual wood pieces.
What we like
Complete multi-room set arrives ready to place — no assembly
Consistent style across rooms makes the whole house look cohesive
What to know
Plastic; can't be stained or repainted easily without prep
Generic Victorian style may not match a modern-style house build
Rolife's miniature room kits are laser-cut wood puzzles that build a complete furnished space — a bookshop study with tiny shelves, books, and a reading lamp. The furniture comes included, and you paint/stain everything to match. The tactile satisfaction of building the furniture is genuinely part of the hobby here, not just the decorating.
What we like
Full furnished room in a box — shelves, books, lamp included unfinished
Kit assembles in 2-3 hours; satisfying standalone project or room add-on
What to know
Single room-box only; not a traditional dollhouse kit
Requires painting before it looks finished — not a quick fill solution
Miniature wallpaper and flooring are the single biggest visual upgrade you can make to a kit house. Raw wood walls look like raw wood walls. A sheet of 1:12 scale wallpaper transforms a room instantly. The standard is printable sheets from miniature craft suppliers — you cut to size with scissors and attach with a thin coat of craft glue or Mod Podge. Flooring sheets (simulated wood plank, tile, marble) work the same way and cost under $5 per sheet.
Best starter
HEMOTON
25-Sheet 1:12 Dollhouse Wallpaper & Flooring Pack
$43.79 as of Jun 22, 2026
★★★★★Our rating· In Stock
A 25-sheet assortment of 1:12 scale wallpaper and flooring patterns — florals, stripes, wood plank, tile — sized to cover a standard dollhouse room with minimal cutting. Self-adhesive or paste-on options; a thin coat of Mod Podge gives more repositionability before the paper sets. This pack covers a full 3-4 room house.
What we like
Multi-pattern pack lets you give each room a distinct look
Pre-scaled to 1:12 — no resizing, minimal waste on standard rooms
What to know
Pattern selection is classic/Victorian; limited modern or contemporary styles
Thin paper requires careful handling; tears if you rush the glue coat
A multi-sheet pack of 1:12 scale flooring and wallpaper patterns, so you can try several looks without ordering from a specialty supplier. The wood-plank and tile prints read as real materials from normal viewing distance, and you cut them to fit with scissors. Far better than painting bare wood floors, and cheap enough to experiment room by room.
What we like
Several flooring and wallpaper patterns in one inexpensive pack
Prints read as real wood and tile at normal viewing distance
Cut to fit with scissors, no special tools needed
What to know
Patterns are generic, not premium veneer like specialty sheets
Thin paper needs careful gluing to avoid bubbles and warping
Dollhouse building requires surprisingly little in the way of tools, but the tools you do need have to be the right ones. Craft glue (not superglue) for wood assembly. Fine-tip tweezers for placing tiny objects you physically cannot grip with fingers. A sharp craft knife for trimming wallpaper and flooring. A self-healing cutting mat so you don't carve the table. That's your starter kit for finishing tools.
Best starter
Fiskars
Fingertip Craft Knife
$7.49 as of Jun 22, 2026
★★★★★Our rating· In Stock
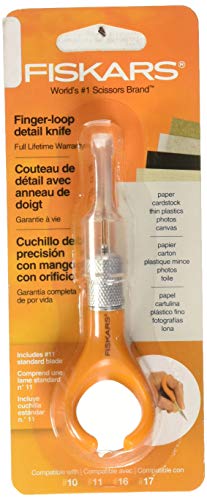
A precision craft knife for trimming miniature wallpaper, cutting flooring sheets to fit, and scoring wood before snapping. The Fiskars fingertip style is shorter and more controllable than a standard box cutter, and replacement blades are cheap. Keep a fresh blade in it, since dull blades tear paper instead of cutting it cleanly.
What we like
Short grip gives much better control for precise trim cuts
Replacement blades are cheap, always cut with a fresh edge
What to know
Blade changes require care, follow the safety cap protocol
Not a heavy-duty cutter, for detail trimming not thick wood
VETUS anti-static stainless steel tweezers are the standard in the miniatures community. Precision-tip steel that places a 1:12 scale dinner plate or a dried flower without shaking. You will immediately realize you cannot do this hobby without fine tweezers. This single-style pointed-tip version handles 80% of placement tasks.
What we like
Anti-static tips prevent tiny plastic and resin pieces from sticking
Multiple tip shapes cover gripping, holding, and placing in one set
What to know
Tips bend permanently if dropped on hard floors — store carefully
Overkill for very large pieces, but you'll use them for 80% of placement
The reference craft glue for wood dollhouse construction. Thick enough to stay where you put it, dries clear, repositionable for a few seconds before setting, and forgiving of the minor misalignments that happen on any first build. Works for wood-to-wood, paper-to-wood (wallpaper), and fabric.
What we like
Thick formula stays in place before setting — no running on vertical walls
Works for wood, paper, and fabric — covers every construction need
What to know
Sets in 10-30 min; hold parts in place longer than you think you need to
Not waterproof when cured; don't use where moisture exposure is likely
Dollhouse building has a learning curve that's almost entirely about sequencing. Here's what to do first, what to save for later, and how to finish your first kit without regrets.
The most common mistake new dollhouse builders make isn’t buying the wrong kit or the wrong glue. It’s doing things in the wrong order. Specifically: gluing the roof on before running the lighting wire. Or wallpapering before painting the ceiling trim. Or furnishing a room before the walls are fully dry.
This guide is about sequencing. The skills themselves — painting, cutting wallpaper, placing furniture — you’ll pick up as you go. Getting the sequence right is what separates a satisfying build from a project you had to take apart and redo.
Step 1: Unbox, inventory, and don’t glue anything yet
Open your kit. Most wood dollhouse kits from Greenleaf or Real Good Toys come as flat laser-cut sheets of wood with pre-scored tabs. Lay everything out and match pieces to the instruction sheet before you touch the glue.
This takes twenty minutes and saves hours. Laser-cut wood kits occasionally have a piece cut slightly wrong, or a tab that won’t fit without sanding. Better to find that now, with everything dry, than to discover it mid-assembly with glue drying on the wall next to it.
While you’re inventorying: decide on your room scheme now. Before you prime, before you paint, before you buy wallpaper. Sketch each room — floor color, wall treatment, overall palette. You don’t need final decisions, but having a general direction prevents the thing that kills most first builds: painting a wall one color, hating it, and not being able to repaint because the floors are already in.
Step 2: Sand, prime, and pre-finish before assembly
Sand all wood surfaces lightly before you glue anything together. A quick pass with 120-grit sandpaper removes the laser char and rough edges, and means paint adheres cleanly instead of soaking uneven into raw wood.
Then prime. A thin coat of gesso or white spray primer on all interior walls and floor pieces before assembly changes everything. Finish coats go on smoother, colors are truer, and you can actually see what you’re painting rather than watching it disappear into raw grain.
Pre-finish pieces you can’t reach after assembly. On most dollhouse kits there are interior corners, ceiling soffits, and the back wall of deep rooms that are nearly inaccessible once the structure is glued together. Paint those pieces now, while they’re flat on the table. A little masking tape on the glue tabs keeps them clean.
Ceiling trim and base molding (if your kit includes them) should be painted before installation, not after. Trying to paint trim in place without getting paint on the wall or floor is the kind of precision work that belongs in a surgery theater, not a first build.
Step 3: Plan your lighting route before the roof goes on
The second most common regret: sealing the roof without running the lighting wire.
If you’re using fairy lights on copper wire, your job is simple: decide which rooms get light, measure the wire route from room to room, and leave a small channel for the wire. A thin groove run through the top of a wall or under floor trim is enough. The wire is thinner than a standard phone charging cable.
If you’re using a wired socket system (Cir-Kit, Houseworks), you need more planning: every ceiling and wall fixture location marked, channels for the tape wire running between them, and the transformer exit point planned before a single wall is glued.
For a first build: use battery-powered micro LEDs. They’re forgiving, they require no planning beyond “where will the battery pack hide,” and the result is genuinely beautiful. Plan the more involved wiring system for your second or third build, once you know what you’re doing.
Glue the main structure now. Walls, floors, dividers — in the sequence your instructions describe (follow them; the order matters for most kits). Use craft glue, not superglue. Craft glue gives you 10-30 seconds of repositionability before it sets. You will use those seconds.
Hold every joint for 60 seconds minimum. Tape works as a clamp — blue painter’s tape holds a wall at a right angle while the glue sets and removes cleanly without tearing the wood.
Leave the roof unglued at this stage. The roof goes on last, after all interior work is done.
A few assembly truths you’ll learn:
Tabs and slots rarely fit perfectly. Sand a tab that’s too thick; don’t force it. A forced tab splits the wood.
Corners gap slightly. Fill gaps with wood filler or a thin bead of white craft glue, let it dry, sand smooth.
Glue squeeze-out is inevitable. Wipe excess with a damp cotton swab immediately. Dried glue under wallpaper creates a bubble that’s nearly impossible to fix.
Step 5: Wallpaper, flooring, and finishing in sequence
Now the interior decoration. The correct sequence inside each room:
Paint or wallpaper the ceiling first. Paint runs down. Wallpaper paste seeps sideways. Do the ceiling before the walls.
Install crown molding or ceiling trim (if using it) before wallpapering walls. Glue trim in place, let it dry, then butt your wallpaper up to it.
Wallpaper the walls. Cut each panel to fit, apply a thin coat of Mod Podge to the wall (not the paper), position the paper, and smooth from center outward. Work one wall at a time.
Install flooring. Cut your flooring paper or sheet to fit, Mod Podge to the floor, smooth carefully. Let it dry under a book to prevent curl.
Add baseboard trim over the raw edge of the flooring. This hides any uneven cuts and gives the room a finished look.
The sequence matters. Wallpaper applied before trim installation means you’ll be cutting around trim later, which is harder. Flooring applied before wallpaper means your wallpaper paste drips onto the floor, which is fixable but annoying.
Step 6: Furnish from large to small
Place large furniture first (sofa, bed, wardrobe), then mid-size pieces (tables, chairs, bookshelves), then accessories (books, plants, dishes). This is how real interior designers stage rooms, and it works at 1:12 scale for the same reason: large pieces define traffic flow, small pieces fill negative space.
Leave space in doorways. A furnished room that looks perfect from the front can look jammed from the side if you’ve forgotten the door swing.
Use your tweezers. Anything smaller than a matchbox is impossible to place with bare fingers without knocking something else over. Fine-tip tweezers are the tool that makes this hobby possible. You should already have them; if you don’t, nothing else works right.
Before you commit a piece of furniture to glue, photograph the arrangement from the viewing angle. What looks right standing over the room often looks wrong at eye level. Fix it while everything is still moveable.
Step 7: Seal the roof and call it done
Once every room is decorated and photographed from all angles, glue the roof. Add any exterior trim, paint the façade, and seal all exterior joints with a thin bead of craft glue or caulk.
Stand back. Take a photo. The first one is always better than you thought it would be.
What to do next: Start a smaller supplementary piece (a garage, a garden shed, a single-room roombox) to practice a technique you want to improve before your second full build. Most experienced builders have three projects going: one finishing, one mid-build, one being planned.
Save your money
What you don't need yet
Beginners get pressured to buy a lot of stuff that doesn't help them play
better. Here's what we'd skip on day one.
A Dremel or rotary tool — Wood kit assembly needs no power tools. Save the Dremel for when you're building from scratch.
Miniature electric wiring systems (Cir-Kit) — The screw-base socket wiring systems are satisfying but require planning every outlet before walls close. Use fairy lights on your first build and add hardwired lighting on build two.
3D printer for custom furniture — A beautiful rabbit hole. Go there after two builds, not on your first weekend.
A full set of acrylic craft paints — Start with four colors (white primer, off-white, one accent, and wood stain) and add from there. Twenty colors before you've started painting is a decision-paralysis trap.
Fancy display cases — Get the build finished and decide where it lives before spending $80 on a glass-front cabinet.
Resin casting supplies — Amazing for making miniature food and water features, but a separate hobby skill. Learn the kit first.
First week
Your first seven days
A short, real plan to get from gear-on-doorstep to actually playing.
Order your kit and lighting before anything else — they take the longest to arrive. · Buy
While you wait, watch a Greenleaf or Real Good Toys build walkthrough on YouTube. Watching someone else make all the beginner mistakes saves you the same time. · Learn
1:12. It's the universal standard — every furniture brand, wallpaper supplier, and accessory maker calibrates to it. 1:24 (half scale) is appealing for small spaces, but the accessory market is a fraction the size and the details are harder to work with.
How long does it take to build and finish a dollhouse kit?
A two-room starter kit can be assembled in a day and decorated over a weekend. A six-room house like the Glencroft is a 30-40 hour project across several weeks. Most hobbyists work an hour or two at a time, which is actually ideal — glue needs to cure.
Can kids do this hobby?
Ages 12+ with supervision, yes. The craft knife and small parts make it inappropriate for younger children. There are snap-together plastic kits designed for younger ages, but they're not really the same hobby as wood kit building.
Do I need any woodworking skills?
None. Greenleaf and Real Good Toys kits are laser-cut and pre-scored — assembly is gluing tabs into slots. The skills involved are closer to craft and model building than carpentry.
Where do I find 1:12 scale miniature accessories?
Amazon has a wide selection, but the best finds are on Etsy (handmade miniatures), eBay (vintage pieces), and specialty shops like Handley House or Miniatures.com. The r/miniatures subreddit has a pinned shop directory worth bookmarking.
How do I add lighting without making a mess of the wiring?
Start with battery-powered fairy lights on copper wire — they're designed to hide under trim and need no soldering. Route all wire before the roof is glued down. If you want proper ceiling and wall fixtures, plan Cir-Kit or Houseworks wiring into your build from the start; retrofitting through finished walls is genuinely difficult.
Miniatures.com — One of the oldest US miniatures retailers. Deep catalog of 1:12 scale furniture, wallpaper, lighting, and supplies. Good for product research even if you buy elsewhere.
Greenleaf Dollhouses — The manufacturer of the most popular beginner wood kits. Their product pages include instruction PDF downloads and community gallery photos of finished builds.
Real Good Toys — Vermont-based manufacturer of premium wood dollhouse kits. More architectural variety than Greenleaf; slightly higher price point.
r/miniatures — Most active English-language miniatures community. Build showcases, buying advice, a pinned shop directory, and a welcoming culture for newcomers.
r/dollhouses — More kit-build focused than r/miniatures. Search for your specific kit model to find photos and tips from other builders.
Doreen Sinnett Designs (YouTube) — Long-running channel with kit build walkthroughs, wallpapering tutorials, and lighting installation videos. The most methodical beginner content in the genre.
As an Amazon Associate, JustBeginning earns from qualifying purchases.
We may also earn commission from other affiliate programs linked on this
page. Editorial recommendations are independent; we don't choose
products based on commission rates.
Product prices and availability are accurate as of the date and time
indicated and are subject to change. Any price and availability
information shown on Amazon at the time of purchase will apply.
Our top pickGreenleaf Storybook Cottage Dollhouse Kit


 Best starter