Knifemaking looks intimidating (sparks, steel, open flames) but stock removal (grinding steel into shape, no forge required) gets beginners to a finished blade in a weekend. Here's exactly what to buy first, what to skip until you're committed, and why choosing the right steel makes everything else simpler.
By Colin B. · Published May 24, 2026 · Last reviewed June 10, 2026
The belt sander (~$70) and propane forge (~$180) are the two big purchases. Steel bar stock and handle scales are surprisingly cheap.
We earn commission on qualifying Amazon purchases — see our
affiliate disclosure.
Price tiers and budget totals shown above are editorial estimates;
actual Amazon prices vary.
At a glance
Our top pick in each category
The fastest path through this guide — each best-starter pick by category.
Scroll for the budget and upgrade alternatives.
Stock removal is the beginner path: you grind a blade shape from flat bar stock, heat treat it, and shape a handle. No forge, no hammer, no anvil. Bladesmithing (forging) comes after you understand how steel behaves, which takes longer than one knife to learn.
Your first knife will be ugly. This is expected. Plan to build 3-5 learning knives before you make one you're proud of. The jump in quality from knife 1 to knife 2 is dramatic. Treat your first blank as paid tuition, not as a product.
1084 high carbon steel is the right starting steel for one concrete reason: it tells you when it's at critical temperature with a simple magnet test. No guesswork, no thermocouple required. Stick with 1084 until you've built at least five knives.
The gear
What you actually need
Knife Steel
Your steel choice sets the ceiling on everything else. For stock removal beginners, 1084 high carbon steel is the gold standard: it hardens predictably in a simple propane forge, quenches in warm canola oil, and the magnet test tells you exactly when it's at critical temp (around 1475°F). O1 tool steel rewards you with finer grain and a better edge but requires a tighter heat-treatment window. Both come as flat bar stock; 1/8" × 1.5" × 12" is the ideal beginner size.
Best starter
Steel Supply Co
1084 High Carbon Steel Bar Stock for Knifemaking
$30.95 as of Jun 22, 2026
★★★★★Our rating· In Stock
1084 is the beginner's steel for one reason: it gives you a clear non-magnetic signal at critical temp, hardens predictably in canola oil, and is covered by more tutorials than any other carbon steel. Grinds easily on a 1×30 belt sander. Buy 1/8" × 1.5" × 12" bars, enough steel for two or three first knives at a fraction of the cost.
What we like
Magnet test tells you exactly when it hits critical temp (no guesswork)
Hardens predictably in canola oil (no specialty quench media needed)
More beginner tutorials written for 1084 than any other carbon steel
What to know
Rusts quickly; needs oiling between grinding sessions
Not as fine-grained as O1 or 52100 for final edge quality
O1 rewards patience with a finer grain structure and a better edge than 1084. The heat-treatment window is narrower, less forgiving of a sloppy quench, but most bladesmiths migrate to O1 after their first five or six knives. At a similar price per bar, it's a natural step-up once you've nailed the fundamentals.
What we like
Finer grain than 1084, better edge potential with proper heat treat
Natural step-up once you've mastered the basics on 1084
What to know
Narrower heat-treatment window, less forgiving of beginner mistakes
Requires Parks 50 or dedicated quench oil, not canola
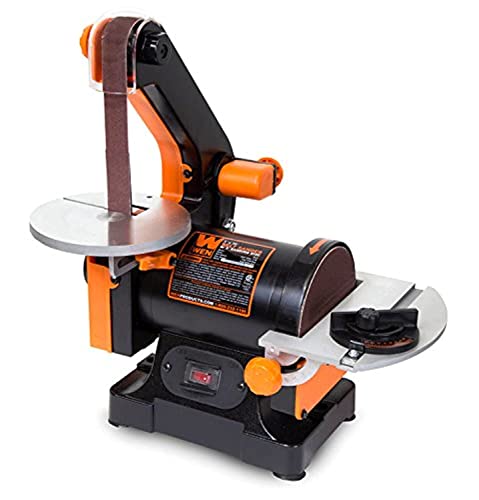
The belt sander is the backbone of stock removal knifemaking; you'll spend 80% of your grinding time here profiling the blade shape, grinding the bevel, and cleaning up grind lines. A 1×30 belt sander costs around $70 and handles your first 10-15 knives without issue. A 2×72 belt grinder is what serious hobbyists and pros use: faster material removal, better belt selection, and proper tool rests for consistent bevel grinds. At $400-800, it's an upgrade you earn after a dozen knives.
Belt Sander — what's the difference?
A few common shapes, each making a different trade.
1×30 Belt Sander
Starter size. Handles first knives at under $80.
Belt size
1" × 30"
Price range
$60–90
Removal speed
Slow–moderate
Best for Beginners, first 10-15 knives, tight budgets
Tradeoff Runs hot; belt wears faster than wider formats
The WEN BG4463 is the first belt sander mentioned in every beginner knifemaking forum. At around $70, it grinds a full blade from bar stock, the 5-inch disc sander handles handle shaping, and replacement belts are cheap and available at every hardware store. You will outgrow it for production work, not for your first dozen knives.
What we like
The go-to beginner recommendation in every knifemaking forum
Under $80 with 5-inch disc sander included for handle shaping
Replacement belts cheap and available at every hardware store
What to know
Runs hot; cool the steel every 30 seconds or risk grain damage
1×30 belt wears faster than wider formats; buy extras
The 2×72 format opens up the belt selection every serious knifemaker runs. Faster material removal, adjustable tool rests for consistent bevel grinds, and belts that outlast 1×30s by a wide margin. This is a serious hobbyist machine; buy it after you've built 10+ knives and know what you're asking it to do.
What we like
2×72 format opens up every serious knifemaking belt on the market
Adjustable tool rests enable consistent hollow and flat grinds
Dramatically faster material removal (fewer passes per session)
What to know
Removes metal fast enough to ruin a bevel in seconds; not for beginners
Premium price ($400-800), premature for your first 10 knives
Files are the great equalizer in stock removal. A 10-inch bastard file shapes the plunge line, cleans up grind lines, and gives you precision a belt sander can't match. You'll also reach for needle files on inside curves and choils. Don't skip this category; even experienced knifemakers with 2×72 grinders finish blades by hand.
Best starter
Nicholson
10-Inch Mill Bastard File with Handle
$14.88 as of Jun 22, 2026
★★★★★Our rating· Only 10 left in stock - order soon.
Nicholson has been the reference-quality hand file brand for over 150 years. The 10-inch mill bastard is the primary shaping tool for stock removal knifemakers, flat for bevel control, aggressive enough to move metal without skating. Buy a wooden handle separately. A sharp Nicholson file used correctly beats a belt sander for final fit-and-finish.
What we like
Nicholson quality, the reference standard for hand files 150+ years
Flat face gives precise control on bevel and plunge-line shaping
Cheap enough to replace when teeth dull rather than clean
What to know
Sold without a handle (buy a file handle separately, $5)
Single-cut only; add needle files for inside curves and detail work
★★★★☆Our rating· Only 15 left in stock (more on the way).
Needle files do the work the big file can't: choils, inside curves, slot finishing, and tight relief cuts. A 6-piece set (flat, round, half-round, square, triangular, knife-edge) covers every situation you'll hit on a knife. Pferd quality stays sharp through a full project, unlike the cheap sets.
What we like
Six profiles cover every tight area you'll encounter on a knife
Pferd quality stays sharp through multiple projects unlike cheap sets
What to know
Snap under lateral pressure; controlled passes only
Short useful life; replace when cuts feel slick instead of biting
Handle scales are the two slabs of material pinned or epoxied to each side of the full tang. Micarta is the beginner-friendly choice: dimensionally stable (it doesn't move with humidity the way wood does), impervious to oils and moisture, and easy to shape with a belt sander and files. G-10 is tougher but produces hazardous fine dust; wait until you have a solid respirator habit. Wood is beautiful but requires finishing and needs to acclimate before glue-up.
Best starter
GAGARIN COMPOSITE
GAGARIN Micarta Knife Handle Scales (Set of 2)
$
★★★★★Our rating
Black linen Micarta is the classic beginner handle material: dimensionally stable, resistant to oils and moisture, and it looks professional when finished with 220-grit paper. A pair of 1/4" × 1.5" × 5" blanks covers your first kitchen knife or hunter. Shapes on the same belt sander you use for the blade.
What we like
Dimensionally stable, won't crack or shift with humidity like wood
Impervious to oils and sweat, ideal for kitchen and EDC knives
Shapes on the same belt sander you use for blade profiling
What to know
Produces fine irritating dust; respirator required during shaping
Less visually striking than figured wood before final finish
Stabilized wood (resin-impregnated under vacuum) gives you wood's visual appeal without the humidity instability. A figured-walnut or maple burl pair produces handles that look genuinely impressive even on a first knife. More expensive than plain Micarta, but right for gift knives or pieces you want to keep.
What we like
Wood's visual appeal without the humidity cracking problem
Stabilized burl and figured wood produces genuinely impressive handles
What to know
More expensive than Micarta; save for knives you want to keep
Harder on belt sander belts than composite materials
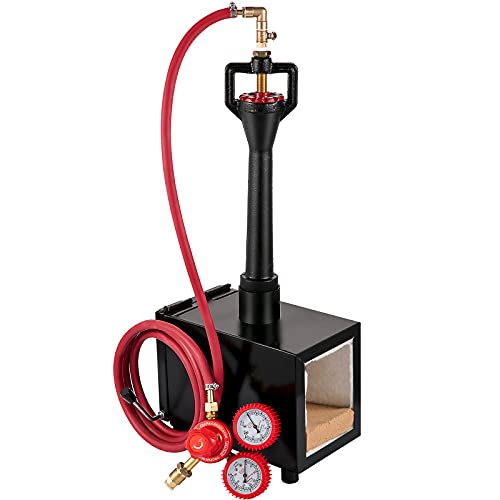
Heat treatment turns a shaped piece of steel into a knife; without it, the blade is soft enough to bend. The process for 1084: heat to critical temperature (non-magnetic, around 1475°F), quench in oil to harden, then temper in a kitchen oven at 400°F for two one-hour cycles. A single-burner propane forge gets you there for under $200. An electric kiln holds temperature within ±5°F and is necessary for stainless steels, but overkill until you're past your first dozen knives.
Best starter
VEVOR
Single Burner Propane Gas Forge
$$$
★★★★★Our rating
A single-burner propane forge is the most accessible heat treatment setup for stock removal. It reaches 2300°F, heats a blade evenly in 3-5 minutes, and lets you watch the steel color and do the magnet test in real time. The VEVOR is the best-selling beginner forge: consistent heat at under $180, runs on a standard 20-lb tank.
What we like
Reaches 2300°F, hot enough for any carbon steel heat treatment
Heats a blade evenly in 3-5 minutes for real-time steel reading
Under $180 and runs on a standard 20-lb propane tank
What to know
Carbon monoxide hazard; outdoor or open-garage use only
Propane costs add up if you're heat-treating every session
An electric kiln holds temperature within ±5°F, the precision stainless steels (154CM, 440C) require. The Hot Shot HS-18K is purpose-built for knifemakers and reaches 2200°F with programmable ramp-and-soak cycles. If you stick with 1084 and O1, you don't need one yet, but when you start working stainless or doing batch runs, this is the benchmark.
What we like
Holds temperature within ±5°F, required for stainless steels
Programmable ramp-and-soak cycles for precise heat treat profiles
What to know
$450-600, a big investment before you know you need that precision
Unnecessary for 1084 or O1 where a propane forge works fine
Safety gear is non-optional in knifemaking. Grinding produces sparks and metallic dust; heat treatment means open propane flames and steel at 1400°F+. At minimum: a full face shield for grinding, a leather forge glove for handling hot steel, and an N95 or P100 respirator for every grinding session. Buy safety gear before anything else; don't grind without it.
Best starter
Lincoln Electric
OMNIShield Professional Face Shield
$50.76 as of Jun 22, 2026
★★★★★Our rating· Only 17 left in stock - order soon.
Full face coverage from hairline to chin protects you from sparks, grinding debris, and broken belt shrapnel. Lincoln Electric makes the standard face shields professional shops stock. Adjustable ratchet headgear stays stable through a grinding session. Wear it over safety glasses; a single spark in the eye ends your knifemaking.
What we like
Full face coverage, protects hairline to chin from sparks and debris
Adjustable ratchet headgear stays stable through a grinding session
Lincoln Electric is the standard brand professional shops stock
What to know
Clear shield scratches over time and eventually needs replacement
Doesn't replace safety glasses; wear both for layered protection
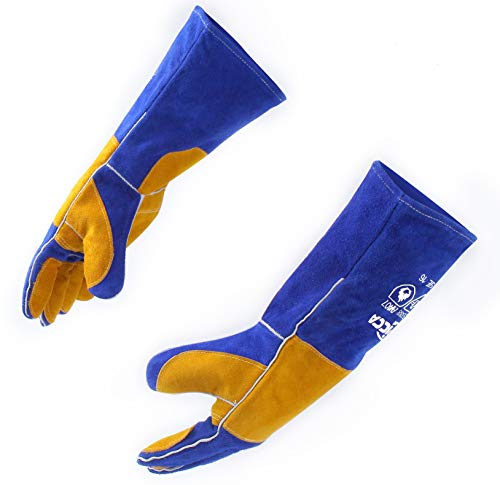
Forge gloves extend to the mid-forearm and resist radiant heat a regular work glove won't survive near a propane forge. The RAPICCA model is widely recommended in bladesmith communities for the balance of heat resistance and enough tactile feel to safely move hot steel in and out of the forge.
What we like
Extends to mid-forearm, protects from radiant heat during forge work
Widely recommended in bladesmith communities for heat-versus-feel balance
What to know
Reduces dexterity; not for grinding, only for forge and heat treat
Leather stiffens over time; break them in before forge day
Most people assume knifemaking requires a forge, an anvil, and years of blacksmithing experience. That’s bladesmithing, a different discipline. Stock removal, the beginner’s path, is simpler: you start with flat bar stock, grind it into a blade shape, heat treat it, and shape a handle. Every tool cuts or grinds. No fire required until heat treatment.
This is what your first 20 hours actually look like.
Hours 1–4: Design, layout, and profiling
Your first knife should be boring by design. A drop-point hunter or a simple utility blade (3 to 4 inch blade, full tang, no recurve, no complex filework). The more variables you eliminate on your first design, the more you learn about the one thing that actually matters: grinding a consistent bevel.
Start on paper. Draw the profile at full scale, cut it out, and trace it onto your steel bar with a Sharpie. This paper template will save you from grinding the wrong shape for two hours. Leave at least 1/8 inch of material outside your traced line; that’s your grinding allowance.
Then you cut the profile. On a 1×30 belt sander with a coarse belt (60 or 80 grit), work in short, controlled passes. You’re removing material to get close to your profile line, not trying to hit it exactly yet. Stop every 30 seconds and dip the steel in water; the 1×30 runs hot, and if the steel gets too hot to touch, you’ve already started degrading the grain structure you’ll need for heat treatment.
By hour four, you should have a rough profile that’s close to your design. It won’t be perfect. That’s exactly right.
Hours 5–12: Grinding the bevel
The bevel is the single hardest skill in stock removal knifemaking, and it’s where most beginners spend the most time and make the most mistakes. You’re grinding a long flat (or convex) slope from spine to edge, consistently, symmetrically, for the entire length of the blade.
Mark your centerline. Before any bevel grinding, use a marker to draw a line down the center of your blade’s edge. You’ll grind to this line from each side. When the marker line disappears, you’re at zero (the edge itself). If one side grinds through faster than the other, your angles are uneven.
Grind high, check often. Start your bevel higher on the blade than you think you need to. You can always grind more material; you can’t put it back. Check your progress by sight every few passes, and hold the blade up to a light to see where the grind lines are.
Plunge line matters more than you think. The plunge line is where your bevel meets the flat of the blade; it’s the visible line that runs perpendicular to the edge at the ricasso. A clean, straight plunge line is the mark of a controlled grind. Use a hand file against a flat stop to clean it up once you’re close.
The honest truth about hours 5-12: your first grind won’t be what you planned. The bevel will wander. One side will be steeper than the other. You’ll grind through your centerline in one spot and not reach it in another. All of this is normal and teaches you exactly what to fix on knife two.
Heat treatment is where the work pays off, or where mistakes catch up to you. For 1084 high carbon steel, the process is:
Normalize the blade 2-3 times: heat to non-magnetic (your magnet stops attracting, around 1475°F), then let it air cool. This relieves stress from grinding and refines the grain.
Harden: heat to non-magnetic again, then immediately plunge edge-first into warm canola oil (or Parks 50). The quench freezes the hard martensite structure. The blade comes out hard (glass hard, meaning it will snap if you flex it).
Temper: put the blade in a kitchen oven at 400°F for two one-hour cycles, letting it cool to room temperature between cycles. This reduces brittleness while keeping most of the hardness.
A few things that will go wrong on your first heat treatment and why they happen:
Blade warps in the quench. Almost universal on first knives. Quench edge-first (not flat), move the blade up and down rather than side-to-side in the oil, and make sure the blade is properly normalized first. A slight warp can be straightened immediately after the quench while the steel is above tempering temperature.
Soft spots on the edge. Usually from uneven heating; one spot was below critical temp when you quenched. Re-normalize, re-harden.
Cracks. A cracked blade is done; don’t try to use it. Cracks usually come from too slow a quench (steel cooled below Ms temperature before hardening) or from a grinding flaw that became a stress riser. Learn from it and move on to the next bar.
By now you have a hardened and tempered blade. Before touching the handle, clean the blade with sandpaper, starting at 120 grit and working up to 400 or higher. This removes scale from heat treatment and shows you any surface defects you want to fix before the handle locks everything in.
Handle attachment. Full-tang handles are two scales of material pinned or epoxied on each side. Drill your pin holes through the tang first (the hand drill works fine), then use those holes as guides to drill through the scales. Mix a two-part slow-cure epoxy, coat the mating surfaces, clamp firmly, and let it cure overnight. Don’t rush the epoxy.
Handle shaping. Once the epoxy is cured, shape the scales to the tang profile on your belt sander, then file and sand to your final shape. A comfortable grip tapers slightly toward the pommel, swells slightly in the middle, and sits naturally in your hand without hot spots. Round all edges; any sharp corner on the handle will eventually become a blister.
Final sharpening. Sharpen the edge by hand on a medium stone (around 1000 grit), then a fine stone. A consistent 20° angle per side is a good starting point for a utility blade. You can tell the edge is sharp when it catches light uniformly along the entire length.
What changes between knife one and knife five
Knife one teaches you that grinding is harder than you thought, heat treatment is more forgiving than you feared, and handle work is surprisingly satisfying. Knife five is faster, cleaner, and the bevel is something you can look at without apology.
The jump happens because your hands learn the grinder before your head does. The first knife is a series of conscious decisions: how much angle, how much pressure, when to stop. By knife five, the decisions are mostly automatic, and you spend your conscious attention on the design choices that make a knife good rather than the mechanical ones that make it finished.
A few things that accelerate the curve:
Post every knife on r/bladesmith before finishing. The feedback is specific, honest, and delivered by people who made the same mistakes. A single comment about your grind geometry can save you three knives of trial and error.
Watch your own hands. Film one of your grinding sessions on your phone, set it up to show your hands and the blade. You’ll see your angle drift in the first 10 seconds and understand immediately what to fix.
Build the same design twice. Your second drop-point hunter will be measurably better than the first, and you’ll know exactly why. Variation between designs makes it harder to isolate what improved.
At hour 20, you have a knife you made. It has flaws. Hold it up and look at it anyway.
Save your money
What you don't need yet
Beginners get pressured to buy a lot of stuff that doesn't help them play
better. Here's what we'd skip on day one.
A 2×72 belt grinder — The WEN 1×30 handles your first 10-15 knives. Buy the 2×72 after you know what you're grinding toward.
An electric heat treatment kiln — Overkill for 1084 and O1. A propane forge works perfectly until you start working stainless steels.
Exotic steels (S30V, M4, 154CM) — These require precision kilns and specialty quench media. Learn on 1084 first; it teaches more with less complexity.
A drill press — A handheld drill works fine for handle pin holes on your first few knives. Add one later for repeatability.
Bladesmithing tools (hammer, anvil, coal forge) — Stock removal doesn't require any of this. You're grinding, not forging. Save the forge setup for year two.
First week
Your first seven days
A short, real plan to get from gear-on-doorstep to actually playing.
Order safety gear first; don't start grinding until you have a face shield and respirator in hand. · Buy
Print a knife profile template on paper, cut it out, and trace it onto your steel with a marker. Your first design should be simple: a basic drop-point hunter or utility blade, nothing fancy. · Action
Practice your bevel grind on a scrap piece of steel before touching your actual blank. Bevel grinding is the hardest skill; give yourself a few warm-up passes. · Action
Join r/bladesmith and read the pinned beginner FAQ. Post a photo of your finished blank before heat treatment; the community gives honest, specific feedback. · Action
r/bladesmith · Active, friendly beginner community with a pinned beginner FAQ
FAQ
Common questions
Should I start with stock removal or bladesmithing?
Stock removal, without question. Forging requires learning hammer technique, fire management, and how to move hot steel simultaneously. Stock removal lets you focus on just two skills: grinding and heat treatment. After 5-10 stock removal knives, you'll know whether you want to add forging to your practice.
How much does it cost to start knifemaking?
For stock removal, expect $280-480 total: a 1×30 belt sander ($70), a single-burner propane forge ($180), safety gear ($50), steel bar stock ($20-30), and handle materials ($20-30). Files, pins, and epoxy bring it to about $400 when you add it all up.
Can I heat treat with just a propane torch?
For small blades (under 4 inches), a MAPP or propane torch can work for 1084. It's harder to heat evenly and easier to overheat the edge; a torch heats a spot, a forge heats the whole blade. Use a forge if you can; use a torch only if you can't set up a forge yet.
What's the best beginner knife design?
A simple drop-point hunter or utility knife with a full tang: 3-4 inch blade, no filework or complex geometry. The less complicated your first design, the more you'll learn about the fundamentals. Save the bowie and the recurve for knife 5 or 6.
How long does it take to make a first knife?
Expect 15-25 hours for your first knife, spread over several sessions. By knife 5, that same design takes 6-8 hours. The time drops dramatically as your grinding efficiency improves.
Do I need to anneal the steel before grinding?
If you buy 1084 bar stock as-annealed from a knifemaking supplier (most ship this way), you don't need to re-anneal before grinding. If you're using steel from a recycled source like old sawblades or files, normalize it 2-3 times to relieve stress before you profile.
r/bladesmith — Active beginner community. Pinned FAQ covers heat treatment, steel selection, and first knife design. Post your work-in-progress for honest, specific feedback.
Walter Sorrells (YouTube) — The best beginner knifemaking channel on YouTube. His stock removal intro series is the definitive starting point: patient, detailed, no fluff.
BladeForums.net: Shop Talk — The oldest and most comprehensive knifemaking forum. The Shop Talk sub-forum has answered every beginner question you'll have. Search before posting.
American Bladesmith Society — The guild for serious bladesmiths. Their Journeyman and Master Smith certifications are the profession's credentials. Check their school listings for hands-on instruction.
The Knife Network — Secondary forum with active supply and tutorial sections. Good for sourcing steel and handle materials in small quantities.
As an Amazon Associate, JustBeginning earns from qualifying purchases.
We may also earn commission from other affiliate programs linked on this
page. Editorial recommendations are independent; we don't choose
products based on commission rates.
Product prices and availability are accurate as of the date and time
indicated and are subject to change. Any price and availability
information shown on Amazon at the time of purchase will apply.
Our top pickWEN 6515T 1" x 30" Belt and Disc Sander

 Best starter