Floral arranging looks expensive on Pinterest. It doesn't have to be. The real first-purchase decisions aren't about flowers — they're about mechanics: frogs vs. floral foam vs. chicken wire, and proper shears vs. kitchen scissors. Get those two right and your first arrangement will surprise you.
By Colin B. · Published May 24, 2026 · Last reviewed June 10, 2026
Chikamasa B-500SF Florist Scissors
— Professional florist shears that cost $30 and last forever — the single tool that changes how long your flowers live.
Shears, a pin frog, a vase, and a conditioning bucket put you fully set up for under $150. Flowers are the ongoing cost — budget $15-25 per trip to the grocery store.
We earn commission on qualifying Amazon purchases — see our
affiliate disclosure.
Price tiers and budget totals shown above are editorial estimates;
actual Amazon prices vary.
At a glance
Our top pick in each category
The fastest path through this guide — each best-starter pick by category.
Scroll for the budget and upgrade alternatives.
Royal ImportsRoyal Imports Flower Acrylic Vases Cylinders - Decorative Centerpiece for Home or Wedding - Non Breakable Plastic, 1-Set of 3 Sizes: 4", 5", 6" - Clear
Your grocery store flowers are fine for learning. Trader Joe's and Whole Foods sell stems cheaply — a $15 mixed bunch has enough material for your first three arrangements. Save the wholesale market for once you know what styles you love.
Buy florist shears before anything else. Regular scissors crush stem tissue, blocking water uptake, and your flowers will die in three days instead of eight. One $25 pair of bypass shears is the highest-ROI purchase in this entire guide.
The mechanics decision — pin frog, floral foam, or chicken wire — is real. Start with a pin frog (kenzan). It's harder at first, but it teaches you stem angle and balance in ways foam hides. And unlike foam, you'll never throw it away.
The single most important tool in your kit, and the most commonly wrong first purchase. Regular scissors crush stem cells and block water uptake — your flowers will last half as long as they should. You need bypass action (two curved blades that cross), not anvil action (one flat blade crushing down). A good pair of florist shears costs $20-35, will outlast a hundred arrangements, and is the reason a florist's grocery-store flowers look better than yours.
Best starter
Chikamasa
B-500SF Florist Scissors
$14.99 as of Jun 22, 2026
★★★★★Our rating· In Stock
Chikamasa scissors are what working florists actually use. The micro-serrated blade grips stems while the bypass action makes a clean cut without crushing vascular tissue — which is what kills flowers early. Sharp out of the box, easy to clean, and comfortable for extended conditioning sessions. Under $30 and worth every cent.
What we like
Micro-serrated blade grips slippery wet stems while cutting
Bypass action cuts cleanly without bruising vascular tissue
Built for hours of use — comfortable spring mechanism
What to know
Can't be resharpened — replace when dull after heavy use
Spring tension takes getting used to vs. standard scissors
If budget is the constraint, Fiskars makes reliable bypass shears under $20 that do the job correctly. Bypass action means clean cuts, the grip is comfortable, and the blade is sharpenable. Not as refined as the Chikamasa, but meaningfully better than household scissors.
What we like
Under $20 and genuinely bypass-action — not anvil
Sharpenable blade extends useful life past the price
Fiskars sizing fits most hand sizes comfortably
What to know
Blade alignment drifts over time — needs occasional adjustment
Less comfortable than Japanese florist scissors for long sessions
Some florists prefer a straight knife to scissors for conditioning cuts — easier to control the angle and the blade stays sharp longer. Most useful when conditioning large batches (30+ stems) where a knife is faster than opening and closing shears. The learning curve is real: wet knives slip.
What we like
Blade angle is easier to control for precise 45-degree cuts
Faster than scissors for conditioning large stem batches
What to know
Real cut risk when wet — need a cut-resistant glove
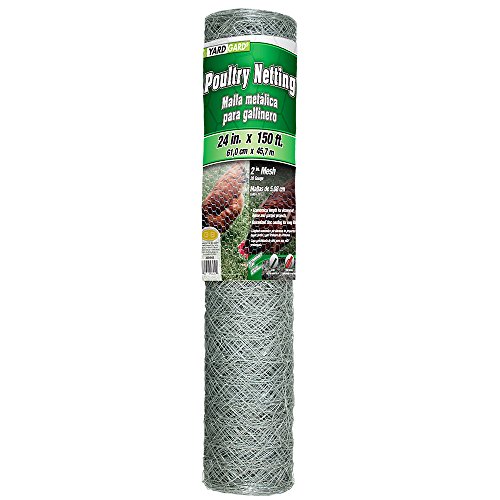
This is the decision most beginner guides skip, and it shapes what kind of arranger you become. Three options: a pin frog (kenzan) grips stems with metal pins, is reusable forever, and teaches you real stem mechanics; floral foam (Oasis) is beginner-friendly but single-use and flagged for environmental impact; crumpled chicken wire is the reusable middle ground most professional florists use for large vessels. Start with a kenzan. Foam is tempting but trains bad habits.
Floral Mechanics — what's the difference?
A few common shapes, each making a different trade.
Pin Frog / Kenzan
Reusable forever. Teaches real stem mechanics. The professional standard.
Reusable
Yes
Eco impact
Zero
Learning curve
Moderate
Best for Beginners who want to learn properly; Ikebana-style designs; most vases
Tradeoff Steeper first-arrangement curve than foam
The kenzan is the starting point of Ikebana and the honest professional's choice. Dense metal pins grip stems firmly at any angle without chemicals or single-use waste. Harder to master than foam for the first arrangement, but it teaches stem angle, weight, and balance in ways foam never will. Buy one 3-inch frog — it fits most cylinder vases and lasts years.
What we like
Reusable indefinitely — buy once, use forever
Teaches real stem mechanics: angle, balance, focal points
No chemicals, no waste, no eco-debate
What to know
Steeper learning curve than foam for first few arrangements
Pins are sharp — needs careful handling when cleaning
Oasis foam is the most beginner-friendly mechanic — it holds stems at any angle, is forgiving of mistakes, and fits any vessel once trimmed. The real tradeoffs: single-use, doesn't biodegrade, and increasingly avoided by professional florists. Fine for your first handful of arrangements while you build confidence with stem placement.
What we like
Holds stems at any angle with zero practice required
Fits any vessel after a quick trim with a knife
What to know
Single-use, doesn't biodegrade — real environmental cost
Dry foam crushes stems; must be fully soaked before use
Crumpled into a ball and dropped into a vase, chicken wire holds stems at precise angles without chemicals or single-use waste. Professional florists use this or caging tape for large installations. More fidgety to set up than foam, but reusable indefinitely and excellent practice for reading stem angles before you commit.
What we like
Reusable indefinitely — wash and re-crumple between uses
No chemicals; eco-friendly alternative to floral foam
What to know
Cut wire edges are sharp — gloves required when shaping
Your vessel shapes your design before you add a single stem. Tall cylinders suit linear arrangements; low bowls require kenzan work and read beautifully on dining tables; bud vases are the no-effort win for a single grocery-store dahlia. Start with clear glass — it's forgiving and shows off stem work. Add low bowls and specialty ceramics once you know which styles you enjoy making.
Best starter
Royal Imports
Flower Acrylic Vases Cylinders - Decorative Centerpiece for Home or Wedding - Non Breakable Plastic, 1-Set of 3 Sizes: 4", 5", 6" - Clear
$22.99 as of Jun 22, 2026
★★★★★Our rating· In Stock
The classic cylinder is the most forgiving vessel for beginners — straight walls don't fight your design. Kingrol's clear acrylic versions are shatterproof, show off your stem work, and hide mechanics cleverly if you fill the bottom with stones. Order two or three sizes to practice proportion with the same flowers. The starter vessel you'll reach for every week.
A collection of ceramic bud vases at different heights is the lowest-stakes way to display what you pick up at the market. One perfect stem per vase, grouped together, looks intentional. Also the fastest way to use odd stems left over from a full arrangement.
What we like
Zero mechanics needed — drop one stem and it looks designed
Grouped on a shelf or windowsill they look gallery-curated
What to know
Too narrow for most mechanics — pin frogs won't fit
Ceramic glazes vary; matte online can arrive glossy
The low wide-mouth bowl is where kenzan work really shines. You see the pin frog under the water line and the design reads completely differently from a vase arrangement — more Ikebana, more intentional. More technically demanding than a cylinder, but the geometry is satisfying once you crack it.
What we like
Pairs perfectly with a pin frog — the definitive kenzan vessel
Low profile works on dining tables without blocking sight lines
What to know
Shallow water volume — requires daily topping up
Less forgiving of stem placement than a tall cylinder
What happens to stems in the first hour after cutting determines how long your arrangement lasts. Professional conditioning isn't complicated, but it's different from what most people do at home: cut stems at 45° and get them into water immediately, strip foliage below the waterline, add flower food, and let them rest in a cool dark place overnight before arranging. This step adds 3-5 days to the life of any arrangement. A tall conditioning bucket is the piece most beginners don't know they need.
Best starter
Drephia
Tall Plastic Florist Buckets (4-pack)
$28.36 as of Jun 22, 2026
★★★★★Our rating· Only 13 left in stock - order soon.
Tall tapered plastic buckets purpose-built for conditioning cut flowers — the same profile professional florists use. Cut stems at 45° and drop them straight in immediately after cutting: no air exposure, no counter wait. A four-pack means you can sort by flower type. This is the tool that explains why florist flowers outlast yours.
What we like
Tall taper profile holds long stems upright without flopping
4-pack lets you sort flower types during conditioning
What to know
Lightweight plastic tips easily when full — set on a flat surface
No handles — grip from the top rim when moving a full bucket
Flower food contains biocide, acidifier, and sugar — the three things cut flowers actually need. More effective than home remedies (copper pennies and bleach work marginally but not as well). One sachet per liter of vase water, refreshed every two days.
What we like
The professional standard — what every florist uses
100-pack covers a full season of weekly arranging
What to know
Over-dosing causes leaf burn — follow the ratio exactly
Doesn't extend life past ~10 days for most cut flowers
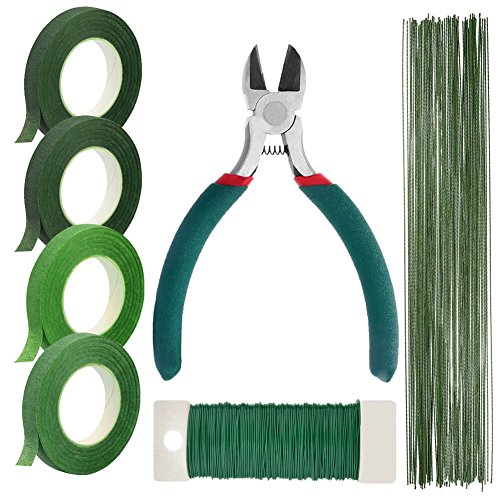
Stem wire lets you extend short stems, support heavy blooms (dahlias flop otherwise), and build wired designs. Floral tape bonds to itself when stretched and wrapped under tension — it doesn't stick like normal tape. Together they unlock most formal arrangement techniques for under $15.
What we like
Wire + tape unlock corsages, wired stems, and extension
Under $15 for a kit covering most beginner techniques
What to know
Floral tape requires tension to bond — takes practice
Wire gauges vary; not every piece in the kit will suit you
Dried arrangements are a completely different mechanic from fresh — no water, no conditioning, no time pressure. The tradeoffs: you're choosing from what's already dried (or drying it yourself, which takes days), and the palette tends toward beige, blush, and earthy tones. The upside: arrange once and it stays beautiful for months. Pampas grass, bunny tails, dried lavender, and silica-preserved roses are the four starting points. Zero mechanics needed for most dried designs.
Best starter
Deco 79
Dried Pampas Grass Natural Foliage
$21.90 as of Jun 22, 2026
★★★★★Our rating· In Stock
Pampas grass is forgiving, dramatic, and lasts years. Zero mechanics required — drop into a wide-mouth vessel, fan out the plumes, and you have an arrangement. Deco 79 stems come in several natural colorways. Trap to avoid: buy the largest diameter and tallest stems available. Undersized pampas looks weak in real spaces.
What we like
Zero mechanics — drop in a vessel and it looks designed
Lasts years with no water, no maintenance, no dying
What to know
Sheds if disturbed — needs a low-traffic, vacuumable spot
Smaller sizes disappoint — order the largest stems available
Bunny tails, dried statice, dried lavender, and wheat are the building blocks of a classic dried arrangement. Individually cheap, beautiful in clusters, available pre-dried on Amazon. Pair with pampas for an instant shelf display under $25 total.
What we like
Instant dried palette — no drying time required
Pairs beautifully with pampas for a complete shelf display
What to know
Fragile stems break in rough shipping — inspect on arrival
Color fades after 12-18 months even without direct sunlight
★★★★☆Our rating· Only 1 left in stock - order soon.
The professional way to dry flowers without losing color or shape. Pour silica gel into a container, bury blooms face-down, cover and seal, wait 48-72 hours. Garden roses, dahlias, and zinnias come out looking almost fresh. Reusable after baking out moisture at 250°F for an hour.
What we like
Preserves color and shape that air-drying destroys
Reusable indefinitely — bake out moisture and repeat
What to know
48-72 hour wait vs. instant results from pre-dried bundles
Needs a sealed container per batch; adds to setup cost
Your first arrangement session — and what happens after
Floral arranging clicks faster than you'd expect. Here's what to actually do your first weekend, the mechanics decision most guides skip, and how to keep getting better.
Floral arranging has a reputation as a delicate, expensive hobby practiced by people with professional training and $300 worth of peonies. None of that is true when you’re starting out. The real barrier isn’t flowers or talent — it’s one piece of technical knowledge that most beginner guides skip over entirely: how mechanics work.
Once you understand why a pin frog beats floral foam, and why a $25 pair of florist shears is the highest-return purchase you’ll make, the rest of the learning curve is just practice and taste.
This is what your first weekend actually looks like.
Before you touch a flower: conditioning
The single most common reason beginner arrangements die early is skipping this step. Most people unwrap a grocery bunch, snip a little off the stems, and drop everything in a vase. That approach loses you 3-5 days of vase life.
Here’s what to do instead:
Fill your conditioning bucket with cool water (room temperature, not cold) and add a flower food sachet. This is your staging area.
Recut each stem at a 45-degree angle — ideally underwater or immediately into water after cutting. The angle matters: a flat cut sits flush against the bottom of a vase and blocks water uptake. A 45-degree cut keeps the vascular tissue open.
Strip all foliage below the waterline. Any leaf sitting in water will rot, clouding the water and producing bacteria that kill the other stems.
Let them rest overnight in a cool, dark room. A cooler environment slows respiration. Professional florists condition flowers in walk-in coolers. Your basement or a cool garage works fine. Even two or three hours makes a visible difference.
This sounds like a lot, but it’s maybe 15 minutes of work. The payoff is arrangements that last a week or more instead of three days.
Your mechanic is what holds stems in position inside your vessel. This is where most beginner guides either skip the decision entirely or recommend floral foam by default. We’re going to explain all three options, because the choice is real.
Pin frog (kenzan): A flat disc of dense metal pins, typically brass. You press stems down onto the pins, which grip at any angle. Reusable indefinitely, no chemicals, no waste. The tool used by Ikebana practitioners and an increasing majority of professional Western florists. Harder to use in your first arrangement — you have to think about stem angle, balance, and weight in ways foam lets you ignore. That’s also why it’s the better way to learn. You can’t hide bad composition behind foam’s compliance.
Floral foam (Oasis): Sponge-like green blocks that you soak in water and trim to fit a vessel. Stems push in at any angle. Very forgiving. The tradeoffs: single-use, doesn’t biodegrade, increasingly flagged by professional florists for environmental reasons (it sheds microplastics). Fine for your first arrangement if you want to minimize frustration; harder to justify in bulk once you know what a kenzan can do.
Chicken wire: Galvanized wire crumpled into a ball and dropped into a vase. Surprisingly effective. Reusable, no chemicals, the choice for large installations where a kenzan is too small. More fidgety than foam to set up the first time.
Our recommendation: start with a pin frog. Your first arrangement will take longer and feel less forgiving. The second will feel better. By your fifth, the kenzan will feel obvious.
Your first arrangement
Set up a cylinder vase with your pin frog at the bottom. Fill with cool water to about two inches below the rim.
Start with your focal flower. This is the stem the eye goes to first — a large rose, a sunflower, a peony. Place it in the center of the frog, perpendicular to the surface. This is your anchor.
Add secondary focal flowers at slightly different heights and angles. Odd numbers (3, 5) look more natural than even numbers. The classic triangle composition — one stem tall in the center, two shorter stems at angles on either side — is a reliable starter template.
Fill in with texture flowers. Statice, baby’s breath, wax flower, and similar small-clustered stems fill gaps and soften the arrangement. They can sit lower and denser than focal flowers.
Add linear elements last. Snapdragons, larkspur, or any stem with significant vertical height. These define the silhouette of the arrangement and give it movement.
Step back and look at it from a foot away. The front-facing view is what matters. Gaps that look obvious up close often disappear from viewing distance. Resist the urge to keep adding stems — arrangements that run out of negative space look crowded, not lush.
Stems keep falling off the frog. Cut the stem shorter and push straight down before angling. Stems that are too long wobble before they grip. If a stem repeatedly falls, it may have a woody base that the pins can’t grip — try scoring the bottom of the stem with your shears first.
The arrangement looks flat. Varying stem height is the fix. Take the tallest element and cut it down, or find something with significant vertical length to add. A difference of six inches between the tallest and shortest stem reads as a composition. A difference of two inches reads as a flat mistake.
Flowers wilt within two days. Most likely cause: the stems weren’t conditioned overnight, or there’s foliage in the water. Pull the arrangement, recut all the stems, strip any submerged leaves, change the water with fresh flower food, and reassemble. Flowers that wilted from dehydration (not disease) will often recover.
The arrangement looks professional on the front and chaotic on the back. That’s normal. Work from the front. Rotate the vase occasionally while assembling to check other angles, but the primary view is the view.
After the first arrangement: what to learn next
The fastest way to improve is to keep a dead arrangement around for a few extra days and study it. Which flowers lasted longest? Which wilted first? Foliage often outlasts flowers. Hardy carnations and chrysanthemums survive a week after the focal roses have given up. That information tells you what to buy more of and what to treat with more care.
Dried florals are worth trying in parallel. Pampas grass, dried bunny tails, and wheat require no mechanics — just a wide-mouth vessel and some positioning. They last months or years. Making a dried arrangement gives you a confidence boost with no time pressure, and the aesthetic is completely different from fresh work.
Try a low bowl. The compote or low wide-mouth bowl is a different challenge from a cylinder. The kenzan sits exposed, the design has to work from all sides (not just the front), and the geometry is more demanding. It’s also more rewarding. A good low arrangement looks like it took professional training. It didn’t — it just took one or two attempts.
Once you’ve made ten to fifteen fresh arrangements, consider a single hands-on class or workshop. You’ll get far more from it than you would have cold, because you’ll know exactly which questions to ask.
Save your money
What you don't need yet
Beginners get pressured to buy a lot of stuff that doesn't help them play
better. Here's what we'd skip on day one.
A full kenzan / frog collection — One 3-inch pin frog fits most cylinder vases. Buy more sizes after you know which vessel shapes you return to.
Floral foam in bulk — Try a pin frog first. You may decide you don't want foam at all, and the environmental cost makes large stockpiles hard to justify.
Wholesale flower market access — Grocery store and farmer's market flowers are perfectly good for learning. Wholesale typically requires a business license most hobbyists don't have.
Arrangement classes before trying at home — Watch YouTube, practice two or three arrangements with grocery flowers, then take a class. You'll get 10x more from it once you know what questions to ask.
A large specialty vessel collection — Three cylinder sizes cover the entire learning period. Specialty ceramics come once you know what arrangements you want to keep making.
First week
Your first seven days
A short, real plan to get from gear-on-doorstep to actually playing.
Order florist shears so they arrive before the weekend. · Buy
Pick up a $15-20 mixed bunch at Trader Joe's or Whole Foods. Aim for three stem types: a focal flower (rose or sunflower), a filler (statice or baby's breath), and a linear element (snapdragon or larkspur). · Action
Condition your stems the night before: recut at 45° and immediately into cool water, strip all foliage below the waterline, add a flower food sachet, and store overnight in a cool room. · Action
Try your first arrangement with a pin frog in a cylinder vase. Start with the focal flower in the center, build out with fillers, and use linear elements to create height. · Action
Make one dried arrangement with pampas grass — no mechanics needed, instant confidence. · Buy
Photograph the process, not just the result. Before-and-after shots teach proportion and color balance faster than any tutorial. · Action
FAQ
Common questions
What's the difference between a pin frog, floral foam, and chicken wire?
All three hold stems in place inside a vessel. A pin frog (kenzan) uses dense metal pins — reusable, eco-friendly, used by professional florists. Floral foam (Oasis) is beginner-friendly, but single-use and not biodegradable. Chicken wire crumpled into a ball is the reusable middle ground. We recommend starting with a pin frog.
Do I need to buy expensive flowers to learn?
No. Trader Joe's and Whole Foods sell stems that work perfectly for learning. A $15-20 mixed bunch gives you enough material for multiple arrangements. Expensive flowers are for once you already know what you're doing and want the result to justify the cost.
Why do I need florist shears — can't I use regular scissors?
Regular scissors crush stem tissue, blocking water uptake at the cut point. Your flowers will die 3-5 days earlier than they should. Bypass shears (or a sharp knife) make a clean cut that stays open. This is the most common and most fixable reason beginner arrangements don't last.
How long will a fresh arrangement last?
With proper conditioning and flower food: 7-10 days for most grocery store flowers. Without conditioning: 3-5 days. Hardy varieties like chrysanthemums and carnations can go 2 weeks. Delicate varieties like anemones and sweet peas are done in 5-6 days no matter what you do.
Should I start with fresh or dried flowers?
Both are worth trying in your first week, for different reasons. Fresh flowers teach you mechanics — cutting angles, conditioning, stem placement. Dried arrangements (especially pampas) give you instant low-stakes confidence. Many arrangers end up doing both regularly.
What's the single biggest mistake beginners make?
Not conditioning stems before arranging. Most people unwrap a grocery bunch and put it straight into a vase. An overnight rest in cool water after a fresh cut extends arrangement life by days. It takes 10 minutes to set up and is the highest-return habit in the hobby.
Floret Flower Farm — Erin Benzakein's farm and blog. The most thorough beginner-to-advanced resource on growing and arranging cut flowers, with deep guides on conditioning, mechanics, and seasonal varieties.
American Institute of Floral Designers (AIFD) — The professional credentialing body for floral designers. Their educational content covers mechanics, color theory, and design principles at a serious level.
Society of American Florists — Industry organization with consumer-facing care guides — especially good for understanding why specific conditioning steps matter at the chemistry level.
Françoise Weeks — Belgian botanical floral designer based in Portland. Her video tutorials on structural technique are some of the best free instruction available anywhere.
r/florists — Active community of professional and amateur florists. Excellent for sourcing questions, mechanics advice, and identifying unusual flowers.
As an Amazon Associate, JustBeginning earns from qualifying purchases.
We may also earn commission from other affiliate programs linked on this
page. Editorial recommendations are independent; we don't choose
products based on commission rates.
Product prices and availability are accurate as of the date and time
indicated and are subject to change. Any price and availability
information shown on Amazon at the time of purchase will apply.


 Best starter