YouTube overlanding is $80,000 trucks and months-long expeditions. Real overlanding is a stock SUV, a few pieces of recovery gear, and a camping setup that fits in your trunk. Most beginners spend $800–1,500 on a first kit and have genuine adventure before they ever bolt on a lift kit.
By Colin B. · Published May 24, 2026 · Last reviewed June 10, 2026
A minimal kit — recovery boards, ground tent, satellite communicator — runs $600–900. Add a compressor fridge and portable power station and you're at $1,500–2,000. A rooftop tent alone adds $600–1,500 on top of that.
We earn commission on qualifying Amazon purchases — see our
affiliate disclosure.
Price tiers and budget totals shown above are editorial estimates;
actual Amazon prices vary.
At a glance
Our top pick in each category
The fastest path through this guide — each best-starter pick by category.
Scroll for the budget and upgrade alternatives.
Your stock vehicle handles more than you think. Before you spend money on lifts, bumpers, or light bars, spend 10 trips finding out what terrain you're actually drawn to. The stock suspension on most modern SUVs handles beginner-to-intermediate routes with no modifications whatsoever.
Recovery gear comes before comfort gear. A rooftop tent is wonderful. A compressor fridge is wonderful. Neither helps when you're stuck in mud with no cell service and no traction boards. Buy safety and recovery first, then layer in comfort.
Plan your first trips within two hours of home. Close to home means you can get towed if something goes wrong, you learn your vehicle's limits without real stakes, and you find out what you're actually missing before you buy it.
The gear
What you actually need
Recovery Gear
Getting stuck is part of overlanding — especially early on. The question isn't whether it'll happen; it's whether you have the gear to get yourself out. Traction boards handle 80% of real-world stuck scenarios: soft sand, wet grass, shallow mud, icy inclines. A hi-lift jack handles the rest and doubles as a come-along in a pinch. Buy recovery gear before anything else on this list.
Best starter
BUNKER INDUST
Recovery Traction Boards (pair)
$87.99 as of Jun 22, 2026
★★★★★Our rating· In Stock
Budget traction boards that handle the stuck scenarios most beginners encounter — loose dirt, wet grass, shallow mud. Plant them under the driven wheels, drive over them, pack them back up. Lighter than MAXTRAX and about 70% as capable at 30% of the price. The right starting point before you know how often you'll actually need them.
What we like
Handles 80% of real stuck scenarios at 30% of MAXTRAX cost
Lightweight enough to store in a compact SUV cargo area
Bright orange coloring — easy to find if one flies into brush
What to know
Flexes under heavy trucks; best for SUVs and lighter rigs
Shorter bite pattern loses grip in very deep sand or mud
The original injection-molded recovery board that every other product is measured against. Thicker, more rigid, and dramatically better in deep sand and thick mud where budget boards flex and slip. When your trips get more remote — and they will — you upgrade to these. The bite pattern has been refined over 15 years of real use by military and emergency services.
What we like
Bite pattern developed with the Australian military — doesn't slip
Rigid enough for full-size trucks without flexing under load
Stacking pegs link boards to extend reach in deep ruts
What to know
$250+ per pair — overkill until you're doing remote multi-day runs
Heavier than budget boards; factor weight for smaller cargo areas
The most versatile recovery tool after traction boards. Vehicle stuck at an angle? Jack one side up and pack rocks underneath. Need to change a tire on a lifted rig? Hi-Lift. Need to pull toward a tree anchor? Hi-Lift with a strap. Buy the 48" version — the 36" model is too short for anything with a lift kit.
What we like
Works as a jack, come-along, and spreader — three tools in one
48" reach handles lifted trucks that stock jacks can't reach
What to know
Requires training on safe use — finger pinch risk if rushed
Heavy at 28 lbs; needs a dedicated mount to store on-vehicle
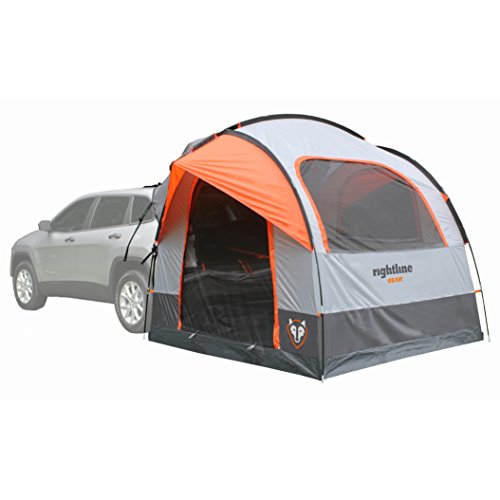
The rooftop tent vs. ground tent debate is overlanding's first philosophical question. RTTs are fast to deploy, get you off the ground, and look great in photos — but they add 100–150 lbs to your roof and cost $600–2,000. A tailgate tent sleeps you at ground level for under $200. For your first year, sleep on the ground and put the RTT money toward recovery gear. You'll know if you want an RTT after six trips.
Sleeping Setup — what's the difference?
A few common shapes, each making a different trade.
Ground / Tailgate Tent
Cheapest entry — sleep low, access your cargo area easily.
Cost
$150–250
Roof weight
Zero
Setup time
15–20 min
Best for Beginners, budget-focused, first-year overlanders
Tradeoff Ground-level; wet and buggy on damp or grassy sites
Fold-flat sleeping inside the cab — weatherproof and stealthy.
Cost
$200–600
Roof weight
None
Setup time
5–10 min
Best for Solo travelers, cold climates, urban stealth camping
Tradeoff Consumes most cargo space; needs flat-folding rear seats
Best starter
Rightline Gear
SUV Tent
$135.17 as of Jun 22, 2026
★★★★★Our rating
Attaches to your SUV or hatchback's open tailgate and pitches on the ground — half tent, half vehicle connection. Sleep at ground level, reach back into your cargo area at 2am without unzipping a full tent, and the whole setup costs under $200. Not glamorous, but it's the fastest way to find out if vehicle camping is for you before spending $1,000 on a rooftop tent.
What we like
Under $200 — true budget entry into vehicle-based camping
Tailgate connection lets you grab gear from cargo area at night
Packs into a carry bag; doesn't permanently live on your roof
What to know
Ground-level sleeping means wet grass and bugs on damp nights
SUV/hatchback only — pickup truck owners need a different option
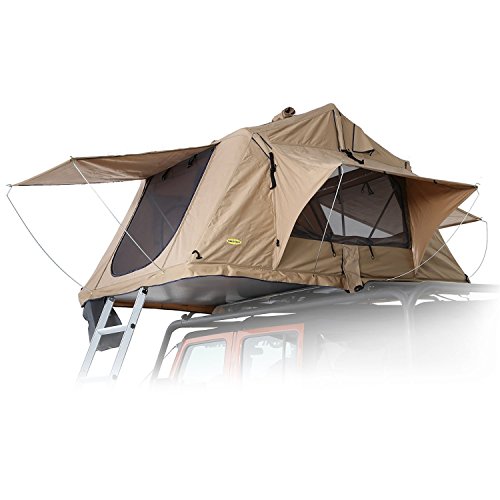
The entry point for rooftop tents without premium-brand markup. Opens in 60 seconds, sleeps two people on a 4-inch foam mattress, and panoramic windows give better airflow than any ground tent. At 140 lbs, confirm your roof rack's dynamic load rating before ordering. The Smittybilt is where most first-time RTT buyers land without regret.
What we like
4-inch foam mattress outperforms most ground sleeping setups
Opens in 60 seconds — faster than any free-standing tent
Panoramic windows on three sides for airflow and views
What to know
140 lbs affects highway fuel economy by 2–4 mpg
Needs a rated roof rack — adds another $300–800 to the budget
★★★★☆Our rating· Only 14 left in stock - order soon.
Overlanding doesn't always happen in warm weather, and getting cold at 2am in a remote canyon is genuinely miserable. The Outfitter Quest is rated to 0°F, works in an RTT, inside a tent, or in your cargo area, and ships at a price that doesn't sting. It's the sleeping bag you buy once for vehicle camping and use for years.
What we like
0°F rating handles cold-desert nights and shoulder-season camping
Double zippers let you vent the top without opening the whole bag
What to know
5 lbs — a vehicle camping bag, not a pack bag
Compresses only so far; takes real cargo space even stuffed
The dual-battery systems you see on YouTube ($800–2,000 installed) solve the same problem a portable power station solves for $500–700, without wiring anything into your engine bay. Start with a portable station. It powers your fridge, charges your devices, runs a CPAP if you need one, and moves to your campsite when you get out of the vehicle. Add a solar panel once trips stretch past two nights.
Best starter
Jackery
Explorer 1000 Portable Power Station
$$$
★★★★★Our rating
1002Wh of power in a suitcase-sized unit. Runs a 30-qt compressor fridge for 12–18 hours on a single charge, recharges off your vehicle's 12V outlet while you drive, and powers a CPAP if needed. No wiring, no installation — plug in, go. The 1000 is the right size for weekend trips: big enough to run a fridge overnight, manageable enough to lift into a cargo area.
What we like
Runs a compressor fridge 12–18 hours per charge — full overnight
Recharges via car outlet, wall, or solar — three input paths
No installation required — plug in and go from day one
What to know
22 lbs — manageable but awkward to lift solo into high cargo areas
14+ hours to recharge via 12V car outlet — plan your drive days
★★★★☆Our rating· Only 16 left in stock - order soon.
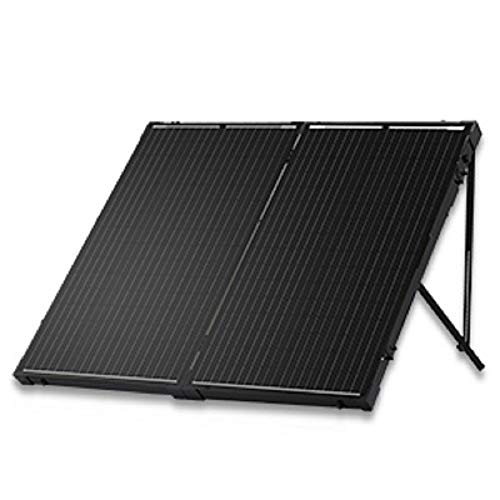
Drape it over the hood or prop it facing the sun and feed your power station while parked. A 200W panel adds 60–100Wh per hour in good sun — enough to offset the fridge's draw on a sunny day and extend off-grid range from two nights to three or four. Renogy's panels are well-built and the company has real US customer support.
What we like
Extends off-grid range by 1–2 days on a sunny weekend trip
Folds flat to store in cargo area between trips
What to know
Output drops sharply in cloud cover — a supplement, not a solution
Rigid panels can crack if driven with poorly secured on rough roads
A 12-volt compressor fridge is the single upgrade that makes overlanding feel like real camping instead of survival mode. It keeps food cold without ice, runs off your power station or vehicle battery, and costs about the same as six ice-chest trips where you burn money on bags of ice every day. At 30 quarts you fit a full weekend of food for two. You buy it once and never go back to ice.
Best starter
BougeRV
CRPRO30 12V Compressor Fridge 30-Quart
$319.99 as of Jun 22, 2026
★★★★★Our rating· In Stock
30 quarts of 12-volt cooling at a price that doesn't require justifying to a skeptical partner. Holds a weekend of food for two, gets to 0°F in freezer mode, and draws 40–45W at cruise — well within what a 1000Wh power station handles overnight. BougeRV has become the brand to beat for beginners: solid compressor, real warranty, and app connectivity.
What we like
Gets to 0°F in freezer mode — safe for meat, keeps ice cream real
40–45W draw works overnight with a 1000Wh power station
App-connected for temperature monitoring from inside the cab
What to know
Run off secondary power only — draining your start battery strands you
Lid rattles on rough roads without a bungee or prop arm to secure it
★★★★☆Our rating· Only 1 left in stock - order soon.
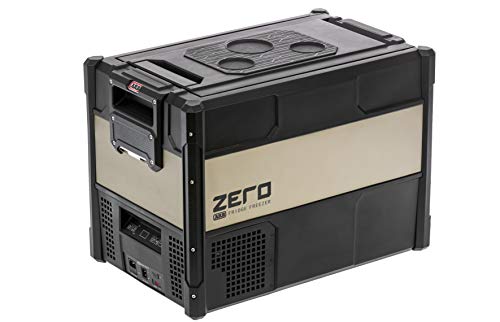
ARB makes the fridges that show up on the hardest expeditions on earth. The Zero 47L handles temperature fluctuations that budget compressors struggle with, the stainless steel interior resists mold and cleans in seconds, and the build tolerates the vibration that eventually kills cheaper units. This is the fridge you buy for two-week trips.
What we like
Stainless steel interior resists mold and cleans in seconds
Military-grade construction tolerates vibration that kills budget units
What to know
$700+ is a serious investment — the right upgrade, not a starter buy
Heavier than budget fridges; factor into weight distribution planning
Cell service ends roughly where the good terrain begins. The Garmin inReach Mini 2 sends your GPS coordinates to family, lets you text on any satellite, and has an SOS button that calls search and rescue worldwide. Buy this before a fridge. Before a tent. Before a rooftop rack. Getting stuck with no way to call for help is the only overlanding scenario with genuinely bad outcomes.
Best starter
Garmin
inReach Mini 2
$249.99 as of Jun 22, 2026
★★★★★Our rating· In Stock
Two-way satellite messaging and global SOS from a device smaller than a phone. Share your GPS track with family in real time, text from a canyon with zero cell signal, and hit the SOS button if the worst happens. The Mini 2 is the smallest inReach ever made — pocketable, clip-on, and the safety purchase we'd make before any comfort gear on this page.
What we like
Two-way satellite texting and SOS — works with zero cell signal
Live GPS track sharing so family knows your position in real time
Pairs with phone app for easier keyboard-style messaging
What to know
Subscription required — $15–50/month depending on plan
Battery lasts 1–14 days depending on tracking interval chosen
GMRS radios let vehicles in your group communicate on trails without burning data or cell service — essential for convoy driving. The GXT1050VP4 transmits across 50 channels, includes two handhelds with a charging cradle, and costs under $75 for the pair. If you ever do group trips, buy these before you leave your first trailhead.
What we like
Keeps your group connected on trails where cell service is gone
Two handhelds with charging cradle — ready out of the box
What to know
FCC GMRS license required ($35, no test, household-wide)
Line-of-sight only — canyons and dense trees kill the signal
Most beginners either overthink the gear or underestimate the terrain. Here's what you'll actually encounter — trip by trip — between packing your stock SUV and calling yourself a real overlander.
Overlanding has a reputation problem. The YouTube version involves $80,000 trucks, rooftop tents that cost more than most people’s first car, and expeditions to Patagonia. The real version — the version accessible to any person with an AWD crossover, two days free, and some curiosity — gets almost no coverage.
This is what your first five overlanding trips actually look like. Not the dream version. The real one.
Trip 1: The shakedown run
Your first overlanding trip should be boring. That’s not a bug.
Pick a forest service road within two hours of home that’s rated “high clearance, dry” — not technical, not recommended for 4x4 only. Download the route on Gaia GPS before you leave. Tell someone where you’re going and when you’ll be back.
Bring everything you’d bring car camping, plus one addition: traction boards in the cargo area. You probably won’t need them. That’s the goal.
You’ll notice three things on this trip that you couldn’t have read about in advance. First, your vehicle is louder on dirt than you expected — squeaks and rattles you’ve never heard. They’re almost always fine; you’re just not used to the noise. Second, corrugated dirt roads (the washboard effect) are fatiguing in a way smooth pavement isn’t. Slow down to 15–20 mph and the vibration decreases dramatically. Third, airing your tires down to 20–25 PSI transforms the ride. Do this before you hit dirt, not after. You’ll want a portable inflator to air back up before the highway.
The goal of trip one is to come home with a list of what you wish you’d had. That list is your gear roadmap.
Now you add an overnight. This is the trip where the gear decisions get real.
If you planned to sleep in a ground tent attached to your tailgate, you’ll learn how much you care (or don’t) about being at ground level. Wet grass, morning dew, the ambient sound of what might or might not be an animal — these either bother you or they don’t. You’ll know after one night.
The things that actually matter on your first overnight that don’t matter on a day trip:
Power management. Your phone is your GPS, your camera, your entertainment, and your emergency backup contact. A portable power station earns its keep on night one. Charge everything before bed and you’ll wake up with full batteries even after running the interior light for an hour.
Food and cold storage. A standard cooler loses to a compressor fridge the moment you spend 12 hours watching it fill with ice melt. You don’t need a fridge on trip two — but you’ll want to understand its value after spending $15 on ice that’s gone by morning.
Darkness. Overlanding campsites don’t have lighting. A good headlamp and one camp light make everything better. These cost $30 combined and weight almost nothing. Don’t skip them.
The most common mistake on the first overnight: packing for every contingency except boredom. A fire pit, a camp chair, and no phone signal for six hours is different from a quick hike. Some people love it immediately. Some need time to adjust. Either reaction is normal.
Trip 3: The first time things go wrong
Something will go wrong. That’s not pessimism — it’s the nature of driving vehicles on terrain they weren’t designed for. The question is whether it’s a story or a crisis.
Most first-time problems are minor: a flat tire on a dirt road, a wheel spinning in soft mud, getting slightly lost when a GPS route doesn’t match the actual terrain. All of these are manageable with basic preparation.
Traction boards earn their money here. Spinning a rear tire into a soft shoulder on a forest road is a 90-second recovery with traction boards and a 90-minute ordeal without them. Slide both boards under the driven wheels, drive over them slowly, pick them up. Done.
The Garmin inReach is why you don’t panic. When you’re genuinely unsure — stuck, vehicle trouble, or just uncertain about your route — being able to text your contact and say “I’m fine, I’m at these coordinates, I’ll be out by 6pm” is worth every dollar of the subscription. Peace of mind isn’t soft. It’s how you make good decisions instead of panicked ones.
After trip three, you’ll have a much clearer sense of what your vehicle’s actual limitations are. Most beginners discover their vehicle is more capable than they expected and they are more cautious than they expected. That’s the right combination.
Trips 4 and 5: Finding your style
By trip four, you know something about what overlanding means to you specifically. Some people are route chasers — they pick destinations first and figure out the gear needed to reach them. Some are camp builders — the destination barely matters; they want a good site to settle into. Some are vehicle people — they’re already thinking about their next modification.
This is when the upgrade decisions start making real sense. A rooftop tent sounds abstract until you’ve spent three nights ground camping in the rain. A compressor fridge sounds indulgent until you’ve done the math on ice costs and wasted food. An onboard air compressor sounds unnecessary until you’re airing back up at a trailhead with a $40 portable inflator that takes 8 minutes per tire.
The best upgrades solve problems you’ve actually had, not problems you’ve read about.
A few things that separate trip-four overlanders from trip-one overlanders:
You’ve learned your vehicle’s ground clearance limits by feel, not by spec sheet
You know which gear lives in the cargo area permanently vs. what gets packed per trip
You’ve found at least one route or region that calls you back — the beginning of a home territory
You’ve had one recovery situation that reminded you why you bought the safety gear first
Don’t upgrade everything at once. The $20,000 builds you see online took years. Each piece was added because of a specific gap on a specific trip. The people with those rigs know exactly why every dollar was spent. Build toward a problem, not toward a YouTube build.
What you’ll wish you’d known on trip one
Every overlander has a list. Here’s what appears on most of them:
Check your spare tire before leaving. Not when you need it — before.
Screenshot your route before going off-grid. Gaia GPS offline maps work; your cell signal doesn’t.
Bring more water than you think. Dust is dehydrating, remote areas are hot, and finding potable water on trail is unreliable.
Tell someone your route and return time. This is the free version of emergency comms. The paid version is the Garmin inReach.
The first night is always the hardest. Strange sounds, unfamiliar darkness, sleeping on new terrain. The second night is always better.
You’re not an overlander at trip five. But you’re something more useful: a person who knows what they need and can make decisions about gear, routes, and capability based on actual experience. That’s how the real builds start.
Save your money
What you don't need yet
Beginners get pressured to buy a lot of stuff that doesn't help them play
better. Here's what we'd skip on day one.
A lift kit — Your stock suspension handles more beginner terrain than you think. Lifts are year-two money — after you know what terrain you're actually chasing.
A winch — Dead weight 90% of the time. Traction boards and a hi-lift jack handle most solo recovery situations at 10% of the cost.
An onboard air compressor — A $40 portable 12V inflator handles airing back up just fine. Buy one once you're airing down for trails regularly, not before.
Light bars and aftermarket bumpers — Looks great, adds nothing to the experience of a first-year overlander. Put that money toward a satellite communicator instead.
Skid plates — Necessary for technical rock crawling — completely unnecessary for beginner routes. Protect your comms before you protect your undercarriage.
A dedicated overlanding vehicle — Your stock crossover or SUV handles more than you think. Learn the terrain before buying the truck you think you need to chase it.
First week
Your first seven days
A short, real plan to get from gear-on-doorstep to actually playing.
Download Gaia GPS or iOverlander and find beginner-rated routes within two hours of your home. · Action
Gaia GPS · Best mapping app for off-road routes — downloadable offline topo maps
iOverlander · Community-sourced campsite and waypoint database
Order traction boards before your first off-pavement trip. · Buy
Air your tires down to 20–25 PSI before hitting dirt. It transforms traction and ride comfort and costs exactly nothing. · Action
Browse r/overlanding and search 'first build' to see what people actually start with vs. what they dream about. · Learn
r/overlanding · Active community — honest first-build advice from people who've been there
Plan your first overnight trip close to home. No cell service required — that's the whole point. · Action
FAQ
Common questions
Do I need a 4x4 truck to go overlanding?
No. Most beginner overland routes are passable in an AWD crossover or SUV with decent tires. 4x4 becomes meaningful when you're tackling technical climbs, deep mud, or loose rock — terrain most first-year overlanders don't hit. Start with what you have and learn what it can and can't do before you buy a new vehicle.
How much should I spend on my first overlanding setup?
Plan for $600–900 for a minimal safety-and-recovery kit: traction boards, satellite communicator, ground tent. Layer in a compressor fridge ($280) and power station ($600) once you've done a few trips and confirmed you're serious. The $20,000 rigs on YouTube represent years of building, not a first purchase.
What's the difference between overlanding and off-roading?
Off-roading is about the vehicle challenge — rock crawling, mud, obstacles. Overlanding uses off-road capability to reach remote camping destinations. The drive is the means; the overnight experience is the point. Overlanding is slower, more self-sufficient, and more about where you end up than how technical the path was getting there.
Do I really need a rooftop tent?
No. A rooftop tent is a comfort upgrade, not a necessity. Plenty of experienced overlanders sleep in ground tents or inside their vehicle and have a better time than people with $2,000 RTTs who skipped recovery gear. Buy traction boards and satellite comms first, then decide on a sleep upgrade after a few real trips.
What are good beginner overlanding routes?
Search Gaia GPS or iOverlander for beginner or easy-rated routes near you. Forest service roads in any national forest are excellent starting points — legal, often maintained, and close to real civilization. Start with roads rated 'high clearance' before attempting anything listed as '4x4 required.'
Is it safe to overland solo?
Riskier than with a group, but manageable with the right prep. Solo overlanders who carry a satellite communicator, know basic recovery techniques, and stick to routes within their vehicle's capability have solid safety margins. The biggest risk is getting stuck with no one to help — recovery gear and sat comms address both.
Gaia GPS — The mapping app most overlanders rely on — downloadable offline topo maps, route sharing, community tracks. Download your region before you leave cell service.
iOverlander — Community-sourced database of campsites, water sources, and waypoints. Invaluable for finding where others have stopped and what conditions they found.
r/overlanding — Active subreddit with honest first-build advice. Search 'beginner build' and 'first rig' — the community calls out unnecessary spending better than most YouTube channels.
Expedition Portal — The original overlanding forum. Slower than Reddit but deeper — vehicle-specific build threads and gear reviews going back 15+ years.
Overland Journal — The long-running print and digital magazine. High-production travel stories, serious gear reviews, and the most thorough coverage of what expedition driving actually looks like.
Matt's Off Road Recovery (YouTube) — Real-world recoveries in the Utah desert. Watch before your first off-pavement trip — you'll see exactly what traction boards, hi-lift jacks, and snatch straps do in actual use.
As an Amazon Associate, JustBeginning earns from qualifying purchases.
We may also earn commission from other affiliate programs linked on this
page. Editorial recommendations are independent; we don't choose
products based on commission rates.
Product prices and availability are accurate as of the date and time
indicated and are subject to change. Any price and availability
information shown on Amazon at the time of purchase will apply.
Our top pickBUNKER INDUST Recovery Traction Boards (pair)

 Best starter