Every finished model started as flat sheets of plastic on a sprue. The gap between that sprue and a painted, detailed display piece isn't talent — it's the right tools and a few key techniques. Here's what you actually need to start building, and what can wait until you've finished your second kit.
By Colin B. · Published May 24, 2026 · Last reviewed June 11, 2026
A solid first build runs $65–130: one beginner kit, a quality sprue cutter, basic paints, and primer. Ongoing cost is cheap — kits are $15–50 each and last weeks of build time.
We earn commission on qualifying Amazon purchases — see our
affiliate disclosure.
Price tiers and budget totals shown above are editorial estimates;
actual Amazon prices vary.
At a glance
Our top pick in each category
The fastest path through this guide — each best-starter pick by category.
Scroll for the budget and upgrade alternatives.
Don't buy an airbrush until you've finished three kits. Rattle cans and brush painting will take you further than you expect, and learning to airbrush is its own separate skill curve that will distract from the actual modeling. Save the $200+ for when you know you're hooked.
Kit quality matters more than any tool you own. A Tamiya or Revell kit fits cleanly with almost no cleanup. A cheap off-brand kit has flash, bad mold lines, and vague instructions that make you quit. Spend $20–40 on a good first kit — it's the investment that determines whether you stick with it.
The sprue cutter is the one tool worth buying properly. A decent pair ($25–40) cuts clean, leaving barely a mark. A bad pair leaves white stress marks in the plastic that paint can't cover. Don't compromise here.
The gear
What you actually need
Starter Kits
Kit selection is your most consequential early decision, and the most common beginner mistake is choosing wrong. Two rules: buy Tamiya or Revell, and stay in the 1/48 aircraft or 1/35 armor category for your first build. Both scales have hundreds of kit options, excellent instructions, and the best molding quality in the hobby. Avoid anything labeled 'Snap' if you want to glue and paint. Avoid anything described as 'Master' or 'Expert' until your third or fourth kit. The sweet spot is a 60–100 part WWII aircraft or tank kit with Tamiya's name on it.
Starter Kits — what's the difference?
A few common shapes, each making a different trade.
1/48 Aircraft (WWII)
The classic beginner scale. Hundreds of kit options.
Part count
50–120
Typical build time
Weekend
Best brands
Tamiya, Hasegawa
Best for Absolute beginners, small display space, iconic WWII subjects
Tradeoff Small cockpit and wing parts require tweezers
The Tamiya 1/48 P-51D is the scale modeling equivalent of a well-written first novel — just complex enough to teach you real skills, just forgiving enough not to punish every mistake. Clean mold lines, brilliant instructions, and it builds into something genuinely impressive. Every modeler has a version of this build in their history.
What we like
Tamiya quality means near-perfect fit — no sanding or gap-filling required
Part count is manageable for beginners, build completes in a weekend
Iconic subject with hundreds of real-aircraft paint schemes to choose from
What to know
Cockpit must be painted before closing — easy to miss if you skip the instructions
1/48 scale parts are small; tweezers are needed for decal placement
If you're not sure modeling will stick, or if you want a build that doesn't require glue, Revell's Snap Tite kits are the honest answer. The VW Beetle goes together without cement, paints up cleanly, and finishes in a few hours. Not the most educational kit, but the right one if you're still deciding.
What we like
Snap-fit design needs no glue — approachable for complete first-timers
Pre-colored parts mean you can finish it without any painting at all
Under $20 — low commitment test of whether the hobby is for you
What to know
No cement means visible seam lines you can't fully sand away
Pre-colored plastic looks plastic — teach you technique it does not
★★★★☆Our rating· Only 2 left in stock - order soon.
Armor modeling is its own discipline, and once it grabs you, aircraft feel like practice. The 1/35 WWII German Panzer IV is a classic entry into this world — manageable part count, ideal surface for weathering techniques, and a subject you'll find paint references for anywhere. Save this for your second or third build.
What we like
Armor is the best category for learning weathering — more flat surfaces
Tamiya fit quality holds even on larger, more complex builds
Wide aftermarket support — photoetch, resin, decals from the community
What to know
Higher part count than 1/48 aircraft — budget a full weekend, not an afternoon
Tracks can be tedious on 1/35 tanks; some builders dread them
Scale modeling requires exactly three cutting tools: a sprue cutter (also called nippers or side cutters), a hobby knife, and a self-healing cutting mat. That's it for the first dozen builds. The quality of your sprue cutter has the biggest single impact on the look of your finished model — a cheap cutter creates white stress marks in the plastic that can't be painted over. Spend the $30 here and nowhere else.
Best starter
Tamiya
Sharp Pointed Side Cutter
$37.60 as of Jun 22, 2026
★★★★★Our rating· Only 4 left in stock - order soon.
Every serious scale modeler has a pair of these. The tapered blade gets flush with the sprue gate, the cut is clean, and the stress-mark problem that plagues cheap cutters essentially disappears. At around $30 it's the highest-impact purchase-to-result ratio in the whole hobby.
What we like
Tapered blade eliminates the white stress marks that ruin cheap-cutter builds
Used by professionals — the single biggest quality-of-life upgrade
Small pivot point gives precise control near delicate parts
What to know
Steel only — using on resin or metal ruins the edge fast
Not the sharpest possible option; upgrade to GodHands when obsessed
Every modeler needs a hobby knife for cleaning mold lines, scraping seams, and cutting away flash. The X-ACTO Z-Series #1 is the standard handle in the hobby, taking the widely available #11 blades. Buy a 100-pack of replacement blades separately — they dull fast, and a fresh blade is always better than a struggling dull one.
What we like
Industry-standard handle with widely available #11 replacement blades
Precision-balanced for fine control on small model parts
Available everywhere — easy to resupply locally or online
What to know
Replacement blades sold separately — budget for a 100-pack from the start
Handle is basic; longer sessions can cause hand fatigue
★★★★☆Our rating· Only 1 left in stock - order soon.
The step up from Tamiya that Gunpla builders and obsessive modelers graduate to. Single-blade design reduces blade flex for an even cleaner gate cut — almost no nub mark to clean up afterward. Noticeably sharper than the Tamiya on fine sprue runners. Save this for build five or six when you know you're staying.
What we like
Single-blade design leaves virtually no nub mark on clean sprues
Sharper out of box than most competition cutters at this price
The Gunpla community's consensus precision pick
What to know
Premium price for a single tool; Tamiya covers 90% of use cases
Single-blade requires careful angle — learning curve from double-blade cutters
Plastic models use solvent-based cement, not super glue — and the difference matters. Plastic cement actually melts and fuses the styrene parts together, creating a bond stronger than the plastic itself. It flows into seams by capillary action if applied correctly, making gaps nearly invisible. Tamiya Extra Thin is the universal recommendation because of that flow — you touch the applicator brush to the seam and it pulls in. You'll need putty for anything with a visible gap, but on quality kits you rarely need it.
Best starter
Tamiya
Extra Thin Cement
$9.89 as of Jun 22, 2026
★★★★★Our rating· In Stock
The green-cap bottle that every modeler has on their desk. Extra thin flows into assembled seams by capillary action — you press the parts together first, then touch the brush to the seam edge and it wicks in perfectly. No mess, no blobs, clean joins every time. Use on styrene plastic only.
What we like
Flows by capillary action — no blobs, no squeezing required
Fuses styrene permanently; the bond outlasts most other failure points
Built-in brush applicator is fine enough for precise placement
What to know
Acts fast — mistakes are permanent within 30 seconds of application
Styrene only; doesn't bond resin, photoetch, or metal parts
★★★★☆Our rating· Only 4 left in stock - order soon.
When two parts don't fit quite right — a common occurrence on budget kits — polyester putty fills the gap and sands smooth. Apply, let cure overnight, sand flush, prime over it. You won't need this often on Tamiya kits, but when you do, nothing else works as well for small seam lines.
What we like
Sands smooth after overnight cure — levels flush with adjacent plastic
Takes primer well; the repair disappears under paint
Small tube lasts dozens of builds; extremely economical
What to know
Shrinks during cure — requires a second thin application on deep gaps
Strong solvent smell; use in ventilated space or with a mask
You have three options for model paints: acrylic (water cleanup, beginner-friendly, the Vallejo and AK Interactive world), lacquer (fast-drying, durable, Tamiya's spray line), and enamel (the old standard, still great for washes and weathering). For your first kit, start with acrylics — they're forgiving and non-toxic, and Vallejo's Model Color line is the most consistent quality in the hobby. Whatever you buy, always prime first. Paint over bare plastic looks exactly like what it is: paint over bare plastic.
Best starter
Vallejo
Model Color Starter Set
$57.40 as of Jun 22, 2026
★★★★★Our rating· Only 11 left in stock - order soon.
Sixteen essential colors in Vallejo's dropper bottle system — the most beginner-friendly paint format in the hobby. Dropper bottles let you dispense exactly what you need without wasting paint or getting a dry crust in the cap. The colors thin with water, clean up with water, and are consistent from bottle to bottle. A set this size covers any WWII aircraft or armor subject you'd start with.
What we like
Dropper bottles eliminate wasted paint and dried caps — clean every session
Water-based acrylic cleans up with tap water; no solvents needed
16-color set covers the full range for WWII aircraft and armor subjects
What to know
Needs thinning for brush work — straight from bottle leaves visible brushstrokes
Slower drying than lacquer; between-coat waits run 30–60 minutes
AK Interactive's 3rd Generation acrylics are a serious scale-modeling paint line — not craft acrylics, not miniature wargaming paints. The 14-color Basic Starter Set covers the color wheel with colors designed for thinning and layering on plastic. At a lower price than Vallejo's equivalent, it's the honest budget entry point for beginners who want a full palette without committing to one subject.
What we like
14 colors cover the core palette at a competitive price point
3rd Gen formula thins well with water or AK thinner
Dropper bottles — same clean dispense system as Vallejo
What to know
Less community documentation than Vallejo; color references are newer
Needs dedicated AK thinner for best consistency; water alone is uneven
Primer is the unsexy step that determines how good your paint looks. Without it, paint rubs off and shows every handling mark. Vallejo's gray surface primer brushes or airbrushes on, dries in minutes, and provides the adhesion base every subsequent layer needs. Gray is the right starter choice — it doesn't shift your top colors the way dark or white primer does.
What we like
Brush-applied or airbrush-ready — works for modelers at every stage
Gray neutral tone doesn't shift subsequent paint colors
200ml bottle covers many kits before needing replacement
What to know
Thick consistency — needs thinning for airbrush use
Rattle-can alternative (Tamiya Fine Surface Primer) is faster for first builds
The airbrush debate is the most common first-timer trap in scale modeling. You don't need one to build a great-looking model. Rattle cans give you a smooth, even base coat in minutes with zero learning curve. Brush painting works fine for detail work and panel filters. The airbrush pays off only when you want smooth color modulation, gradients, or large-scale camo schemes — and that's a skill that takes months to develop. Start with Tamiya's spray primer and Tamiya Color Spray cans. Buy an airbrush after your third completed kit if you're still thinking about it.
Airbrush & Spray Paint — what's the difference?
A few common shapes, each making a different trade.
Rattle Can (No Setup)
Shake and spray. Perfect for beginners and batch builds.
Setup time
None
Color options
Limited
Entry cost
$6–12/can
Best for First builds, quick base coats, beginners not ready for airbrush
Tradeoff Can't mix custom colors; ongoing cost per can adds up
Entry Airbrush Kit
Full control, real learning curve. Best after build #3.
Setup time
15 min
Color options
Unlimited
Entry cost
$150–250
Best for Modelers who've finished 2–3 kits and want smooth base coats and gradients
Tradeoff Learning curve; first few sprays are usually too wet or too dry
Best for Committed modelers who've mastered basic airbrushing
Tradeoff Overkill for anyone on their first year in the hobby
Best starter
Tamiya
Fine Surface Primer (Light Gray Spray)
$15.97 as of Jun 22, 2026
★★★★★Our rating· In Stock
The industry benchmark for rattle-can primer. Fine particle formula bonds to bare styrene and sanded surfaces with equal reliability, dries in 30 minutes, and sands perfectly smooth. Shake for two minutes, spray from 8 inches in short passes, and you have a professional primer base without any equipment. Every modeler — even airbrush users — keeps these on the shelf.
What we like
Zero setup — shake and spray, no compressor or cleaning required
Fine particle formula covers bare styrene with no brush marks
Sands smoothly for seamless surface prep
What to know
Single-use can with no color versatility; need separate cans per color
Propellant costs money per use vs. rechargeable airbrush compressor
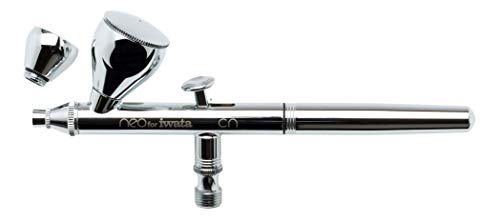
When you're ready for an airbrush, Iwata makes the most consistently recommended entry point. The Neo CN is a 0.35mm gravity-feed brush — the size that handles both base coats and detail work without changing guns. Well-built, easy to clean, and if you catch the airbrush bug, Iwata's full line uses the same connector fittings so you don't restart from scratch.
What we like
0.35mm needle handles base coats and fine detail — one brush to start
Iwata quality means it cleans reliably; clogs are rare with proper thinning
Parts are widely available and repairs are DIY-friendly
What to know
Compressor not included — budget $60–100 for a small tank compressor
Airbrush technique takes 5–10 hours of practice before results beat rattle cans
If you want the airbrush experience without the Iwata price, Paasche has built reliable entry-level brushes for decades. The H-SET is a single-action brush — easier to control than dual-action because you're only adjusting air, not air and paint simultaneously. The tradeoff is less fine control at detail work, but for base coating and broad coverage, it does the job.
What we like
Single-action simplicity — one variable to manage, not two
American brand with widely available replacement parts
Lower price point to test whether airbrushing is your thing
What to know
Single-action limits fine detail control; you'll outgrow it within a year
Nozzle sizes are fixed — you need to buy different heads for fine vs. base work
The three finishing steps that separate a flat-colored plastic model from a convincing scale replica: panel line wash, decal application, and clear coat. Panel line wash is the fastest skill that produces the most visual impact — you apply a dark liquid into the recessed lines, wipe it off the raised surfaces, and suddenly the model has depth and shadow. Decals go on over a gloss coat so they don't silver. Clear coat seals everything and lets you choose your final sheen. None of these are hard. All of them matter.
Best starter
Tamiya
Panel Line Accent Color (Dark Gray)
$13.23 as of Jun 22, 2026
★★★★★Our rating
The simplest, highest-impact finishing technique in the hobby. The dark gray flows into recessed panel lines, wipe off the excess with a cotton swab dipped in lighter fluid, and the model reads as a real aircraft or tank with depth. Takes fifteen minutes. Looks like you spent an hour. This one product changes how your completed builds look more than anything else in the hobby.
What we like
The fastest detail technique with the biggest visual payoff
Dark gray works on any color scheme — gray, olive, tan, camo
Built-in applicator brush; no separate tools needed
What to know
Requires lighter fluid to remove; keep a bottle nearby
Over-application on light colors can stain if not removed within an hour
Decals (the thin printed transfers that add unit markings, national insignia, and codes) need a setting solution to look like they're painted on, not floating on the surface. Micro Sol softens the decal enough to conform to surface detail and eliminates the silvering that makes decals look fake. Apply Micro Set first, place the decal, then apply Micro Sol over it and let it cure without touching.
What we like
Eliminates decal silvering — makes transfers look painted on
Works on curved and textured surfaces where decals normally bridge
A single bottle lasts years of regular modeling
What to know
Softens the decal fully — any touch during cure wrinkling it permanently
Requires a companion Micro Set bottle for best results
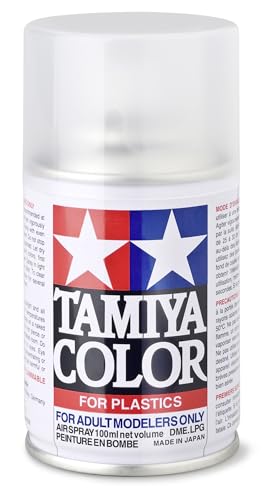
A gloss coat before decals and a matte coat after — that's the finishing sequence that makes builds look professionally completed. Tamiya's clear gloss spray applies in smooth even coats, dries hard enough for decal work in an hour, and provides the shiny surface that decal setting solutions need to work properly. Follow it with a matte coat to knock back the shine to your preferred finish.
What we like
Gloss coat is essential for proper decal application — Tamiya's is reliable
Dries hard within an hour; ready for decal work same session
Rattle-can format needs no equipment or cleanup
What to know
Single-use can; need separate matte coat for a non-glossy final finish
Lacquer-based; apply over fully cured acrylic only
Your first model kit: from sprue to finished build
The first build is slower and messier than you expect. The second one is when you actually learn. Here's what to do in between — and what mistakes every beginner makes exactly once.
The box looks manageable. You open it and find six grey sprues covered in parts you can’t quite place, a sheet of decals, and instructions in four languages with photos so small you’ll need reading glasses.
This is where most people either slow down and build something they’re proud of, or rush and produce something they hide in a drawer.
Here’s what the first build actually looks like — and how to not be that second person.
Session one: open the box, don’t glue anything
The single best thing you can do on your first session is build the whole kit without any glue. Called dry fitting, it’s not a suggestion — it’s how you find out where things actually go before cement makes it permanent.
Lay the sprues out and read the instructions all the way through. Tamiya instructions are excellent: numbered sequence, clear exploded views, color callouts for each stage. Read them before you cut a single part.
Then start cutting. The rule for sprue removal: two cuts, not one. First cut leaves a small nub still attached to the part (safer, no stress marks). Second cut removes the nub close to the part surface. Then clean the nub mark with a few passes of a fresh X-Acto blade. On a quality cutter this takes thirty seconds per part and leaves a nearly invisible mark.
Don’t twist parts off the sprue. You’re not in a hurry, and twisting leaves stress-whitened plastic where the gate attached.
Dry-fit every major assembly: fuselage halves, wing joints, landing gear. If something doesn’t line up, figure out why now. A gap during dry fit is a seam after gluing. On Tamiya kits, almost everything should fit without force. If you’re forcing something, you’re holding it wrong.
Session two: cement and sub-assemblies
Plastic cement doesn’t work like glue. It melts the styrene and fuses the two parts chemically — the joint becomes stronger than the plastic itself. Tamiya Extra Thin is the standard because it flows by capillary action: you press the parts together first, then touch the brush to the seam, and it wicks in on its own. You’re not applying glue to a surface. You’re feeding solvent into a pressed joint.
Work in sub-assemblies, not the whole kit at once. Complete the cockpit before closing the fuselage. Build the engine cowling separately. Join the wing halves before attaching them to the body. Sub-assemblies let each joint cure fully before you stress it with the next join.
When two halves come together — fuselage halves, wing top and bottom — clamp them or rubber-band them gently while they cure. Twenty minutes is usually enough. An hour is better. Overnight is better still.
Visible seam lines where halves meet need attention before paint. Sand the seam with 400-grit sandpaper, then 600, then 800 if you want a smooth finish. If there’s a gap, fill it with Tamiya White Putty, let it cure overnight, then sand. Don’t try to paint over an unfilled seam — it will always show.
Prime before you paint. One or two light coats of gray primer from a rattle can, held eight to ten inches away, in short passes. Let it dry fully — an hour minimum, overnight is better. Primer reveals every surface defect: the seam you thought was sanded smooth, the stress mark you missed, the fingerprint you didn’t wipe down. Fix them now, re-prime, then paint.
Scale modeling is not painting in the watercolor sense. You’re not trying to create colors — you’re recreating reality. For WWII aircraft, that means the Olive Drab and Neutral Gray of a P-51, or the mottled grey-greens of a Luftwaffe fighter. Those reference colors are documented in books, kit instructions, and online databases. You’re reproducing them, not inventing them.
Brush painting works fine for first builds. Thin your acrylics to the consistency of skim milk — if the paint is straight from the jar, it’s too thick and will show brushstrokes. Two thin coats cover better than one thick one. Let each coat dry fully before the next.
Panel line wash is where the model transforms. Once your base color is cured, apply Tamiya Panel Line Accent Color (dark gray for most subjects, dark brown for desert, black for armor) across the whole model. The formula flows into recessed panel lines on its own. Wait ten minutes, then wipe the raised surfaces clean with a cotton swab dipped in lighter fluid (Zippo or Ronsonol). What remains in the recesses creates instant depth and shadow. The model suddenly has a scale. This is the technique beginners see and assume takes skill — it takes about fifteen minutes.
Decals go on last, over a gloss coat. The gloss surface prevents silvering (the milky halo around decals that makes them look stuck on rather than painted on). Apply Micro Set to the surface, place the decal, then apply Micro Sol over it. Let it cure for an hour without touching. The decal will wrinkle as the Sol softens it, then conform to the surface detail as it dries. Don’t touch it during this process.
Seal everything with a final clear coat — gloss for a lacquered finish, semi-gloss for most military subjects, matte for armor and infantry figures.
Forgetting to paint the cockpit before closing the fuselage. The interior is sealed behind the canopy and you’ll never get to it. The instructions always tell you when to paint it. Read ahead.
Gluing the canopy in the wrong position. On aircraft, the canopy position is easy to get slightly wrong. Dry fit it five times before cementing. A crooked canopy ruins the silhouette.
Rushing the cement cure. Tamiya Extra Thin feels dry in ten minutes. It is not fully cured. If you stress the joint at ten minutes, you’ll get a stress mark or a re-opened seam. Wait an hour. Overnight for structural joins.
Not thinning your paint. This one is universal. Straight-from-jar paint on a brush produces ridge marks at every stroke. Thin to skim milk consistency. It takes more coats but looks infinitely better.
Applying decals over flat paint. The microscopically rough surface of matte paint traps air under the decal film and creates silvering. Always apply a gloss coat before decals, even if you plan a matte final finish.
What changes between build one and build two
On your second kit, the instructions make more sense before you need them. You dry fit without being told to. You find the seam lines before they’re visible in primer. You remember to paint the interior.
The second build is where modeling actually becomes modeling — where your hands stop working against you and start working with the kit. The first build is something you need to get through.
Pick your second kit before you finish your first one.
Save your money
What you don't need yet
Beginners get pressured to buy a lot of stuff that doesn't help them play
better. Here's what we'd skip on day one.
An airbrush — Rattle cans and brush painting will produce great results for your first three or four builds. Airbrush technique is its own skill that takes practice to develop — don't let it distract from learning the actual modeling fundamentals.
Photoetch upgrade sets — Ultra-thin brass detail parts that replace plastic ones. Looks incredible. Requires soldering or super glue, small parts the size of commas, and very good eyes. Kit #10 territory, not kit #1.
Resin aftermarket parts — Resin cockpit floors and figures add detail and cost $20–60 per upgrade. The base kit is already fine for learning technique — aftermarket is for when you're building showpieces.
Scribing tools — Used to recreate panel lines that were sanded away. You won't sand away panel lines on your first several builds. When you do, an X-Acto knife and ruler will handle 80% of rescribing needs.
A spray booth — If you prime with rattle cans in a ventilated area (open window, garage door), you don't need one. Buy it when you get an airbrush and want to spray indoors regularly.
Pre-shading supplies — Applying a dark base over panel lines before your main color for a shadow effect. A real technique with real impact, but one to learn after you've mastered basic painting and panel line wash.
First week
Your first seven days
A short, real plan to get from gear-on-doorstep to actually playing.
Order your first kit and sprue cutter — these are the only two things you absolutely need to start. · Buy
Do I actually need an airbrush to start scale modeling?
No. Rattle-can primer and brush-applied acrylics will produce genuinely good results for your first several builds. Airbrush technique is its own learnable skill separate from modeling, and trying to develop both at once is a recipe for frustration. Start with rattle cans. Add an airbrush after build number three if you're still thinking about it.
What scale should a complete beginner start with?
1/48 aircraft or 1/35 armor. Both scales have hundreds of beginner-friendly kit options from Tamiya and Hasegawa, excellent instructions, and a large community. 1/72 is also popular — more parts for the money, but smaller individual parts that require tweezers. Avoid 1/16 or large-scale until you've built confidence with smaller kits.
Why does my plastic turn white when I cut the parts off the sprue?
That's stress whitening — the plastic deforms slightly when cut with a dull or imprecise cutter. The fix is a quality sprue cutter (Tamiya's is the standard recommendation). Cut slightly away from the part first, then clean the nub with a sharp X-Acto blade. The white stress marks don't sand away or paint over cleanly — preventing them is the only solution.
What's the difference between plastic cement and super glue?
Plastic cement (like Tamiya Extra Thin) is a solvent that melts and fuses styrene plastic — the bond is permanent and stronger than the plastic itself. Super glue (cyanoacrylate) just adheres surfaces together without chemically bonding them. Use plastic cement for styrene-to-styrene joins. Use super glue only for non-plastic parts like photoetch brass, resin, or glass.
How long does it take to build a beginner kit?
A 60–100 part 1/48 aircraft kit takes about a weekend: two to three hours for construction and assembly, several hours for painting in stages with drying time in between, and another hour for finishing. Plan across two or three days so you're not forcing paint to dry faster than it should. Rushing drying time causes paint to crack or wrinkle.
What's the best resource for learning technique?
YouTube. Scale Modelers World, Quick Kits, and Doogs Models all have beginner-focused tutorials. Reddit's r/modelmakers is welcoming to beginners and the pinned wiki has a curated list of starter resources. IPMS (the national club) has local chapters with in-person build nights in most cities.
How much does it cost per build after the initial tool investment?
Each kit runs $20–50. A rattle can of primer and a few Vallejo paints adds $15–25 per new color scheme. Total per build: $35–75 for a WWII aircraft or armor subject once you have your basic tools. The recurring kit purchase is the main ongoing cost — this is an affordable hobby.
Scale Modelers World (YouTube) — Well-produced beginner and intermediate tutorials. Start with the primer application and panel line wash videos.
Quick Kits (YouTube) — Fast, focused build videos. Good for seeing what a specific technique looks like before trying it yourself.
Doogs Models (YouTube) — Intermediate and advanced techniques explained clearly. Skip until after your first two builds; then it becomes essential.
r/modelmakers — Active community with a pinned beginner FAQ. Post your first build — the feedback is genuinely useful and encouragement is generous.
IPMS USA — The national scale modeling club. Find a local chapter for in-person build nights, contests, and a community that has seen every beginner question before.
Tamiya Model Magazine — Tamiya's own coverage of techniques and new kit releases. Useful for color guide references on their own kits.
As an Amazon Associate, JustBeginning earns from qualifying purchases.
We may also earn commission from other affiliate programs linked on this
page. Editorial recommendations are independent; we don't choose
products based on commission rates.
Product prices and availability are accurate as of the date and time
indicated and are subject to change. Any price and availability
information shown on Amazon at the time of purchase will apply.