Shoemaking is the rare craft where you're building something functional from raw materials that can outlast fast fashion by decades. The gear list is specific and the learning curve is real, but beginners can make a wearable shoe in their first month. The community is unusually generous with patterns and knowledge.
By Colin B. · Published June 18, 2026 · Last reviewed June 18, 2026
Barge All-Purpose Cement (1 Quart)
— Barge cement bonds soles and uppers permanently. It's what professional cobblers use and what you'll need too.
Budget total
$300
Typical total
$500
Shoemaking is one of the more expensive crafts to start. Lasts alone run $60-120, a proper tool set adds $80-150, and leather for a first pair adds another $40-80. Budget $300 minimum for a build-ready kit.
We earn commission on qualifying Amazon purchases — see our
affiliate disclosure.
Price tiers and budget totals shown above are editorial estimates;
actual Amazon prices vary.
At a glance
Our top pick in each category
The fastest path through this guide — each best-starter pick by category.
Scroll for the budget and upgrade alternatives.
Buy your last first, in your own foot size. Everything else depends on it. The last determines the shape of the shoe, and a beginner should make shoes they can actually wear. Order before anything else so you can trace your last and draft your paper pattern from it.
Start with a simple silhouette. Oxford shoes, derbies, and basic ankle boots are far easier to learn on than anything heeled or pointed. A beginner who starts with a heeled boot is asking for frustration. Master a flat or low-heel shape first.
Watch at least one complete build video before ordering tools. There are excellent free YouTube channels (Shoestars, DW Shoes) showing full builds from scratch. One hour of video will tell you exactly what to buy and why.
The gear
What you actually need
Lasts
A last is the form your shoe is built around. Every shoe or boot starts here: you're stretching and tacking leather over it to create the three-dimensional shape. Get lasts that match your own foot size first. Most beginners start with a simple Oxford or Chelsea last before moving to anything heeled. Buying in your own size means you can wear what you make. Note that Amazon carries composite/synthetic lasts; wooden lasts from specialist suppliers (Springfield Leather, Weaver) are the professional upgrade.
Lasts — what's the difference?
A few common shapes, each making a different trade.
Oxford / Derby Last
Flat or low-heel. The easiest first last for beginners.
Heel height
Flat or 0.5"
Toe shape
Rounded or slightly square
Best for
Dress shoes, loafers, derbies
Best for First-time builders; everyday casual builds
Tradeoff Limited style range; no boots or heeled silhouettes
Best for Second-time builders ready for heeled projects
Tradeoff More complex build; requires stacked heel construction
Moccasin / Casual Last
Flat with flexible toe spring. The most forgiving shape.
Heel height
Flat
Toe shape
Wide and rounded
Best for
Moccasins, slip-ons, casual shoes
Best for Beginners who want a relaxed, forgiving silhouette
Tradeoff Won't produce structured dress shoes; looks deliberately casual
Best starter
TATYZ
Shoemaking Last Pair (Oxford/Derby Profile)
$$
★★★★★Our rating
TATYZ lasts are the most consistently reviewed composite shoe lasts available on Amazon. Sized in EU measurements (EU 43 = US 10), they come in a full range of sizes and hold the Oxford toe profile well. Use glue-based lasting with these rather than tacks; the composite construction doesn't grip tacks the way wooden lasts do, but bonds cleanly with Barge.
What we like
Consistent Oxford profile in a full EU size range
Holds shape under lasting tension without warping
Composite construction is lightweight and easy to pull from finished shoes
What to know
EU sizing only; requires conversion (EU = US + 1.5 roughly)
Composite won't grip lasting tacks; use glue-based lasting method
If your target silhouette is a fashion shoe or pointed-toe flat rather than a classic Oxford, this plastic pointed-toe last gets you started. Lower cost than the Oxford composite and good for practicing the lasting technique before committing to your real upper leather. Also a valid first last for anyone whose main interest is women's fashion footwear.
What we like
Pointed toe profile for fashion flats and loafer silhouettes
Lower cost; good for practicing lasting before cutting real leather
What to know
Plastic construction is less rigid under heavy lasting tension
Fashion toe profile limits use to specific silhouette styles
For builders with larger feet (US 12 and up), finding a last on Amazon can be frustrating. This EU 46 Oxford-profile last matches US size 12 (foot length ~30.5cm). Same composite construction as the standard Oxford last, just sized for feet that most last suppliers treat as special-order territory.
What we like
EU 46 / US 12 fills a gap left by most Amazon last options
Oxford profile works for shoes, loafers, and casual builds
What to know
One fixed size; doesn't cover half-sizes or sizes above 46
Composite construction; use glue-based lasting, not tacks
Leather doesn't cut like fabric. You need dedicated knives: a round knife (also called a head knife) for cutting patterns and straight edges, and a skiver for thinning leather so edges fold and glue cleanly. The most common beginner mistake is using a craft knife and wondering why everything looks ragged. Sharp matters more than expensive. Resharpen on a leather strop after every session.
Best starter
Tandy Leather
Al Stohlman Round Knife
$74.90 as of Jun 22, 2026
★★★★★Our rating· In Stock
Tandy's round knife (named for master leatherworker Al Stohlman) is the standard starting point for leather cutting. The curved blade lets you rock through cuts instead of dragging, giving you cleaner edges with less effort. It comes sharp out of the box, and a leather strop is all the maintenance it needs. This is the knife in virtually every beginner shoemaking class.
What we like
Curved blade rocks through cuts cleanly without tearing leather
Comes sharp; a leather strop is all the maintenance it needs
Named for Al Stohlman, the reference standard in leather tool design
What to know
Takes practice to use correctly; watch a cutting tutorial first
Right-handed default; left-handers need to order the left-hand version
A skiver thins leather edges so they fold flat without bulk, a step used at every seam and every lasting tack. Craft Sha's Japanese SK5 steel skiver holds a razor edge longer than cheap alternatives, and the wooden handle angle is designed for the controlled, shallow cuts skiving requires. Buy this alongside your round knife, not instead of it.
What we like
SK5 high-carbon steel holds a razor edge through a full project
Handle angle designed for shallow, controlled skiving cuts
What to know
Steeper learning curve than the round knife; watch a demo first
★★★★☆Our rating· Only 4 left in stock - order soon.
If you're doing a proof-of-concept build before committing to real tools, OLFA's 25mm heavy-duty utility knife with fresh snap-off blades will get you through a moccasin or simple slip-on. Not ideal for thicker upper leather, but adequate for a first test. Upgrade to a real round knife once you know the craft is worth the investment.
What we like
Very low cost entry; a real tool upgrade after your first build
Snap-off blades always fresh; no stropping required
What to know
Tears rather than cuts in leather heavier than 3 oz
No substitute for a proper round knife past the moccasin stage
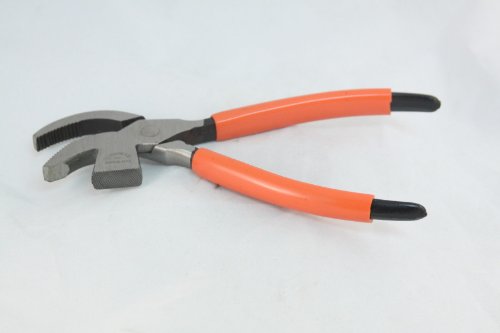
Lasting pliers are the single most important tool in shoemaking. They grip leather and let you pull it taut over the last before tacking or gluing. Without them, you'll fight the material the whole build and end up with lumps. A harness awl makes the stitching holes that run along the insole board where sole meets upper. A stitching groover cuts a channel so your thread sits recessed and doesn't wear through on the ground.
Best starter
C.S. Osborne
No. 233 Lasting Pincer
$65.95 as of Jun 22, 2026
★★★★★Our rating
C.S. Osborne has been making professional cobbler tools since 1826. Their No. 233 lasting pincer has a jaw profile built for the 2-4mm leather uppers a beginner will work with, and a handle length that gives real mechanical advantage when pulling. Nothing else in this price range is as consistently built or as long-lasting.
What we like
Jaw profile built for 2-4mm upper leather, the beginner range
Long handle provides real mechanical advantage when pulling tight
C.S. Osborne has made cobbler tools since 1826
What to know
Jaw can mark visible leather if applied too aggressively
Steel construction; heavier than cheap alternatives
Tandy's starter leathercraft set bundles the entry-level tools every beginner needs: swivel knife, punches, needles, and a basic toolkit in one purchase. Not a cobbler-specific set, but it covers the cutting, punching, and stitching tools that shoemaking shares with general leathercraft. Pair it with the C.S. Osborne pliers for a complete starting kit.
What we like
Covers cutting, punching, and stitching basics in one purchase
Tandy quality is reliable at entry-level for all the bundled tools
What to know
No lasting pliers included; those must be bought separately
General leathercraft kit, not cobbler-specific; some tools won't apply
The Speedy Stitcher is a lock-stitch awl that punches and stitches in one motion, ideal for attaching welt and stitching sole edges where a straight needle can't reach. It's not a replacement for hand-stitching with a harness awl, but it's invaluable for sole-attachment work in welt construction. A useful add-on once you've committed to the craft.
What we like
Reaches sole-edge seams no straight needle can access
Includes multiple needle sizes and 180 yards of pre-loaded thread
What to know
Not suitable for visible upper stitching, only sole-edge work
Thread tension takes practice to set without popping stitches
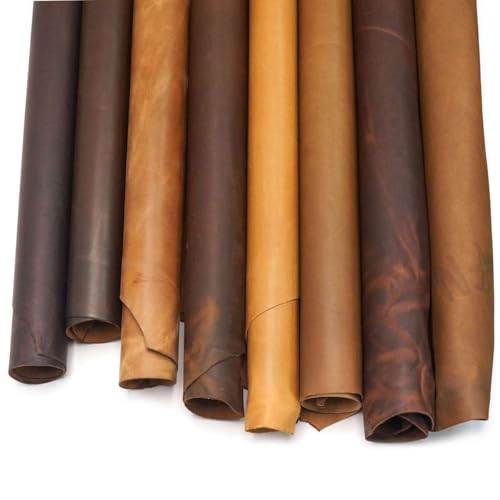
Shoemaking uses specific leather weights and tannages. Uppers: 2-4 oz vegetable-tanned or chrome-tanned leather that flexes with the foot. Outsoles: 8-10 oz vegetable-tanned sole leather, or a ready-made rubber sole unit. The most common beginner mistake is using garment leather (too thin) or general craft leather (too soft) for uppers. Buy from a dedicated leather supplier. Good upper leather weights start around $40 for a half-hide.
Best starter
Springfield Leather Co.
Chrome-Tanned Side (3-6 oz)
$62.95 as of Jun 22, 2026
★★★★★Our rating· In Stock
Chrome-tanned leather is more forgiving for beginners: softer out of the box, needs less breaking-in, and Springfield's 3-6 oz side lands right in the upper-leather weight range. Pre-dyed options mean you skip the finishing step entirely on your first build. Easier to hand-last than stiffer veg-tan, which makes it the smarter starting material for most beginners.
What we like
Softer out of the box, more forgiving for hand-lasting beginners
Pre-dyed options available; skip the finishing step on first build
3-4 oz weight is right for shoe uppers without added stiffener
What to know
Doesn't burnish or respond to edge work the same way as veg-tan
Softer construction may need added stiffener for structured toe caps
Before cutting into good upper leather, practice your skiving and cutting technique on this heavier material. The 7-9 oz weight is too stiff for most upper work, but it's perfect for sole sections, practice pieces, and getting comfortable with your tools before the build that matters. At Tandy's price, it's a cheap way to burn through the learning curve without ruining expensive material.
What we like
Good weight for practicing skiving and cutting before the real build
Works for heel lifts, insole board, and smaller sole sections
What to know
Too stiff and heavy for uppers; not a substitute for 3-4 oz leather
Shoulder grade has variation; watch for scar tissue and loose grain
Outsole leather needs to be dense, firm, and abrasion-resistant. ELW's 8-9 oz pre-cut sheet is the right density for hand-cut outsoles and holds a beveled edge cleanly. At 24 inches square, one sheet yields sole material for two or three pairs of standard-size shoes. For traditional welt or cemented builds; if you want rubber soles, buy a pre-made rubber sole unit instead.
What we like
Dense enough for full-contact outsoles, resists abrasion well
Pre-cut 24x24" sheet gives sole material for 2-3 pairs
What to know
Dulls cutting tools faster than upper leather; resharpen often
Heavy construction adds noticeable weight compared to rubber soles
Two essentials: Barge contact cement for attaching soles and bonding upper to insole, and waxed thread for hand-stitching. Barge is the industry standard. Apply to both surfaces, let it flash-tack about 10 minutes, then press together for a bond nothing will break by hand. Waxed thread in 0.8-1mm diameter is the standard weight for shoe construction, the same used in professional shops worldwide.
Best starter
Barge
All-Purpose Cement (1 Quart)
$36.50 as of Jun 22, 2026
★★★★★Our rating· In Stock
Barge is what professional cobblers use. Contact cement needs to flash-tack on both surfaces before you join them, and Barge's working time is forgiving enough for beginners who need to reposition. It bonds upper to insole board and sole to upper, and that bond outlasts most of the rest of the shoe. The quart size gives you enough for multiple pairs and is the standard available size.
What we like
Professional-grade bond; what cobblers have used for decades
Forgiving flash-tack window allows repositioning before final press
Bonds leather to leather, leather to rubber, leather to board
What to know
Solvent-based; ventilate well and keep away from open flames
Brush must be cleaned immediately; cement dries in the bristles
Edge Kote seals the raw leather edge of your sole, giving the shoe a professional finish instead of a fuzzy buff edge. Fiebing's alcohol-based formula dries fast, bonds permanently to veg-tan, and is the finishing product used in traditional shoemaking workshops. One bottle finishes several pairs of shoes. Apply with a small brush, burnish lightly when dry.
What we like
Seals sole edges for a clean, professional look
Alcohol-based formula dries fast and bonds permanently to veg-tan
What to know
Permanent; test on a scrap before applying to your finished shoe
Over-application builds up and cracks; thin coats only
Hand-stitching shoes requires waxed thread that locks in place without fraying. Ritza 25 is the leatherworking standard: the pre-waxed braided polyester makes hand-needling easy, and the tight braid resists cutting through leather over long wear. Buy a 25m spool and you'll have enough thread for three or four pairs.
What we like
Pre-waxed braid locks into stitching holes without fraying
Resists cutting through leather better than unwaxed thread
What to know
Polyester doesn't age the same way as natural linen thread
Choose your color intentionally; dark thread reads less on dark shoes
Shoemaking has a reputation for being ancient, complicated, and slightly mysterious. Some of that is earned. But the core sequence (last, pattern, upper, sole) is logical once you’ve seen it once. A beginner with the right tools can make a wearable shoe in their first month. Not a perfect shoe. A real one.
This is what your first month actually looks like, from buying your first last to pulling a finished pair off the form.
Week 1: The last arrives and pattern work begins
Everything in shoemaking starts with the last. It’s the wooden or plastic form your shoe is built around, shaped like a foot but more architectural, a tool for construction rather than just a template. Your first act is to trace the last’s faces onto paper and turn those traces into a pattern for your upper.
Don’t skip this step. Buy a pattern online if you want, but understanding how a flat piece of leather becomes a three-dimensional shoe requires you to do pattern work at least once. Trace the top face (the vamp), the back (the counter), and the bottom (the insole). Add seam allowance. Cut the paper shapes out and tape them onto the last. You’ll see immediately where things don’t fit and why.
Expect to cut several paper patterns before anything is right. That’s normal. Paper is cheap. Leather is not.
Once your pattern is confirmed on the last, transfer it to your leather. Use a scratch awl to trace the pattern outline; don’t use a pen. Cut with a head knife (round knife), rocking the curved blade through the cut rather than dragging; dragging tears instead of cuts.
Skiving is the step most beginners skip and then regret. Every edge that will fold or overlap needs to be thinned with a skiving knife so it lies flat without bulk. The top edge of the toe cap, the collar, the seam allowances: thin them all before sewing. This single step is the difference between a shoe that looks handmade in a good way and one that looks handmade in a bad way.
Sew your upper together with waxed thread and a harness awl. Shoe stitching is a saddle-stitch: two needles, one hole, crossing threads that lock each stitch in place even if one side breaks. Practice the stitch on scrap before touching your upper.
Week 3: Lasting, where the shoe becomes a shoe
Lasting is the act of stretching the upper over the last and securing it to the insole board. This is the most physically demanding part of the build and the step that benefits most from lasting pliers.
Start at the toe. Pull the leather over the last and tack it to the insole board with lasting tacks. Work from toe to heel in small sections, alternating sides, always pulling toward the center. The goal is even, wrinkle-free tension across the entire upper. You will not achieve this on your first try. You’ll get close enough.
At the heel, the leather needs to be gathered and folded. This is the part most tutorials gloss over. Watch a video specifically on heel-lasting before you attempt it. The technique is not obvious.
Once fully tacked, apply Barge cement to both the upper flap and the insole board. Let it flash-tack (10 minutes), then press firmly. Remove the tacks; the glue holds now.
Pull your last out of the lasted upper. Resist the urge to do this too early; give the adhesive 24 hours to cure.
Prepare your sole. If you’re using a leather outsole, cut it to the shape of the bottom of your last, then skive and bevel the edges with a leather edge beveler. If you’re using a pre-made rubber sole unit, trim it to match the lasted upper’s outline.
Apply Barge to both the bottom of the lasted upper and the top of the sole. Flash-tack, press firmly, clamp if possible, and let cure overnight. Hand-stitch around the perimeter if you’re doing a simple welt or moccasin construction.
Finish the edges. Fiebing’s Edge Kote, applied in thin coats and burnished with a bone folder or wooden dowel, seals the sole edge and gives the shoe its finished, professional look. Apply leather conditioner to the upper.
Put them on. Walk around. The fit will be close to your last’s foot, which is your foot.
Pattern work takes longer than the actual shoemaking. Most of your first month is paper, pencil, and iterations. That’s not a problem; that’s learning the craft.
Skiving changes everything. Before skiving, your shoe looks handmade in the wrong way. After skiving, it looks like something a skilled person made. This is the step that separates hobbyists who progress from hobbyists who stay frustrated.
The smell of fresh leather and Barge cement together is its own thing. You’ll either love it immediately or find it overwhelming. Most shoemakers love it.
Your first pair won’t fit perfectly. It will fit close. That’s enough to know the process worked. The fit gets dialed in over several builds as you learn how your pattern shapes translate to wearing comfort.
What comes next
Most shoemakers make three or four pairs of Oxford or derby shoes before branching into boots or heeled designs. Each pair teaches something the last one didn’t. By your fifth pair, you’ll have a working understanding of lasting tension, seam placement, and sole attachment that no amount of reading can replicate.
The community around hand shoemaking is small and unusually helpful. The subreddit and YouTube channels are worth following; people post build logs and answer questions with real patience.
Save your money
What you don't need yet
Beginners get pressured to buy a lot of stuff that doesn't help them play
better. Here's what we'd skip on day one.
A Blake stitching machine — Blake machines run $2,000-10,000 and require trained technique. Hand-welted or cemented construction produces equally durable shoes and teaches you everything Blake does, without the machine.
A full cobbler's bench — Any sturdy workbench works for a first build. A dedicated cobbler's bench is worth buying once you're making multiple pairs a year.
Exotic leather — Alligator, ostrich, and stingray all behave differently from standard cow leather and require specialized tools. Master standard leather first.
Pattern-making software — Free hand-drafted patterns from foot tracings are the method used by most shoemaking teachers. Software is for production volume, not one-at-a-time craft builds.
A shoe stretcher machine — A real last stretcher is only needed for tight-fitting designs with specific measurements. Not needed for your first six builds.
First week
Your first seven days
A short, real plan to get from gear-on-doorstep to actually playing.
Order your last in your own foot size before anything else. Everything else waits for it. · Buy
Watch one complete beginner shoe build on YouTube from start to finish before buying tools. Shoestars and DW Shoes both have full Oxford builds in plain language. · Learn
r/shoemaking · Active community; wiki has a good supplier list
Trace your foot on paper and rough-draft your upper pattern. You'll adjust it once the last arrives, but having a starting shape ready speeds your first build session. · Action
Order your tools and leather once the last arrives. Trace the last faces to confirm your pattern before cutting anything expensive. · Buy
Do a dry-run lasting session without glue. Stretch the upper over the last, hold it with tacks, then remove it. Understanding the tension before committing to adhesive is worth an hour of practice. · Action
Order Barge cement only after your pattern is confirmed. There's no rush; you don't need it until sole-attachment day. · Buy
A beginner's first pair takes 15-30 hours spread over multiple sessions. Adhesive cure time and drying between steps adds up. Plan for two or three weekends, not one afternoon.
What leather weight do I need for shoe uppers?
2-4 oz vegetable-tanned or chrome-tanned leather. Below 2 oz, the upper is too soft to hold shape. Above 4 oz, it's too stiff to last properly over the toe box. General craft leather from hobby stores is usually the wrong weight.
Do I need a sewing machine?
No. Traditional shoemaking (hand-welted, cemented, or moccasin construction) is done entirely by hand with awl and needles. A sewing machine only comes in for Blake stitching, which most beginners don't attempt.
Can I make sneakers and athletic shoes?
Technically yes, but sneaker construction uses vulcanized rubber soles and pre-fabricated components that aren't hand-craft friendly. Start with leather-soled or rubber-unit shoes. Sneaker-making is its own separate discipline.
What's the difference between Goodyear welt and cemented construction?
Goodyear welt stitches the sole through a strip of welt leather; it's resole-able but requires more tools. Cemented construction glues the sole directly to the upper, which is faster and easier. Start cemented.
Where do I get patterns?
The best source is making your own from a paper last tracing. Free and paid patterns are also available from Svelte Academy and Last Patterns. Don't skip learning pattern-making; it's about 30% of the craft.
Shoestars (YouTube) — Full beginner shoe builds in plain language, from Oxford shoes through ankle boots. One of the most useful free resources for getting started.
r/shoemaking — Active subreddit with build logs, tool advice, and beginner questions. The wiki has a good supplier list and beginner FAQ.
r/goodyearwelt — Primarily a shoe appreciation community, but the wiki covers construction methods and lists shoemaking schools and workshops worldwide.
Svelte Academy (YouTube) — Pattern-making and lasting tutorials with a European perspective. Strong on the technical drawing and measurement side of shoemaking.
Springfield Leather Company — One of the better US suppliers for shoemaking-appropriate leather weights. Their buying guide is helpful for first-time leather purchasers.
The Art of Shoemaking by Golding and Golding — The closest thing to a standard textbook on the craft. Dry but thorough on construction methods, lasting technique, and pattern drafting.
As an Amazon Associate, JustBeginning earns from qualifying purchases.
We may also earn commission from other affiliate programs linked on this
page. Editorial recommendations are independent; we don't choose
products based on commission rates.
Product prices and availability are accurate as of the date and time
indicated and are subject to change. Any price and availability
information shown on Amazon at the time of purchase will apply.
Our top pickShoemaking Last Pair (Oxford/Derby Profile)

 Best starter